
Rich Chocolate Cupcakes How to Bake Them
If I’m honest, one of my favorite ways to sneak some veggies into my kids’ diet without them suspecting a thing is by making this zucchini swirl cake. It’s fall-apart moist, with just the right hint of sweetness, and the best part? That gorgeous marbled swirl of zucchini and batter that makes it look like a little work of art. I always do this when I want to impress friends at a brunch or when I need a quick baking fix after a long day—trust me, it’s one of those recipes that disappears in minutes at my house. I remember my grandma making a simple zucchini bread when I was little, and I’d sneak bites from the pan, totally smitten. Now, I do a little twist and turn with this cake, making it rich and slightly decadent, yet still super easy. It’s perfect for mornings, cozy afternoons, or late-night cravings when you want something sweet but don’t want to wait an hour to bake. My kids actually ask for this all the time, and honestly, I don’t blame them. It’s a total comfort food that brings back so many childhood memories. Plus, the smell alone makes the whole house smell like a warm hug. Let me show you how to make your own zucchini swirl cake — it’s easier than you think!
What is Zucchini Swirl Cake?
Think of zucchini swirl cake as a happily married blend of moist, mildly sweet cake with a surprise of tender zucchini shreds running through it. It’s essentially a lemony-spiced cake — think vanilla and citrus notes — with a beautiful swirl pattern of zucchini mixed right into the batter. The name ‘swirl’ comes from the way you layer or marble the zucchini mixture into the batter before baking, creating a lovely marbled look. It’s inspired by those classic banana or marble cakes, but the star here is really the zucchini, which keeps the cake ultra-moist and adds a subtle vegetable boost that makes you feel a little better about indulging. I always tell myself this is a sneaky way to get more greens in—because, let’s face it, sometimes I need that guilt-free moment! This recipe is perfect because it’s incredibly approachable; no complicated techniques, just simple mixing, layering, and baking. And if you love a cozy, homemade cake that hits all the right notes—sweet, tender, with a little chew—then this one’s definitely for you.
Why you’ll love this recipe?
Honestly, what I love most about this zucchini swirl cake is how it hits that perfect sweet spot—moist, soft, with a little chew from the zucchini—plus that gorgeous marbled pattern that makes it almost too pretty to cut. The flavor? It’s subtly lemony with hints of vanilla and cinnamon, which makes it a versatile treat for any time of day.
- Flavor:What is the flavor of zucchini?
- Simplicity: I’ve made this countless times, and trust me, you don’t need fancy equipment or fancy skills. Just good old mixing bowls and a spatula. Plus, it’s one of those recipes that you can toss together in under an hour from start to finish.
- Cost-efficiency: What is the best way to measure cost-efficiency? Most of the ingredients are pantry staples—flour, sugar, eggs, zucchini. If you keep a few lemons around, you’re all set. I’ve even tested this with applesauce instead of oil for a healthier twist.
- Versatility: Fancy a bit more decadence? Top it with cream cheese frosting or a dusting of powdered sugar. Want it gluten-free? Swap the flour with a quality gluten-free blend. It’s a blank canvas that welcomes experimentation.
What I truly love about this cake, though, is how it’s just so cozy and familiar. It reminds me of Sunday mornings when my mom would bake a loaf or two, filling the house with that sweet, yeasty aroma and the promise of a good day ahead. It’s one of those recipes I turn to when I want comfort or when I’m trying to clear out some extra zucchini from the garden. Honestly, it’s become a bit of a family staple—and I know once you try it, it’ll be one of yours too!
How to Make Zucchini Swirl Cake
Quick Overview
This cake comes together in a few simple steps. First, you’ll grate the zucchini, squeeze out the excess moisture, and set it aside. Meanwhile, you whisk up your wet ingredients—like eggs, oil, lemon juice, and vanilla. Then, you blend in your dry ingredients—flour, sugar, baking soda, and spices—before gently folding the zucchini into the batter. The fun part? Layering or swirling the zucchini mixture into your batter before baking, creating that beautiful marbled effect. Pop it into a preheated oven, bake until a toothpick inserted in the center comes out clean, and then stuff it with a simple glaze while it cools. It’s honestly a foolproof process that delivers flavorful, tender slices every time. The best part? It’s so forgiving—you can tweak the spices or add nuts or chocolate chips if you’re feeling adventurous.
Ingredients
For the Main Batter:
- 1 ½ cups all-purpose flour (I like to use a bit of organic or unbleached for richer flavor)
- 1 cup granulated sugar (or coconut sugar if you want a richer, caramel-y hue)
- 1 teaspoon baking soda
- ½ teaspoon baking powder
- ½ teaspoon salt
- 1 teaspoon ground cinnamon (oregano or nutmeg work great too if you want more warmth)
- ½ teaspoon vanilla extract
- ½ cup vegetable oil (or melted coconut oil for a more tropical taste)
- 2 large eggs
- ¼ cup fresh lemon juice (for that bright, fresh touch)
For the Filling:
- 1 cup grated zucchini (about 1 medium zucchini)
- 1 tablespoon granulated sugar (just to sweeten the zucchini a little)
- A squeeze of lemon juice or splash of vanilla (optional but adds flavor)
For the Glaze:
- ½ cup powdered sugar
- 1-2 teaspoons lemon juice
- Optional: a sprinkle of lemon zest or vanilla extract for extra flavor
Step-by-Step Instructions
Step 1: Preheat & Prep Pan
Set your oven to 350°F (180°C). Grease a loaf pan or round cake pan with butter or non-stick spray—trust me, this makes the crumb come out perfect. Line it with parchment if you like extra insurance and ensure easy removal. Get your zucchini ready by grating it on the fine side of a box grater. Toss it in a paper towel or clean dish towel and give it a good squeeze to remove excess moisture; this keeps your cake from getting soggy.
Step 2: Mix Dry Ingredients
In a large bowl, whisk together the flour, sugar, baking soda, baking powder, salt, and cinnamon. Combining these first ensures even distribution of all those spices and leaveners—that way, no one bite is overly cinnamon-y or bland.
Step 3: Mix Wet Ingredients
In a separate bowl, whisk the eggs, oil, lemon juice, and vanilla until smooth. I always do this step first so everything’s well combined before adding it to the dry ingredients. It’s nice to see how the batter looks shiny and just a little cloudy — that’s a good sign!
Step 4: Combine
Pour the wet mixture into the dry ingredients, and gently fold using a spatula or wooden spoon. Don’t overmix—I’ve learned that stirring just until everything’s combined is key. You’ll see a thick, fluffy batter, and that’s perfect. Overmixing can make the cake dense, and nobody wants that.
Step 5: Prepare Filling
In a small bowl, toss your grated zucchini with a tablespoon of sugar, a squeeze of lemon or splash of vanilla, then set aside. If you want to add nuts or chocolate chips, now’s the time. I love tossing in some chopped walnuts or mini chocolate chips for a little surprise in every bite.
Step 6: Layer & Swirl
Pour about half of your batter into the prepared pan. Dot with spoonfuls of the zucchini mixture, then cover with more batter. Use a butter knife or toothpick to swirl gently through the layers, creating that marbled pattern. The key is to do this carefully so you don’t mix it all together—keep the distinct layers for a beautiful swirl!
Step 7: Bake
Pop it into the oven and bake for 45-50 minutes. Check doneness by inserting a toothpick in the center—if it comes out clean, you’re golden. If you notice the top browning too quickly, tent it loosely with foil and keep baking until done. Every oven is different—trust your nose and your toothpick!
Step 8: Cool & Glaze
Let the cake cool in the pan for about 15 minutes, then transfer to a rack. While it cools, whisk your powdered sugar with lemon juice until smooth. Drizzle or brush the glaze over the slightly warm cake; this adds a gorgeous shiny finish and a little tang that complements the sweetness perfectly.
Step 9: Slice & Serve
Use a sharp serrated knife to cut neat slices. I like to let it cool completely before slicing because it helps prevent crumbling. Serve it with a cup of tea or a glass of cold milk. If you’re feeling fancy, sprinkle a little extra lemon zest on top for color and zing. Honestly, it’s best enjoyed when slightly warm or at room temperature—the flavors seem to deepen then.
What to Serve It With
There’s so much you can do with this cake—think beyond the usual. For breakfast, pair it with a mug of strong coffee or a glass of freshly squeezed orange juice. The lemon in both accentuates the citrus notes in the cake and keeps things feeling bright and fresh.
For brunch, serve slices with a dollop of whipped cream or a smear of mascarpone. It’s lovely with a side of fresh berries or sliced peaches—sensing a summery vibe here!
As a dessert, it’s fabulous on its own, but I also like to serve it with a drizzle of honey or a sprinkle of chopped nuts on top. When I entertain, I do a little presentation with a dusting of powdered sugar, and it always gets oohs and aahs because look at those beautiful swirls! My family especially loves plating it up with a scoop of vanilla ice cream on a warm day—pure comfort.
For casual snacking, I cut thick slices and keep them in a container in the fridge. It’s perfect with afternoon tea or just a quick sweet bite when the craving hits. Honestly, once you’ve tried this, it’ll become your go-to for those cozy, homemade moments.
Top Tips for Perfecting Your Zucchini Swirl Cake
Over the years, I’ve picked up a few tricks that make my zucchini swirl cake turn out consistently amazing. Here’s what I’ve learned:
- Zucchini Prep: Always squeeze out as much moisture as possible. Moisture is the enemy, and excess water can make your crumb dense or soggy. Use a clean towel to really press out the liquid after grating—it makes all the difference.
- Mixing Advice: Don’t go overboard on mixing once you combine wet and dry. Gentle folds are key to keeping the batter tender and airy. Overmixing can lead to a tougher texture, and that’s not what we want here.
- Swirl Technique: To keep the marbling neat, pour batter in layers, then use a skewer or toothpick to create a figure-eight pattern or swirling motion. This creates those gorgeous, natural-looking patterns that wow at the table.
- Ingredient Swaps: Tried almond or oat flour? They can work but might impact the crumb or moisture. Usually, a 1:1 swap works okay but do test the batter consistency. Coconut sugar adds a lovely caramel note, but it’s sweeter so cut back if you don’t want extra sweetness.
- Baking Tips: Always check for doneness a few minutes before the timer ends—every oven is different. Keep an eye on browning and use a toothpick for the best test. If it’s golden and a toothpick comes out clean, you’re all set.
- Glaze Variations: For different flavors, try adding vanilla, a dash of orange liqueur, or even a sprinkle of sea salt on top for contrast. The glaze should be pourable but not too runny—add more powdered sugar if it’s too thin or a splash of lemon juice to loosen it up.
This recipe is so forgiving, and I’ve really learned that sometimes, less is more—don’t stress too much about perfect layers, just enjoy the process and the delicious results. My personal tip? Always taste the batter before baking. That way, you can adjust sweetness or spices — trust me, it’s a game changer.
Storing and Reheating Tips
This cake tastes amazing for several days if stored properly. I usually keep it in an airtight container at room temperature for up to two days. After that, I prefer refrigerating it—just cover it tightly with plastic wrap or put it in a resealable bag. It stays fresh for about 4-5 days that way, and I find it actually gets even more flavorful the next day.
If you want to freeze it, wrap slices or the whole cake tightly in plastic wrap, then foil, and stash it in the freezer. It keeps well for up to 3 months. To reheat, pop slices in the microwave for 20-30 seconds or warm the whole cake at 350°F until just heated through. I usually add a fresh drizzle of glaze or a dusting of powdered sugar after warming to bring back that bakery-fresh look.
Here’s a little tip: If you plan to store it after glazing, hold off on the glaze until you’re ready to serve, so it stays glossy and fresh-looking. No one wants a soggy, dull-looking slice!
Frequently Asked Questions
Final Thoughts
Honestly, this zucchini swirl cake has become a true family favorite. There’s something so comforting about its moist crumb and gentle citrus notes—plus that stunning marbled pattern. It’s like a hug in every slice. I love that it’s forgiving enough for a beginner but refined enough to serve at special get-togethers. Every time I bake this, I realize how lovely simple ingredients can come together in such a delicious way. If you’re craving something sweet, homemade, and a little nostalgic, give this a try—you won’t be disappointed. And hey, I’d love to hear how yours turns out! Leave a comment or tag me in your photos—happy baking, friends!
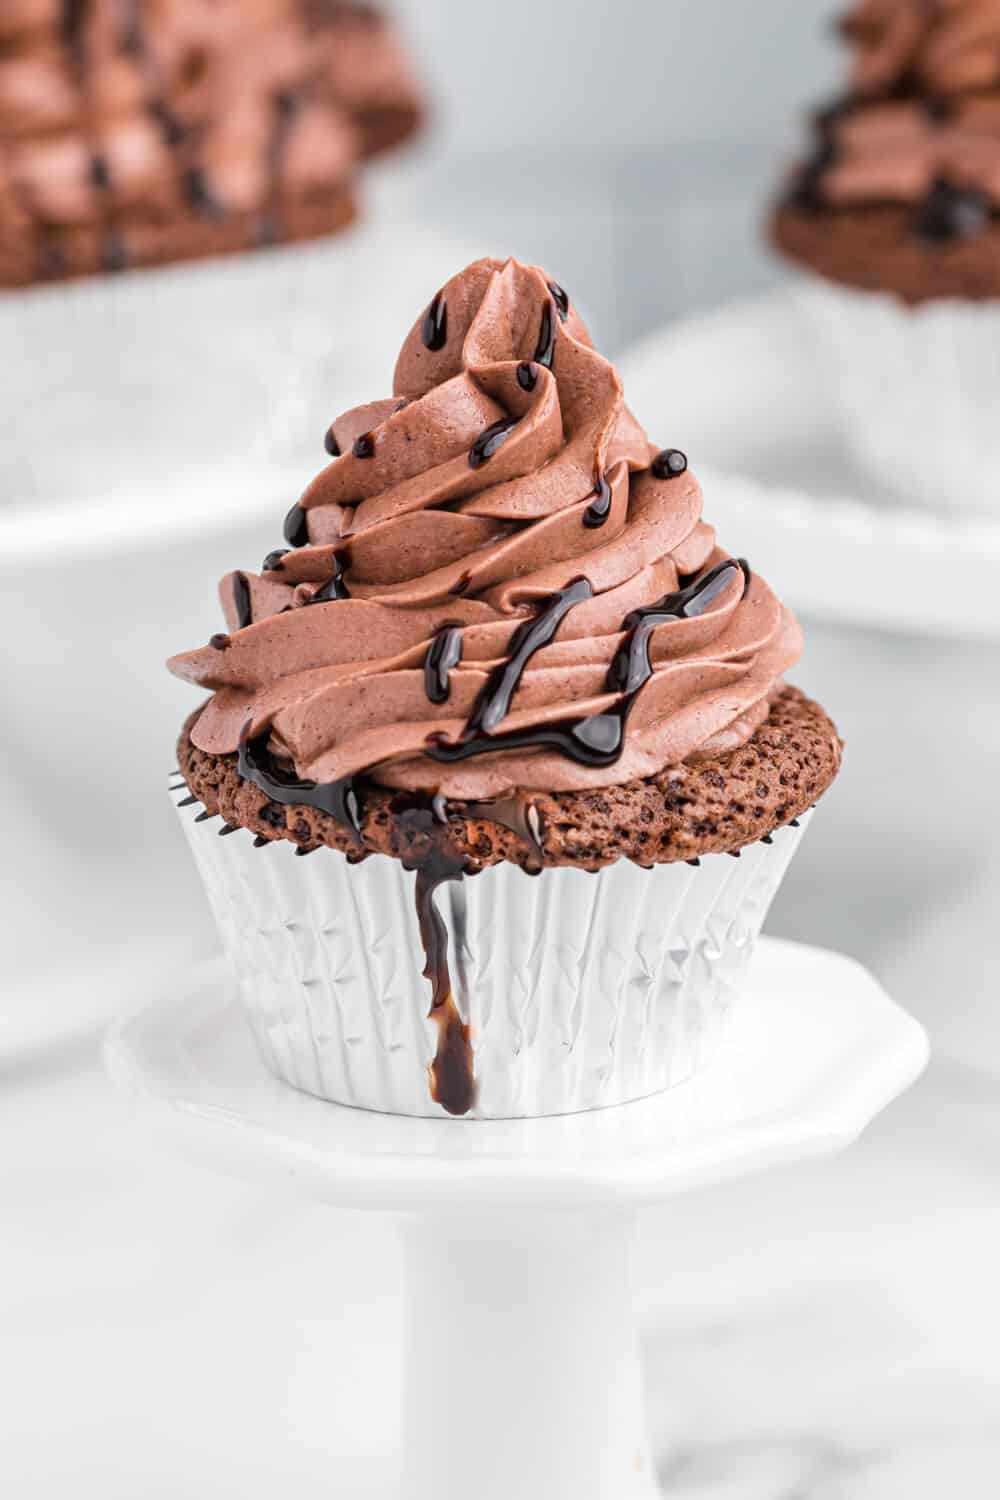
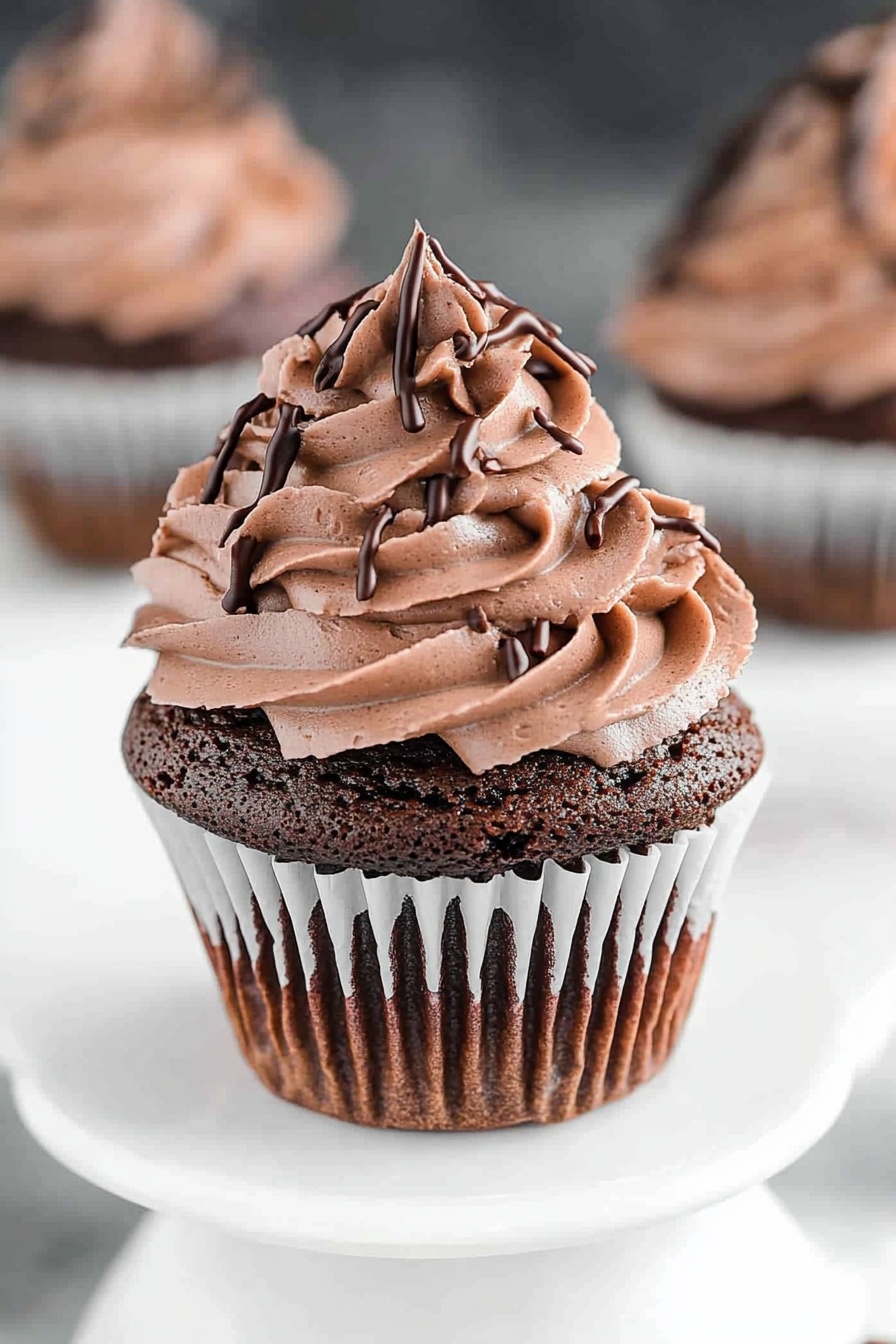
chocolate cupcakes
Ingredients
Method
- Preheat oven to 350°F. Add cupcake liners to a muffin pan and set aside.
- In a large bowl, stir together flour, salt, baking powder, and cocoa powder.
- In another bowl, cream butter and sugar with an electric mixer on medium speed.
- Melt the chocolate chips in the microwave for about 40 seconds. Stir. Put back in for 20 second increments stirring in between until melted. Pour chocolate into butter/sugar mixture and mix on medium speed.
- Add eggs and egg yolks one at a time while continuing to mix.
- Add oil, vanilla, and sour cream and continue to mix on medium.
- Add wet ingredients to dry ingredients and stir to combine.
- Fill each cupcake liner about ¾ full.
- Bake 23 to 25 minutes or until a toothpick comes out of the center of a cupcake clean. Cool in pan for 15 minutes before removing to a baking rack. Cool completely before frosting.
- To make the frosting, add butter to a mixing bowl and beat until smooth. Add in half and half and vanilla extract and continue to beat with an electric mixer on medium.
- Add in icing sugar and dark cocoa and beat until well blended.
- Frost cupcakes and drizzle chocolate sauce over top, if desired.

Love this idea! My kids actually loved the zucchini swirl cake we made last week—so easy and they didn’t even notice the veggies.
Love the idea of hiding veggies in desserts! My kids would never know there’s zucchini in these. Definitely trying this soon.
I love the idea of hiding veggies in baked goods—my kids actually asked for seconds of this cake last time!
Love the idea of sneaking veggies into treats—clever and delicious!
That sounds delicious! I love the idea of hiding veggies in sweet treats—my kids are way more open to trying new things when they’re baked into something tasty like this.