
Rich Chocolate Cupcakes How to Bake Them
There’s something magical about pulling a warm, gooey coffee cake out of the oven — that smell alone can turn a tough morning into a moment of pure joy. I remember the first time I made this zucchini chocolate swirl coffee cake. I was skeptical about adding zucchini to a dessert, honestly. But I’d always loved sneaking veggies into baked goods; it’s like an edible secret weapon. Plus, I wanted something that felt indulgent but also a little sneaky, especially when my kids ask for seconds on a slice of chocolate-y goodness. This cake is that perfect middle ground. It’s moist, tender, and filled with swirls of gooey chocolate that almost melt into the batter. And the best part? You can whip this up in less than an hour, even on those mornings when I barely have time to breathe. It’s incredible how just a few simple ingredients can turn into this richly flavored, comforting masterpiece. And trust me — once you try it, it’ll be one of your go-to recipes, too. I always do this when I want something sweet and satisfying but don’t want to fuss for hours. My favorite part? The swirl of chocolate makes it feel so decadent — my kids actually ask for this all the time now. It’s become a family staple, for sure.
What is Zucchini Chocolate Swirl Coffee Cake?
Think of this as a cozy breakfast cake with a surprising twist — that secret ingredient, zucchini, keeps it super moist and healthy-ish, but you’d never guess from the rich chocolate swirls that streak through it. It’s essentially a classic coffee cake, but with a chocolatey makeover and a veggie boost. The name might sound fancy, but it’s really just a simple, one-bowl batter that’s layered with melted chocolate or chocolate chips, then swirled to create a beautiful marbled effect. The zucchini here is more of a supportive actor — it adds moisture and a little nutritional bump, making sure the cake stays tender and not crumbly. Plus, I love that it adds a gentle surprise flavor that complements the chocolate perfectly. Think of it as that cozy Sunday morning treat or a quick brunch dessert — what’s great is how flexible it is, so you can customize it with nuts, berries, or even a dusting of powdered sugar for extra flair. My friends are always impressed when I tell them it’s secretly packed with zucchini — they think I’ve outdone myself again.
Why you’ll love this recipe?
What I love most about this zucchini chocolate swirl coffee cake is how it hits all the right notes — fluffy, rich, and just a little bit indulgent. The scent alone fills my kitchen with warm, chocolaty goodness that practically draws everyone to the table like a magnet. This one’s a lifesaver on busy nights because you can prepare it in one bowl, bake it in under 45 minutes, and still have something special to share with family or friends. The zucchini keeps it unbelievably moist, and the swirl of melted chocolate creates pockets of intense flavor that make every bite feel like a little celebration. Plus, the experience of swirling the batter is almost meditative — it’s satisfying to see that beautiful marbling emerge. And I’ve tested this with different kinds of chocolate — semi-sweet, dark, even peanut butter chocolate — and it never disappoints. It’s also budget-friendly, since zucchini and chocolate chips are usually staples in my kitchen. What I love most is how versatile it is — my kids ask for this all the time, and I love that I can sneak in a vegetable, guilt-free. It’s perfect when you want something cozy yet fancy enough to serve guests. And the best part? It’s foolproof; I’ve made it dozens of times and it always turns out beautifully, with minimal fuss.
How do you make Zucchini Chocolate Swirl Coffee Cake?
Quick Overview
This cake is a breeze to make — just mix up a simple batter, fold in some shredded zucchini, melt your favorite chocolate, then swirl everything together before baking. The key is not overmixing to keep it tender and moist. Once it’s baked, the whole house fills with that irresistible aroma. A quick glaze or powdered sugar dusting takes it over the top. Honestly, it’s so easy you’ll want to make it weekly, especially when you’re craving something sweet but want to feel a little healthier. The chocolate swirl gives it a gorgeous marbled look, and you can personalize it with nuts or berries for extra flair. My favorite part? The swirls turn into these little pockets of melty chocolate in every bite. Trust me — once you get the hang of swirling, it’s almost addictive. This cake is perfect for a cozy weekend brunch or even an after-dinner treat. And if you’re short on time, you can even make the batter the night before and bake it fresh in the morning.
Ingredients
For the Main Batter:
– 1 1/2 cups all-purpose flour (I always prefer unbleached for a richer flavor)
– 1 teaspoon baking powder
– 1/2 teaspoon baking soda
– 1/4 teaspoon salt
– 1 cup granulated sugar
– 2 large eggs
– 1/2 cup vegetable or canola oil
– 1 teaspoon vanilla extract
– 1 cup shredded zucchini (squeeze out excess moisture — trust me on this one!)
For the Filling:
– 3/4 cup semi-sweet chocolate chips or chopped chocolate (melted with a pinch of butter or cream for a smoother swirl)
– Optional: 1/4 cup chopped nuts or berries for added texture and flavor
For the Glaze:
– 1/2 cup powdered sugar
– 1-2 teaspoons milk or cream
– A splash of vanilla (optional)
Step-by-Step Instructions
Step 1: Preheat & Prep Pan
Set your oven to 350°F (175°C). Grease a 9-inch round or square baking pan with butter or non-stick spray and line the bottom with parchment paper. I always do this — it makes the cake come out so much easier, and no broken edges! Keep your ingredients ready; mise en place makes everything flow smoothly once you start mixing.
Step 2: Mix Dry Ingredients
In a large bowl, whisk together the flour, baking powder, baking soda, and salt. This step is crucial because it evenly distributes the leavening agents, ensuring your cake rises perfectly and has a nice tender crumb. I usually do this by hand; it takes a minute but makes a difference in texture.
Step 3: Mix Wet Ingredients
In a separate bowl, beat the eggs well, then add the sugar, oil, and vanilla. Whisk until smooth and slightly frothy. The sugar helps give the cake a lovely tender crumb, and the oil keeps it moist. I tested this with almond milk once (for a dairy-free version) and it actually made the cake even creamier — so feel free to experiment if you like!
Step 4: Combine
Pour the wet mixture into the dry ingredients and gently fold everything together. Be careful not to overmix; just stir until combined. Overmixing can make the cake dense, and that’s the last thing you want here! It’s okay if there are a few streaks — that’s what creates that lovely marbled effect when you swirl with the chocolate later.
Step 5: Prepare Filling
Melt the chocolate chips either in the microwave in 20-second bursts or in a double boiler until smooth. If you want an extra shiny swirl, stir in a tiny bit of butter or cream. Let it cool slightly so it doesn’t sink into the batter. You can also add a sprinkle of sea salt or cinnamon to jazz it up.
Step 6: Layer & Swirl
Pour half of the batter into the prepared pan, spreading evenly. Drizzle melted chocolate over the batter, then add the remaining batter on top. Using a knife or spatula, swirl gently to create those beautiful marbled patterns — don’t overdo it, or the swirl will blend too much and lose its visual impact.
Step 7: Bake
Pop it into the oven and bake for 35–40 minutes. You’ll know it’s ready when the top is golden and a toothpick inserted into the center comes out clean (a few moist crumbs are okay, but no wet batter). If the top browns too quickly, tent it with foil — I’ve learned this the hard way. Every oven is a little different, so start checking around the 35-minute mark.
Step 8: Cool & Glaze
Let the cake cool in the pan for about 15 minutes before transferring it to a wire rack. This prevents breaking and ensures the layers set nicely. Mix your powdered sugar with milk and vanilla to make a glaze, then drizzle beautifully over the slightly warm cake. If you prefer less sweetness, dust it with powdered sugar instead — simple and elegant.
Step 9: Slice & Serve
Once cooled completely, slice with a sharp serrated knife for clean edges. Serve warm or at room temperature, perhaps with a scoop of vanilla ice cream or a dollop of whipped cream. I like to add a sprinkle of extra chocolate chips or nuts on top for presentation. Honestly, it’s delicious either way — perfect with a cup of coffee or a glass of milk.
What to Serve It With
This cake is so versatile—it practically dresses up or down depending on your mood. For breakfast, I love serving it with a strong cup of black coffee or a creamy latte. The slightly bitter coffee balances out the sweetness perfectly. It’s also fantastic for brunch — maybe cut into smaller pieces, served with fresh fruit and a drizzle of honey. My family loves it as an after-dinner dessert, especially with a little extra chocolate drizzle or a sprinkle of sea salt on top. Honestly, I’ve even packed slices in lunchboxes for a treat during the day! On cozy weekends, I sometimes warm a slice and serve it alongside Greek yogurt or a glass of cold milk. The kids think it’s a special treat, and I love how the zucchini sneaks in that extra bit of nutrition without compromising flavor.
Top Tips for Perfecting Your Zucchini Chocolate Swirl Coffee Cake
Having made this cake countless times, I’ve picked up a few tricks that make a big difference:
- Zucchini Prep: Always squeeze out excess moisture after shredding — a damp zucchini can make your batter too sticky and dense. I use a clean tea towel or paper towels to blot out as much water as possible. Freshness is key, so don’t let it sit too long after grating.
- Mixing Advice: To prevent overmixing, combine your wet and dry ingredients just until no streaks remain. It takes a gentle touch, but it’s worth it — this keeps the cake light and fluffy.
- Swirl Customization: Play around with the chocolate placement. For a more dramatic look, pour the melted chocolate in zig-zag patterns. For a subtler effect, just swirl lightly through the batter. Visuals matter, and that marbled pattern makes the cake look super fancy!
- Ingredient Swaps: Want to make it healthier? Swap in whole wheat flour (use a 1:1 ratio, but expect a slightly denser crumb). You can also substitute coconut sugar if you prefer less refined sweetener. For dairy-free, almond or oat milk works great in the glaze or batter.
- Baking Tips: Oven temperatures vary, so start checking at 35 minutes. If you notice the top browning too fast, tent it with foil. Toothpick tests are your best friend here — moist crumbs are okay, wet batter is not.
- Glaze Variations: Instead of powdered sugar, you can use a thin layer of melted chocolate or a touch of cream cheese frosting for a different finish. Keep it simple, or go gourmet — either way, it’s delicious.
The first time I tried adding a pinch of cinnamon to the swirl, and it was a revelation — adds a warm, spicy note that pairs beautifully with the chocolate. The key is to experiment and find your favorite twist. Trust me, the more you make this, the more you’ll see how forgiving it is — it’s all about having fun with the process and enjoying the cozy results.
Storing and Reheating Tips
This cake keeps surprisingly well. If you’re enjoying it within a day or two, store it in an airtight container at room temperature for up to two days. Just keep it covered or in a cake dome — this keeps it moist and fresh. If you want to make it last longer, pop it in the fridge — it’ll stay good for up to five days, but I recommend bringing it back to room temperature or gently warming slices in the microwave for a few seconds until soft and gooey again. Freeze slices separately wrapped in plastic wrap and foil for up to three months — perfect for those “must-have-a-slice-now” moments. When reheating, I do about 15 seconds in the microwave; the edges get warm and the chocolate swirls melt just right. If you’re not a glaze person, skip it altogether for storing — the cake is moist enough on its own. Just remember, the glazed version is best enjoyed fresh, so don’t wait too long to dive in!
Frequently Asked Questions
Final Thoughts
This zucchini chocolate swirl coffee cake is that rare delight — a cozy piece of comfort that also sneaks in a secret vegetable. Over the years, it’s become a family favorite because it’s simple, forgiving, and endlessly customizable. The smell alone makes my house feel warmer, and I love how versatile it is. Whether I’m making it for breakfast, brunch, or just a sweet afternoon treat, it never fails to bring smiles around the table. Honestly, if you’re looking for a recipe that’s approachable but feels special, give this one a try. Once you make it, you’ll understand why I keep coming back to this cake — it’s like a hug in dessert form. Happy baking! And I would love to hear how yours turns out — feel free to leave a comment or share your own twists. Remember, some of the best recipes are the ones you make your own, so don’t be afraid to experiment and enjoy every bite!
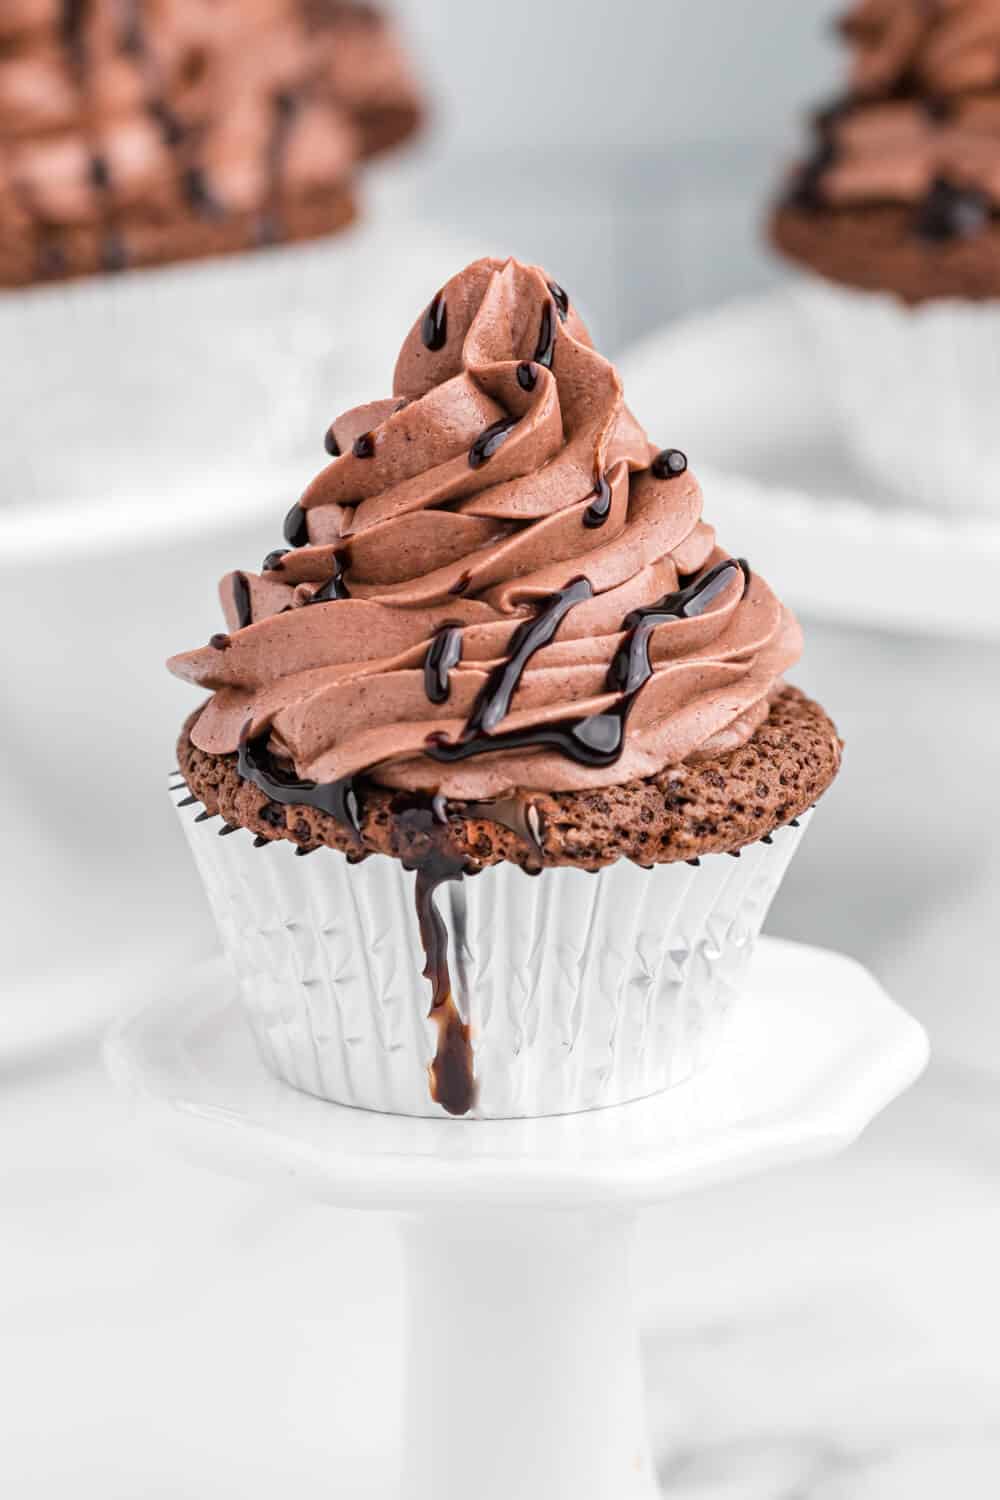
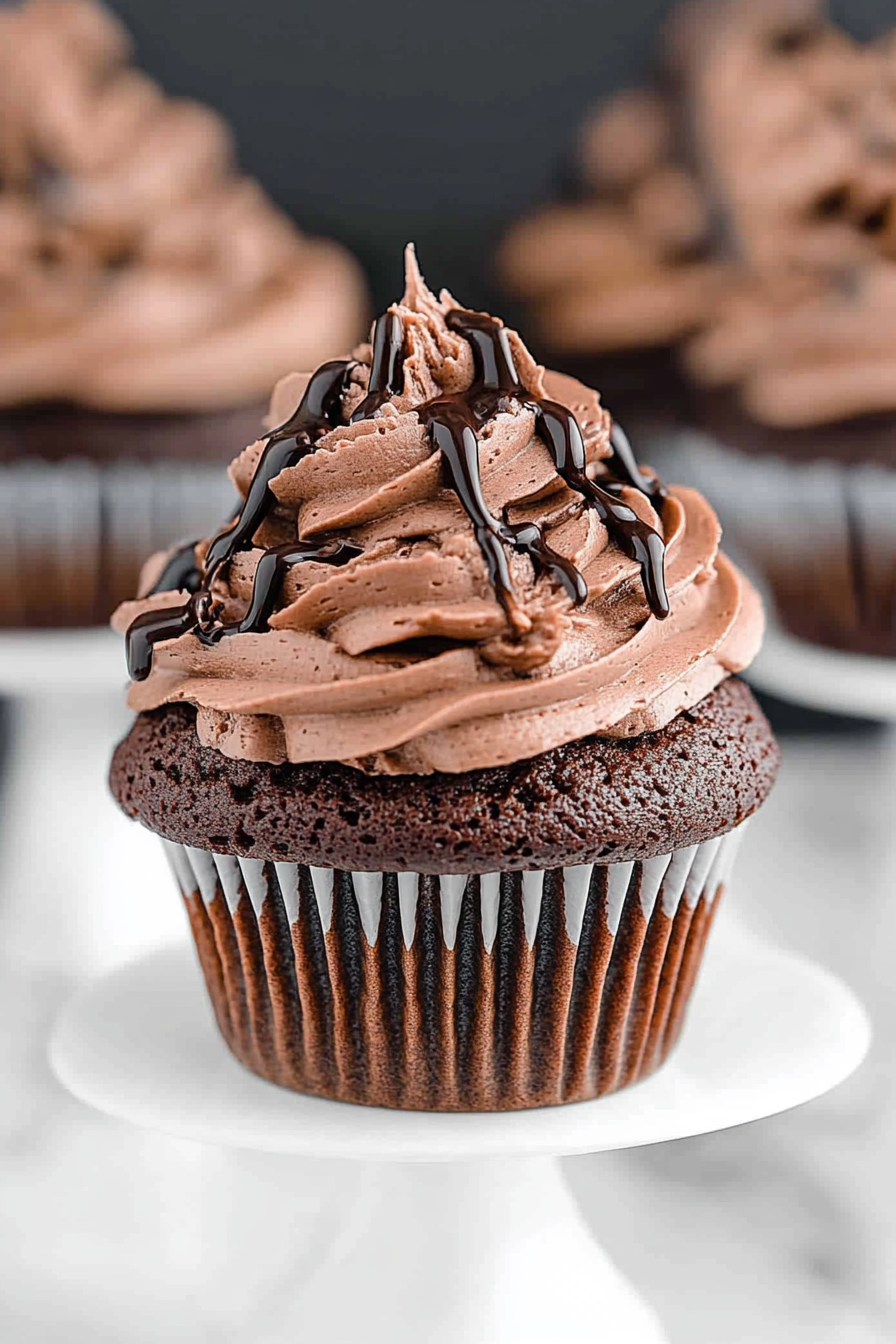
chocolate cupcakes
Ingredients
Method
- Preheat oven to 350°F. Line muffin pan with cupcake liners.
- In a large bowl, combine flour, salt, baking powder, and cocoa powder.
- Cream butter and sugar with an electric mixer on medium speed.
- Melt chocolate chips in microwave for about 40 seconds. Stir and microwave in 20-second intervals until smooth. Add to butter-sugar mixture and mix well.
- Add eggs and egg yolks one at a time, mixing after each addition.
- Stir in oil, vanilla, and sour cream until combined.
- Gradually add dry ingredients to wet mixture, mixing until just combined.
- Fill cupcake liners about 3/4 full.
- Bake for 23 to 25 minutes or until a toothpick inserted in the center comes out clean. Cool in pan for 15 minutes, then transfer to a wire rack to cool completely.
- For frosting, beat butter until smooth. Add half and half and vanilla, mix well.
- Gradually add powdered sugar and dark cocoa, beating until smooth.
- Frost cooled cupcakes and drizzle with chocolate sauce if desired.
Love these! The aroma is unbeatable—perfect for lifting any mood. Can’t wait to try this recipe!
I love the idea of that warm, gooey cupcake — it’s like a little slice of happiness in every bite!
I’ve made these before and they turned out amazing—so rich and moist! The chocolate frosting is definitely my favorite part.
I love how warm chocolate cupcakes can completely transform a gloomy day — the aroma alone makes everything feel better.
I’ve tried making these before and they were absolutely delicious—so rich and moist! Definitely adding this to my baking list again.