
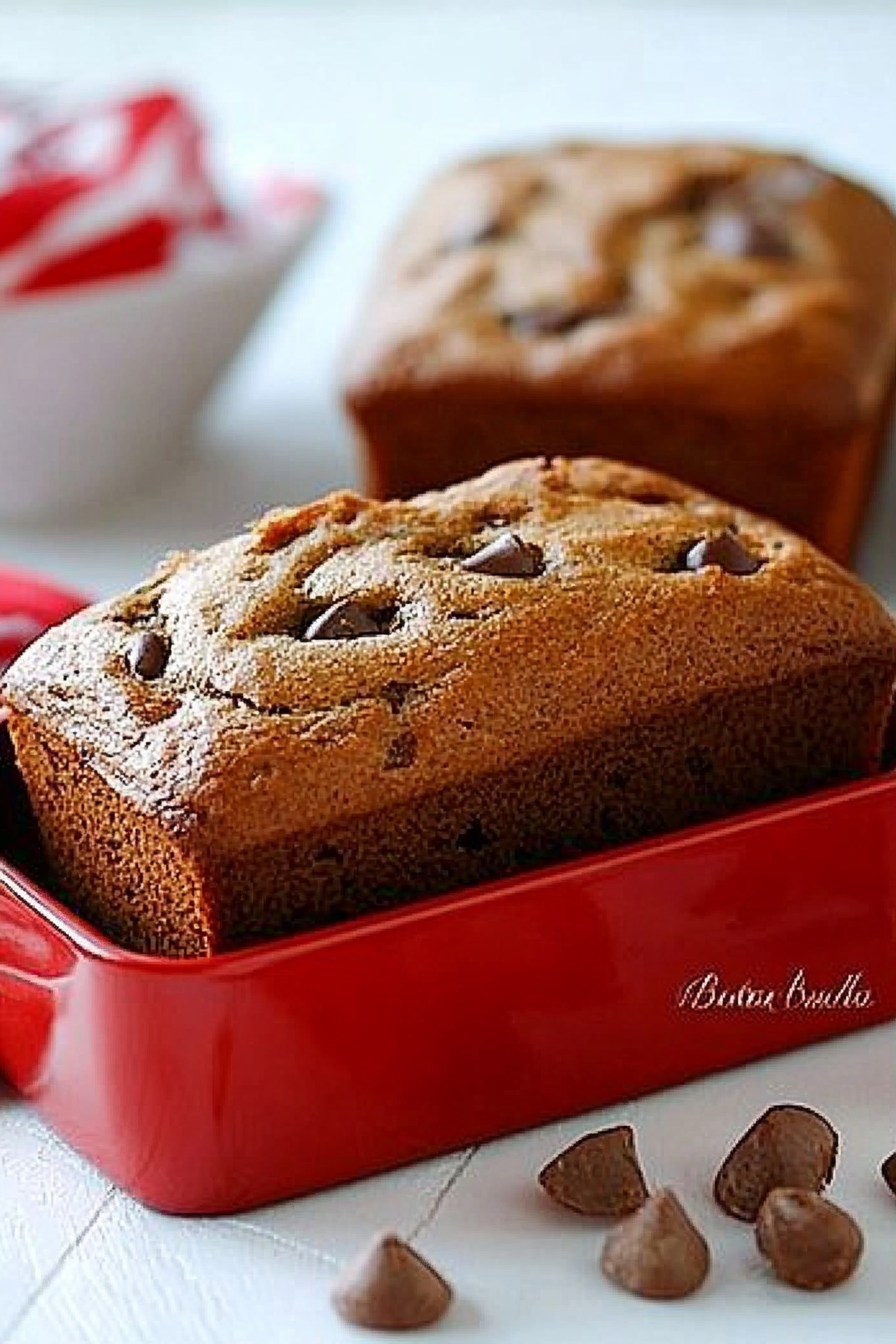
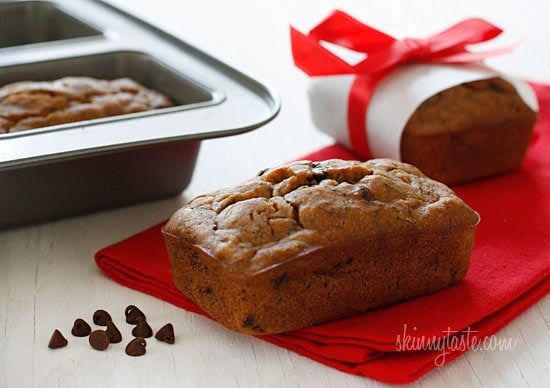
Easy Banana Bread with Chocolate Chips
If there’s one thing I’ve learned over the years in my kitchen, it’s that the perfect banana bread can secretly be the highlight of your day. Nothing beats the smell of ripe bananas mingling with melting chocolate chips, filling the house with whispers of sweet nostalgia. I always do this when I want something cozy but effortless—when the kids are asking for a snack, or I need a quick weekend treat to share with friends. It’s one of those recipes that never fails me, no matter how busy life gets. Honestly, I even sneak a slice at midnight if I’m craving something sweet but don’t want to turn on the oven again. Trust me on this one—this chocolate chip banana bread is a total lifesaver on busy nights. Plus, it’s so forgiving—you can make it with last-minute ripened bananas, and it’ll still turn out moist and flavorful every single time. Have I convinced you yet to give it a try? Well, grab those bananas, and let’s get baking! It’s about to become your new favorite comfort food.
What is chocolate chip banana bread?
Think of it as a delightful marriage between a classic banana loaf and a secret stash of melting chocolate chips. It’s essentially a soft, moist bread that’s packed with bananas—those super ripe ones that nobody wants to throw away—and speckled with gooey chocolate bits. The name says it all; it’s a lazy weekend baking project, but the flavor? Pure indulgence. The concept is simple: ripe bananas bring natural sweetness and moisture, while the chocolate chips add bursts of rich, melty goodness. I love how versatile it is—you can enjoy it sliced warm with a pat of butter, toasted for breakfast, or even as a dessert topped with whipped cream. Its origins are humble, a homey remedy for overripe bananas, but I swear, once you try this, it might just replace your usual banana bread recipe. It’s comforting, slightly decadent, and surprisingly easy to pull together—perfect when you’re craving something sweet but don’t want to fuss too much.
Why you’ll love this recipe?
What I love about this chocolate chip banana bread is how it hits all the right notes — taste, texture, and ease of making. Let me walk
- Flavor:What is the difference between banana and chocolate?
- Simplicity: This recipe doesn’t require fancy ingredients or complicated techniques. I’ve tested it with regular all-purpose flour and standard baking soda, and it always turns out perfectly moist and tender.
- Cost-efficiency: Using overripe bananas and everyday pantry staples, this bread is budget-friendly. Plus, it’s a clever way to use up those bananas that have been sitting on your counter too long.
- Versatility: Love nuts? Add some chopped walnuts or pecans. Want it extra chocolatey? Toss in some chocolate chunks instead of chips. It’s a blank canvas for your favorite add-ins. I’ve also started experimenting with a sprinkle of sea salt on top — game changer.
- For Breakfast: Pair a warm slice with freshly brewed coffee or a glass of cold milk. My kids love it with a smear of peanut butter, and I swear, it’s like breakfast pudding.
- For Brunch: Serve with a side of Greek yogurt and fresh berries, or alongside scrambled eggs and crispy bacon. It’s a crowd-pleaser, especially if you’re hosting and want something sweet but not overly complicated.
- As Dessert: Warm slices topped with vanilla ice cream or a drizzle of caramel sauce turn this into a real treat. A sprinkle of flaky sea salt on top of the glaze makes all the difference.
- For Cozy Snacks: Toasted with butter and a cup of tea? Yes, please. It’s perfect when you just want a little something sweet and comforting during those chilly evenings.
- Zucchini prep: Not in this recipe, but I’ve tested adding grated zucchini once — it’s a moisture magic maker! Just squeeze out excess water before mixing.
- Mixing advice: Overmixing is the enemy. I always fold until just combined to keep the bread from turning dense or rubbery.
- Swirl customization: For prettier marbling, I add dollops of batter randomly, then swirl gently. Using a skewer helps create beautiful patterns.
- Ingredient swaps: Dark chocolate chips make the bread richer, but I’ve used white chocolate or even peanut butter chips for variety. I’ve also tested coconut sugar—works beautifully, with a slightly caramelized flavor.
- Baking tips: If your loaf browns too fast, cover with foil around the 45-minute mark. Every oven is different—trust your toothpick test over the clock.
- Glaze variations: For a different twist, try a lemon glaze or sprinkle cinnamon sugar on top before baking for a cinnamon toast flavor.
- Room temperature: Wrap it tightly with plastic wrap and store in a bread box for up to 2 days. Just be mindful that it’s best eaten sooner rather than later — bananas tend to soften over time.
- Refrigerator storage: Wrap slices or the entire loaf in plastic wrap or place in an airtight container. It’ll last about 4-5 days, and I love reheating slices in the microwave for about 15 seconds — just enough to warm the chocolate and open up the flavors.
- Freezer instructions: Wrap tightly in plastic wrap then aluminum foil, or store in a freezer-safe bag. It keeps well for up to 3 months. To thaw, leave it out at room temp or warm slices gently in the microwave. The key is to avoid sogginess, so reheat just enough to enjoy.
- Glaze timing: If you want a shiny, sweet drizzle, add the glaze after reheating, not before. It’s one of those small tricks that keeps everything looking and tasting fresh.
Honestly, what makes this recipe special isn’t just the flavor but how it makes me feel—nostalgic, cozy, and a little bit proud every time I share it with friends or family. It’s a classic that’s been remixed to satisfy that sweet craving, and I promise, once you make it once, it’ll be a go-to for lazy weekends or last-minute gatherings.
How to Make Chocolate Chip Banana Bread
Quick Overview
This bread comes together quickly—no fancy techniques needed. The key is to mash your bananas until smooth, mix the dry ingredients just until combined to avoid toughness, and fold in the chocolate chips gently so they’re evenly distributed. You’ll layer and swirl the batter for a pretty marbled effect before baking it until golden and delicious. The best part? It smells so good while baking, you’ll want to dive right in. It’s forgiving if you tweak the sweetness or toss in extras, making it perfect for both novice and seasoned bakers alike.
Ingredients
For the Main Batter:
– 3 ripe bananas (the mushier, the better for sweetness and moistness)
– 1/2 cup melted unsalted butter or coconut oil
– 1 cup granulated sugar (you can reduce a little if you prefer less sweetness)
– 2 large eggs, at room temperature
– 1 teaspoon vanilla extract
– 1 1/2 cups all-purpose flour
– 1 teaspoon baking soda
– 1/2 teaspoon salt
For the Filling:
– 1 cup semi-sweet chocolate chips
– Optional: chopped walnuts or pecans for added crunch
– A pinch of sea salt flakes for sprinkling on top (trust me on this!)
For the Glaze:
– Optional: powdered sugar mixed with a splash of milk, or a drizzle of melted chocolate for extra decadence
Step-by-Step Instructions
Step 1: Preheat & Prep Pan
Preheat your oven to 350°F (175°C). Grease a loaf pan generously with butter or non-stick spray. You can also line it with parchment paper for easy removal. I always do this because it saves so much hassle later and keeps the bread from sticking, especially if you’re using a darker ceramic pan.
Step 2: Mix Dry Ingredients
In a small bowl, whisk together the flour, baking soda, and salt. This step ensures even distribution of the leavening and seasoning—nothing worse than a clump of baking soda lurking in your slice. Set it aside.
Step 3: Mix Wet Ingredients
In a large mixing bowl, mash the bananas until smooth — I like to use the back of a fork or a potato masher. Then, stir in the melted butter, sugar, eggs, and vanilla. Whisk everything until it’s well combined but don’t overmix, or your bread might turn out dense. I’ve learned that gentle mixing keeps the texture just right—light and moist.
Step 4: Combine
Add the dry ingredients to the wet mixture in three additions, folding gently with a spatula after each. Stop as soon as there’s no visible flour — overmixing here can make the bread tough, and nobody wants that. At this point, the batter should be thick but pourable—think like a thick cake batter.
Step 5: Prepare Filling
Mix the chocolate chips into the batter, saving a handful for sprinkling on top if you like a gooey topping after baking. If you want to get fancy, fold in some chopped nuts here too. This step is totally customizable—feel free to swap out chocolate for white chocolate or even peanut butter chips.
Step 6: Layer & Swirl
Pour about two-thirds of the batter into your prepared loaf pan. Then, dollop spoonfuls of the remaining batter on top. Use a chopstick or toothpick to gently swirl the layers for a marbled effect. This part feels a bit like painting, and it’s so satisfying when done right. Don’t overdo it—just enough to see pretty streaks appear.
Step 7: Bake
Place the loaf in your preheated oven and bake for about 60-70 minutes. You’ll know it’s done when a toothpick inserted in the center comes out clean or with just a few moist crumbs. If you notice the top getting too dark before it’s baked through, tent it loosely with foil. Oven temps can vary, so keep an eye on it after 50 minutes.
Step 8: Cool & Glaze
Let the bread cool in the pan for about 15 minutes, then transfer to a wire rack. This helps it set perfectly and prevents it from sogging. Once cooled slightly, if you’re using glaze, drizzle it on top while still warm for that glossy, irresistible finish.
Step 9: Slice & Serve
Slice the bread with a serrated knife — I find that letting it sit for a few minutes after cooling makes cleaner cuts. Serve it warm with a pat of butter or a dusting of powdered sugar. It’s also fantastic toasted the next day. Honestly, it disappears faster than I can blink — my kids ask for this all the time!
What to Serve It With
This banana bread is so versatile, it’s almost a meal on its own. Here are some of my favorite ways to serve it:
This bread has become a staple in my house, especially during those lazy Sundays when I want something baking in the oven but I don’t want to fuss. The smell alone gets everyone in the kitchen, and it’s enough to make my house feel like a warm hug.
Top Tips for Perfecting Your Chocolate Chip Banana Bread
After making this dozens of times, I’ve picked up a few tricks that make all the difference:
One thing I’ve learned is that patience really pays off. Letting the bread cool completely before slicing ensures clean cuts and perfect texture. Also, keep leftovers wrapped tightly — it stays moist for several days, if it lasts that long!
Storing and Reheating Tips
This bread is best enjoyed fresh but also keeps well. Here’s how I store it:
I’ve tested all of these, and I can honestly say that even after freezing, this banana bread retains its moist, flavorful quality. It’s like a cozy hug in every bite, no matter when you enjoy it.
Frequently Asked Questions
Final Thoughts
Honestly, this chocolate chip banana bread has become a little family legend in my kitchen. Every time I bake it, I feel like I’m wrapping everyone I love in a warm blanket—that’s the heart of what “human” really means in sharing food: connection, comfort, and a little bit of joy. The best part? It’s so easy that even last-minute guests or kids can lend a hand, turning baking into a fun family activity. Plus, it’s endlessly adaptable—swap out ingredients, add your favorite nuts, or even make it gluten-free. Whatever your twist, I promise this will be a recipe you reach for again and again. So, next time you have some overripe bananas staring at you, don’t toss them—bake this beauty instead. Happy baking, and I can’t wait to hear how yours turns out! Please, leave a comment, share your variations, and let’s keep this delicious conversation going.
Banana Bread
Ingredients
Method
- Preheat oven to 325°F. Spray a loaf pan with cooking spray.
- Mash bananas in a bowl and set aside.
- In a medium bowl, whisk together flour, baking soda, and salt.
- Cream butter and brown sugar in a large bowl until smooth.
- Add egg whites, mashed bananas, vanilla, and apple sauce; beat until combined.
- Gradually add the dry ingredients to the wet mixture and stir until just combined. Fold in chocolate chips.
- Pour batter into the prepared loaf pan and bake for about 50 minutes or until a toothpick inserted comes out clean.
This recipe sounds perfect! I love how comforting banana bread can be—definitely makes mornings so much better.
This sounds so comforting! I’ve made banana bread a few times and the chocolate chips really take it to the next level.
This sounds so comforting! I love the idea of banana bread becoming your daily highlight.
I totally agree—there’s something so comforting about baking banana bread. That warm, sweet aroma filling your kitchen is pure magic.
This sounds so comforting—I’ve been craving banana bread lately! Do you have any tips for making it extra moist?