

Sweet Birthday Cookies How to Bake Them
There’s something utterly comforting about a warm slice of banana bread, isn’t there? I remember sneaking into the kitchen as a kid, nibbling on a piece right out of the pan while Mom wasn’t looking. Over the years, I’ve tweaked my recipe to make it healthier and more flavorful, and I think I’ve nailed the perfect combination. The secret is the zucchini—yes, zucchini! It keeps the bread incredibly moist and adds a subtle veggie boost that makes it feel like a well-kept secret. This zucchini banana bread is one of those recipes I turn to when I want something sweet but don’t want to feel guilty afterward. It’s foolproof, irresistibly tender, and my kids ask for it all the time. Honestly, I always do this when I have ripe bananas and a few zucchinis hanging around, and it’s a lifesaver on busy nights when everyone needs a quick treat. Trust me, once you try this, it’ll become a staple in your house, too. So, grab those bananas and zucchinis—you’re about to make something truly special!
What is Zucchini Banana Bread?
Think of zucchini banana bread as a sneaky way to get your kids (and yourself) to eat more veggies without sacrificing flavor. It’s essentially a moist, tender bread that marries the sweetness of ripe bananas with the subtle earthiness of zucchini. The name might sound a little unexpected, but the combination is a match made in heaven. The zucchini disappears into the texture, leaving the bread super soft and flavorful, while the bananas add that comforting, rich sweetness. It’s like a cozy hug in every slice. This recipe’s all about hearty, wholesome ingredients made effortlessly in your kitchen. The best part? It’s adaptable — you can toss in walnuts, chocolate chips, or even a swirl of peanut butter if you’re feeling fancy. Think of it as a nurturing snack that satisfies your sweet tooth and keeps you feeling good, all at the same time.
Why you’ll love this recipe?
What I love most about this zucchini banana bread is how versatile and forgiving it is. Even if you’re not a seasoned baker, you can whip this up without breaking a sweat. It’s that kind of recipe where you just toss everything in one bowl (no fancy techniques needed) and wait for the magic to happen. The smell alone—oh, the smell—fills the house and makes everyone come running. Plus, it’s budget-friendly! Most of these ingredients are staples—ripe bananas, zucchinis, flour, and a bit of sugar—and you probably already have them in your pantry. The zucchini keeps the bread incredibly moist, so you don’t need to worry about dry edges or a crumbly crumb. And let’s talk about how many ways you can enjoy it: fresh out of the oven, toasted with butter, topped with a drizzle of honey, or even as an on-the-go breakfast. It’s good for breakfast, snack time, or even a sweet dessert. Honestly, what I love most is how this recipe is a little bit sneaky—your kids get their veggies, and you get a treat that feels like a reward. It’s comfort food with a healthy twist.
How do you make Zucchini Banana Bread?
Quick Overview
This zucchini banana bread comes together in one bowl, making cleanup a breeze. You start by mashing your ripe bananas, grating your zucchini, and mixing everything up quickly. Then, pour the batter into your loaf pan, swirl in any extras like chocolate chips or nuts if you’d like, and pop it in the oven. It’s that simple! The magic is in how moist and tender it turns out—seriously, almost like a cake. Honestly, I love how adaptable this recipe is; I’ve even tested it with a splash of almond milk instead of regular milk, and it made it creamier without changing the texture. Whether you’re a beginner or a seasoned baker, this recipe will quickly become one of your go-tos. It’s ideal when you want something comforting that’s also packed with good stuff. And don’t worry—while it looks fancy, this bread is super forgiving and totally doable on a weeknight. Trust me, your kitchen is about to smell divine!
Ingredients
For the Main Batter:
– 3 large ripe bananas, mashed (the browner, the better! Ripe bananas bring that sweet, mellow flavor)
– 1 cup grated zucchini (about 1 medium zucchini, grated and squeezed to remove excess moisture)
– 2 cups all-purpose flour (I prefer unbleached for a richer flavor)
– 3/4 cup granulated sugar (or coconut sugar for a healthier boost)
– 1/4 cup melted unsalted butter or neutral oil (vegetable or light olive oil works well)
– 2 large eggs (room temperature helps with even mixing)
– 1 teaspoon vanilla extract (because it adds that warm, cozy aroma)
For the Filling (optional):
– 1/2 cup chopped walnuts or chocolate chips
– A teaspoon of cinnamon or nutmeg for extra warmth (totally optional but worth it)
For the Glaze (optional):
– 1/2 cup powdered sugar mixed with a teaspoon of lemon juice or milk (to drizzle on top)
– Or simply dust with powdered sugar for a pretty finish
Step-by-Step Instructions
Step 1: Preheat & Prep Pan
Set your oven to 350°F (175°C). Grease a standard loaf pan with butter or line it with parchment paper—trust me, this makes cleanup so much easier. Get everything ready; you’ll want to have your ingredients measured out in advance because once you start mixing, it all comes together quickly. While the oven heats, grate your zucchini and squeeze out as much moisture as possible—this step is crucial for avoiding a soggy loaf. I always do this early because I’ve learned that a dry zucchini gives you that perfect, tender crumb without excess water.
Step 2: Mix Dry Ingredients
In a big mixing bowl, whisk together the flour, sugar, and spices if you’re using any. Mixing the dry ingredients first ensures even distribution of the baking soda, salt, and spices, which helps your bread rise evenly and taste balanced. No lumps, no fuss—just a smooth, uniform mixture. I’ve tested this with whole wheat flour, and it still turns out great, though I reduce the sugar slightly because whole wheat tends to have a nutty flavor.
Step 3: Mix Wet Ingredients
In a separate bowl, mash your bananas really well—use a fork, or if they’re super ripe, just mash with a potato masher. Then, add the melted butter, eggs, and vanilla, whisking until the mixture is smooth. I’ve found that warming the bananas slightly or letting the eggs come to room temperature helps everything blend better, resulting in a more cohesive batter.
Step 4: Combine
Pour the wet mixture into the dry ingredients and gently fold them together. Don’t overmix—just stir until everything is combined. If you overmix, the bread can get dense or tough, and nobody wants that. Fold in your grated zucchini last, along with any optional add-ins like chocolate chips. The batter will be thick but moist—perfect for the next step.
Step 5: Prepare Filling
If you’re doing a swirl or adding extras, sprinkle your nuts or chocolate chips over the batter, then gently swirl them in with a butter knife. For a pretty marbled effect (my kids love to watch this!), drop spoonfuls of the batter and filling alternately into the loaf pan, then swirl gently with a skewer or toothpick. Trust me, it’s all about the visual—this makes the loaf look as tempting as it tastes.
Step 6: Layer & Swirl
Once everything’s layered, take a skewer or chopstick and run it through the batter to create marbling. This step is optional but adds a lovely visual touch. Be gentle and don’t overdo it—you want a nice swirl, not a mixed-up batter.
Step 7: Bake
Pop it into your preheated oven and bake for about 50-60 minutes. Check for doneness by inserting a toothpick or cake tester into the center; it should come out clean. Every oven is different, so start checking around 50 minutes. If it’s browning too quickly, tent with foil. This bread is done when it feels springy yet firm, and the smell will make your entire house smell like a cozy bakery.
Step 8: Cool & Glaze
Let the bread cool in the pan for about 10 minutes, then transfer it to a wire rack. I know, it’s tempting to dive in right away, but patience makes all the difference. Once cooled, drizzle with your favorite glaze or dust with powdered sugar. The glaze adds a little extra sweetness and a pretty finish, but plain is just as delicious if you’re keeping it simple.
Step 9: Slice & Serve
Slice once fully cooled—warm bread can be crumbly. Use a serrated knife for clean slices. This zucchini banana bread is perfect for breakfast, a quick snack, or dessert. Serve it with a dollop of yogurt or even a smear of peanut butter for a more substantial treat. Honestly, this bread disappears in minutes at my house, especially with a cup of coffee.
What to Serve It With
This bread is so versatile that it can be the star of many meals. For breakfast, I love to serve it toasted with a pat of butter and a drizzle of honey—it’s a comforting start to the day. My kids enjoy it plain or with a smear of cream cheese. It also makes a lovely brunch centerpiece—pair it with fresh fruit, a cup of chai, or even a mimosa for a weekend treat.
As a dessert, it’s perfect sliced and served warm with a scoop of vanilla ice cream or a dollop of whipped cream. The flavors even work beautifully with a dusting of cocoa powder or cinnamon for a cozy twist. In the afternoon, it’s my go-to snack with a hot cup of tea or coffee, providing that sweet boost without feeling overly indulgent. My family loves stacking slices on a plate and sharing it around the table—nothing beats enjoying a homemade treat with loved ones.
Top Tips for Perfecting Your Zucchini Banana Bread
After making this recipe countless times, I’ve picked up a few tricks to get it just right every single time. First, do not skip salting and squeezing your zucchini—excess moisture is a secret enemy of moist, tender bread. Use a clean kitchen towel or cheesecloth to get rid of that extra water; it makes all the difference. I’ve learned that grating the zucchini on a fine side of the box grater gives a more uniform, tender crumb, while coarser grating adds more texture—your call depending on your preference.
Mixing is key. Overmixing can lead to dense bread, so stir just until everything is combined. I also recommend using ripe bananas—they should be super soft and smell sweet. Under ripe bananas won’t give you that rich flavor, and I swear, overripe ones mash easiest, almost like puree. When adding extras like chocolate chips or nuts, sprinkle them in last and stir gently—they tend to sink otherwise.
If you want to tweak the sweetness, reduce the sugar by a couple of tablespoons, or swap it for honey or maple syrup. Just keep in mind, these substitutions might slightly alter the moisture content. For a dairy-free version, I’ve tested coconut oil and almond milk, which work beautifully, giving the bread a subtle nutty flavor. Baking at the right temperature and checking for doneness around the hour mark helps prevent overbaking—nobody likes that dry, crumbly bread! Lastly, for the glaze, I recommend adding a splash of lemon juice to powdered sugar—it brightens the flavor and makes your loaf look extra tempting.
Experimenting is part of the fun—sometimes I add a pinch of cinnamon or replace the vanilla with almond extract for a different flavor profile. The more I make this, the more I realize how forgiving and adaptable it is. Just trust your instincts, and don’t be afraid to make it your own!
Storing and Reheating Tips
This bread stays moist and fresh for days if stored properly. Keep it in an airtight container or wrap it tightly in plastic wrap. At room temperature, it’ll stay good for about 2 days—perfect for breakfast or a quick snack. If you want to keep it longer, pop it in the refrigerator for up to 5 days. Just make sure it’s well-wrapped; I’ve learned that moisture is the enemy of freshness. When it’s cold, I like to slice it and microwave a piece for about 10 seconds—it warms beautifully and tastes just as fresh.
If you have leftovers and want to freeze it, wrap slices individually to prevent freezer burn. Thaw at room temperature or warm up in the microwave. I’ve tested it with a double layer of foil and a freezer-safe bag, and it does just fine for up to 3 months. Just remember, if you’re icing or glazing the loaf, do it after thawing so the toppings stay fresh and glossy.
Frequently Asked Questions
Final Thoughts
This zucchini banana bread isn’t just a recipe; it’s a little piece of home—a cozy, nurturing treat that I keep coming back to. Its moist, tender crumb, combined with the sneaky veggies and sweet bananas, makes it feel like a hug in every slice. Over the years, I’ve tweaked and perfected it to the point where I trust it to turn out perfect every time. It’s forgiving enough for anyone to make, but fancy enough to impress friends or family. Plus, the gym bag or snack box loves how portable and satisfying it is. I hope you try this soon—play around with add-ins, adjust the sweetness, or add your own personal touch. I can’t wait to hear how yours turns out! Happy baking, my dear friend—enjoy every bite!
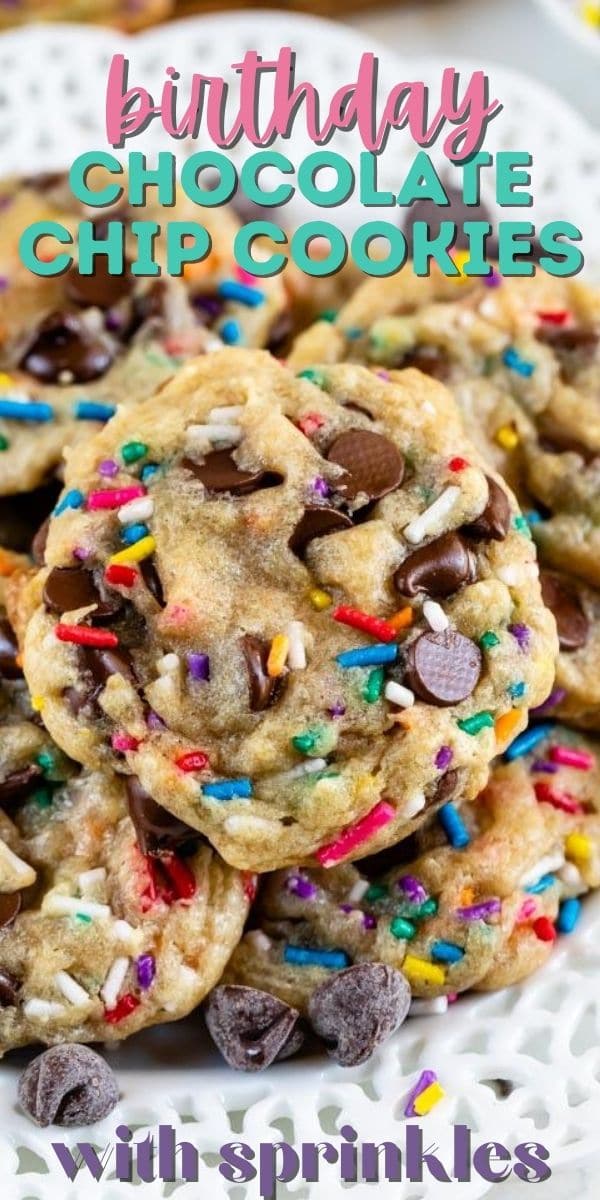
chocolate chip cookies
Ingredients
Method
- Note: This dough requires chilling.
- Place melted butter in the bowl of a stand mixer fitted with the paddle attachment (or a large bowl if using a hand mixer). Add granulated and brown sugars and mix on low speed until smooth. Mix in egg and vanilla extract until combined.
- Mix in baking soda and salt, then slowly add flour and mix just until combined. Scrape sides of the bowl as needed. Fold in chocolate chips and sprinkles.
- Line a cookie sheet with a silicone baking mat or parchment paper. Scoop 2 tablespoon sized balls of dough onto the sheet. Chill for at least 2 hours.
- Preheat oven to 350°F. Arrange chilled dough balls on a baking sheet, 2 inches apart. Bake for 11-15 minutes until edges are golden.
- Cool cookies on the baking sheet for 10 minutes before transferring to a wire rack.


I love how comforting banana bread feels—this recipe looks perfect for any birthday celebration! Can’t wait to try it.
I love this recipe! Banana bread always reminds me of my grandma’s kitchen. Can’t wait to try baking it this weekend.
I love banana bread, especially straight from the oven! Do you have a favorite add-in like chocolate chips or walnuts?
I absolutely love banana bread! That warm, cozy feeling is the best—nothing beats a slice straight from the oven on a rainy day.
This recipe sounds perfect! I love how simple and cozy banana bread can be — it brings back so many sweet memories.