
Creamy Chicken King Recipe: How to Make It
There’s something magical about this zucchini cinnamon swirl cake. Maybe it’s the way the aroma of cinnamon fills the kitchen or how one slice instantly transports you back to grandma’s cozy Sunday afternoons. I’ve made this recipe countless times, experimenting with different fillings and glazes, and I can honestly say it’s become my go-to comfort dessert. The best part? It’s surprisingly easy — perfect for that moment when you’re craving something sweet but don’t want to fuss over complicated baking.
This cake is the embodiment of cozy, warm flavors wrapped in a moist, tender crumb, and that cinnamon swirl running through it? Totally addictive. My kids actually ask for seconds (and thirds!) and I always do this when I want to bring a little homemade love to my family or surprise friends. Trust me, this one’s a lifesaver on busy nights or when you just want something that tastes like you fussed but actually didn’t. So, let’s step into the kitchen — I’ll walk you through every little tip I’ve learned from years of making this. It’s worth every bite!
What is a Zucchini cinnamon swirl cake?
Think of it as a twist on the classic zucchini bread, but transformed into a luscious cake with a cinnamon-sugar ribbon running through it. It’s essentially a moist, tender cake packed with shredded zucchini, which keeps everything super soft and flavorful—without making it heavy. The cinnamon swirl is like a warm hug, swirling beautifully into the batter so every slice has that cozy, cinnamon-spiced surprise. The name itself is pretty literal, but it’s the combination of the subtle vegetable addition with the sweet, cinnamon-spiked goodness that makes this recipe uniquely comforting.
Initially, I thought, “Zucchini in cake? Really?” But once I made it, I was hooked. It’s a sneaky way to sneak in some veggies, especially for kids who turn up their noses at traditional zucchini sides, and it turns out to be a total flavor winner. It’s perfect for breakfast, brunch, or even a casual dessert — a versatile, approachable treat that feels like a warm hug on a chilly day.
Why you’ll love this recipe?
What I love most about this zucchini cinnamon swirl cake is how it manages to be both comforting and unexpectedly sophisticated. The flavor? Warm cinnamon with a hint of sweetness complemented by the natural earthiness of zucchini — it’s like a cozy blanket for your taste buds. And talk about simplicity — I’ve tested this with my busy mornings and relaxed weekend afternoons, and it’s honestly foolproof. Mix, swirl, bake, and enjoy. No fuss, no complicated steps.
Plus, it’s budget-friendly. Those ingredients? Staple items in my pantry: flour, sugar, zucchini, cinnamon — simple, and inexpensive. And the best part? It’s incredibly versatile. Feel like adding a handful of chopped walnuts or chocolate chips? Go wild! Want to skip the glaze? Totally fine. This cake can handle your personal tweaks.
I have tried similar recipes, like carrot cakes or banana breads, but what keeps me coming back to this is the perfect balance of flavor, moisture, and that swirl of cinnamon that makes it look as pretty as it tastes. And honestly, nothing beats slicing into a warm piece, crumbs melting in your mouth, with a drizzle of coffee or tea.
How do I make Zucchini Swirl Cake?
Quick Overview
This cake comes together in just a handful of steps, making it perfect whether you’re an experienced baker or just dipping your toes in. Start by shredding your zucchini—you don’t even need to peel it (trust me on this!)—then set it aside to drain any excess moisture. Mix the dry ingredients, then stir in the wet, being gentle so you don’t overmix—nobody likes a dense cake! Prepare your cinnamon-sugar filling, swirl it into the batter, pop it in the oven, and wait for that heavenly aroma to fill your kitchen. It’s the kind of recipe that’s satisfying without any stress, and the result? A gorgeous, dessert-worthy cake that’s cozy, sweet, and just right.
Ingredients
For the Main Batter:
– 2 cups shredded zucchini (about 2 small zucchinis, grated and gently squeezed dry to remove excess moisture)
– 1 ½ cups all-purpose flour (try unbleached for a richer flavor)
– 1 teaspoon baking powder
– ½ teaspoon baking soda
– ¼ teaspoon salt
– 2 teaspoons ground cinnamon
– ½ cup granulated sugar
– ½ cup packed light brown sugar
– ½ cup vegetable oil or melted butter (I tested with almond milk for a creamier texture—trust me on this!)
– 3 large eggs
– 1 teaspoon vanilla extract
For the Filling:
– ⅓ cup packed brown sugar
– 1 tablespoon ground cinnamon
– 2 tablespoons softened butter or margarine
For the Glaze:
– 1 cup powdered sugar
– 2-3 tablespoons milk (or cream for richness)
– ½ teaspoon vanilla extract
– Optional: a sprinkle of cinnamon or lemon zest for extra punch
Step-by-Step Instructions
Step 1: Preheat & Prep Pan
Start by preheating your oven to 350°F (175°C). Grease your 9-inch round cake pan or line it with parchment paper—whatever you prefer. I always do this first because it’s the kind of step you can forget once you get rolling, and then you end up scrambling. If you’re using a non-stick pan, just give it a quick coating of butter or spray. Ready? Great, let’s move on.
Step 2: Mix Dry Ingredients
In a large bowl, whisk together the flour, baking powder, baking soda, salt, and cinnamon. This step ensures your leavening agents are evenly distributed — no clumps! It also helps prevent the batter from ending up with pockets of baking powder or uneven cinnamon flavor, which I learned the hard way after some lumpy cakes.
Step 3: Mix Wet Ingredients
In another bowl, beat the eggs until light and slightly frothy. Add the sugars, oil (or milk if you’re opting for that), and vanilla, whisking until everything’s well combined and slightly fluffy. I’ve tested this with almond milk sometimes, and honestly, it made the cake even more tender and moist. It’s a fun swap if you’re looking to make it dairy-free!
Step 4: Combine
Pour the wet into the dry ingredients and fold gently — don’t overmix! I always say: mix until just combined. Overdoing it can make the cake dense, and nobody wants that. The batter should be thick but soft. Add in your shredded zucchini last, folding until evenly dispersed. The zucchini will look a bit gloppy, but that’s exactly what you want for moisture.
Step 5: Prepare Filling
In a small bowl, mix the brown sugar and cinnamon. Soften your butter until it’s spreadable, then spread it over the sugar mixture. This creates a delicious cinnamon-sugar paste that melts into the batter. If you’re feeling adventurous, toss in a handful of chopped nuts or mini chocolate chips here. I’ve done that before, and wow, it’s a game-changer.
Step 6: Layer & Swirl
Pour about half the batter into the prepared pan. Spread evenly, then dollop half of your cinnamon mixture on top. Use a knife or skewer to swirl gently, creating that beautiful marbled pattern. Repeat with the rest of the batter and filling. Here’s my secret: don’t over-swirl — just a few gentle passes to show off that pretty cinnamon swirl. When baked, this pattern just makes everyone gasp.
Step 7: Bake
Pop into your preheated oven and bake for about 40-45 minutes. Keep an eye on it around the 40-minute mark; the top should be golden and a toothpick inserted into the center should come out clean. If it’s browning too fast on top but the middle is raw, tent with foil and keep baking. Over the years, I’ve learned that every oven is different, so stick with your toothpick test!
Step 8: Cool & Glaze
Once baked, let your cake cool in the pan for at least 15 minutes. Then, transfer to a wire rack to cool completely — this helps keep that moist crumb intact. While it cools, mix up your powdered sugar glaze, adding milk slowly until it reaches a pourable but not runny consistency. Drizzle generously over the cooled cake. The glaze will soak into the top just enough to add that extra layer of sweetness and shine.
Step 9: Slice & Serve
Use a sharp serrated knife to slice cleanly, especially if your cake has lots of swirl. I love serving it slightly warm with a dollop of whipped cream or a splash of cream for extra indulgence. And honestly, it’s just as good at room temperature — no matter how hot or cold, every bite is a hug in cake form.
What to Serve It With
This cake is so versatile, I often serve it in different ways depending on the occasion. For breakfast, I love pairing it with strong black coffee or a milky latte — the cinnamon aroma really shines in the morning. When I serve it as brunch, I set it on a pretty plate with fresh berries and a drizzle of honey, making it look just fancy enough to impress even the most casual guests.
For dessert, I sometimes add a scoop of vanilla ice cream or a dollop of mascarpone — seriously divine. And on those lazy weekend afternoons, it’s perfect with a glass of cold milk or hot tea. My family’s favorite way? Warm slices with extra glaze and a sprinkle of chopped nuts for crunch. It’s a cozy, satisfying treat that makes every Saturday feel special.
Top Tips for Perfecting Your Zucchini Cinnamon Swirl Cake
After making this so many times, I’ve honed a few tricks to always get perfect results. First, don’t rush the zucchini prep. Squeezing out excess moisture is a game-changer — I usually toss the shredded zucchini in a clean dish towel and give it a good squeeze to avoid a soggy crumb. Moisture control is everything!
When mixing, fold gently and avoid overmixing the batter to keep it fluffy. I’ve learned that the swirl pattern looks best when you pour half the batter, dollop in the cinnamon mixture, and then carefully swirl with a knife — too much stirring and the pattern disappears.
If you want to customize, swap the cinnamon for nutmeg or cardamom — both lovely in this cake. And if you’re using gluten-free flour, start with about 1¾ cups and add more if needed; the batter should be thick but scoopable. Trust me, I’ve tested all these variations, and the one thing that stays constant is how irresistibly moist and flavorful it turns out.
A couple of lessons learned: don’t skip draining the zucchini, or your cake might turn out dense or watery. Also, line your pan well; I once forgot and ended up with a cake stuck to the bottom, lesson learned! This cake bakes best on the middle rack, and I always keep an eye on the edges—they tend to brown quickly.
Glaze is optional, but I say do it — it’s like the cherry on top. If you want a thicker glaze, add a little more powdered sugar, or thin it out with a splash of cream for a glossy finish.
Storing and Reheating Tips
Leftovers? No problem. Store your cake in an airtight container at room temperature for up to two days — it stays moist and lovely. After that, I recommend wrapping it tightly and refrigerating for up to 4 days. The flavors actually deepen over time, especially if the cake sits overnight with the glaze. Just make sure to bring it back to room temperature before slicing for the best texture.
If you need to freeze it, wrap the cooled cake tightly in plastic wrap, then foil, and stash it in the freezer for up to 3 months. To reheat, slice a piece and warm it gently in the oven or microwave — it’s just as delicious, especially with that cinnamon aroma wafting through your kitchen. If the glaze has hardened, give it a quick drizzle of fresh glaze before serving.
A little tip: If you prefer your cake without glaze after freezing or refrigerating, you can always prepare a fresh batch of icing or dust it with powdered sugar just before serving.
Frequently Asked Questions
Final Thoughts
If there’s one dessert I keep coming back to, it’s this zucchini cinnamon swirl cake. It’s packed with flavor, so moist and tender, and it feels like a warm hug in every bite. I’ve made it for birthday parties, family gatherings, or just weekend afternoons when I want to treat myself without spending hours in the kitchen. The swirl inside? Always a visual favorite, and the smell… oh, the smell alone makes everyone gather in the kitchen. Plus, it sneaks in a veggie that I swear no one notices — just pure, comforting goodness.
I hope you try this and find your own little tweaks — maybe add some nutmeg or swap the glaze for a lemon drizzle. Whatever you do, I know this will become one of your favorites too. I can’t wait to see how yours turns out! Drop me a comment or share your variations — I love hearing from fellow bakers.
Happy baking!
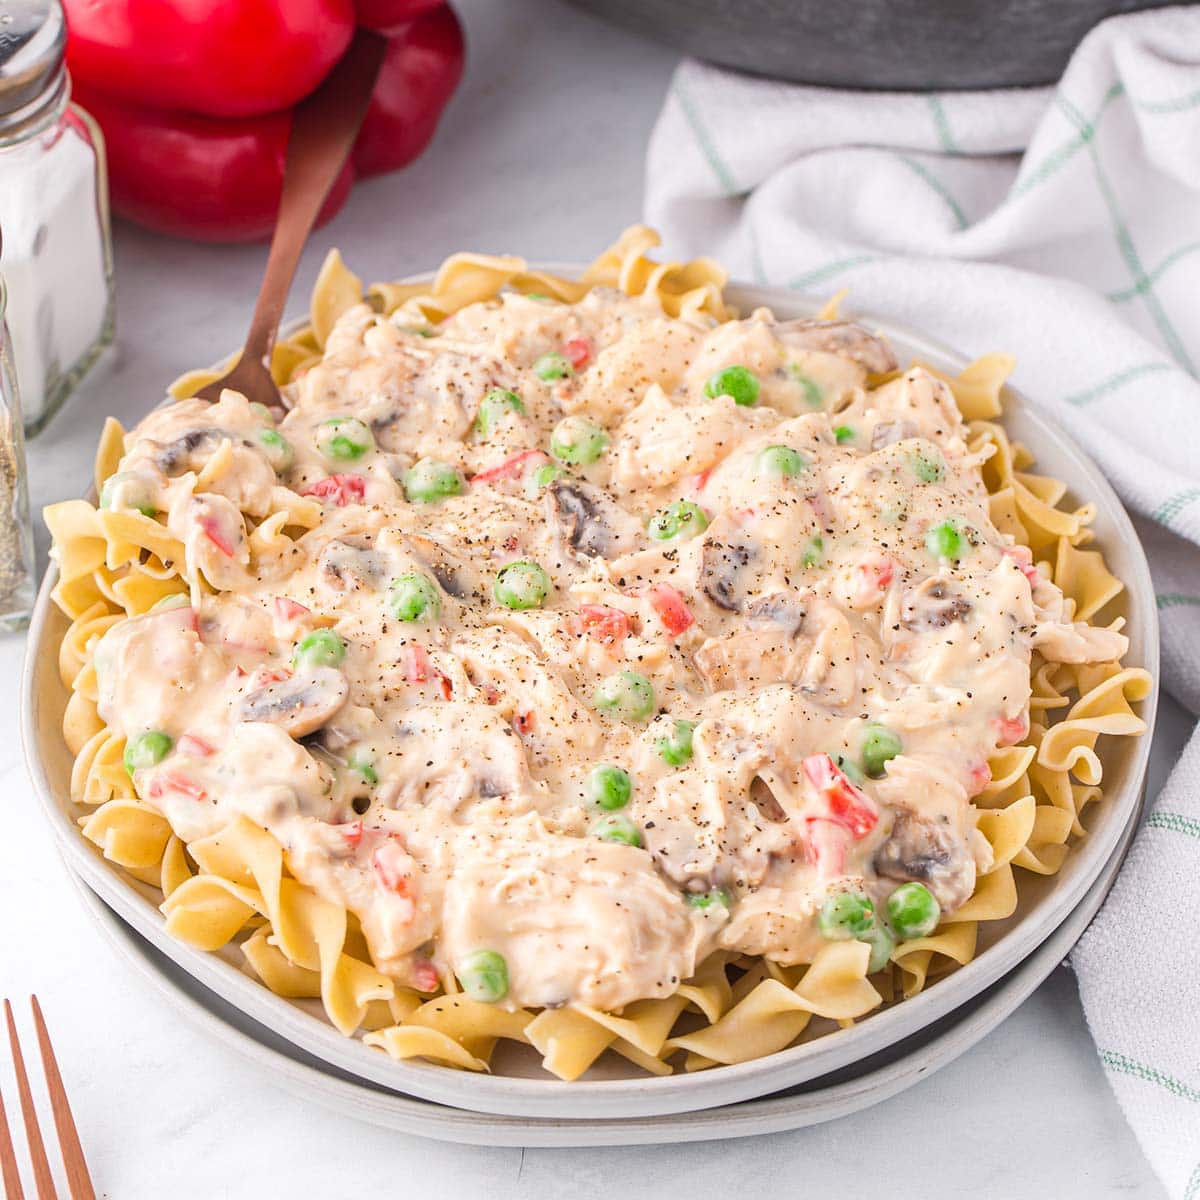
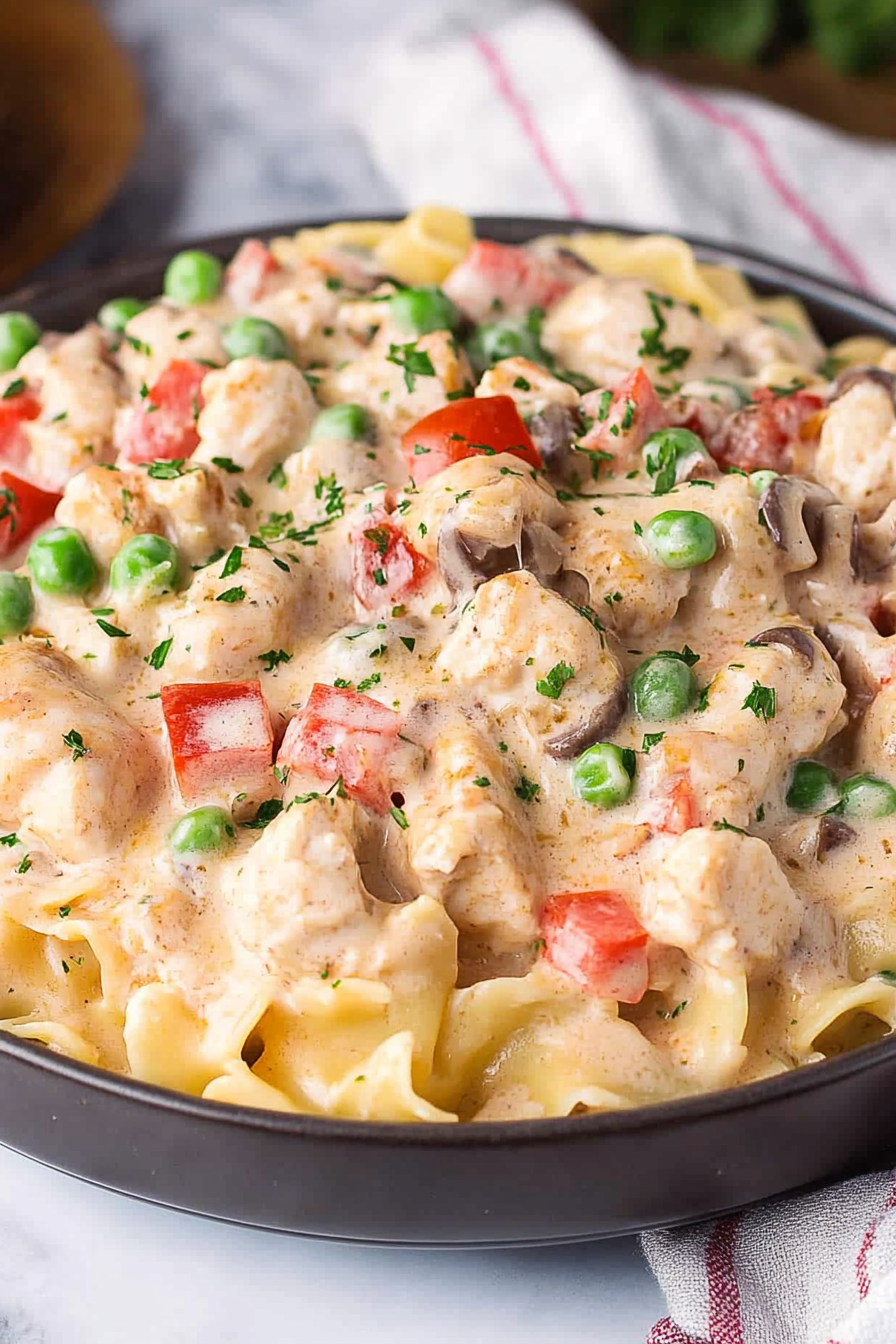
Chicken a la King
Ingredients
Method
- In a large saucepan or skillet, heat the cooking oil over medium-high heat until hot, about 1-2 minutes.
- Add and sauté the red bell pepper and mushrooms until slightly soft, about 3-4 minutes.
- Sprinkle in the Italian seasoning and mix together with the vegetables.
- Stir in the shredded chicken, condensed cream of mushroom soup, condensed cream of chicken soup, and peas.
- Cook over low heat for 5-7 minutes or until everything is heated through and hot.
- Gradually stir in the heavy cream until combined and then remove from the heat.
- Garnish with black pepper and serve warm over a bed of rice, noodles, pasta, or biscuits.


That zucchini cinnamon cake sounds incredible—I can just imagine how comforting that aroma must be! Definitely adding this to my baking list.
This recipe sounds amazing—cinnamon and zucchini in a cake? Genius! I’ve never thought to combine those flavors.
I love this recipe—it sounds so comforting and nostalgic! The cinnamon swirl must be amazing.
I love how this recipe brings back such warm, comforting memories—cinnamon and nostalgia in every bite!
I love how this recipe brings back such warm, nostalgic feelings—cinnamon and zucchini cake sounds absolutely divine!