
Zesty Citrus Sugar Cookies How to Bake
There’s just something about baked goods that warm the soul, right? I remember wandering into my grandma’s kitchen as a kid, the smell of cinnamon and sugar wafting through the air. It was always so comforting, like a little hug in food form. Over the years, I’ve tried to recreate that magic, especially on mornings when I need a little sunshine. This zucchini coffee cake—yes, zucchini—has become a staple in my house, and I swear, it’s a better-secret-than-it-should-be kind of recipe. It’s moist, tender, with a hint of crunch from the zucchini, and the swirl of cream cheese just takes it over the top. The best part? It’s dead simple to make, and the whole family loves it—my kids ask for seconds every time. Trust me, this one’s a lifesaver on busy mornings or a cozy weekend brunch. Plus, sneaking in zucchini means I can tell myself I’m being kinda healthy—kind of!—even while indulging in a sweet treat. I always do this when I want something homemade, comforting, and a little nostalgic. Let’s dive into what makes this zucchini coffee cake so magical.
What is Zucchini Coffee Cake?
Think of this as the love child of a classic coffee cake and a sneaky vegetable upgrade. It’s essentially a tender, buttery cake made with grated zucchini, which keeps it super moist, and topped with a spectacular cream cheese swirl that melts into every bite. The name “coffee cake” is because it’s perfect for breakfast or brunch—though honestly, I’ve been known to sneak a slice at night with a cup of tea. It’s inspired by the traditional crumb-topped coffee cakes you see in bakeries, but with the added bonus of zucchini that’s barely detectable once baked. The idea started years ago, as a way to use up those garden zucchinis, which seem to multiply faster than I can pick them. I wanted something that wasn’t just healthy but also decadent enough to impress friends and family, and let’s admit it—anything with cream cheese in the swirl immediately feels fancy! The flavor tip: there’s a subtle hint of cinnamon, vanilla, and a touch of nutmeg, making each bite smell just like comfort itself. Think of this as the cake that’s good enough to serve for breakfast AND dessert—because I’ll never say no to a slice of this.
Why you’ll love this recipe?
What I love most about this zucchini coffee cake is how surprisingly straightforward it is—no fancy tools or techniques needed. It’s really just mixing, layering, and baking, like making a big comforting hug in cake form. The zucchini keeps it irresistibly moist; I’ve tested it with varieties from our backyard garden, and each time it comes out perfect. Plus, the flavor profile? Absolutely divine. That cinnamon-scented batter paired with a creamy, tangy swirl? It’s an irresistible combination. And speaking of budget, the ingredients are simple pantry staples—flour, sugar, zucchini, cream cheese—that I usually have on hand. It’s also incredibly versatile; you can swap in different extracts or spices, add nuts, or even switch up the glaze topping. My kids ask for this all the time, and honestly, I don’t mind because I know they’re sneaking in some veggies. I like to think of it as a bit of a sneaky health boost—minus the vegetables hidden inside, but it’s the perfect way to get my family’s breakfast game up a notch without any fuss. Whether it’s a casual weekend brunch or special breakfast for guests, this cake never fails to impress. It’s warm, cozy, and makes the house smell like love.
How do I make Zucchini Coffee Cake?
Quick Overview
This zucchini coffee cake is as easy as mixing, layering, and baking. I start by grating the zucchini and squeezing out excess moisture—trust me, that’s key to avoiding a soggy cake. Then, I prepare the buttery batter while preparing the cream cheese swirl separately. Once poured into the pan, I swirl the cream cheese in a gentle figure-eight pattern, giving a beautiful marbled effect. The cake bakes for about 40-45 minutes, and you’ll smell the cinnamon and vanilla all over the kitchen. After cooling, I often add a simple glaze, which enhances the sweetness without overpowering the cake. The result is moist, tender, and bursting with flavor. This method is foolproof, and I always do this when I want to indulge but keep it simple. It’s perfect for making ahead too—just refrigerate leftovers, and it still tastes amazing the next day.
Ingredients
For the Main Batter:
– 2 cups all-purpose flour (I prefer unbleached for flavor).
– 1 cup granulated sugar (white or cane sugar works).
– 1 teaspoon baking powder.
– ½ teaspoon baking soda.
– ½ teaspoon salt.
– 1 teaspoon ground cinnamon (trust me on this, it’s worth it).
– ½ teaspoon ground nutmeg (optional but adds warmth).
– 1 cup vegetable oil (or melted butter, but I tested with canola and it’s equally moist).
– 3 large eggs.
– 1 teaspoon vanilla extract.
– 1 ½ cups grated zucchini (about 1 medium zucchini, grated and excess moisture squeezed out).
For the Filling:
– 8 oz cream cheese, softened.
– ¼ cup granulated sugar.
– 1 teaspoon vanilla extract.
– Optional: zest of a lemon for brightness or a sprinkle of cinnamon for extra warmth.
For the Glaze:
– 1 cup powdered sugar.
– 2-3 teaspoons milk or lemon juice for flavor.
– Optional: a splash of vanilla or almond extract.
Step-by-Step Instructions
Step 1: Preheat & Prep Pan
First, set your oven to 350°F (175°C). Then, grease a 9-inch springform pan or standard cake pan with butter or non-stick spray. Lining it with parchment paper makes life even easier for removing the cake later. This is just so nothing sticks and everything comes out neat and beautiful.
Step 2: Mix Dry Ingredients
In a large bowl, whisk together the flour, sugar, baking powder, baking soda, salt, cinnamon, and nutmeg. I always do this first because it ensures all the dry ingredients are evenly distributed, preventing clumps and guaranteeing a consistent rise. It’s like giving your baking a little backbone—it makes a difference, trust me.
Step 3: Mix Wet Ingredients
In a separate bowl, whisk together the eggs, oil, and vanilla until smooth. I’ve tested with applesauce in place of eggs, and it works great for an even healthier twist—just be aware it may change the texture slightly. The mixture should be silky and runny but not greasy.
Step 4: Combine
Pour the wet mixture into the dry ingredients and gently fold until just combined—don’t overmix! Overmixing makes the batter dense and tough, and nobody wants that. It should be lumpy but evenly combined. Then, fold in the grated zucchini, making sure to distribute it evenly without pressing too hard or overworking the batter.
Step 5: Prepare Filling
In a small bowl, beat the softened cream cheese with sugar and vanilla until smooth. A small trick I’ve learned: making sure the cream cheese is really softened makes for a silky swirl without lumps. If you want a little zing, add a teaspoon of lemon zest—super refreshing.
Step 6: Layer & Swirl
Pour half of the batter into the prepared pan. Drop dollops of the cream cheese mixture over it, then add the remaining batter on top. Using a butter knife or toothpick, swirl the cream cheese into the batter with gentle figure-eights—this creates that beautiful marbled swirl. It’s kinda like painting, but with batter. Just don’t overdo it; a light swirl is enough to create stunning visual streaks.
Step 7: Bake
Pop it into your preheated oven and bake for about 40-45 minutes. Check with a toothpick inserted in the center—it should come out clean or with just a few moist crumbs. I’ve found that oven times can vary, so start checking at 38 minutes if yours runs a little hot. Let it cool in the pan for about 15 minutes before transferring to a wire rack.
Step 8: Cool & Glaze
Once cooled, whisk together powdered sugar and milk or lemon juice until you reach that perfect drizzle consistency. I like to pour it while the cake is still slightly warm—this helps the glaze seep into all the nooks and crannies. And honestly, the glaze is optional but highly recommended—it adds just the right touch of sweetness and shine.
Step 9: Slice & Serve
Use a sharp serrated knife to slice cleanly. Wait until it’s fully cooled so it doesn’t fall apart. Serve with a cup of coffee or tea and enjoy the comforting aroma filling your kitchen. It’s gorgeous on a platter, sprinkled with a little extra cinnamon or a few fresh berries for color. This cake is equally beautiful served warm or at room temperature. My family always asks for this for Sunday brunch, and leftovers are just as delicious the next day when reheated or enjoyed cold.
What to Serve It With
This zucchini coffee cake is kind of a chameleon—great for breakfast, brunch, or even a cozy dessert. For mornings, I love pairing it with a strong cup of coffee or a glass of cold milk. The kids enjoy it with some fresh fruit or a dollop of yogurt on the side. When I serve it for brunch, I like to add a fresh fruit compote or a drizzle of honey—something bright to contrast the rich, sweet flavors. It also makes a lovely dessert—warm slices topped with a scoop of vanilla ice cream or a dusting of powdered sugar create a beautiful presentation. For casual snack time, it’s perfect to pack a slice in a lunchbox or enjoy with a cup of tea in the late afternoon. Honestly, I think it’s what I’d call “happy food”—the kind that makes ordinary days special.
Top Tips for Perfecting Your Zucchini Coffee Cake
Over the years, I’ve learned a few tricks to make this cake absolutely foolproof. First, make sure to squeeze out as much moisture from the zucchini as possible—I use a clean dish towel for that. Too much moisture can make the cake soggy, and nobody wants that. When mixing the batter, I always fold gently—overmixing can lead to a dense crumb and ruin the fluffiness. For the swirl, I’ve experimented with different techniques—sometimes I swirl more aggressively for a marbled look, other times just a few gentle passes. Both work fine, but I prefer a light swirl; it keeps the cake looking beautiful without disturbing the rise too much. As for ingredient swaps, I tested using coconut oil and almond flour once—while it was still moist, the texture was slightly grainier, so I’d say stick with all-purpose flour for best results unless you’re gluten-free. Remember, every oven is different, so keep an eye on it as it bakes. And if you want to switch up the flavor, add a hint of orange zest or cardamom—you might discover a whole new favorite. Making this cake taught me that small tweaks can make a big difference, so don’t be afraid to experiment a little!
Storing and Reheating Tips
This cake keeps beautifully, which is good because I often find myself slicing a piece for breakfast and then sneaking another after dinner. If you’re enjoying it within a day or two, keep it covered at room temperature—about 2 days max—by tenting it with foil or keeping it in an airtight container. For longer storage, pop it into the fridge for up to 5 days. Just be sure to cover it well or keep it in an airtight container so it stays fresh. When reheating, I usually microwave a slice for about 20 seconds—just enough to warm through and bring back that cozy aroma. If you prefer, you can warm it in a 350°F oven for 10 minutes—perfect if you want to restore a little of that just-baked softness. Freezing works well too: wrap slices tightly in plastic wrap and then seal in a freezer bag. They’ll last for about 2 months. When ready to eat, let it thaw overnight in the fridge or reheat directly. I find that the glaze sometimes hardens a bit in storage, so I just re-glaze if needed. Honestly, leftovers are just as good, which makes this cake a real winner for make-ahead mornings or bringing to potlucks. It’s a comfort food that tastes just as wonderful on day three as it did fresh out of the oven.
Frequently Asked Questions
Final Thoughts
This zucchini coffee cake is one of those recipes that sneaks into your heart—and into your family’s regular rotation. It’s incredibly forgiving, cozy, and versatile. I love knowing that I can add a vegetable that’s usually destined for dinner and turn it into a morning showstopper or a dessert that’s a little slice of happiness. Every time I make this, I see my kids grab seconds, my friends rave about the smell, and I feel a warm glow inside knowing I’ve shared something homemade and comforting. If you give this a try, I’d love to hear how yours turns out! Maybe tweak the spices, swap in some nuts, or even experiment with different glazes. Whatever you do, make it your own—because that’s what makes cooking fun, right? Happy baking, and don’t forget—sometimes, the simplest recipes turn out to be the most memorable. Enjoy!

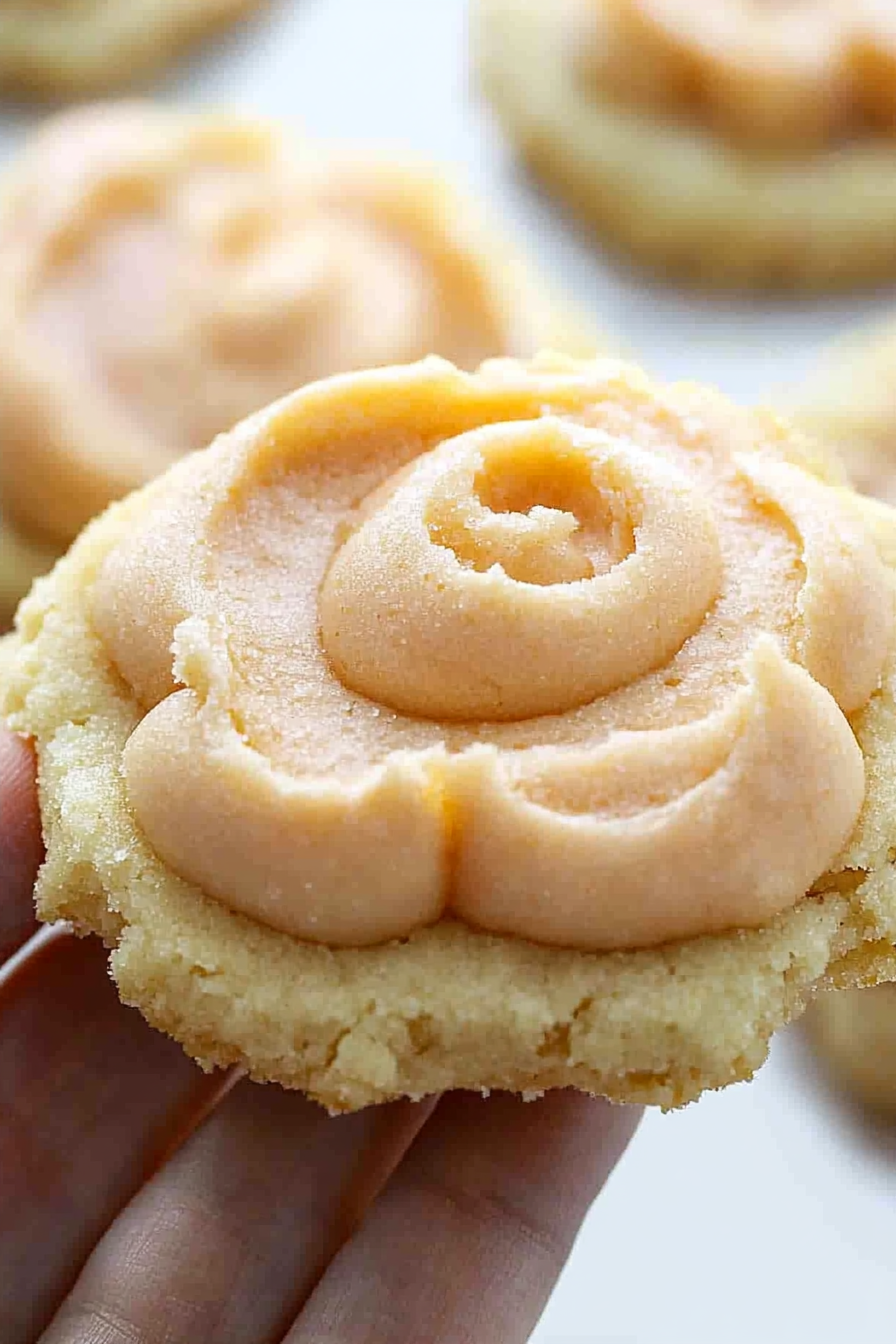
orange sugar cookies
Ingredients
Method
- Preheat oven to 350°F.
- In the bowl of a stand mixer, combine butter, granulated sugar, and confectioners' sugar and mix until just combined.
- Add vegetable oil, eggs, orange juice, orange zest, and orange extract; mix well.
- In a bowl, sift together cream of tartar, salt, and flour.
- Gradually add the flour mixture to the butter mixture, mixing until dough pulls away from sides of the bowl.
- Using a cookie scoop, portion out dough onto parchment-lined baking sheet.
- Roll each dough ball until smooth and round.
- Press each cookie with a glass dipped in granulated sugar to flatten slightly.
- Bake for 8-12 minutes or until edges are lightly golden. Cool before frosting.
- For the frosting, beat butter, sour cream, orange juice, salt, and orange extract until smooth. Gradually add confectioners' sugar to reach desired consistency. Color with orange food coloring if desired. Spread on cooled cookies.

These cookies sound absolutely perfect for a cozy day! The citrus twist takes it to another level—can’t wait to try them.
I love how baking brings back such sweet memories—this recipe sounds perfect for making your own cozy moments!
I love how baking brings back such sweet memories—my grandma’s kitchen always smelled like home! These cookies sound perfect for cozy days.
I love how cookies bring back such warm memories! Grandma’s kitchen always felt like home.
I love how this recipe brings back those cozy, comforting memories—baking really does have a special magic!