
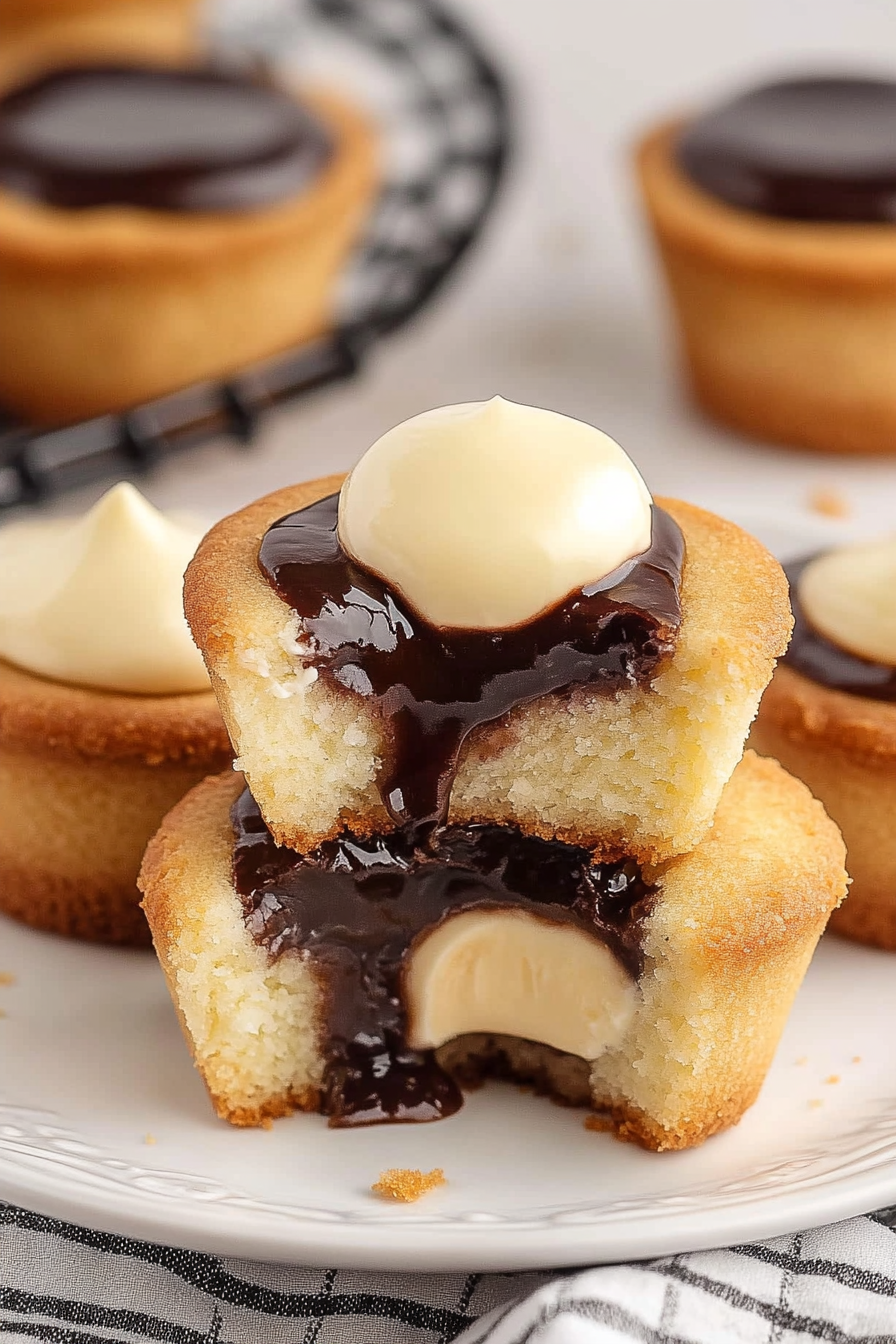
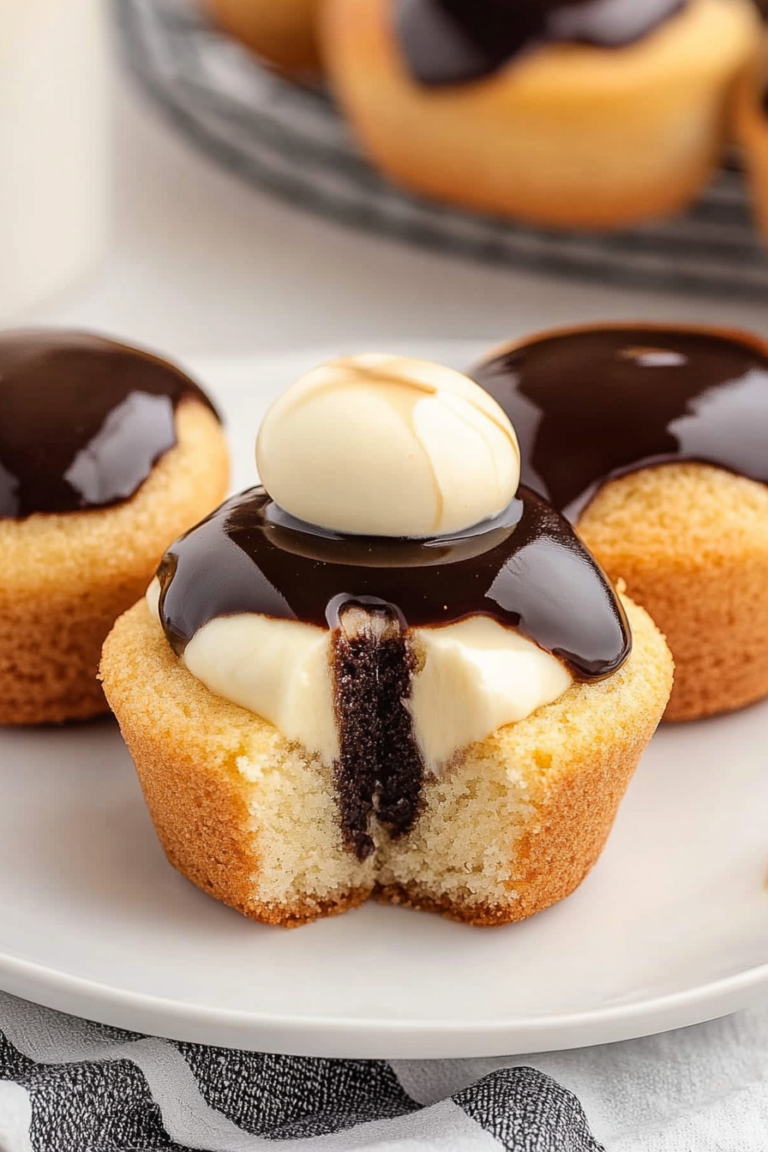
Creamy Boston Pie Cups How Easy
There’s something about baking banana bread that just brings home all the cozy feelings, right? I remember my grandma’s warm kitchen, the smell of ripe bananas mingling with cinnamon, and the joy of slicing into that perfect, golden loaf. But a little twist on the classics? That’s where the magic really happens. I’ve been tinkering with different recipes over the years, and my absolute favorite has to be this zucchini banana bread—yes, zucchini! It sneaks in moisture, keeps the loaf tender, and adds a subtle veggie boost. And honestly, it’s downright addictive. I’ll admit, my kids ask for this all the time—my youngest even calls it “magic bread” because she can’t believe zucchini is in there! Whether you’re craving a snack that’s kinda healthy (but tastes like a treat), or looking for something to brighten up your brunch table, this zucchini banana bread with a cinnamon swirl is a game changer. It’s quick to whip up, uses simple pantry staples, and I promise—once you try it, it’ll become a regular in your baking rotation. Trust me on this one—it disappeared in minutes at my house!
What is Zucchini Banana Bread?
Think of zucchini banana bread as a playful mash-up of classic banana bread with a sneaky vegetable upgrade. It’s essentially a looser, slightly more moist loaf, packed with mashed bananas for sweetness and depth, but also with grated zucchini folded right into the batter. The name might sound fancy, but making it is totally approachable—even if you’re new to baking. The zucchini isn’t just there for show; it’s a quiet hero, adding super moisture and helping the bread stay soft for days, without any artificial flavors or weird ingredients. The cinnamon swirl? Just a little sprinkle of spice that makes each bite feel like a warm hug. I learned this trick from my mother-in-law, who always says, “A little cinnamon makes everything better,” and she’s right. And no, zucchini doesn’t make it taste like veggies—if anything, it enhances the richness and keeps the loaf from feeling heavy. Think of it as a healthier twist on a dessert favorite that’s perfect for breakfast, snacks, or anytime you need a little comfort.
Why you’ll love this recipe?
Honestly, what I love most about this zucchini banana bread is how versatile and forgiving it is. First, the flavor—those sweet bananas combined with warm cinnamon and just a hint of zucchini create a beautiful, cozy aroma that fills the entire house while baking. The taste? Pure comfort with a hint of surprise—every slice practically melts in your mouth. Then there’s the simplicity. I’ve made this so many times during busy mornings or weekend brunches, and it’s always straightforward. No complicated steps, no fancy equipment needed—just a bowl, a spoon, and some patience. Plus, it’s budget-friendly. I usually have overripe bananas and a zucchini hiding in my fridge, so I can toss everything together without a special run to the store. And the best part? It’s insanely adaptable. Want to make it gluten-free? Swap in almond flour or a gluten-free blend. Looking to make it healthier? Reduce the sugar slightly or add a handful of walnuts. This recipe is my secret weapon for when I want something sweet but feel good about what I’m eating.
What really sets this apart from other banana breads I’ve made—is that it stays moist for days. I’ve tested this with almond milk, oat milk, even coconut milk, and it all worked beautifully, making the loaf even creamier. And of course, the cinnamon swirl? It’s my personal favorite—kind of a little secret treasure inside every slice. My kids love the little streaks of spice running through, and honestly, it’s so pretty I almost hate cutting it sometimes! Whether you’re making it just for your family or bringing it to a brunch, it’s a guaranteed crowd-pleaser. It’s one of those “go-to” recipes that I always do when I want a quick, wholesome treat that tastes like a hug in bread form.
How do you make Zucchini Banana Bread?
Quick Overview
This zucchini banana bread comes together in about an hour—start to finish—making it perfect for busy mornings or lazy weekends. It’s all about combining mashed bananas and grated zucchini into a simple batter, swirling in a cinnamon sugar mixture, and then baking until golden and fragrant. What I love is that it’s super forgiving—overmix the batter a little, and it’s still delicious. The secret to keeping it moist? Grated zucchini that’s been gently squeezed to remove excess moisture, plus the bananas that add natural sweetness and moisture. Once baked, you’ll have a gorgeous loaf that’s slightly dense but with a tenderness that almost melts in your mouth. It’s perfect for slicing thick, sharing with friends, or just keeping all to yourself for those cozy mornings before the hustle begins.
Ingredients
For the Main Batter:
– 3 ripe bananas (the really brown, sweet ones work best)
– 1 cup grated zucchini (about 1 small zucchini)
– 1/3 cup olive oil or melted butter
– 2 large eggs
– 2 teaspoons vanilla extract
– 1 1/2 cups all-purpose flour (or gluten-free flour blend)
– 1 teaspoon baking soda
– 1 teaspoon baking powder
– 1/2 teaspoon salt
– 1 teaspoon ground cinnamon
– 1/4 cup brown sugar (optional, for extra sweetness)
For the Filling:
– 2 tablespoons packed brown sugar
– 1 teaspoon ground cinnamon
For the Glaze:
– 1/2 cup powdered sugar
– 1-2 teaspoons milk or cream
– 1/4 teaspoon vanilla extract (optional)
– Additional cinnamon for sprinkling (optional)
Step-by-Step Instructions
Step 1: Preheat & Prep Pan
Heat your oven to 350°F (175°C). Grease a standard loaf pan with butter or non-stick spray, then line it with parchment paper for easy removal. This step is key because nothing’s worse than fighting with a stuck loaf—a hair-pulling moment for sure. Set your pan aside while you prepare the batter.
Step 2: Mix Dry Ingredients
In a medium bowl, whisk together the flour, baking soda, baking powder, salt, cinnamon, and brown sugar (if using). Combining the dry ingredients well ensures your baking soda and powder disperse evenly and prevent any dense spots. It’s a little step that makes all the difference—trust me, I’ve had lumpy banana breads before and it’s no fun.
Step 3: Mix Wet Ingredients
In a large mixing bowl, mash the bananas until smooth—yep, ripeness totally matters here. I always do this right in the peel though, then scoop the mash out. Add the eggs, vanilla, and melt-in-your-mouth olive oil or butter. Whisk everything until well combined and slightly frothy—that’s how I know the eggs are fully incorporated and ready to mingle with the dry stuff.
Step 4: Combine
Now, gently fold the wet ingredients into the dry mixture. Don’t overmix—just stir until everything is moist. It’s okay if it’s a little lumpy—that’s what gives the bread its rustic charm and tender crumb. Overmixing can make it dense, and nobody wants a heavy loaf here. If you see flour pockets, just give it a few more gentle stirs.
Step 5: Prepare Filling
Combine the brown sugar and cinnamon in a small bowl. If you want extra flavor, toss in a pinch of nutmeg or ginger. Set aside—this will be sprinkled on the batter later to create that irresistible cinnamon swirl.
Step 6: Layer & Swirl
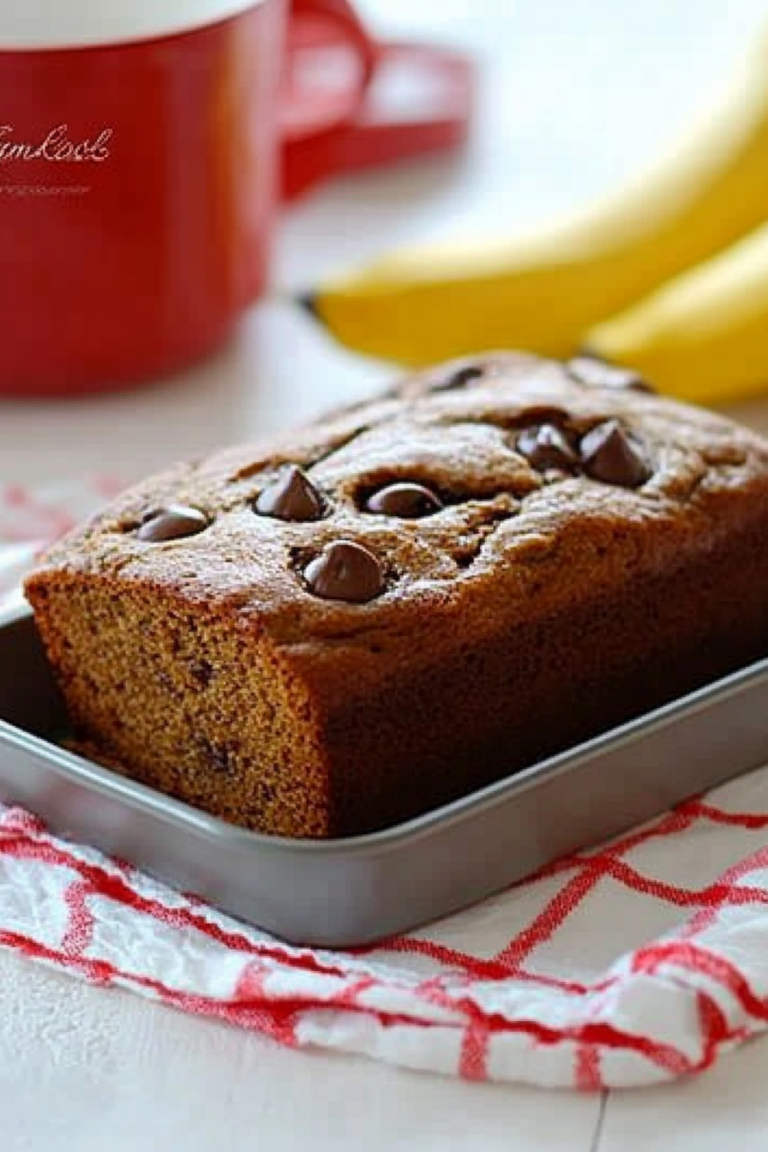
Pour about half the batter into your prepared loaf pan. Sprinkle half of the cinnamon-sugar mixture over it. Add the remaining batter on top, then sprinkle the rest of the cinnamon-sugar over the surface. Using a skewer or a butter knife, gently swirl the layers together—don’t overdo it, just enough to create beautiful streaks of cinnamon goodness. This swirl adds a surprise burst of flavor and visual appeal, so be gentle but confident!
Step 7: Bake
Bake in the preheated oven for 50-60 minutes. Check doneness by inserting a toothpick or cake tester into the center; it should come out clean or with a few moist crumbs. If the top starts browning too quickly, tent it with foil for the last 10 minutes. Sometimes my oven bakes hot in spots, so I rotate the pan halfway through for even results.
Step 8: Cool & Glaze
Allow the bread to cool in the pan for about 15 minutes before transferring to a wire rack. This helps it set and makes slicing easier. While it cools, whisk together powdered sugar with milk and vanilla for the glaze. Drizzle it generously over the loaf once cooled slightly—this glossy finish makes it look as pretty as it tastes. For a little extra cinnamon kick, sprinkle some on top of the glaze.
Step 9: Slice & Serve
Use a serrated bread knife for clean slices. I like cutting mine about 1-inch thick—generous, I know! Serve warm or at room temperature, with a cup of coffee or tea. The smell alone is enough to make everyone rush to the kitchen. Trust me, this bread is excellent as is, but it also pairs beautifully with a dollop of whipped cream or a smear of cream cheese if you’re feeling fancy.
What to Serve It With
This zucchini banana bread is like a blank canvas—you can dress it up or keep it simple, depending on your mood. For breakfast, I love spreading a little butter and pairing it with a cup of hot coffee—nothing beats that moment of calm in the morning while the bread’s still warm in your hands. When I have guests over for brunch, I toss a handful of blueberries or chopped nuts into the batter for extra texture, and serve it alongside fresh fruit and crispy bacon. As a dessert, it’s perfect with a scoop of vanilla ice cream or a drizzle of caramel sauce. And on lazy weekends, I keep slices handy for quick snacks—paired with a glass of milk or a chai latte. My family finds it downright addictive, and I never mind making a double batch because it never lasts long. Honestly, I feel pretty proud when I see everyone coming back for seconds—or thirds!
Top Tips for Perfecting Your Zucchini Banana Bread
If you want your bread to turn out just right every time, here are a few tricks I’ve learned after testing this recipe over and over:
- Zucchini Prep: Be sure to grate your zucchini and then gently squeeze out excess moisture. If you don’t, your batter might be too wet, and your loaf could end up a little heavy or soggy. I usually toss grated zucchini in a paper towel and give it a gentle press—it’s quick and makes a big difference.
- Mixing Advice: Overmixing leads to dense bread. Stir until just combined, and don’t worry if the batter is a little lumpy—the rustic look is part of the charm.
- Swirl Customization: Feel free to add chopped nuts, chocolate chips, or even a splash of maple syrup in the cinnamon-sugar mixture for extra flavor. For a more marbled look, use a skewer to swirl in different directions.
- Ingredient Swaps: Want to make this gluten-free? Swap in almond flour or oat flour with a little extra baking powder to help with rise. If you want less sugar, reduce the brown sugar to 2-3 tablespoons, and maybe add a drizzle of honey or agave for natural sweetness.
- Baking Tips: Every oven is different. Start checking around 50 minutes, and if the loaf browns too quickly, tent it with aluminum foil. The toothpick test is your best friend—no one likes a gummy center.
- Glaze Variations: For a tangy twist, try mixing in a bit of cream cheese or lemon zest into the glaze. It adds a little brightness that balances the sweetness perfectly.
One thing I’ve learned—every time I stray from the original, it’s still good, but I prefer this classic approach. The balance of flavors, the moist crumb, the gentle swirl of cinnamon—these are what make this loaf unforgettable. And don’t stress if it’s not perfect—it’ll still taste like a little slice of heaven.
Storing and Reheating Tips
This bread is pretty hardy, so you can make it ahead and still enjoy every slice later. Keep it covered tightly at room temperature for up to two days, wrapped in foil or stored in an airtight container. If you want it to stay moist longer, pop it in the fridge—just bring slices to room temp or give them a quick warm-up in the microwave. Freezing is a great option, too. Wrap individual slices or the whole loaf tightly in plastic wrap, then foil, and freeze for up to three months. Thaw overnight in the fridge or warm in the microwave for a few seconds. When it comes to adding that cinnamon glaze, I recommend waiting until it’s fully cooled—otherwise, it’ll just melt away. If you’re reheating a slice, stick it in the microwave for about 15 seconds or until just warm. It tastes just as good as fresh, I swear!
Frequently Asked Questions
Final Thoughts
This zucchini banana bread is more than just a recipe—it’s a little piece of comfort, baked right into a slice. The combination of sweet bananas, tender zucchini, and fragrant cinnamon creates a loaf that’s moist, flavorful, and utterly inviting. It’s the kind of treat that makes your home smell like a warm hug, and you’ll find yourself reaching for another slice before you know it. I love how adaptable it is—you can add nuts, chocolate chips, or even swap in gluten-free flours without losing its charm. Whether you’re baking it for kids, a weekend brunch, or just because you need a little something sweet, I promise it won’t disappoint. Grab those bananas and zucchini—trust me, you’ll be hooked. Happy baking, my friend! And I’d love to hear how yours turns out—leave a comment, share your twists, or tag me on social media. Now go ahead, indulge—you deserve it!
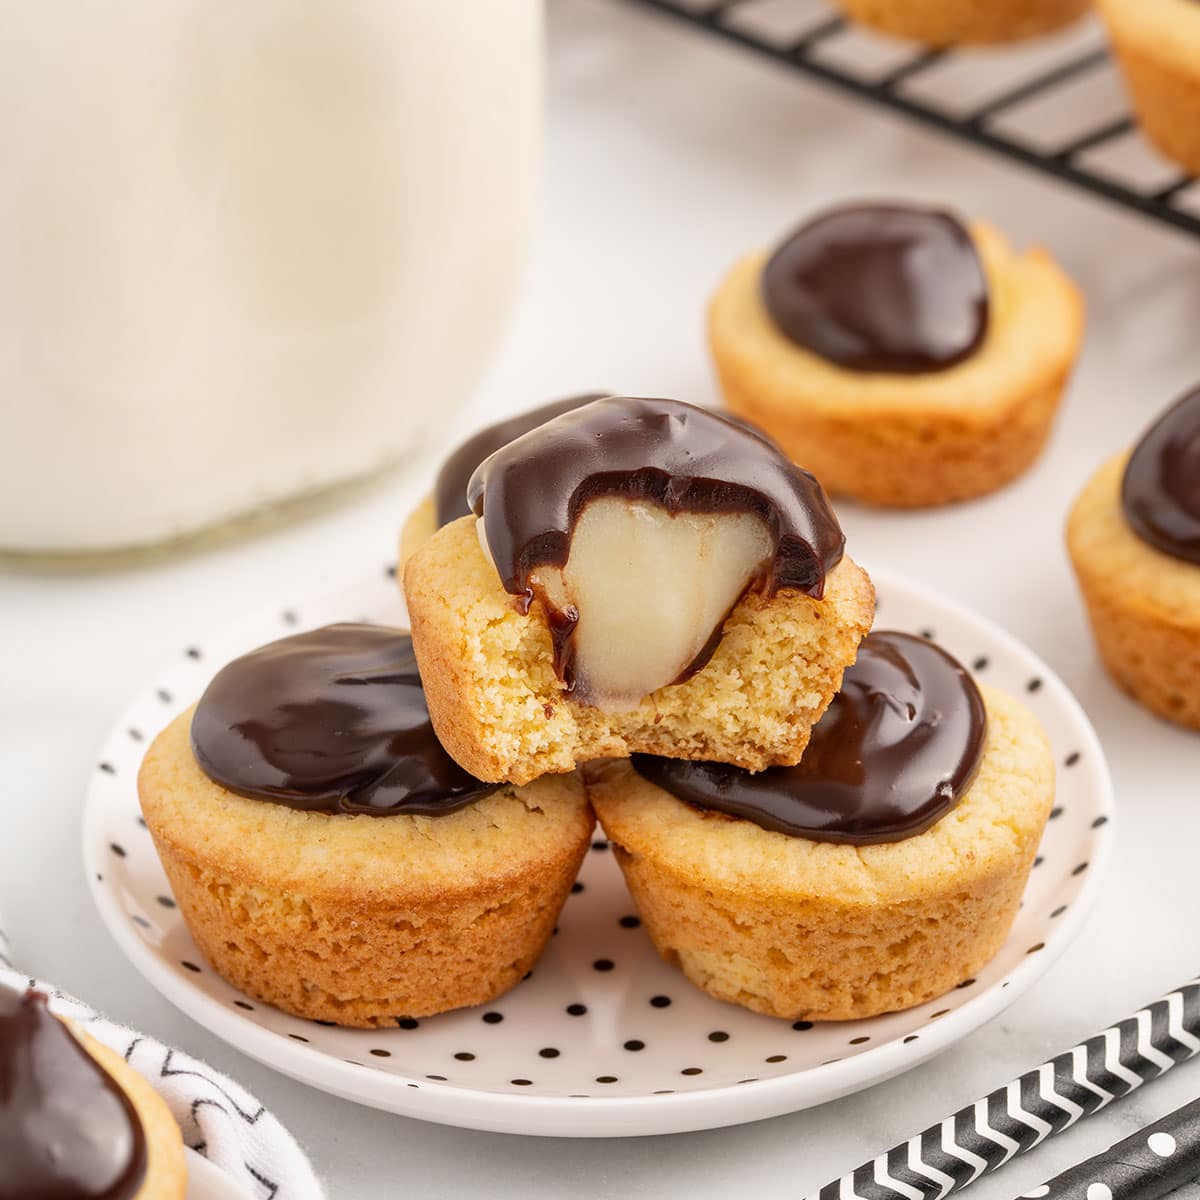
Boston Cream Pie
Ingredients
Method
- Preheat the oven to 350°F. Spray 2 mini muffin tins with nonstick cooking spray.
- Add the cake mix, melted butter, and eggs to a medium bowl. Stir until fully combined and no lumps remain.
- Measure 2 to 2.5 teaspoons of dough per mini muffin cup and press into a flat shape at the bottom of each cup.
- Bake for 9-10 minutes until golden and puffed.
- Cool the cookie cups, then gently press the centers to form a cup shape. Transfer to wire racks.
- Meanwhile, combine cold milk and pudding mix in a bowl. Mix with a handheld mixer until thickened, about 1.5-2 minutes.
- Transfer pudding to a piping bag or ziplock with a corner snipped.
- Pipe pudding into each cookie cup just to the top.
- For the ganache, place chocolate chips in a heat-safe bowl. Heat heavy cream for 1 minute until bubbling and pour over chocolate.
- Stir until smooth. Spoon a small amount over each filled cookie cup. Chill before serving.


These pie cups sound absolutely dreamy—banana bread flavors in cupcake form? Yes, please! My grandma’s banana bread was legendary too.
I love how banana bread recipes can instantly bring back such warm memories—this one sounds perfect for a cozy weekend!
I totally get what you mean—there’s nothing like the smell of banana bread baking to make a house feel like home. Reminds me of my mom too!
I love how banana bread brings back such sweet memories—this recipe looks perfect for a cozy afternoon with a cup of tea!
I love how baking banana bread feels like a warm hug—my kids always ask me to make it on weekends!