
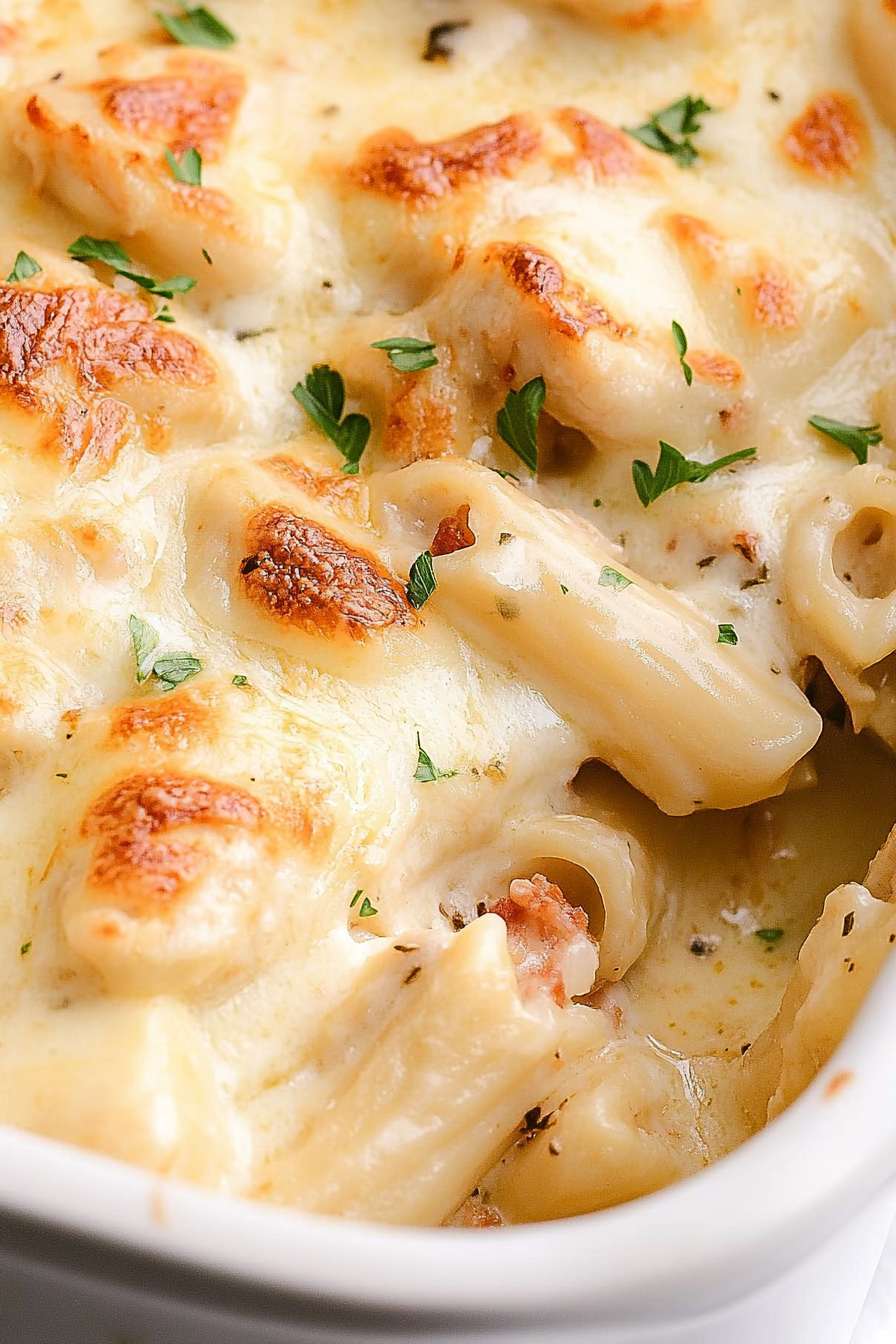
Creamy Chicken Bacon Ranch Delight
Have you ever had that moment late at night when the craving for something sweet hits you out of nowhere? That’s exactly how I found myself one chilly evening, rummaging through the pantry and feeling a little bored with the usual cookie or ice cream options. Then I remembered this zucchini swirl cake I’d been tinkering with — a recipe I’d tested so many times it’s become almost like my kitchen’s secret weapon. It’s soft, moist, and somehow feels indulgent without being overly sweet. Honestly, I think what makes it so special is how surprisingly simple it is to whip up, even when I’m exhausted after a long day. My kids love it, my friends always ask for the recipe, and I can’t help but sneak a slice when no one’s looking. Nothing beats that warm, homey smell filling the house — like a hug in cake form. This one’s a lifesaver on busy nights, or whenever I crave something cozy and comforting. Trust me, once you make this, it’ll be your go-to for those evenings when only something homemade will do.
What is Zucchini Swirl Cake?
Think of zucchini swirl cake as a marriage between a tender, buttery cake and the hearty, humble vegetable that often gets overlooked in savory dishes. It’s essentially a moist vanilla batter infused with shredded zucchini — but here’s the fun part: swirled with a layer of cinnamon-spiced cream cheese filling. The name comes from how the filling gently swirls through the batter as it bakes, creating those gorgeous marbled patterns that make every slice feel like a little bit of art. It’s a cake that’s perfect for breakfast, brunch, or even a casual dessert — it’s just that versatile. When I first made this, I was super skeptical about how zucchini would taste in a sweet cake. But honestly, it adds this incredible moisture and a subtle earthiness that balances the sweetness perfectly. It’s kind of like sneaking a vegetable into dessert — only you don’t have to feel guilty about it! This cake, while simple, hits all the high notes: flavor, texture, and nostalgia in each bite.
Why you’ll love this recipe?
What I love most about this zucchini swirl cake is how it combines everything I want in a dessert: approachable ingredients, that comforting home-baked smell, and a flavor profile that’s both familiar and a little unexpected. The batter is so forgiving — I’ve tested it with almond milk, which actually made it even creamier, and it still turned out just as perfect. The filling? It’s got that cinnamon-sugar warmth that reminds me of cozy mornings, but it’s balanced by the fresh zucchini, so it doesn’t feel too rich or heavy. Plus, this cake is incredibly budget-friendly — just simple pantry staples, and you probably already have most of them at home. The best part? The swirl technique is so easy. I’ve made this countless times, and it never fails to impress my friends or make my kids ask for seconds (which is saying a lot). It’s also versatile: you could swap in blueberries, chocolate chips, or even chopped nuts if you’re feeling adventurous. Honestly, I love how adaptable it is — and how just a few simple adjustments can make it taste like a totally different treat. Plus, it’s perfect when you want a little something homemade but don’t want to spend hours fussing in the kitchen. This cake is a little bit of love in every slice, and I promise once you try it, it’ll become part of your favorites too.
How do I make Zucchini Swirl Cake?
Quick Overview
This cake is a breeze to make — no fancy equipment or ingredients required. Basically, you mix up a simple vanilla batter, prepare a cinnamon-spiced cream cheese filling, then layer and swirl them together before baking. The magic happens in the oven, where the swirl settles into those beautiful marbled patterns, and the aroma alone will make your house smell like a bakery. I always do this when I want something homemade to brighten my day or impress friends at a weekend brunch. It’s surprisingly quick, too — from start to finish, you’re looking at about an hour. The batter is whipped together in just a few minutes, and the baking time is about 35-40 minutes. What makes this recipe special is how effortlessly it comes together, yet the result feels such a step above everyday baked goods. You get that perfect balance of moist, tender crumb and rich filling. Trust me, you’ll love how forgiving the process is — you won’t believe how easy it is to get professional-looking, bakery-worthy slices!
Ingredients
For the Main Batter:
– 1 1/2 cups all-purpose flour (or a gluten-free blend if you prefer)
– 1 teaspoon baking powder
– 1/2 teaspoon baking soda
– 1/4 teaspoon salt
– 1/2 cup unsalted butter, softened
– 3/4 cup granulated sugar
– 2 large eggs
– 1 teaspoon vanilla extract
– 1/2 cup milk (dairy or plant-based, I tested with almond milk and it’s fabulous)
For the Filling:
– 8 oz cream cheese, softened
– 1/2 cup granulated sugar
– 1 teaspoon cinnamon
– 1 cup shredded zucchini (squeeze out excess moisture — trust me, this keeps it from getting soggy)
For the Glaze (optional but highly recommended):
– 1/2 cup powdered sugar
– 1-2 teaspoons milk (add until drizzling consistency)
– A splash of vanilla or lemon juice for extra flavor
Step-by-Step Instructions
Step 1: Preheat & Prep Pan
Set your oven to 350°F (175°C). Grease a 9-inch round or square baking pan — I like lining mine with parchment paper for easy removal. Keep the batter ready; you don’t want it to sit out too long as you mix in the zucchini.
Step 2: Mix Dry Ingredients
In a small bowl, whisk together flour, baking powder, baking soda, and salt. Doing this first ensures even distribution of leavening agents, which helps your cake rise beautifully. Set aside.
Step 3: Mix Wet Ingredients
In a large bowl, beat the softened butter and sugar until fluffy — about 2-3 minutes. Add eggs one at a time, beating well after each addition. Stir in vanilla and milk. The batter should be smooth and just a little airy.
Step 4: Combine
Gradually add dry ingredients to the wet, mixing gently until just combined. Overmixing can make the cake dense, so slow and steady wins the race here. It should look thick but pourable.
Step 5: Prepare Filling
In a bowl, beat the softened cream cheese, sugar, and cinnamon until smooth. Then, fold in the shredded zucchini, making sure it’s well incorporated but not overworked. This keeps the filling creamy and moist.
Step 6: Layer & Swirl
Pour half the batter into your prepared pan. Dollop the entire cream cheese filling on top. Top with the remaining batter. Using a toothpick or skewer, swirl gently through the batter to create beautiful marbled patterns — don’t overdo it, or you’ll lose the swirl effect.
Step 7: Bake
Bake for 35-40 minutes, or until a toothpick inserted into the center comes out clean. Slight cracks on top are normal and add to the homemade charm. Keep an eye on it around the 35-minute mark — ovens vary, so let’s say patience is key here.
Step 8: Cool & Glaze
Allow the cake to cool in the pan for about 15 minutes, then transfer to a wire rack. Once completely cooled, drizzle with your prepared glaze. I like adding a splash of lemon juice to the glaze for a bright finish, but vanilla works beautifully, too.
Step 9: Slice & Serve
Slice once the cake is fully cooled — a serrated knife helps get those neat, clean pieces. My family loves this warm with a cup of tea or coffee, but it’s equally delicious chilled. I always do this for that perfect Sunday brunch or an afternoon snack. The best part? It keeps well in the fridge for a couple of days — but honestly, it’s so good, it rarely lasts that long!
What to Serve It With
This zucchini swirl cake is pretty much a chameleon — it works everywhere. For breakfast, I love serving it with a steaming cup of coffee or a dollop of Greek yogurt alongside. The subtle sweetness makes it perfect for a morning pick-me-up, especially with a drizzle of honey or fresh berries. If you’re hosting brunch, pair it with a mimosa or freshly squeezed juice, and don’t forget a few extra slices for everyone to grab. For dinner dessert, I like to serve it with a scoop of vanilla ice cream or a dollop of whipped cream — it feels fancy but is totally effortless. When I want something casual and cozy, I’ll just cut thick slices and napkin in hand, especially when my kids are asking for “that zucchini thing again”— they actually call it that now! This cake has become a family favorite because it’s delicious, forgiving, and feels like a warm hug after a long day.
Top Tips for Perfecting Your Zucchini Swirl Cake
Over the years, I’ve picked up a few tricks that’ll take your cake from good to *amazing*. First off, prep your zucchini properly — I always squeeze out as much moisture as possible after shredding. It’s weird how much water can hide in there! You won’t believe how much moisture it releases, and too much can turn your batter watery or cause your cake to collapse. Next, when mixing the batter, be gentle. Overmixing speeds up gluten formation in the flour, making the cake dense instead of tender. When it comes to swirling, I like to add just enough to create a marbled look without blending into a muddy mess. A skewer or a chopstick is perfect for this — I’ve learned that aggressive swirling distorts the beautiful pattern I’m aiming for. If you want to swap flavors, try adding a handful of chopped walnuts for crunch or blueberries for a burst of fruity sweetness. I’ve also tested reducing sugar slightly in the batter — it’s still sweet enough, but not overly so, allowing the zucchini’s earthiness to shine. As for baking, I always position my rack in the middle of the oven — that’s where heat is most even. Keep an eye on your cake — oven temps vary, so start checking around 35 minutes. You’ll know it’s ready when the top is golden, and a toothpick comes out with just a few moist crumbs. And the glaze? Keep it thick enough to stay put but fluid enough to drizzle beautifully. A little lemon zest added to the glaze adds a cheerful brightness, especially in spring and summer.
Storing and Reheating Tips
This cake stores well, making it perfect for making ahead or leftovers. If you plan to serve it within a day or two, keep it covered loosely with foil at room temperature — it’ll stay moist for about a day. If you want to keep it longer, pop it in an airtight container and refrigerate — it stays fresh for up to 3 days. Just remember, the glaze hardens a bit when chilled, so if you prefer it glossy and fresh, add the glaze just before serving. To reheat a slice, a quick 10-15 seconds in the microwave is enough to warm it through without drying it out. Want that fresh-baked feel? I’ve found that warming it slightly enhances the flavors and moisture. If you’ve frozen the cake, it’s best to thaw overnight in the fridge, then bring it to room temperature before serving. The key is to keep it covered well to prevent it from drying out or absorbing fridge odors. If you want to add fresh glaze after reheating, do so just before serving — it makes all the difference in presentation and flavor!
Frequently Asked Questions
Final Thoughts
This zucchini swirl cake has become my little secret weapon for bringing comfort and a touch of beauty to my kitchen. It’s one of those recipes that makes you feel like a pro but is actually so forgiving you can’t go wrong. Whether it’s a quiet weekend morning or a last-minute get-together, it’s a crowd-pleaser with a humble twist. I love how it sneaks in some vegetables but no one ever suspects — it’s sneaky and satisfying in the best way. Plus, it’s a wonderful way to use up those zucchini lurking in the fridge — I always have some on hand in summer. As I write this, I’m already planning to bake another batch for the weekend, maybe with blueberries or a dash of lemon zest. Honestly, I hope you give it a try and that it becomes part of your baking family too. I’d love to hear how yours turns out or any fun twists you add — don’t forget to leave a comment or share a photo! Happy baking!
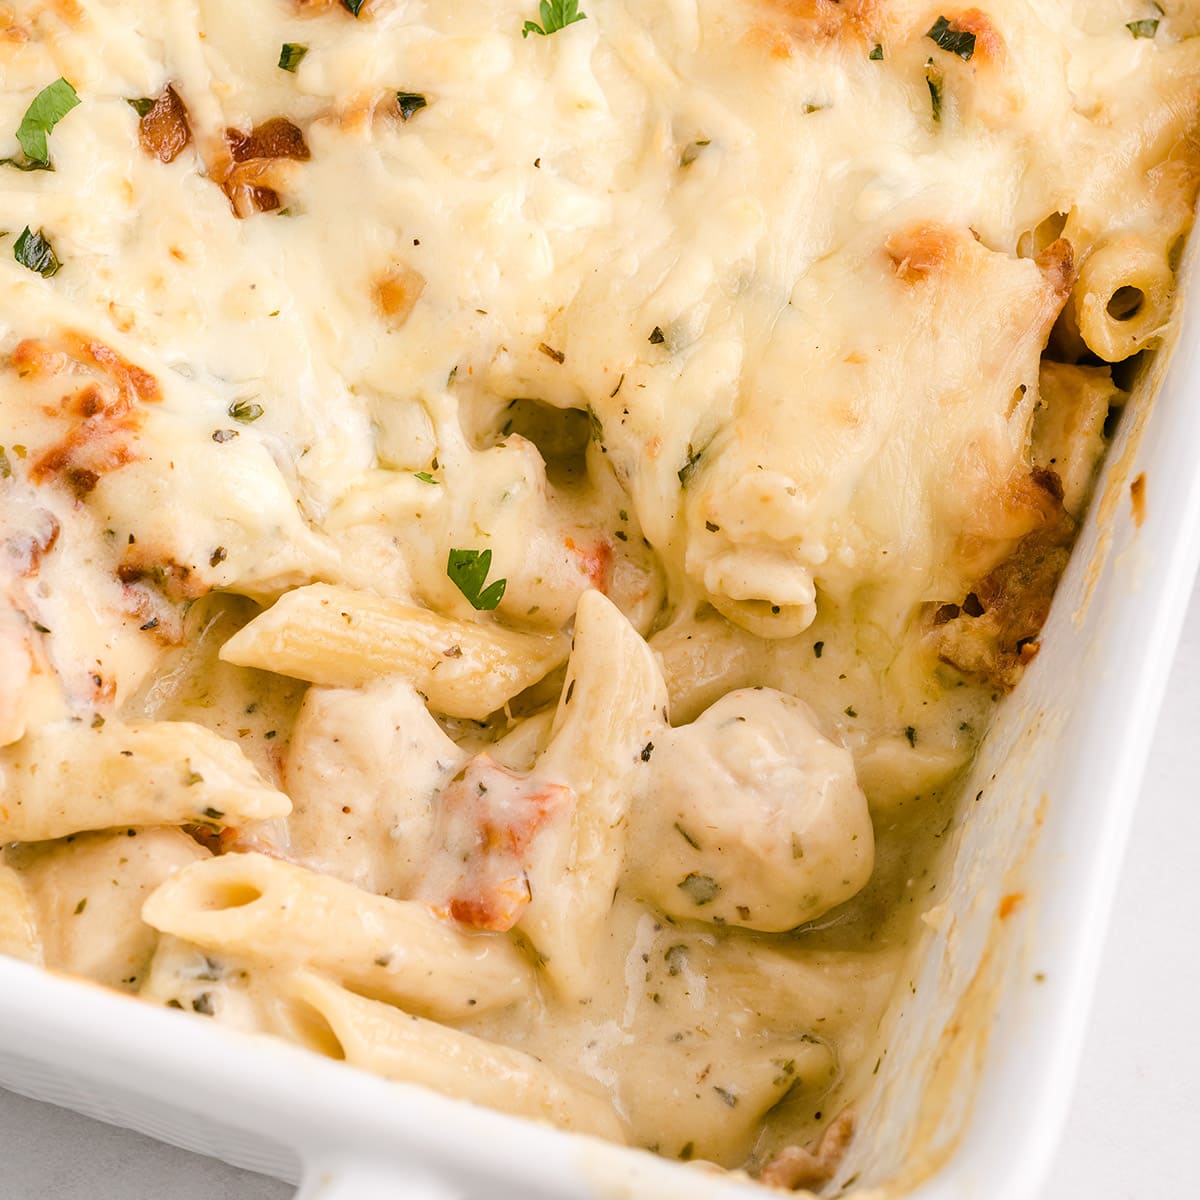
chicken ranch
Ingredients
Method
- Preheat oven to 350 degrees F. Grease a 9x13 inch baking dish.
- Cook and chop bacon; set aside.
- Cook pasta according to package instructions; drain.
- In a large skillet, melt 4 tablespoons butter with 1 tablespoon olive oil over medium heat. Add chicken pieces, season with salt and pepper, cook until no longer pink, then remove and set aside.
- In the same skillet, sauté chopped onion and minced garlic until translucent.
- Add flour, Italian seasoning, basil, and Ranch mix to the skillet; stir well.
- Gradually add chicken broth, heavy cream, and cream of chicken soup, stirring constantly until the mixture thickens and is bubbly.
- Stir in parmesan cheese, sun dried tomatoes, cooked chicken, cooked pasta, and chopped bacon. Mix well.
- Pour mixture into the prepared baking dish. Top with Italian cheese and parsley.
- Bake uncovered for 30 minutes or until bubbly and cheese is melted.


That sounds so comforting—I totally get those late-night cravings! This recipe looks perfect for those cozy moments.
That sounds so comforting—I totally get late-night cravings like that! Creamy and savory combos are my weakness too.
I love how comforting this dish is—perfect for those late-night cravings when you need something hearty and flavorful. Thanks for sharing!
I’ve been there—midnight cravings are the worst! That recipe sounds like the perfect comfort food fix.
I love that story—sometimes the best recipes come from unexpected cravings! This dish sounds absolutely comforting for a late-night snack.