
Hawaiian Pie Recipe: Simple Tropical Delight
Have you ever had that moment when you stumble upon a recipe that’s so simple, so cozy, you wonder why you hadn’t made it a hundred times before? That’s exactly how I felt the first time I made this carrot zucchini loaf. It’s like a warm hug in bread form, packed with sneaky vegetables—think of it as a more wholesome, slightly sweeter take on banana bread, but with the added bonus that kids LOVE it. I always do this when I want something comforting, but I don’t want to feel guilty afterward. Plus, it’s perfect when you’ve got those stray zucchini and carrots sitting in the fridge, begging to be used up—trust me, I’ve tested this with every variation imaginable, and it never fails to disappear in minutes at my house. The smell alone from the oven makes everyone gather around, even if they’re not hungry yet. It’s that good. Honestly, I find myself reaching for a slice at 10 pm when I want a sweet treat but don’t want to bake a whole cake. This loaf is a lifesaver on busy nights or when you want to impress a friend with minimal effort. Kind of feels like magic, doesn’t it? And I promise, once you try it, you’ll be hooked too.
What is a carrot zucchini loaf?
Think of this carrot zucchini loaf as a delightful twist on traditional quick bread. It’s essentially a moist, tender loaf that’s just sweet enough, with tiny flecks of grated vegetables adding both flavor and health benefits. The name says it all—carrots and zucchini are the stars, sneaking their way into every bite, making this a sneaky way to get your kids to eat more veggie goodness without a fuss. The concept is simple: grate the vegetables, mix them into a slightly sweet batter, pour into a loaf pan, and bake. It’s a lot like banana bread but with a more savory, earthy vibe thanks to the zucchini. The beauty of this recipe is how versatile it is—gluten-free options, add-ins like walnuts or coconut, or even swapping sugar for honey if you’re feeling a bit more health-conscious. The origin? Well, I’d say it’s a little bit inspired by those classic brunch recipes, but this one’s got a personality all its own. My favorite part? That moist crumb that stays tender for days—if it lasts that long!
Why you’ll love this recipe?
What I love most about this carrot zucchini loaf is how it ticks all the boxes: it’s super flavorful, insanely easy, and wonderfully adaptable. The flavor profile is a gentle balance of sweetness from the carrots and a hint of earthiness from the zucchini—and because it’s packed with vegetables, I feel good serving slices to my family even on busy weeknights. Plus, it’s so budget-friendly. You probably already have all the ingredients in your pantry—flour, sugar, eggs, and those leftover veggies in the fridge—making it a real lifesaver when you want to whip something up in a jiffy without making a grocery run. I also love how versatile it is: serve it for breakfast with a smear of cream cheese, slice it thin for tea-time, or enjoy it as dessert with a drizzle of honey or a dollop of yogurt. My kids ask for this all the time, and I’ve even thrown in a handful of blueberries once—total game changer. It’s one of those recipes I keep coming back to because it always feels like a little treat, but without the guilt. Plus, it freezes beautifully, so I can stash extras for busy mornings or unexpected guests.
How do I make a Carrot Zucchini Loaf?
Quick Overview
This carrot zucchini loaf is about as straightforward as baking gets. You start by grating your veggies, mixing dry ingredients, then blending everything together. The batter comes together quickly—no fancy equipment needed, just a bowl and a spoon. Pour it into a loaf pan, pop it in the oven, and wait. The magic happens while you do laundry or sip coffee. The result is a beautifully moist loaf that smells like a bakery even before it’s done. The whole process takes about an hour, step from prep to plate, and honestly, it’s one of those recipes you don’t mind doing over and over because it’s just that fuss-free and rewarding.
Ingredients
For the Main Batter:
– 2 cups all-purpose flour (or gluten-free blend if you prefer)
– 1 cup granulated sugar (or coconut sugar for a healthier vibe)
– 1 teaspoon baking powder
– ½ teaspoon baking soda
– ½ teaspoon salt
– 1 teaspoon ground cinnamon
– ½ teaspoon nutmeg (optional but adds cozy flavor)
– 3 large eggs
– ½ cup vegetable oil or melted coconut oil
– 1 teaspoon vanilla extract
– 1 cup grated carrots (about 2 medium carrots)
– 1 cup grated zucchini (remove excess moisture by squeezing out with a towel)
– ½ cup crushed pineapple or applesauce (optional for extra moisture and sweetness)
For the Filling:
– Optional: Cream cheese, a handful of raisins, chopped nuts, or a sprinkle of coconut flakes for added texture and flavor.
For the Glaze:
– ½ cup powdered sugar or maple glaze
– 1-2 teaspoons milk or lemon juice
– A dash of vanilla (if using powdered sugar)
Step-by-Step Instructions
Step 1: Preheat & Prep Pan
Heat your oven to 350°F (175°C). Grease your loaf pan with butter or line it with parchment paper—trust me, this makes removal so much easier, and cleanup a breeze. Set aside for now.
Step 2: Mix Dry Ingredients
In a big bowl, whisk together the flour, sugar, baking powder, baking soda, salt, cinnamon, and nutmeg. Breaking up the lumps is key to a smooth batter later on, and this step helps distribute all those flavors evenly.
Step 3: Mix Wet Ingredients
In another bowl, beat the eggs, then stir in the oil, vanilla, and pineapple or applesauce if you’re using it. Whisk until smooth—you want everything well combined but not overmixing at this stage.
Step 4: Combine
Pour the wet mixture into the bowl of dry ingredients. Gently fold everything together, just until you no longer see streaks of flour. It’s okay if a few lumps remain—that’s how you get a tender crumb. Overmixing makes it dense, so keep it light.
Step 5: Prepare Filling
If you’re adding extras like nuts or raisins, fold them into the batter now. I love adding chopped walnuts or pecans—they add nice crunch. For a little cream cheese swirled in, I usually let the batter rest while I swirl it, just so the flavors meld.
Step 6: Layer & Swirl
Pour half the batter into your pan. If you’re adding a filling, spread it evenly over this layer. Then pour the rest on top. I like to swirl a skewer or butterknife around for a marbled look—that’s what makes this loaf extra fun to cut into!
Step 7: Bake
Bake for 50-60 minutes. You’re looking for a golden top and a toothpick inserted in the center to come out clean. Every oven is different—my first time I overshot and it got a bit dry, so start checking around 50 minutes if your oven runs hot.
Step 8: Cool & Glaze
Let the loaf cool in the pan for 10-15 minutes before transferring it to a wire rack. Once cooled a bit, drizzle with your glaze or dust with powdered sugar. The glaze adds that perfect sweet gloss, but honestly, sometimes I prefer it plain with a smear of butter or cream cheese.
Step 9: Slice & Serve
Use a serrated knife for clean cuts—wait until it’s just slightly warm or fully cooled for perfect slices. This loaf is great warm or at room temp. I usually slice it thick for breakfast, or thin for tea with friends. Trust me, once you’ve made it a couple of times, you’ll have your own little rituals for serving this comforting treat.
What to Serve It With
This carrot zucchini loaf is pretty versatile. For breakfast, it’s divine with a hot cup of coffee or tea, maybe spread with butter or a dollop of Greek yogurt. My kids love it toasted with a swipe of cream cheese—fits perfectly into their “kids-approved” category. On brunch days, I layer slices with fresh berries and a drizzle of honey, making it look almost fancy without any extra fuss. It’s a natural for dessert, too—warm slices topped with a little vanilla ice cream or whipped cream turn it into a real showstopper. Honestly, I’ve been known to sneak a slice under my blanket while binge-watching my favorite show on a cozy night; it’s that good. I also like packing it up for picnics or taking slices in my lunchbox—it’s a wholesome snack that keeps me satisfied without a sugar crash.
Top Tips for Perfecting Your Carrot Zucchini Loaf
Over the years, I’ve learned a few tricks that make this loaf even better:
- Zucchini Prep: Always squeeze out the excess moisture from grated zucchini. It prevents sogginess and keeps the loaf moist but not wet. I use a clean tea towel—wring it out like crazy until the zucchini feels almost dry.
- Mixing Advice: Be gentle when folding wet into dry ingredients. Overmixing is the enemy—it can make the loaf dense and heavy. Just fold until ingredients are combined, and stop.
- Swirl Customization: Want more visual wow-factor? Use a toothpick to create more intricate swirl patterns—try zigzags or circles for a fun touch.
- Ingredient Swaps: Sub in coconut sugar for a richer, caramel flavor or almond flour for gluten-free. I tested this with almond milk too, and it actually made it even creamier—win-win!
- Baking Tips: Oven times can vary. My trick? Start checking at 50 minutes and use a toothpick for doneness. If it springs back when lightly pressed, it’s ready.
- Glaze Variations: A splash of lemon juice in the glaze adds brightness, or sprinkle the top with shredded coconut before baking for extra texture. I learned to add glaze only once the loaf is cooled; otherwise, it melts away.
Personal note: every time I think I’ve done this perfectly, I try a new swap or sprinkle a little extra cinnamon, and it surprises me again. Baking is all about those little tweaks, right? Trust me on this one — don’t rush it. Patience pays off in moist, flavorful slices that make everyone ask for more.
Storing and Reheating Tips
This loaf keeps wonderfully, which is a blessing on busy mornings or lazy weekends. Keep it in an airtight container at room temperature for up to two days—that’s when it’s at its freshest. I wrap slices individually in foil or parchment, so I just grab a piece when a craving hits. If you want to keep it longer, pop it in the fridge for up to five days; just warm a slice in the microwave for about 10 seconds, and it’s almost like fresh-baked. Want to freeze it? Wrap slices tightly in plastic wrap and store for up to three months. Thaw at room temperature or microwave for 20 seconds. I usually add a quick glaze or sprinkle of nuts right before serving if the loaf was stored in the fridge—it refreshes the look and flavor.
Frequently Asked Questions
Final Thoughts
Honestly, this carrot zucchini loaf has become one of those kitchen staples I reach for whenever I want a little piece of homey comfort. It’s not just a bread—it’s a memory in every slice, a mix of childhood mornings and lazy weekends. Every time I make it, I’m reminded that simple ingredients can turn into something extraordinary—a little bit sweet, a little bit earthy, and always warmly welcoming. Plus, it’s one of those rare recipes that tastes better the day after baking, when the flavors have had time to meld. If you’re looking for a new go-to treat that’s wholesome and totally foolproof, give this a try. And don’t forget to come back and tell me how it turned out! I’d love to see your variations or hear your tips. Happy baking, friends!
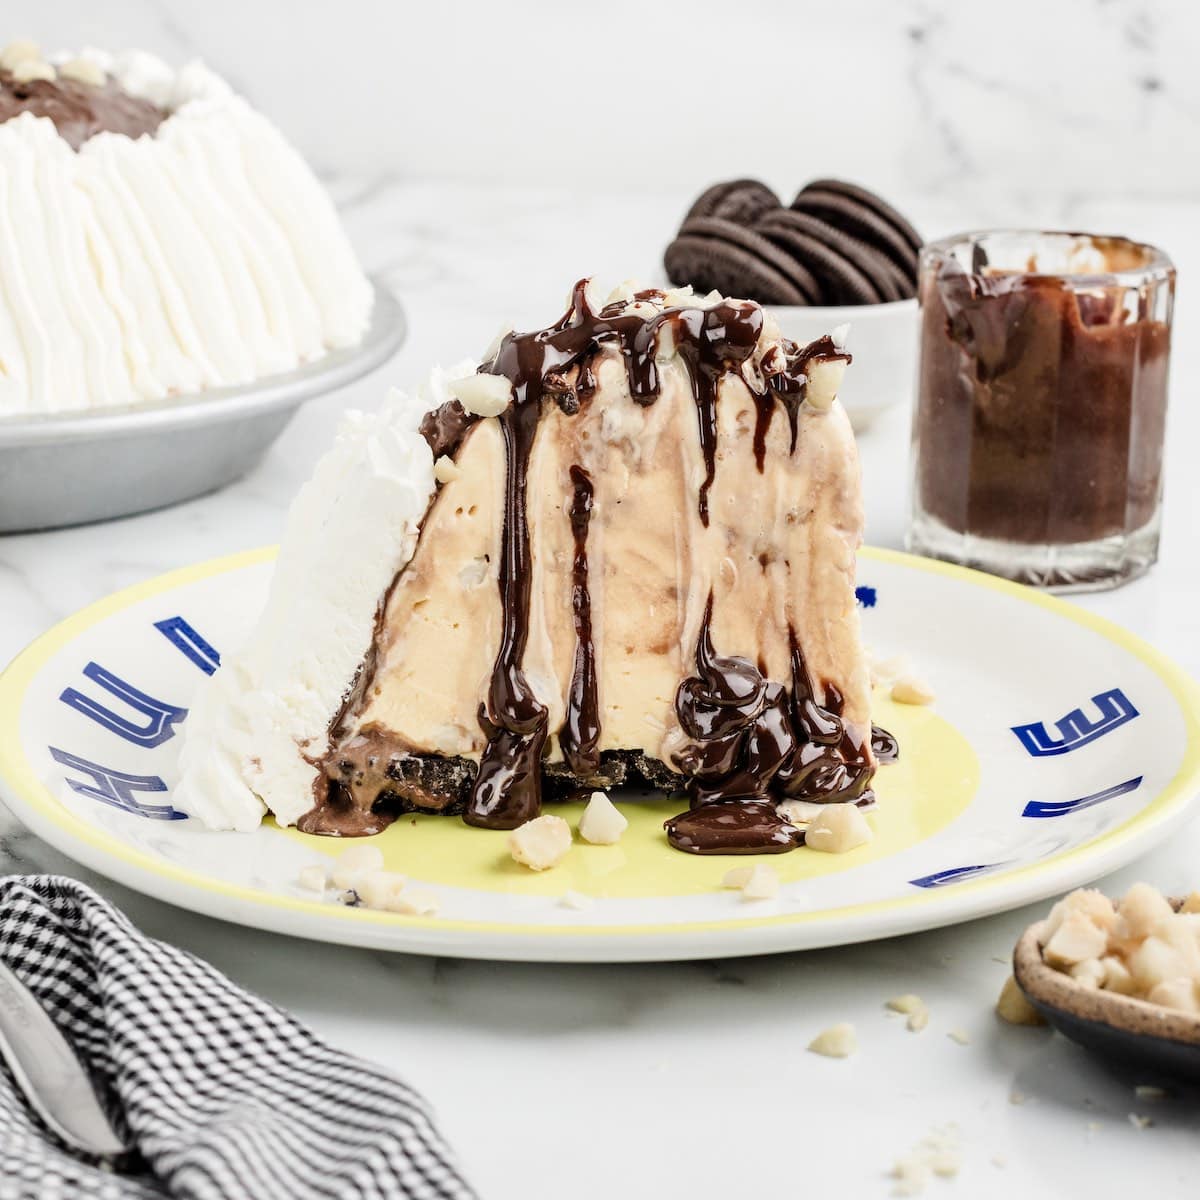
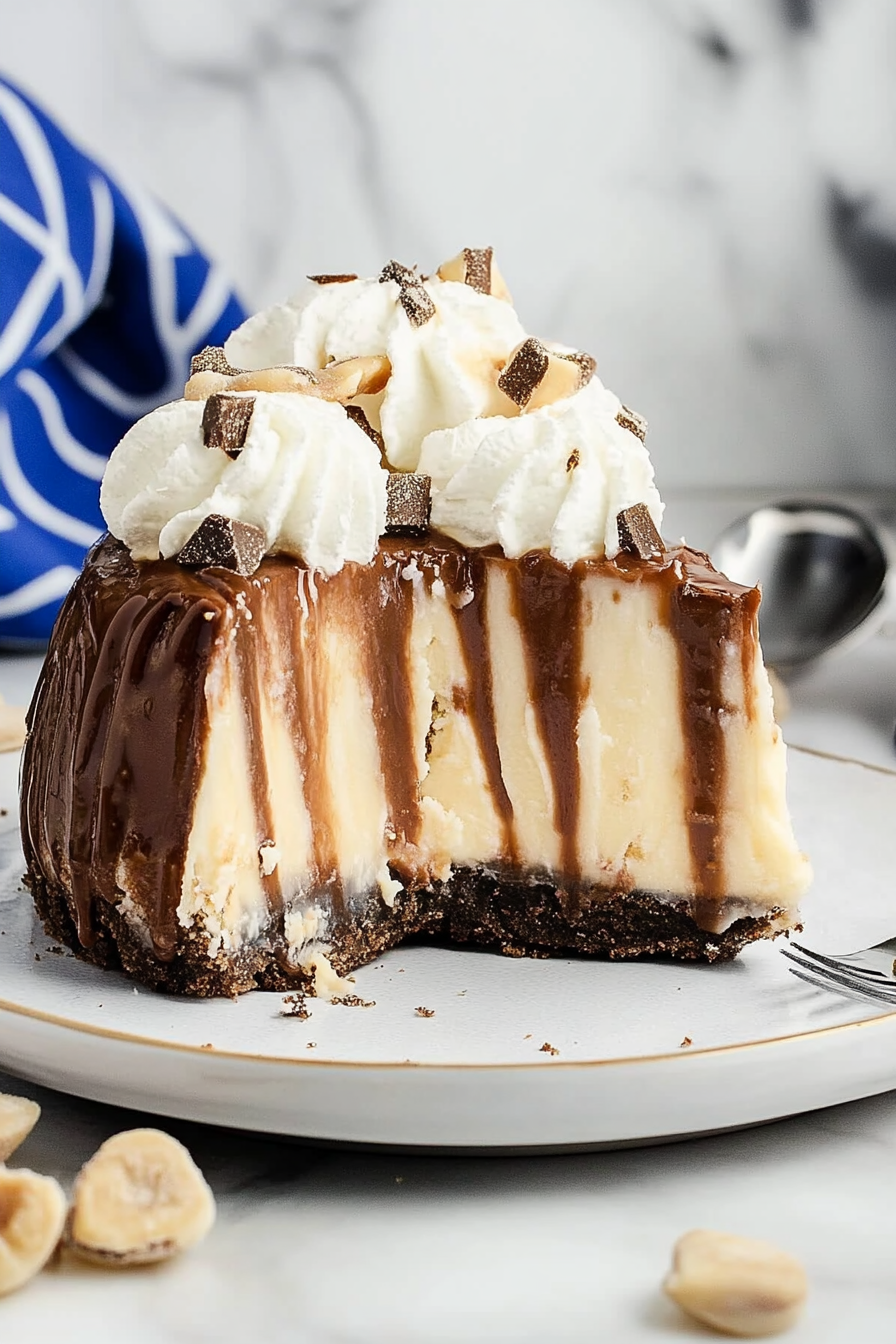
hula pie
Ingredients
Method
- Crush the Oreo cookies into fine crumbs using a food processor or by placing in a zip-top bag and crushing with a rolling pin.
- Mix the crushed cookies with melted butter until well combined.
- Press the mixture into the bottom of a 9-inch pie dish to form the crust. Place in the freezer to set.
- Allow vanilla ice cream to soften for 10-15 minutes. Mix softened ice cream with 0.75 cup chopped macadamia nuts, reserving some for topping.
- Line a 2½-quart mixing bowl with plastic wrap, leaving overhang. Spray lightly with non-stick spray.
- Spoon the ice cream mixture into the lined bowl. Cover with plastic wrap and freeze for 4-6 hours until firm.
- Remove the ice cream from the freezer, lift out using the plastic wrap, and place over the prepared crust.
- Drizzle hot fudge over the dome of ice cream and sprinkle with remaining chopped macadamia nuts.
- Garnish with whipped topping around the edges and serve immediately.


Absolutely! I’ve had that moment with a few recipes—sometimes the simplest ones are the best. This one sounds perfect for a rainy day.
Yes! This recipe hits that cozy spot perfectly—simple ingredients, tropical flavor, and so satisfying. I’ve made it a few times and it never disappoints.
I’ve made this before and it’s seriously such a comforting, easy treat—perfect for when you want something sweet but don’t want to spend hours in the kitchen.
I just tried this recipe and it’s amazing! Simple ingredients, tropical flavor—definitely making this a regular. Thanks for sharing!
This sounds amazing! I love how simple and cozy recipes like this can feel both comforting and exciting—definitely giving me the urge to try it soon.