
Crimson Velvet Cheesecake How to Make It
If you ever need a dessert that’s almost too good to be true, but comes together faster than you can say “sweet tooth,” let me introduce you to my zucchini swirl cake. I remember making this for the first time when my kids were tiny and always asking for something sweet after dinner. The smell alone — warm, cinnamon-y, with a hint of zucchini — used to have everyone rushing to the kitchen. Honestly, this one’s a lifesaver on busy nights because it’s like a homemade hug in cake form. Plus, I love how it sneaks veggies into dessert, so I don’t feel *so* guilty about seconds. Over the years, I’ve tested this with different fillings, and I swear, it gets better every time. My friends call it “that surprisingly healthy-looking cake” — but trust me, they’re hooked on how moist, flavorful, and downright addictive it is. And the best part? It’s perfect for coffee mornings, family gatherings, or even just when you need a little comfort with your afternoon tea. Are you ready to bake? Because this one’s a good one!
What is Zucchini Swirl Cake?
Think of zucchini swirl cake as the lovechild of a cinnamon-spiced loaf and a gooey dessert with a surprise center. It’s essentially a rich, tender cake layered with a sweet cinnamon filling and beautifully marbled with zucchini ribbons. The name might make you think it’s complicated — but I promise, it’s so straightforward. Think of it as a cozy, slightly rustic cake that offers all the warmth of fall in every bite. It got its name because before baking, you gently swirl the cinnamon filling into the batter, creating those gorgeous marbled streaks that are just as pretty as they are tasty. I always say, if you like a bit of sweetness with a vegetable twist, this recipe is a must-try. It’s like getting your cake fix and sneaking in some greens — what’s not to love? Plus, it’s perfect when you want something impressive but don’t feel like fussing in the kitchen all day.
Why you’ll love this recipe?
What I love most about this zucchini swirl cake is how it manages to be both humble and show-stopping at the same time. The flavor? Oh, it’s cinnamon-laced with hints of vanilla and that tender, moist crumb that just melts in your mouth. The zucchini keeps everything super moist without adding any weird flavor — get ready to have everyone surprised when you tell them there’s sneaky veggies involved! The best part? It’s incredibly simple — no complicated frosting or fancy techniques needed. Just mix, swirl, bake, and enjoy. This cake is budget-friendly, too; most ingredients are staples you already have in your pantry, and the zucchini is an easy way to stretch your grocery dollars. Plus, it’s versatile: my family loves it as a breakfast muffin, a quick snack, or a cozy dessert. I’ve even made mini-loaves for gifts, and they disappeared faster than I could say “delicious!” Honestly, what really makes this recipe a keeper for me is how forgiving it is — perfect for beginners and seasoned bakers alike. Trust me on this — once you make it once, you’ll keep coming back for more.
How do I make Zucchini Swirl Cake?
Quick Overview
This cake starts with a simple batter made from basic ingredients, whipped together until smooth. You then prepare a sweet cinnamon filling and fold or swirl it into the batter, creating those gorgeous marbled streaks. The secret? Don’t overmix — just gently fold everything together. Baking it until golden and moist is the final step, and in just about an hour, you’re carting out a fragrant, irresistible treat. It’s that easy, really. The beauty of this is how forgiving it is: I’ve tested it with different flour types, and it still turns out moist and flavorful. Plus, the swirling technique makes it look fancy without any fancy tools. Perfect for when you want to impress or just treat yourself, but don’t have the time or patience for complicated baking.
Ingredients
For the Main Batter:
– 2 cups all-purpose flour (or gluten-free blend if you prefer!)
– 1 cup sugar
– 1 teaspoon baking powder
– 1/2 teaspoon baking soda
– 1/2 teaspoon salt
– 1 teaspoon vanilla extract
– 2 large eggs
– 3/4 cup vegetable oil or melted butter
– 1 cup grated zucchini (squeeze out excess moisture; I like to do this with a clean kitchen towel to avoid soggy cake!)
For the Filling:
– 1/2 cup brown sugar
– 2 teaspoons ground cinnamon
– 1/4 cup softened butter (or coconut oil for a dairy-free twist)
For the Glaze:
– 1 cup powdered sugar
– 2-3 tablespoons milk (or almond milk)
– 1/2 teaspoon vanilla extract (optional)
Step-by-Step Instructions
Step 1: Preheat & Prep Pan
Set your oven to 350°F (175°C). Grease a 9-inch loaf pan or round cake pan with butter or non-stick spray. Lining it with parchment is a little trick I swear by — keeps everything coming out so easy. Having everything prepped makes a huge difference when you’re elbow-deep in batter.
Step 2: Mix Dry Ingredients
In a large bowl, whisk together the flour, baking powder, baking soda, salt, and sugar. I always do this first to ensure everything is evenly distributed — especially the baking soda, so the cake rises beautifully without lumps. The flour should look a little pasty and fluffy.
Step 3: Mix Wet Ingredients
In a separate bowl, beat the eggs, then stir in the oil (or melted butter) and vanilla. I test the temperature — if your eggs are super cold, the oil might seize up a little, so let it sit for a minute. Once combined, fold in the grated zucchini. I like to use a spatula and do gentle folding — you want it evenly distributed, not overmixed.
Step 4: Combine
Pour the wet mixture into the dry ingredients and stir gently just until combined. Don’t overdo it — overmixing can lead to a dense cake. The batter should be thick but pourable. If it looks too stiff, a splash of milk helps loosen it up.
Step 5: Prepare Filling
Mix together the brown sugar and cinnamon in a small bowl. Once ready, add the softened butter and stir until crumbly, like a chunky streusel. You can add a pinch of nutmeg or cardamom if you’re feeling adventurous — trust me, it adds a lovely warmth.
Step 6: Layer & Swirl
Pour about half your batter into the prepared pan. Spread evenly. Then sprinkle the cinnamon filling over the batter, followed by the rest of the batter. Use a toothpick or skewer to swirl the cinnamon into the batter gently. It should look like beautiful marble streaks — not a jumbled mess. This part is what makes the cake look so special.
Step 7: Bake
Pop it into the oven and bake for 45-55 minutes. Check with a toothpick or cake tester — if it comes out clean, you’re good! Every oven varies, so start checking around 45 minutes. If the top gets too dark before the middle is cooked, cover loosely with foil — no worries, I’ve done that more times than I count.
Step 8: Cool & Glaze
Let the cake cool in the pan for about 15 minutes, then transfer to a wire rack. Once cool, drizzle with your simple glaze — mix the powdered sugar, milk, and vanilla until smooth. If you want it thicker, add a bit more powdered sugar; if thinner, a splash more milk. Trust your senses — this glaze makes the cake look so inviting.
Step 9: Slice & Serve
Slice with a sharp knife, ideally after about 30 minutes of cooling — warm cake can be a little crumbly. Serve with a dollop of whipped cream or a scoop of vanilla ice cream, but honestly, it’s perfect all on its own, especially with a steaming cup of coffee or hot tea. My kids prefer it slightly warm, and I love it at room temp — depends on the day!
What to Serve It With
This zucchini swirl cake is incredibly versatile. When I serve it for breakfast, I like to pair it with a strong drip coffee and a little dollop of Greek yogurt on the side. It makes the mornings feel so cozy. At brunch, I’ve sliced it into thick squares and arranged it on a platter with fresh berries and a drizzle of honey — looks fancy but takes just minutes to throw together. As a dessert, I love serving it slightly warm with a scoop of vanilla ice cream or a spoonful of mascarpone, especially if I want to elevate it for company. For casual snacking, it’s a real winner with a glass of cold milk or even a warm cup of tea. I’ve made mini loaves as gifts many times, and they’re always the first to go — wrapped in parchment and tied with a ribbon, they look adorable and taste even better!
Top Tips for Perfecting Your Zucchini Swirl Cake
Getting this cake just right took a few tries — but I learned some tricks along the way that I swear by now. First, always squeeze out as much moisture from the zucchini as possible; too much water can make the cake soggy or dense. I prefer to do this after grating by wrapping it in a clean dish towel and giving it a good squeeze — it’s faster and more effective. When mixing the batter, gentler is better — overmixing will develop gluten and make the cake tough. Folding is the way to go. For the swirl pattern, I like to add a few extra spoonfuls of cinnamon filling on top of the batter and then gently drag a skewer through to get that marbled effect. You can get creative — try adding chopped nuts or a dash of ginger to the filling. Substituting applesauce for part of the oil works wonderfully if you want to cut back on fats, but keep an eye on baking time because the batter can be denser. When baking, always check around the 45-minute mark to prevent over-browning. A hot oven isn’t your friend here; try to bake in the center and rotate if needed to get even results. For the glaze, I sometimes add a splash of lemon juice to give it a little zing or a teaspoon of espresso powder for a mocha twist — trust me, these small changes make a big difference. Every bake teaches me something new, but the core remains a beloved family classic I keep coming back to because it’s so forgiving and utterly delicious.
Storing and Reheating Tips
This cake is actually just as good the next day — if you keep it in an airtight container, it stays moist and fresh for about 2-3 days at room temperature. I usually cover it with a cake dome or a large plate to keep away any lingering fridge odors. If it’s warm outside or you live in a humid climate, pop it in the fridge — just remember to bring it back to room temp or warm it slightly before serving for that cozy, fresh-baked feel. For longer storage, it freezes beautifully: wrap it tightly in plastic wrap, then foil, and store for up to 3 months. Thaw at room temperature or warm slices in the microwave for a quick treat. If you’re saving the glaze for later, hold off until serving day — it’s just the perfect finishing touch fresh, but it can make the cake slightly soggy if added too early. I’ve found that a little reheating helps revive the moistness; just a quick 10-second warm-up is enough for that just-baked magic.
Frequently Asked Questions
Final Thoughts
If you’re looking for a way to jazz up your typical cake repertoire with something a little different, this zucchini swirl cake is your new best friend. It’s cozy, versatile, and forgiving — I’ve made it on busy weeknights, with leftover zucchini from the garden, and for fancy brunches. Every time, it’s a hit. The combination of cinnamon, tender cake, and the hidden veggie secret makes it feel comforting but a little sneaky in the best way. I love how the swirl pattern turns out almost too pretty to eat, but once you slice into it, you’ll be hooked. Trust me, once you get the hang of swirling that cinnamon, you’ll feel like a pro. This recipe is a wonderful reminder that dessert can still be nourishing, simple, and utterly delicious. I can’t wait to hear how yours turns out — and if you add your own little twist, even better! Happy baking, my friend — and don’t forget to leave a comment or share your photos!
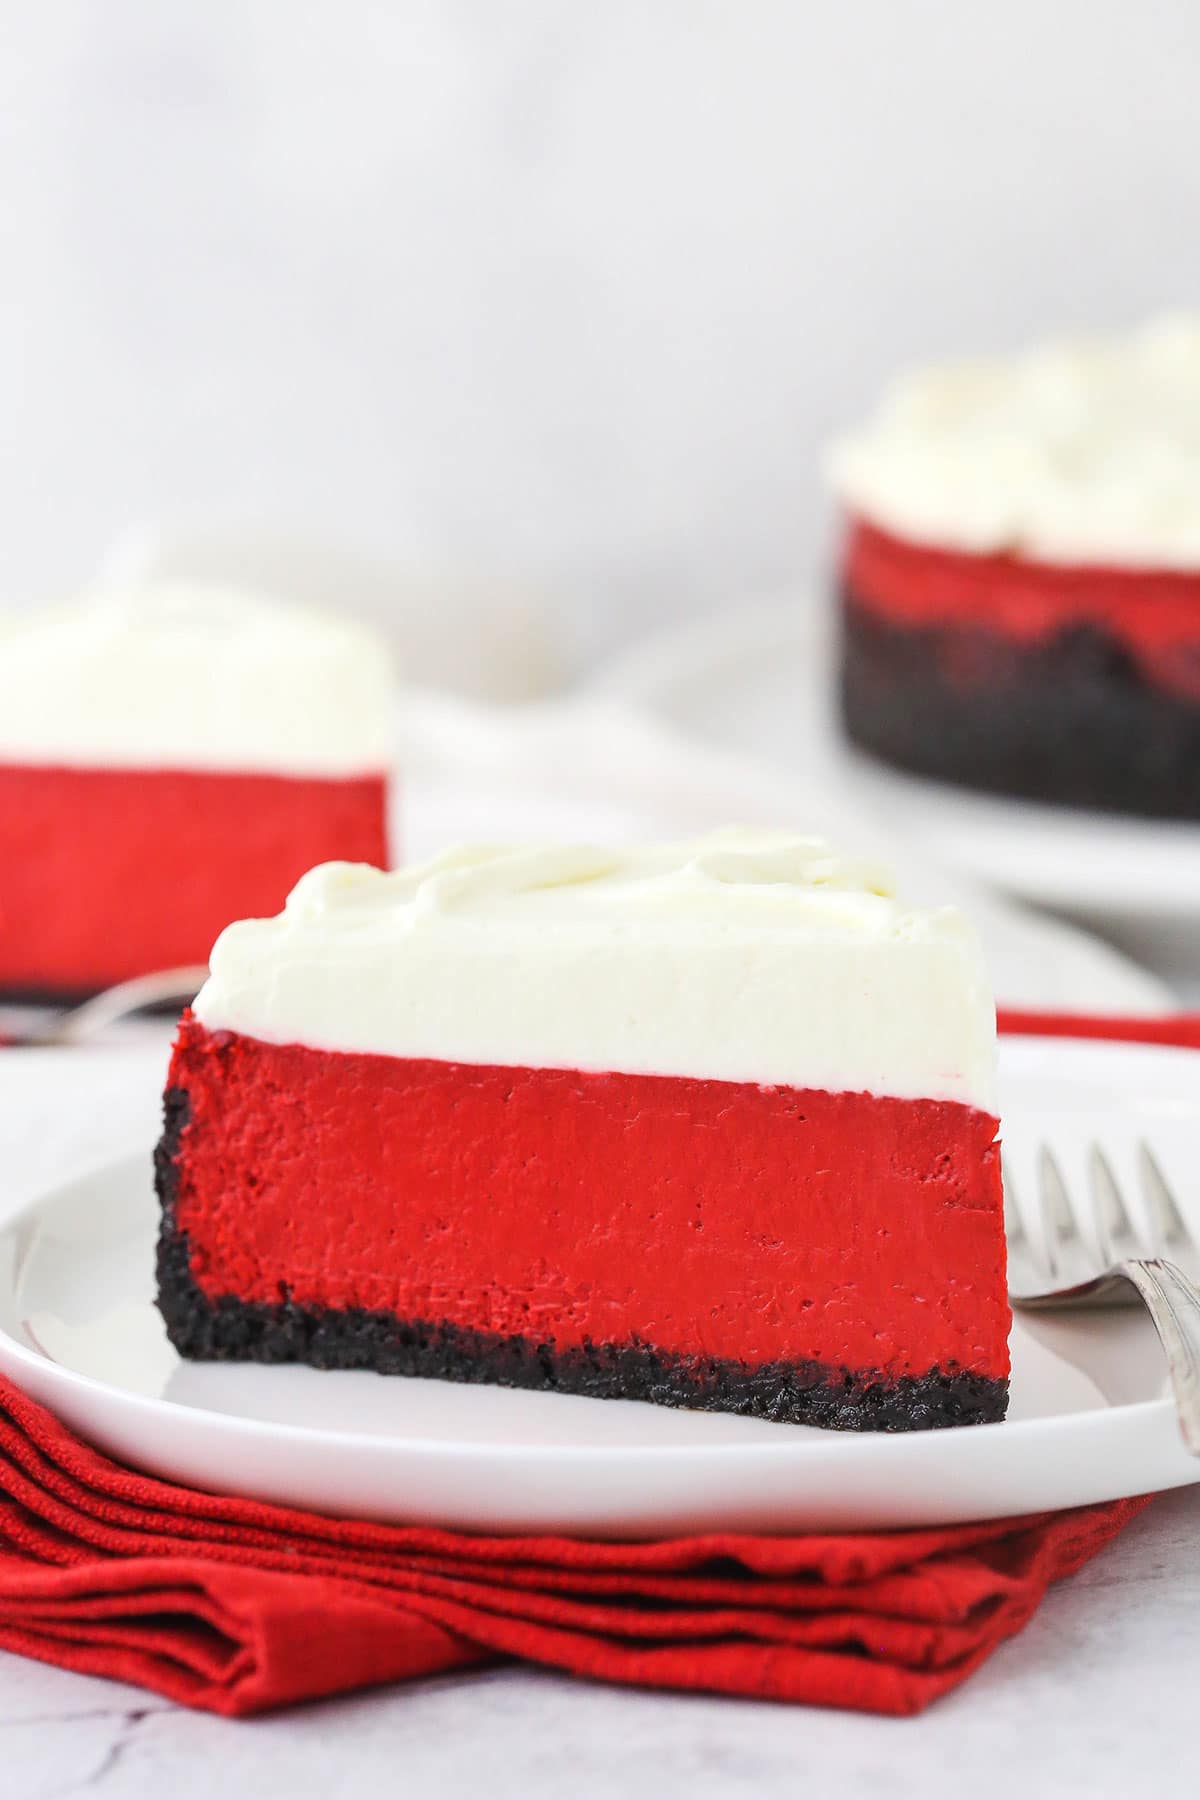
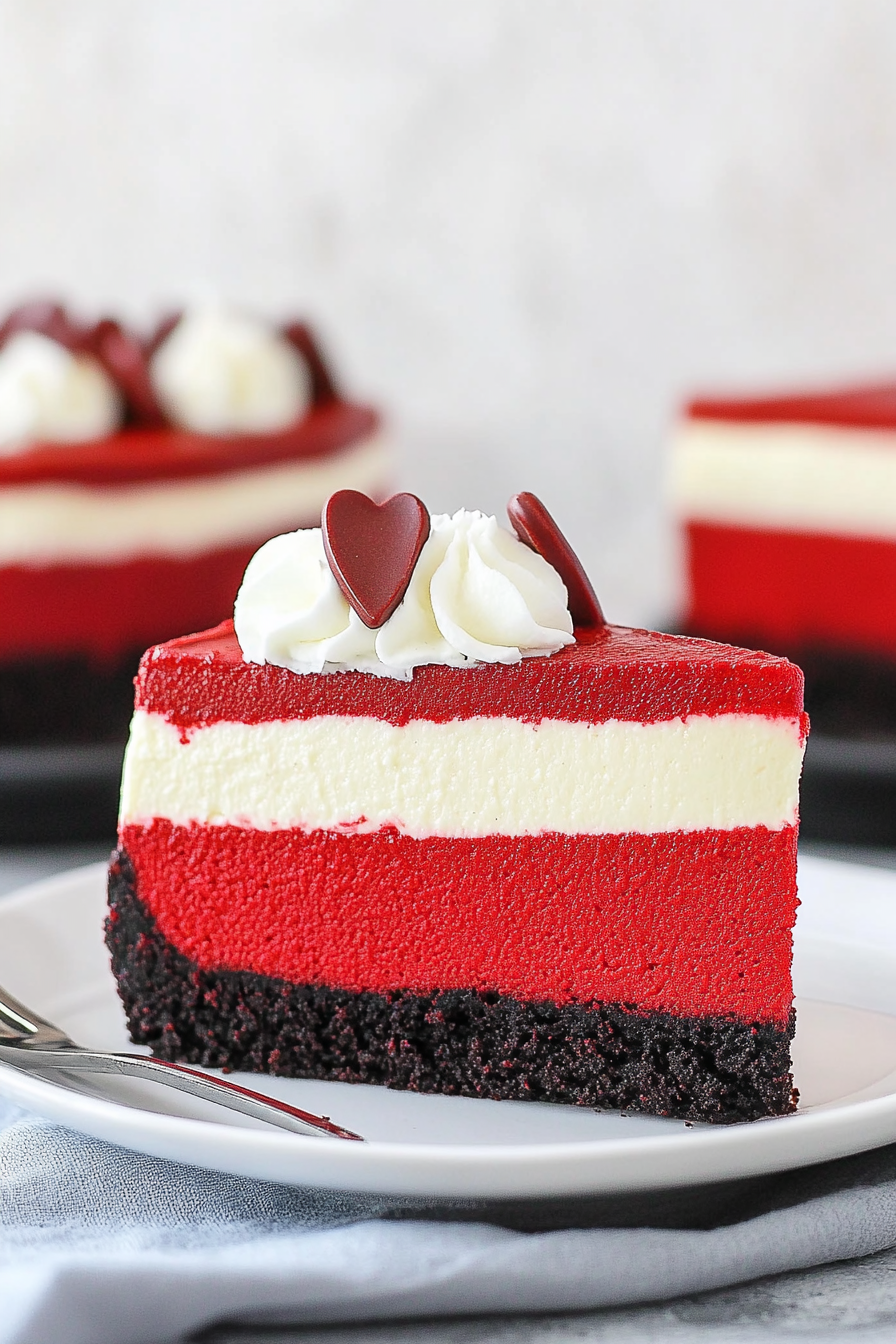
red velvet cheesecake
Ingredients
Method
- Preheat oven to 325°F. Line a 9-inch springform pan with parchment and grease the sides.
- Combine crushed Oreos with melted butter to make the crust. Press into the bottom of the prepared pan.
- Bake the crust for 10 minutes. Set aside to cool.
- In a large bowl, beat cream cheese, sugar, and cocoa powder until smooth.
- Add sour cream and buttermilk, mixing on low. Add eggs one at a time, then vanilla, food coloring, and vinegar.
- Pour the batter over the crust. Cover with foil and place in a water bath. Bake for 1 hour 45 minutes.
- Turn off oven, crack door, and cool for 30 minutes. Remove from water bath and refrigerate until firm (at least 4 hours).
- Whip heavy cream with powdered sugar and vanilla until stiff peaks form.
- Gently fold whipped cream into softened cream cheese and spread over cheesecake.

Wow, this cheesecake sounds absolutely divine! I love how it’s rich but still feels light—perfect for any celebration.
I love the idea of a zucchini cheesecake—surprising yet delicious! How does the zucchini affect the texture?
I never thought zucchini could make such a rich dessert, but this cheesecake is incredible—smooth, velvety, and totally addictive!
I love cheesecake, but zucchini? I’m intrigued—how does that change the texture without watering it down?
I love cheesecake, but adding zucchini is a game-changer! Can’t wait to try this version—it sounds both rich and refreshing.