
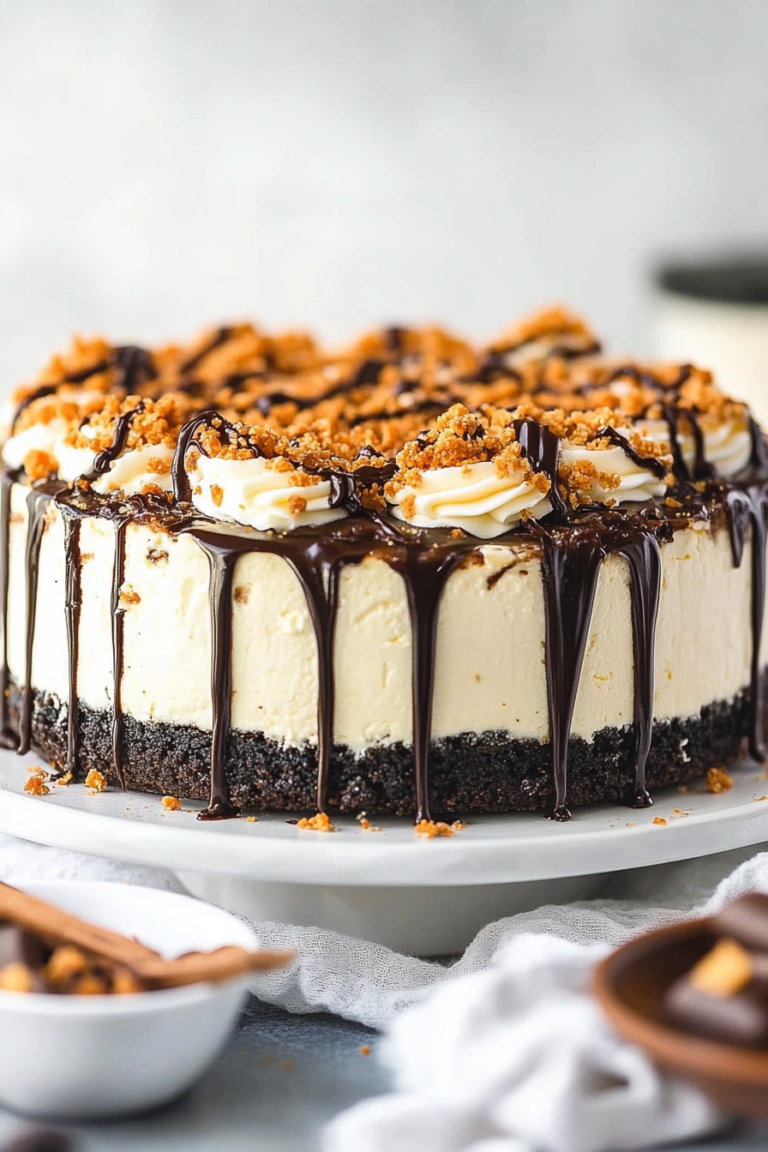
Crimson Velvet Cheesecake How to Make It
If I had to pick a favorite dessert to make when I want something comforting but not overly fussy, it’s this zucchini swirl cake. Honestly, it’s become a family staple—my kids ask for it all the time, especially when I want to sneak in some hidden veggies (because let’s be honest, especially with busy mornings, sneaking in nutrition is a win). The smell alone when it’s baking—like vanilla, cinnamon, and just a hint of summer—always pulls everyone into the kitchen. And, trust me, it’s way easier to whip up than most people think. This one’s a lifesaver on busy nights when I want something homemade but I don’t want to fuss for hours. Plus, it’s pretty versatile—you can swap ingredients, play with flavors, or make it a little healthier without sacrificing the tender, moist crumb. I’ve tested this with almond milk (made it even creamier!) and used walnuts instead of pecans—each version is a hit. Honestly, I know you’ll love how warm and inviting this cake smells, looks, and tastes. It’s like a little piece of Sunday morning, any day of the week. Ready to bake up some magic? Let’s go! But fair warning—it disappears pretty fast at my house, so I always double the batch.
What is Zucchini Swirl Cake?
This zucchini swirl cake is basically a cozy, moist loaf cake swirled with spiced cinnamon and hints of vanilla, with tiny bits of sweet zucchini hidden inside—kind of like a soft, tender treasure hunt. Think of it as a comforting hybrid between a classic coffee cake and a quick bread, but with a little artistic swirl that makes it feel a bit special. The name “swirl” actually comes from how I gently layer the cinnamon-spiced batter with the zucchini mixture, creating a beautiful marbled effect when you slice into it. It’s essentially a cake designed for those afternoons when you need a sweet pick-me-up or a casual dessert that feels like a warm hug. I love that it’s straightforward enough for beginners but has enough depth of flavor to impress anyone. And it’s a great way to use up extra zucchini in the summer—such a sneaky way to get your kids (and yourself) eating more greens without them even realizing it. Plus, the texture? Soft, slightly dense, but still crumbly enough to feel homemade—nothing too fancy or perfect, just good honest baking that makes your kitchen smell irresistible.
Why you’ll love this recipe?
Honestly, what I love most about this zucchini swirl cake is how adaptable and forgiving it is. If you’re like me, you’ve probably ruined a batch of muffins or bread by overmixing—trust me, I’ve learned my lesson the hard way! But this cake is different. It’s almost impossible to mess up, which makes it perfect for those days when you want something cozy but don’t want to stress over tiny details. The flavor is just incredible—warm cinnamon, vanilla, and a touch of nutty sweetness from the zucchini—my house always smells like a dream when it’s baking. Plus, it’s budget-friendly, with ingredients I usually keep in my pantry—flour, sugar, some spices, and an zucchini or two that’s been hanging out in the fridge. You can even swap in apples or carrots if zucchini isn’t around, making it super versatile. What really keeps me coming back is how this cake always feels special yet effortlessly simple. My favorite part? The swirl pattern—the way it looks when you cut into it is so pretty, like a little piece of art. My kids actually ask for seconds, and the best part? It’s just as good the next day, slightly warm or even cooled. This one’s a keeper, I promise!
How do I make Zucchini Swirl Cake?
Quick Overview
This cake starts with a basic batter—fluffy, slightly sweet, with a hint of vanilla. You’ll prepare your zucchini mixture first, just grate and squeeze out some extra moisture (so it doesn’t make your cake soggy). Then, you’ll layer your batter in a loaf pan, sprinkling cinnamon-sugar and dolloping the zucchini mix inbetween, swirling gently to get that gorgeous marbled look. Baking is straightforward—about 50 minutes in the oven, but I always start checking around 45 because ovens vary. Once it’s golden on top and a toothpick comes out clean, you’re ready. Cool for a bit, then drizzle with a simple glaze if you’re feeling fancy. It’s honestly one of those recipes where beginners get a confidence boost, and seasoned bakers will appreciate the rustic beauty and depth of flavor. And the best part? It’s great for breakfast, coffee, or a cozy afternoon treat. No fuss, just pure, comforting baking.
Ingredients
For the Main Batter:
– 2 cups all-purpose flour (I always sift it to keep the texture light)
– 1 1/2 teaspoons baking powder
– 1/2 teaspoon baking soda
– 1/2 teaspoon salt
– 1 teaspoon ground cinnamon (trust me, it makes all the difference)
– 1/2 cup granulated sugar
– 1/2 cup brown sugar (adds richness)
– 1/2 cup vegetable oil (or melted butter if you prefer a richer cake)
– 2 large eggs
– 1 teaspoon vanilla extract
– 3/4 cup milk or almond milk (for extra creaminess, I’ve even used coconut milk!)
For the Filling:
– 1 medium zucchini, grated and squeezed to remove excess moisture (don’t skip this step!)
– 2 tablespoons brown sugar
– 1 teaspoon ground cinnamon
– Optional: 1/4 cup chopped walnuts or pecans (for added crunch)
For the Glaze:
– 1 cup powdered sugar
– 2-3 teaspoons milk or cream
– 1/2 teaspoon vanilla extract
– A pinch of cinnamon (for extra aroma)
Step-by-Step Instructions
Step 1: Preheat & Prep Pan
Preheat your oven to 350°F (175°C). Grease a standard loaf pan with butter or use parchment paper to keep things easy. I always do this first so I can get my batter ready without rushing. Plus, a well-prepped pan helps your cake come out perfectly and leaves fewer crumbs behind. If you want a rustic look, just a light coating of butter and a sprinkle of flour works just fine.
Step 2: Mix Dry Ingredients
In a large bowl, whisk together your flour, baking powder, baking soda, salt, and cinnamon. This step ensures your leavening agents are evenly distributed, so your cake rises uniformly. I’ve learned over the years that sifting flour is so worth it—the crumb turns out lighter and fluffier that way. Plus, it prevents lumps and uneven pockets of baking soda or powder.
Step 3: Mix Wet Ingredients
In another bowl, beat together the sugars, oil, eggs, and vanilla until smooth. I find it easiest to use a whisk or hand mixer until everything looks slightly frothy and well combined. Add the milk gradually—trust me, it helps keep the batter smooth and prevents overmixing. When I tested this with almond milk, it made everything even creamier and added a mild nutty flavor that I loved.
Step 4: Combine
Pour your wet mixture into the dry ingredients. Gently fold everything together with a spatula—don’t overmix! You want just combined, with no streaks of flour. Overmixing tends to make the cake dense, and nobody wants that. Just a few gentle folds are enough—they’ll develop a tender crumb.
Step 5: Prepare Filling
While the batter rests, combine your grated zucchini with brown sugar, cinnamon, and nuts if you’re using them. Let it sit for 5 minutes to allow the sugar to sweeten the zucchini and soften it a little—this little step really enhances the flavor. Make sure to squeeze out as much moisture as possible from the zucchini before adding it to the batter, or your cake might come out a tad soggy. I always do this by wrapping the grated zucchini in a clean dish towel and giving it a good squeeze.
Step 6: Layer & Swirl
Pour about half of the batter into your prepared pan. Smooth it out with your spatula, then sprinkle half of the cinnamon-sugar mixture over the top. Dollop spoonfuls of the zucchini mixture on top and swirl with a knife or skewer. Repeat with remaining batter, cinnamon, and zucchini, swirling again. This creates those beautiful marbled patterns that make the cake so pretty and fun to cut.
Step 7: Bake
Place in your preheated oven and bake for about 50 minutes. I check for doneness around 45 minutes—your house smells so good by then! You’ll know it’s ready when the top is golden and a toothpick inserted into the center comes out clean. If it starts to brown too quickly, tent it with foil for the last 10 minutes.
Step 8: Cool & Glaze
Let the cake cool in the pan for about 15 minutes, then transfer it to a wire rack. I usually wait until it’s room temperature before glazing—it makes spreading the glaze easier and prevents melting. Mix powdered sugar with milk and vanilla until smooth—add extra milk if it’s too thick or a bit more powdered sugar if it’s too runny. Drizzle it over the top while the cake is still slightly warm—you’ll get that beautiful glossy finish that’s just irresistible.
Step 9: Slice & Serve
Use a sharp serrated knife for clean cuts, and serve slices slightly warm or at room temperature. This cake is insanely good with a dollop of whipped cream or a splash of extra vanilla. Honestly, I think it’s perfect on its own—moist, tender, with those lovely swirls of cinnamon and zucchini peeking through. My kids love it warm with a bit of butter melting on top, but leftovers are just as delicious the next day for a quick breakfast or afternoon snack.
What to Serve It With
This zucchini swirl cake is so cozy in so many ways. For breakfast, I love it with a good strong coffee or a glass of cold milk—it’s not overly sweet, so it pairs perfectly with your morning brew. On weekends, we do a brunch with a side of fresh berries and a drizzle of honey—nothing too fancy, just easy elegance. As a dessert, I serve it with a scoop of vanilla ice cream or a dollop of Greek yogurt, especially if I want to turn up the gourmet vibe. For an afternoon pick-me-up, I’ll slice a warm piece and nibble while reading or chatting with friends. It’s also fantastic as a casual snack—you don’t even need utensils; just grab and go. I’ve even made mini muffins with this batter, baking at 350°F for about 20-25 minutes. My kids’ friends always ask for thirds, and I swear the secret is how the zucchini keeps everything so moist and tender. No matter how you serve it, it’s a little slice of comfort you’ll keep coming back to.
Top Tips for Perfecting Your Zucchini Swirl Cake
Over the years, I’ve picked up a few tricks that make this recipe even better:
- Zucchini Prep: Always squeeze out as much moisture as possible. I wrap the grated zucchini in a clean kitchen towel and give it a firm squeeze—this prevents sogginess and keeps your cake tender.
- Mixing Advice: Gently fold the ingredients together—overmixing is the enemy here! It can turn your lovely batter into a dense, leaden loaf. Think light and airy.
- Swirl Techniques: For the prettiest marbled pattern, don’t overmix after adding the zucchini. Layer carefully, and use a skewer or butter knife to create gentle swirls—bright swirls look gorgeous and make each slice feel special.
- Ingredient Swaps: I’ve experimented with adding chopped walnuts or coconut flakes for texture. Apple chunks work beautifully too—just remember to adjust your sugar because of their sweetness.
- Baking Tips: Every oven is different, so start checking around 45 minutes—your toothpick should come out clean, and the top should be lightly golden. If it browns too quickly, tent it with foil.
- Glaze Variations: Try a lemon glaze or sprinkle with chopped nuts for added flair. If you’re feeling adventurous, fold in a little cocoa powder into the batter for a chocolate twist!
One thing I’ve learned: patience is key. Letting your cake cool fully before glazing prevents the glaze from sliding off, and it helps develop those flavors even more. Also, don’t stress if your swirl isn’t perfectly defined—this cake is rustic and charming in that imperfect way. It’s homemade, heartfelt baking at its best.
Storing and Reheating Tips
This cake keeps surprisingly well. If you can resist, store slices in an airtight container at room temperature for up to two days—cover loosely with foil to avoid drying out. After that, I pop slices into the refrigerator, where they stay fresh for about 4 days. For longer storage, wrap individual slices tightly in plastic wrap, then freeze for up to 3 months. When you’re ready to eat, thaw at room temperature or warm slices in the microwave for about 20 seconds—just enough to bring back that comforting warmth. If you’re serving with glaze, wait until just before serving to drizzle, especially if it’s been refrigerated; the glaze is best when fresh. Chilling the cake slightly helps it slice more neatly, especially if the batter was extra moist. The secret is to keep it wrapped well—moisture is a baker’s best friend, but too much moisture can turn your beautiful cake into a soggy mess. Trust me, maintaining that perfect balance makes all the difference. And if you want to add a fresh sprinkle of cinnamon or powdered sugar before serving, do that just before slicing for a pretty presentation and an extra aroma boost.
Frequently Asked Questions
Final Thoughts
If there’s one thing I want you to know, it’s that this zucchini swirl cake is more than just a dessert—it’s a little piece of comfort that feels homemade in every bite. The marriage of tender cake, cinnamon-spiced swirl, and hidden zucchini keeps it moist and flavorful, yet totally achievable even on busy weekdays. Every time I bake this, I think about how simple ingredients can create something so warm, nostalgic, and downright delicious. It’s become a tradition in my house—an easy way to celebrate summer zucchinis or just indulge in a sweet treat that’s not too heavy. I hope you try it, tweak it, and fall in love just like I did. And I’d love to hear your variations—so don’t be shy, leave a comment or share your photos! Happy baking, and may your house smell as wonderful as mine does right now—filled with cinnamon, vanilla, and the promise of a cozy moment. Enjoy every bite!
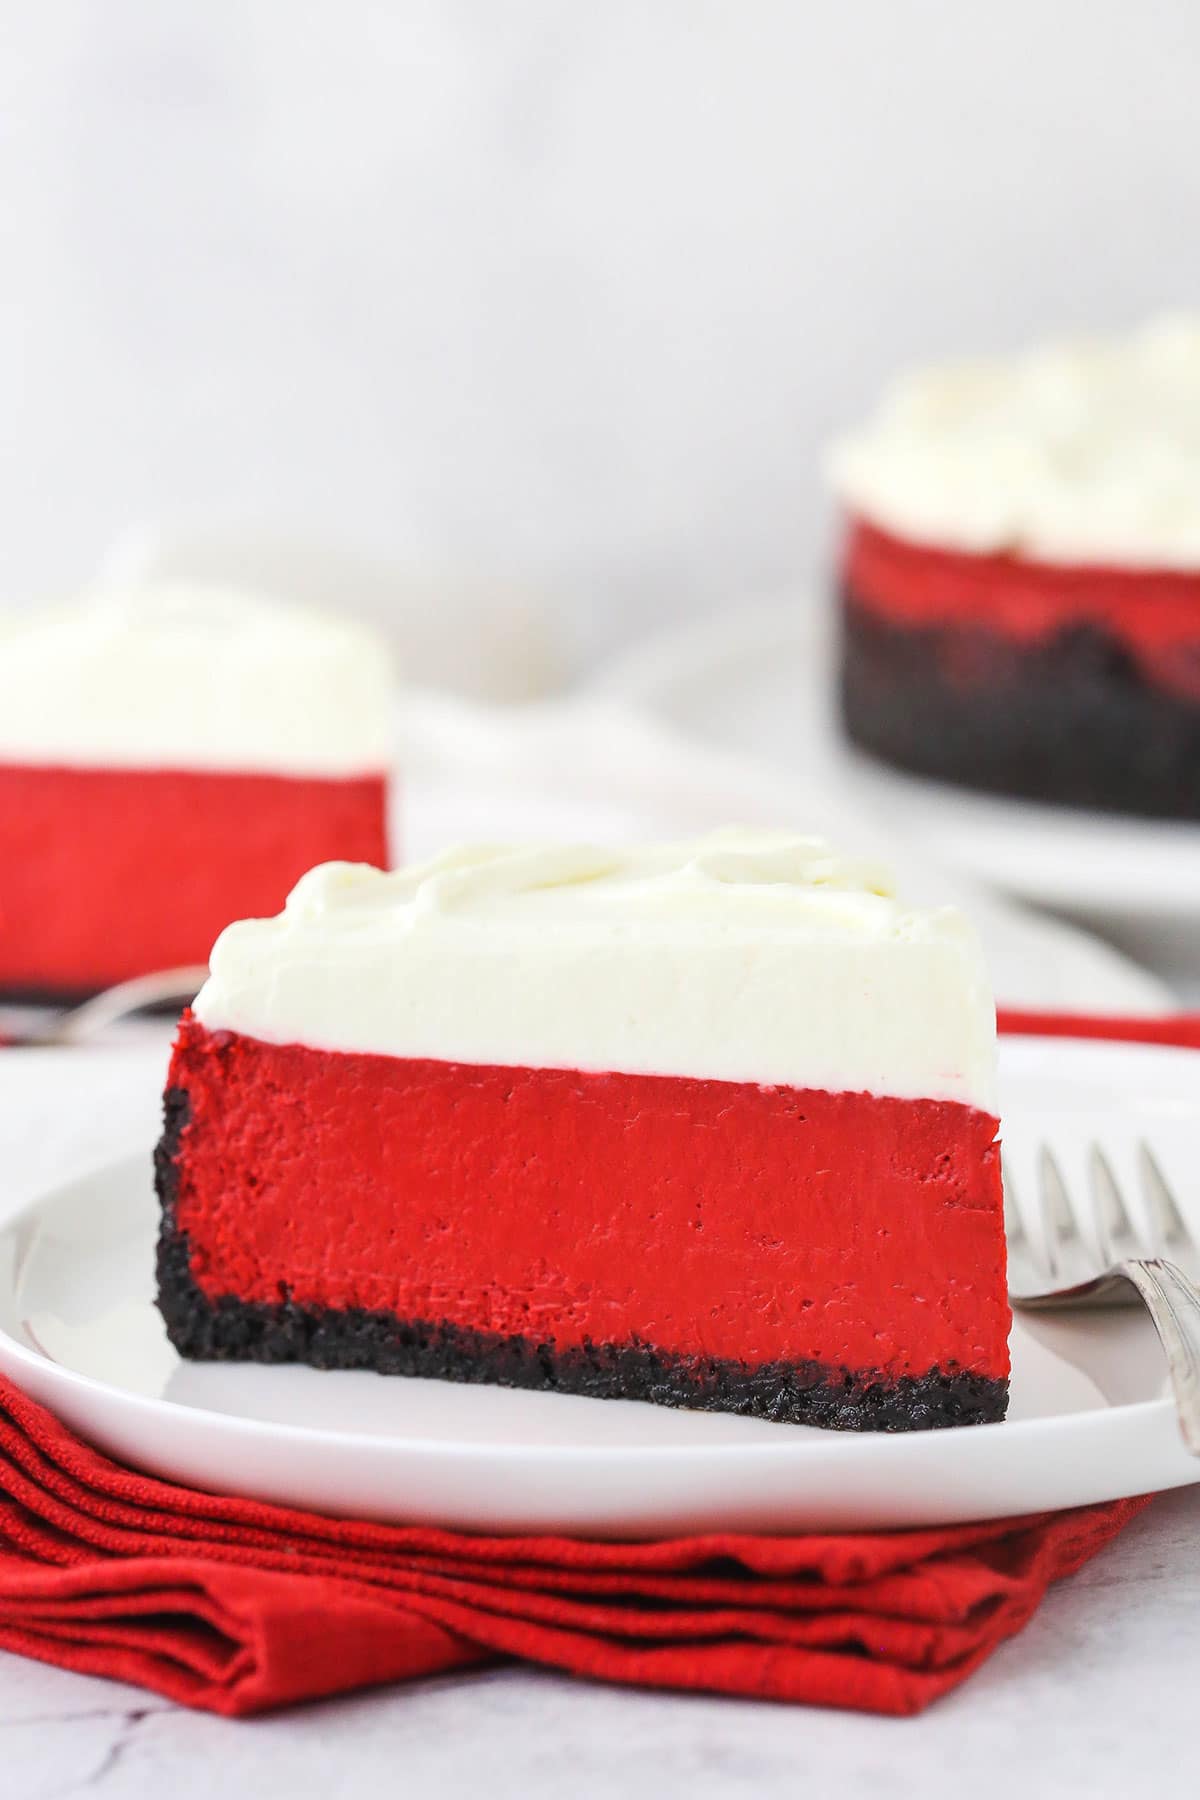
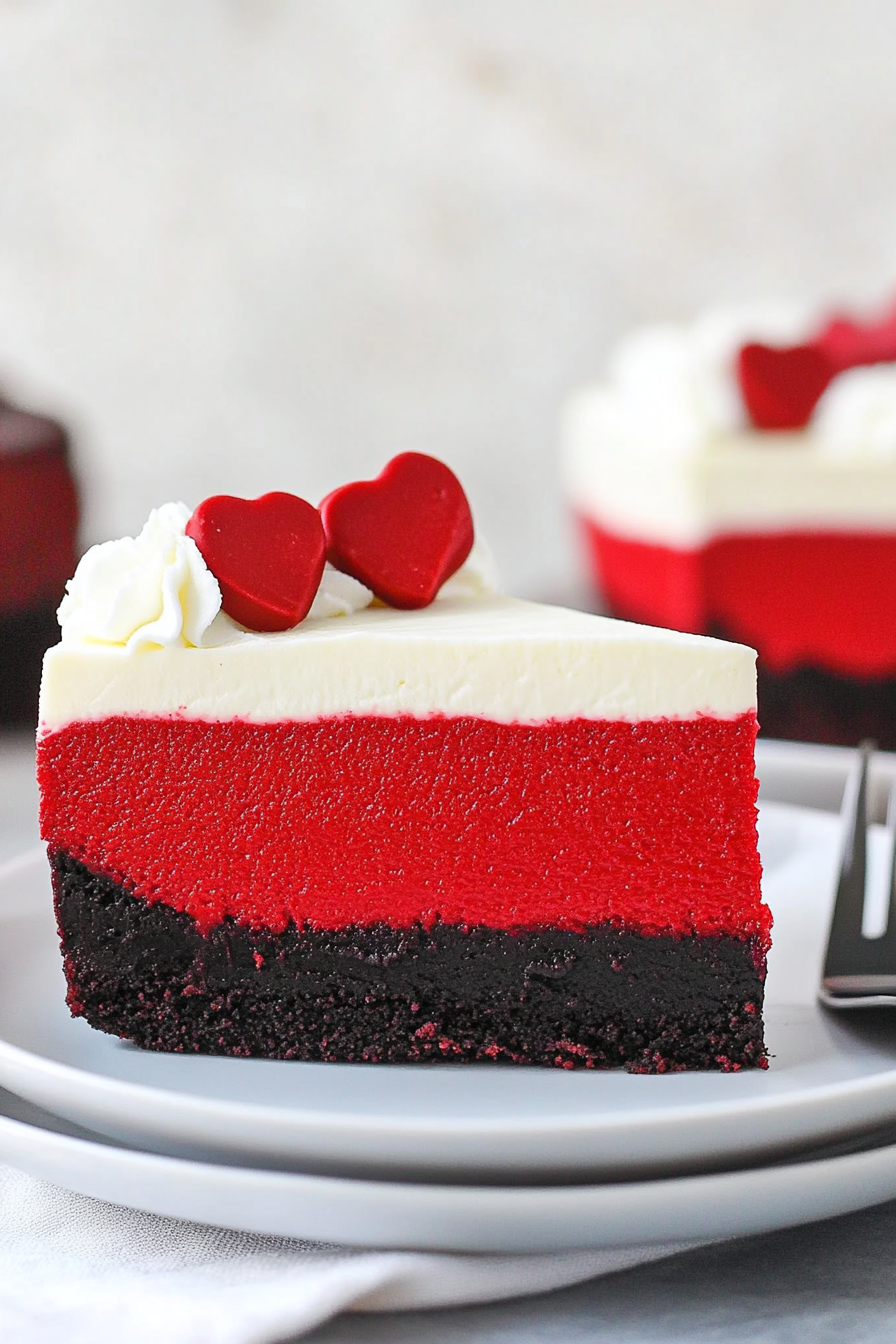
red velvet cheesecake
Ingredients
Method
- Preheat oven to 325°F. Line a 9-inch springform pan with parchment paper and grease the sides.
- Prepare the crust by crushing Oreos and mixing with melted butter. Press into the bottom of the pan and bake for 10 minutes. Cool completely.
- Reduce oven temperature to 300°F. Beat cream cheese, sugar, and cocoa powder until smooth. Add sour cream and buttermilk and mix well.
- Add eggs one at a time, mixing slowly. Mix in vinegar, vanilla, and food coloring until fully incorporated.
- Pour batter over crust. Place the springform pan inside a water bath and bake for 1 hour 45 minutes. Turn off oven and leave door closed for 30 minutes. Cool and refrigerate overnight.
- Make whipped cream by beating heavy cream with powdered sugar and vanilla until stiff peaks form. Spread over cooled cheesecake and refrigerate before serving.

Looks delicious! I love cheesecakes, and this sounds perfect—comforting but still impressive. Would you recommend any special tips for the crust?
Love the simplicity and comfort this cheesecake sounds like—perfect for a cozy treat without the stress!
Love this cheesecake recipe! It sounds perfect—comforting but still special. Zucchini swirl cake is such a great idea too, I’ll have to try it soon.
Looks delicious—I’ve been wanting to try something like this! Does the cheesecake layer hold up well with the zucchini?
Love how this cheesecake sounds rich and comforting—definitely adding it to my must-try list!