
Easy Pressure Cooker Pot Roast Dinner
One of my earliest memories in the kitchen is sneaking a spoonful of batter while my mom baked her zucchini cake. That sweet, almost velvety texture mixed with the fresh, slightly earthy flavor of zucchini always made me feel like I was getting a secret treat—something special. Over the years, I’ve played around with that recipe, tweaking it until it became this incredibly moist, lightly spiced zucchini swirl cake that my whole family asks for. It’s honestly one of those recipes that feels like a warm hug—a perfect balance of comfort, sweetness, and freshness. And, let me tell you, it’s surprisingly easy to make! This one’s a lifesaver on busy nights when dessert feels like an afterthought but you still want something homemade and satisfying. Plus, the aroma alone when it’s baking is enough to make anyone’s day better. If you love a little dash of nostalgia and a whole lot of flavor, stick around—I’ll share all my tips and secrets below.
What is Zucchini Swirl Cake?
Think of zucchini swirl cake as a delightful twist on traditional quick bread or loaf cake. It’s essentially a tender, moist cake infused with fresh zucchini, which gives it that lovely, subtle veggie note—kind of like a secret ingredient. The “swirl” part refers to the beautiful marbled, cinnamon-sugar pattern that runs through each slice, making it as gorgeous as it is tasty. The name comes straight from how I layer the cinnamon-spiced filling into the batter and then swirl it through—kind of like making a cinnamon roll, but in cake form. It’s the perfect way to sneak some extra veggies into dessert (because, trust me, no one will notice), and it’s amazing when served for breakfast with a little dusting of powdered sugar or topped with cream cheese frosting for a brunch crowd. The versatility of this recipe makes it a go-to for everything—snacks, picnics, or even a quick sweet pick-me-up after a long day.
Why you’ll love this recipe?
What I love most about this zucchini swirl cake is how it manages to be both simple and deeply satisfying. The flavor—oh, it’s just heavenly. The warm aroma of cinnamon and vanilla paired with the fresh zucchini makes it smell like fall in a loaf. It’s the kind of dessert that gets better with each day, staying moist and tender without drying out. And let’s not forget how budget-friendly it is—most of the ingredients are pantry staples or things I always keep on hand. I’ve made this with regular all-purpose flour, but I’ve also tested it with almond flour, and honestly, it added a little nuttiness that I loved! This cake is so versatile—I’ve served it plain, dusted with powdered sugar, or dressed up with a whipped cream topping. It’s a crowd-pleaser without the fuss, and my kids actually ask for seconds. The swirled pattern makes it look fancy, but I promise, it’s a breeze to assemble. Once you get the hang of swirling the filling, it’s almost meditative—such a satisfying part of the process!
How do I make Zucchini Swirl Cake?
Quick Overview
This zucchini swirl cake comes together quickly with natural ingredients and straightforward steps. The batter is smooth, moist, and fragrant, folded with shredded zucchini—don’t worry about excess moisture; I always squeeze out a little after shredding. The cinnamon-sugar filling is layered and swirled into the batter before baking, creating that gorgeous marbled look. The best part? It’s baked in one pan, so cleanup is a breeze. Once it’s done—ah, that smell!—you’ll let it cool just enough before slicing into that beautiful swirl pattern. Serve it warm or at room temperature, and enjoy the compliments pouring in. This recipe is flexible, forgiving, and downright addictive.
Ingredients
For the Main Batter:
– 2 cups all-purpose flour (or gluten-free blend if needed, just swap in equal measure)
– 1 1/2 teaspoons baking powder
– 1/2 teaspoon baking soda
– 1/4 teaspoon salt
– 1 teaspoon ground cinnamon
– 1/2 teaspoon ground nutmeg (optional, but adds warmth)
– 1/2 cup granulated sugar
– 1/2 cup brown sugar (for deeper flavor)
– 1/2 cup vegetable oil or melted coconut oil
– 3 large eggs
– 1 teaspoon vanilla extract
– 1 cup freshly shredded zucchini (about 1 medium zucchini, shredded and squeezed dry)
For the Filling:
– 1/4 cup brown sugar
– 1 teaspoon ground cinnamon
– 2 tablespoons softened butter or coconut oil
– Optional: a dash of nutmeg or a pinch of ground ginger for extra warmth
For the Glaze:
– 1/2 cup powdered sugar
– 1-2 teaspoons milk or lemon juice
– A few drops of vanilla, if desired
– Optional: a sprinkle of cinnamon or zest for extra flavor
Step-by-Step Instructions
Step 1: Preheat & Prep Pan
Start by heating your oven to 350°F (175°C). Grease a 9×5-inch loaf pan or line it with parchment paper—trust me, parchment is your best friend here! This helps the cake come out in one piece, no sticking. Set aside your prepared pan while you get the batter ready—it’ll save you time later.
Step 2: Mix Dry Ingredients
In a large bowl, whisk together the flour, baking powder, baking soda, salt, cinnamon, and nutmeg if you’re using it. It’s important to mix these thoroughly so everything incorporates evenly—this is what keeps the cake light and airy. A good whisk or sifter makes this step go faster and more evenly.
Step 3: Mix Wet Ingredients
In a separate bowl, beat together the sugars, eggs, and vanilla until well combined—about 2 minutes. Add the oil and mix until smooth. I always make sure the eggs are at room temperature; it helps everything blend better. Then, gently fold in the shredded zucchini—press out any excess moisture with your hands or a cloth before adding. This prevents the batter from getting soggy and keeps your cake nice and tender.
Step 4: Combine
Pour the wet ingredients into the dry and stir gently until just combined—don’t overmix, or the cake might get dense. It’s okay if there are a few lumps; that’s normal. Overmixing makes the batter tough, and we want soft, fluffy cake, not rubbery. If it seems too thick, a splash of milk can loosen it up a bit.
Step 5: Prepare Filling
Mix together the brown sugar, cinnamon, and softened butter in a small bowl. I love making sure the butter is soft but not melted—this way, it’s easier to spread and swirl. Feel free to add a pinch of ginger or a dash of nutmeg if you’re feeling fancy. This will be the sweet, spicy layer that transforms the cake into something special.
Step 6: Layer & Swirl
Pour half of the batter into your prepared pan and spread evenly. Then dollop spoonfuls of the cinnamon mixture over the batter. Pour the remaining batter on top, and using a butter knife or skewer, gently swirl through the layers—make big S-shaped strokes to create that beautiful marbled effect. Trust me, the more artistic your swirl, the prettier the final cake!
Step 7: Bake
Pop it into the oven and bake for 50-60 minutes. Check for doneness by inserting a toothpick into the center—it should come out clean or with just a few moist crumbs. Every oven is different, so start checking around the 50-minute mark. Once baked, let it cool in the pan for about 15 minutes before transferring to a wire rack.
Step 8: Cool & Glaze
Allow the cake to cool completely before glazing. Mix the powdered sugar with milk or lemon juice until smooth—adjust the liquid a little at a time till you get the right drizzle-worthy consistency. Drizzle over the cooled cake, and sprinkle with extra cinnamon or zest if you want—I like to keep it simple, but a little flair never hurts!
Step 9: Slice & Serve
Use a serrated knife to slice through the swirl neatly—this cake holds its shape beautifully if cooled properly. Serve slices on their own or with a dollop of whipped cream or a scoop of vanilla ice cream. It’s fabulous warm or at room temp, and honestly, it’s just as good the next day—if it lasts that long!
What to Serve It With
This cake is so versatile I almost consider it a chameleon. For breakfast, a cup of fresh coffee or chai makes the perfect pairing—just a light dusting of powdered sugar if you’re in a rush. I’ve even served slices with a smear of mascarpone or cream cheese for a fancy brunch. It’s lovely as an after-dinner treat, paired with a hot cup of tea or a splash of sweet dessert wine. My kids love it as a snack after school, especially when I hide extra zucchini in there—shhh!—and I’ve made mini muffins with this batter too, baking them for about 20 minutes. It’s a crowd-pleaser no matter how you serve it. I love that you can dress it up or down, depending on the occasion, making it my go-to anytime I want a cozy, sweet moment with family or friends.
Top Tips for Perfecting Your Zucchini Swirl Cake
Like with any baking, a few little tricks make all the difference. First, always squeeze out excess moisture from your shredded zucchini. I learned the hard way that too much water makes the batter runny and the cake dense. A simple squeeze with your hands or a clean tea towel does wonders. When mixing, avoid overworking the batter—gentle folds are key to fluffy, tender cake. As for the swirl, don’t be too timid—make big, sweeping motions with your skewer or knife to get a nice marbled pattern. If you want a more vibrant look, try adding a few drops of food coloring to part of the swirl—my kids think that’s super fun! Substituting ingredients is totally doable, too. I’ve tested this with gluten-free flour, and it still came out moist and flavorful, just with a slightly denser crumb. When baking, always keep an eye on the oven around the 50-minute mark—every oven bakes a little differently. If you’re experimenting with sugar, reducing it slightly still yields a delicious cake, though I recommend trying it first as written because the balance of sweetness really makes it shine.
The biggest lesson I’ve learned is patience—let it cool completely before slicing or glazing. The flavor deepens overnight, and the swirl becomes more pronounced. Trust me, the wait pays off!
Storing and Reheating Tips
This cake stays amazing for days. If you’re planning to eat it within a few days, keep it wrapped tightly in plastic or stored in an airtight container at room temperature—up to 2 days. After that, pop it in the fridge—just be sure to cover it well; it can dry out if exposed. For longer storage, the freezer is your friend. Wrap individual slices tightly in plastic wrap and then foil—they’ll last a month like this. To reheat, microwave a slice for about 15-20 seconds until warm or let it come to room temperature. I always wait to glaze it until just before serving if stored in the fridge; this keeps the glaze shiny and fresh. If you’re in a hurry, warming the slice briefly in the microwave will make it feel just baked again. Just remember to cover it lightly so it doesn’t dry out or get soggy—the goal is that perfect moist crumb every time.
Frequently Asked Questions
Final Thoughts
This zucchini swirl cake is truly a treasure—I’ve made it so many times that I’ve lost count, and every single slice reminds me why I keep coming back to it. The combination of moist, tender crumb and the spicy cinnamon swirl makes it feel special, yet it’s one of the easiest homemade desserts you can whip up on a busy weekday. It’s a lovely way to sneak some veggies into dessert, and honestly, nobody complains about that—my kids ask for this all the time! Plus, it’s adaptable: gluten-free, muffins, glaze or no glaze, the possibilities are endless. I love sharing this recipe because it’s one I’ve perfected with love and a few funny trial-and-error moments. If you try it, I’d love to hear how it turned out—leave a comment or snap a photo! Happy baking, friends. And don’t forget to enjoy a big cup of coffee while you’re at it—this cake pairs perfectly with it.

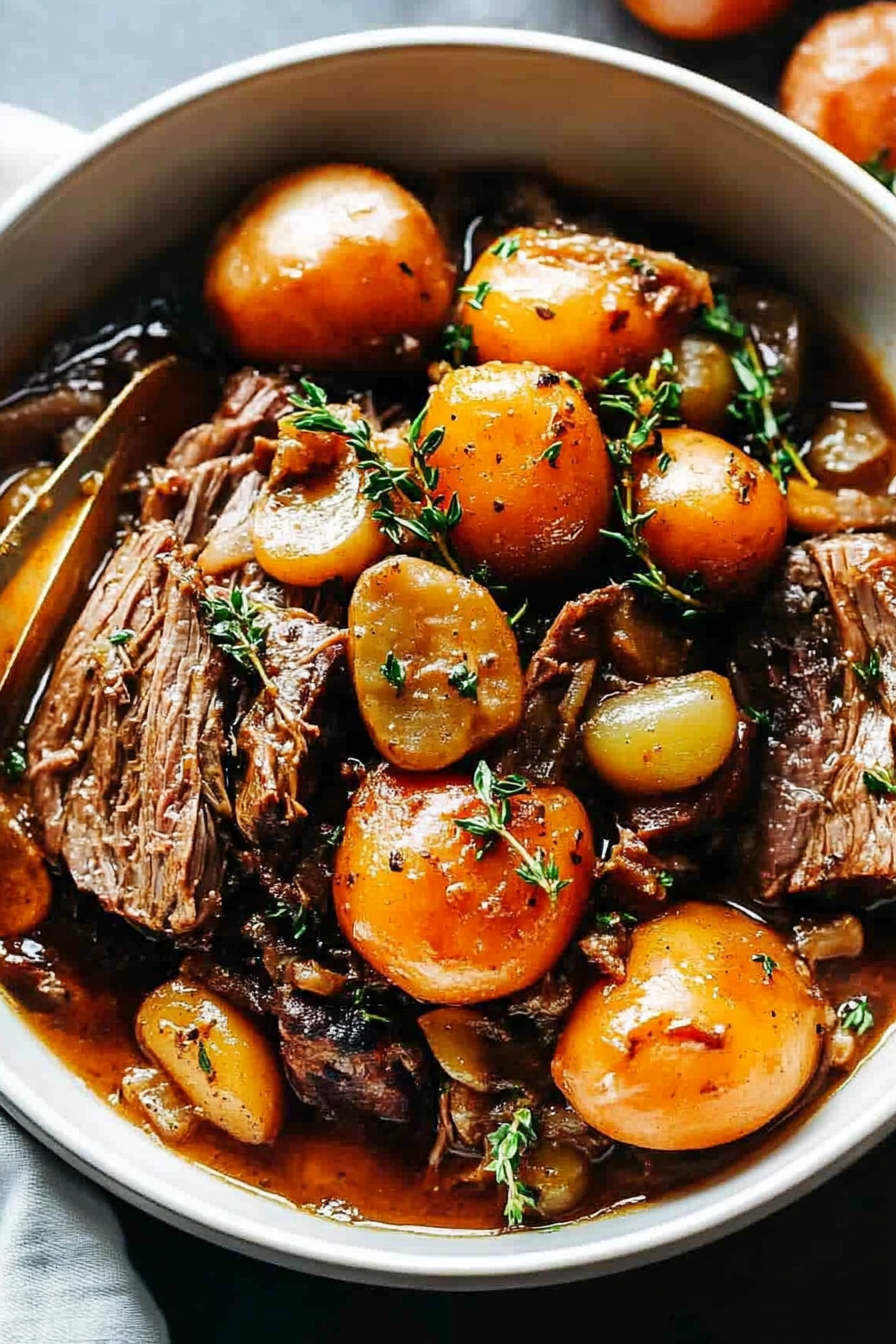
Instant Pot Pot Roast
Ingredients
Method
- Trim excess fat off the beef. Cut into 3-4 large chunks. Turn the Instant Pot to the sauté function and add oil. When the oil is hot, add beef and sear until a crispy brown exterior forms.
- Add the onion, garlic, mushrooms, whole potatoes, tomato paste, red wine, broth, fresh herbs, salt, and Worcestershire sauce to the Instant Pot and cook on high pressure for 40 minutes.
- After 40 minutes, release pressure and add carrots and celery. Bring back to pressure and cook for an additional 10 minutes. Allow for 15 minutes of natural pressure release.
- Remove beef and veggies from the Instant Pot. Add the cornstarch slurry to the remaining liquid. Switch to sauté mode and cook until thickened into gravy, about 2-3 minutes.
- Serve the beef and vegetables with gravy spooned over the top. Enjoy!


That sounds delicious! I love the idea of adding zucchini to cakes—it’s such a clever way to add moisture and nutrition.
This sounds delicious—I love how comfort food brings back such sweet memories! The pressure cooker makes it even easier.
That recipe sounds delicious! The pressure cooker must make the pot roast so tender. I’ll definitely have to try it soon.
I love this recipe—it reminds me of my grandma’s pot roasts; they always turned out so tender and flavorful!
I love this recipe—it’s comforting and so easy to make in the pressure cooker! Perfect for busy weeknights.