
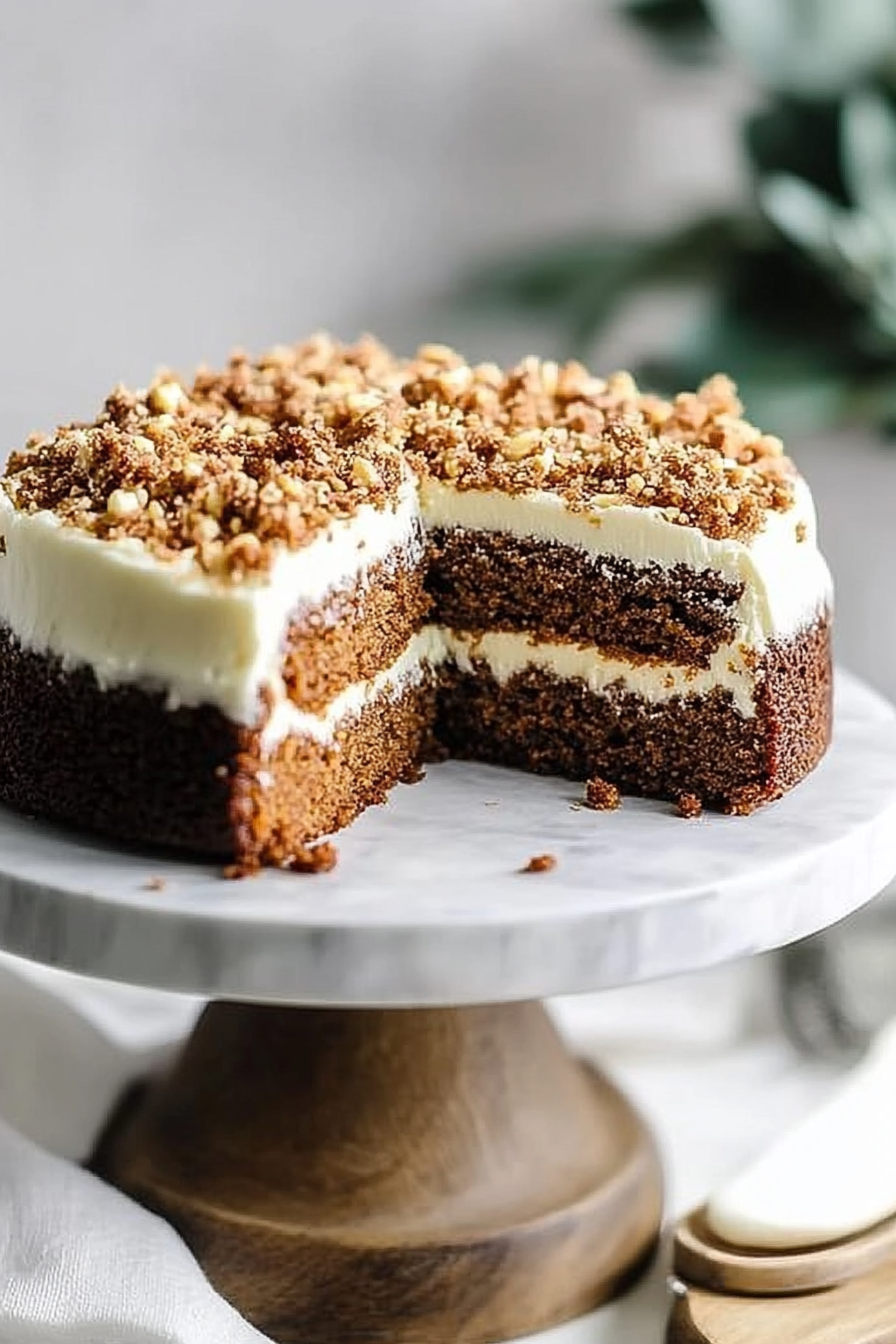
Easy Moist Carrot Cake Recipe
There’s something about baking bread that makes my home smell like comfort in every corner. I remember my grandma’s kitchen, where she’d whip up her legendary zucchini bread on lazy Sunday mornings. That sweet, earthy aroma lingering in the air? It’s a memory I carry with me, and honestly, it’s what prompted me to perfect my own version. This zucchini nut bread? It’s like giving old traditions a fresh update—crusty on the outside, moist and tender inside, packed with flecks of zucchini, crunchy nuts, and a hint of cinnamon. And the best part? It’s super easy — perfect for those evenings when I want something homemade but don’t want to fuss over complicated recipes. Plus, it’s a sneaky way to get the kids to eat their veggies — they never suspect a thing! I always do this when I have a basket of zucchini sitting around, waiting for me to turn it into something delicious and wholesome. And trust me, this one’s a lifesaver on busy nights when dessert feels like too much effort but a little something sweet is a must.
What is Zucchini Nut Bread?
Think of zucchini nut bread as a cozy, slightly sweet loaf that’s packed with shredded zucchini — not unlike a quickbread that’s both satisfying and sneaky healthy. It’s essentially a soft, moist bread with a gentle crumb, flecked with bits of chopped nuts for crunch. Its origins come from the creative minds of home bakers who wanted to squeeze extra veggies into their baking without sacrificing flavor. That’s why it’s often called “bread,” but it honestly feels more like a sweet cake you can spread butter on or toast up with a smear of jam. The name is pretty straightforward—zucchini, which adds moisture and nutrients, paired with nuts for texture. I love how versatile it is: breakfast, snack, or dessert — you really can’t go wrong. It’s almost like a cross between a moist cake and hearty bread, making it perfect for any occasion. And don’t worry—if you’ve never baked with zucchini before, this recipe will have you hooked from your very first slice.
Why you’ll love this recipe?
What I love most about this zucchini nut bread is that it’s a little bit special, but so simple to make. The flavor is what really gets me—sweet, nutty, with just that right amount of cinnamon warming everything up. The aroma alone is enough to draw everyone into the kitchen, and then they’re amazed at how moist and tender it is, considering how wholesome it is. Plus, it’s budget-friendly—just a handful of pantry staples, a fresh zucchini, and some nuts you probably already have hiding in your fridge or pantry. I’ve made this countless times, tweaking the nuts, swapping in walnuts, pecans, or even almonds, depending on what’s in the mix. And the best part? It stays perfectly moist for days. I often make a big loaf on Sunday and enjoy it all week — waking up to a slice toasted with butter or a quick snack with coffee. It’s also super versatile — I’ve tested it with applesauce instead of oil, and it turned out just as dreamy. It’s become a staple in my kitchen, and I promise — once you try it, you’ll see why everyone asks for the recipe.
How do you make Zucchini Nut Bread?
Quick Overview
This bread is a straightforward mix-and-bake situation—no complicated techniques. I start by shredding zucchini generously, squeezing out excess moisture (which keeps the loaf from getting soggy), then whisk together the dry ingredients. In another bowl, I blend the wet ingredients—think eggs, oil, vanilla—until smooth. Mix everything gently just until combined, fold in chopped nuts, then pour everything into a loaf pan. Pop it in the oven, and expect that heavenly smell to fill your home in about 50-60 minutes. Once it’s baked to perfection, I cool it for a bit before drizzling it with honey glaze that adds just the right touch of sweetness. This method keeps things simple but results in a beautifully textured loaf that tastes both wholesome and indulgent.
Ingredients
For the Main Batter:
– 2 cups shredded zucchini (about 2 medium zucchinis, grated and squeezed to remove moisture)
– 1 ½ cups all-purpose flour
– 1 teaspoon baking powder
– ½ teaspoon baking soda
– ½ teaspoon salt
– 1 teaspoon ground cinnamon
– 1 cup granulated sugar
– ½ cup vegetable oil (I tested this with applesauce once, and it was equally moist!)
– 2 large eggs
– 1 teaspoon vanilla extract
For the Filling:
– ¾ cup chopped walnuts or pecans — I love walnuts for their slightly bitter crunch
– Optional: ½ cup mini chocolate chips for those who want a treat
For the Glaze:
– ¼ cup honey
– 1 tablespoon warm water
– A squeeze of lemon juice (optional, to brighten the flavor)
– Additional chopped nuts for topping (if desired)
Step-by-Step Instructions
Step 1: Preheat & Prep Pan
Set your oven to 350°F (175°C). Grease a standard loaf pan with butter or line it with parchment paper — don’t skip this step, or you’ll be fighting with the sticky edges. I like to give it a gentle spray of non-stick spray and dust with a little flour; it makes release a breeze. This is my go-to method for ensuring that beautiful slice comes out intact.
Step 2: Mix Dry Ingredients
In a medium bowl, whisk together the flour, baking powder, baking soda, salt, and cinnamon. Sifting isn’t necessary, but I do it if I want that ultra-light crumb. Combining these first helps make sure your leavening agents are evenly distributed—trust me, it makes a difference!
Step 3: Mix Wet Ingredients
In a large bowl, beat the eggs, sugar, and oil—until the mixture looks slightly frothy and smooth, about 2 minutes. I always add the vanilla last, mixing just enough to incorporate. I’ve tested this with almond milk, and honestly, it made the bread even creamier! So feel free to experiment if you want to keep it dairy-free or just swap ingredients to suit your taste.
Step 4: Combine
Pour the dry ingredients into the wet and gently fold—don’t overmix! You want a slightly lumpy batter, not a dense glue. Overmixing can make the bread tough, so take your time. I switch to a spatula here; it’s gentler and helps keep everything fluffy.
Step 5: Prepare Filling
Stir the chopped nuts into the batter or sprinkle over the top before baking — I love embedding some within the batter for bursts of crunch, but the topping looks pretty, too. If you’re feeling decadent, chocolate chips are a fun addition. Just fold them in last after the nuts.
Step 6: Layer & Swirl
Pour half of the batter into the loaf pan, sprinkle some nuts or chocolate chips, then add the rest. I love doing a light swirl with a skewer to create a marbled effect — makes it look fancy even if I’m exhausted after a long day.
Step 7: Bake
Pop it in the oven and bake for 50-60 minutes. To check for doneness, insert a toothpick into the center — it should come out clean. The top will turn golden, and your home will fill with that irresistible aroma. If it starts to brown too quickly, tent with foil after the first 30 minutes.
Step 8: Cool & Glaze
Let the bread cool in the pan for about 15 minutes before transferring it to a wire rack. While it’s still a little warm, drizzle with the honey glaze I mix up earlier — it’s sweet and tangy, balancing the earthiness of the zucchini. If you want a crunch on top, sprinkle some chopped nuts on the glaze before it sets.
Step 9: Slice & Serve
This bread slices best once fully cooled, but honestly? I can’t resist sneaking a warm piece with softened butter. It’s amazing plain too, especially if you add a touch of extra honey or a smear of cream cheese. Serve it on a pretty plate, and watch everyone ask for seconds.
What to Serve It With
This zucchini nut bread is truly versatile. For breakfast, I love to toast a slice and spread a bit of butter or honey—simple but so satisfying. It pairs beautifully with a rich black coffee or a milky latte, especially when the mornings are chilly. For brunch, serve it alongside fresh fruit and a dollop of yogurt—think of it as a hearty, slightly sweet toast that everyone loves. If you’re thinking of dessert, I slice it thick and serve it with a scoop of vanilla ice cream or a drizzle of caramel sauce. It’s also fantastic as an afternoon snack at my kids’ playgroup; they love the nuts and think it’s a “special treat” despite how healthy it is. When I want to keep it super casual, I’ll just leave it on the counter with a mug of tea — it’s the perfect comfort food to end any day. I’ve even made mini muffins from this batter for on-the-go snacks—trust me, you’ll want to have these around always.
Top Tips for Perfecting Your Zucchini Nut Bread
Over the years, I’ve learned a few tricks that totally elevate this bread. Firstly, prep your zucchini well—shredding and squeezing out as much moisture as possible prevents that annoying soggy bottom. I always do this by wrapping the grated zucchini in a clean kitchen towel, then squeezing tightly — it’s a little workout, but SO worth it. Moisture is your enemy here; too much, and your bread becomes dense or gummy, which I’ve totally done myself by rushing through this step. I also recommend folding ingredients gently—overmixing is the silent enemy of fluffy, tender bread. Honestly, I used to dump everything together and wonder why my loaf was flat or tough—that’s a no-go! When I swirl the batter, I take my time creating beautiful ribbons—plus, it makes the finished loaf look like I fussed, even if I didn’t. When adding nuts or chocolate chips, I like to toss them lightly in a bit of flour beforehand — prevents them from sinking. If you’re swapping ingredients like whole wheat flour or coconut sugar, start with smaller amounts and try baking at a slightly lower temperature — I’ve found it helps prevent burning and keeps that soft crumb. And don’t forget, the glaze is totally optional, but it’s what really makes this bread feel special. Mixing honey with a little warm water makes a glossy finish that’s just irresistible. Trust me, a little patience in the stir and layer process pays off big time.
Storing and Reheating Tips
This bread stays fresh for about 3-4 days at room temperature wrapped loosely in foil or stored in an airtight container; I like to keep it on the counter so it’s easy to grab on hectic mornings. If you want to keep it longer, pop slices in the fridge—just know that it’s best eaten within a week to keep the texture. For maximum freshness, I recommend slicing only what you plan to eat and keeping the rest intact. Reheating is simple — warm a slice in the microwave for about 15-20 seconds, or toast it lightly for that just-baked crispiness. If you’ve glazed the loaf, it’s best to add the glaze fresh before serving — microwave slices if you prefer a warm treat, then drizzle the honey glaze over the top. For freezing, wrap the entire loaf tightly in plastic wrap, then foil, or slice into individual portions and freeze in zip-top bags. When ready to enjoy, let it thaw at room temperature for about an hour or pop it in the microwave for a quick reheat. The glaze can be added after reheating if you want that glossy, sweet finish—just warm the glaze slightly for easier drizzling. I’ve tested all these methods, and honestly, nothing beats a warm slice straight from the oven!
Frequently Asked Questions
Final Thoughts
If there’s one baking project I think you should try, it’s this zucchini nut bread. It’s cozy, wholesome, and just fancy enough to impress friends or family. Plus, the fact that it’s so forgiving makes it perfect for beginners — I’ve failed so many times before I cracked the perfect method. The smell of cinnamon, the bite of crunchy nuts, and that tender crumb bring me back to simpler days, and I love how versatile it is, whether for breakfast, snack, or dessert. Once you see how easy it is to throw together and how delicious it turns out, I bet it’ll become a part of your regular rotation, too. So go ahead, shred some zucchini and get baking — I’d love to hear how yours turns out! Remember, cooking isn’t just about following recipes; it’s about making memories and sharing love, one loaf at a time. Happy baking!
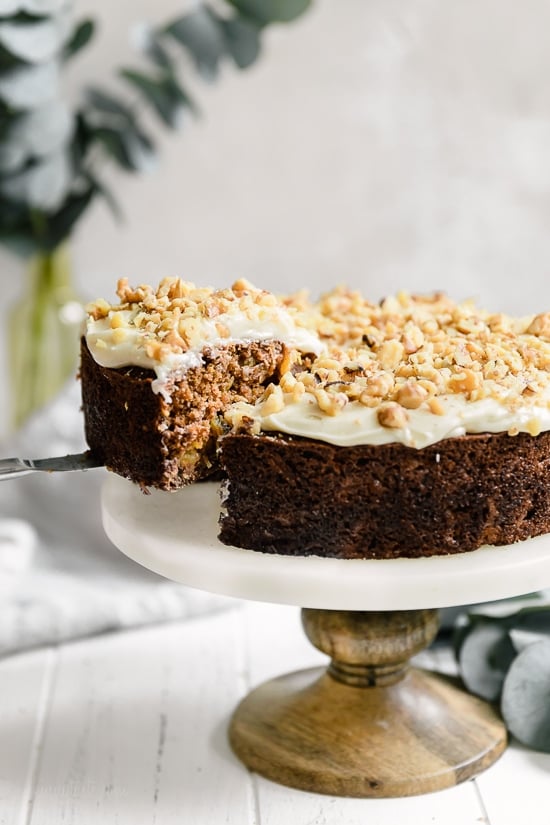
carrot cake
Ingredients
Method
- Preheat oven to 350°F.
- In a large bowl, combine flours, sugar, coconut, baking soda, salt, and cinnamon; stir well.
- In a medium bowl, whisk together oil, eggs, and vanilla.
- Add grated carrots and pineapple; fold into the wet mixture.
- Fold wet ingredients into dry ingredients, then fold in walnuts.
- Pour batter into a greased 8-inch round cake pan.
- Bake for 40-50 minutes, or until a toothpick inserted into the center comes out clean.
- For frosting, beat together cream cheese, powdered sugar, and vanilla until smooth. Spread over cooled cake.
- Garnish with remaining chopped walnuts if desired.


This recipe sounds amazing! Nothing beats the cozy smell of homemade carrot cake baking. I can totally picture my grandma’s kitchen too—so warm and inviting.
That sounds so cozy! I love the idea of baking bringing warmth to the whole home.
This sounds so cozy—carrot cake is my favorite! I can almost smell it baking right now.
This recipe sounds so cozy! I can already imagine the warm, comforting aroma filling my kitchen just like your grandma’s. Thanks for sharing such a heartfelt post!
This recipe looks amazing—my grandma used to make carrot cake too, and the smell still brings back such warm memories.