
Easy Frozen Banana Treats for Summer
There’s something about the smell of a warm cake filling the house that instantly makes me feel at home. This zucchini swirl cake is one of those recipes I always turn to when I want something comforting but a little special. It’s kind of like a soft, cozy hug wrapped in a slice — moist, sweet, with a hint of freshness from the zucchini that keeps it lighter than your typical cake. I remember making this for Sunday brunch, and my kids asking if they could have it for breakfast (don’t worry, I did say yes!). It’s honestly become a family favorite, especially because it’s so simple — no fancy equipment, no complicated technique, just pure baking love with a tender, tender crumb that disappears in minutes at my house. Plus, the swirl of cinnamon and the touch of glaze make it irresistibly pretty. Trust me, this one’s a lifesaver on busy nights or when you’re craving something sweet but don’t want to turn on the oven for a giant cake. Let’s dive into how I make it — and why I think you’ll love it just as much as I do!
What is Zucchini Swirl Cake?
This zucchini swirl cake is essentially a tender, moist cake layered with a cinnamon-sugar filling that gets beautifully marbled through every slice. Think of it as a cross between a quick bread and a coffee cake — a perfect mixture of bread-like comfort and the sweet, indulgent feel of cake. The secret is the grated zucchini, which adds a little moisture and a punch of nutritional goodness without taking away from the cake’s luscious richness. The name “swirl” comes from how you layer and gently swirl the cinnamon filling into the batter before baking, creating this gorgeous marbled effect when you slice into it. I like to think of it as a cake that’s both homey and a little fancy, making it perfect for breakfast, brunch, or everyday dessert. It’s so approachable you’ll want to make it all the time — and don’t be surprised if your family asks for it weekly!
Why you’ll love this recipe?
What are some good reasons to make zucchini swirl cake?
- Incredible flavor: The natural sweetness from the zucchini pairs perfectly with the warm cinnamon and sugar filling. When you take that first bite, you’ll notice how cozy and comforting it feels, like a warm hug on a chilly day.
- Super simple to make: No weird gadgets or lengthy techniques — just good old mixing bowls and a quick whisk. Honestly, it’s one of those recipes I always do when I want a homemade treat without fussing for hours.
- Budget-friendly ingredients: Most of what you need are pantry staples and the zucchini from your garden or the farmers market, making it kind to your wallet.
- Versatile and adaptable: Love nuts or dried fruit? Toss them in! Want a gluten-free version? Swap in a good quality gluten-free flour. It’s that flexible. So many of my friends have tried variations, and they all come out delicious.
What I love most about this is that it’s not just a dessert — it’s a recipe that becomes part of your family’s story. I’ve tested this with apples, and it actually made the cake even more moist! The smell alone when it’s baking is enough to send everyone running into the kitchen. Plus, it’s perfect when you want a treat that’s sweet but not overly indulgent — especially when paired with a cup of coffee or tea. This cake is actually my “pick-me-up” on busy mornings because it’s quick to whip up and always makes my house smell amazing. Once you try it, I swear you’ll be making it on repeat, just like me.
How to Make Zucchini Swirl Cake
Quick Overview
This cake is all about combining simple ingredients into a batter, layering it with a cinnamon-sugar mix, swirling, and baking to perfection. The process takes just a little over an hour from start to finish — no resting time or complicated steps. The best part? It’s pretty foolproof. You’ll mix the batter, prepare the filling, layer them in your pan, swirl, then bake. After cooling just a bit, you drizzle your glaze, slice, and serve. It’s honestly a great recipe for both novice bakers and seasoned pros looking for comfort food that’s quick and satisfying. And did I mention how gorgeous the marbled spiral looks when you cut into it? It’s almost too pretty to eat — almost.
Ingredients
For the Main Batter:
- 1 1/2 cups all-purpose flour (or gluten-free blend if needed)
- 1 teaspoon baking powder
- 1/2 teaspoon salt
- 1 teaspoon cinnamon (plus extra for filling)
- 1/2 cup granulated sugar
- 1/2 cup brown sugar (for added richness)
- 1/2 cup vegetable or canola oil
- 3 large eggs
- 1 teaspoon vanilla extract
- 1 cup freshly grated zucchini (make sure to squeeze out excess moisture!)
For the Filling:
- 1/4 cup granulated sugar
- 1 teaspoon cinnamon
- 2 tablespoons softened butter or coconut oil
For the Glaze:
- 1 cup powdered sugar
- 1-2 tablespoons milk or cream
- 1/2 teaspoon vanilla extract
- Optional: a pinch of cinnamon or lemon zest for extra flair
Step-by-Step Instructions
Step 1: Preheat & Prep Pan
Set your oven to 350°F (175°C). Grease a 9-inch round or square baking pan — I like to use parchment paper for quick release — and have your ingredients ready so you can work smoothly. I always do this first so I don’t forget!
Step 2: Mix Dry Ingredients
In a large bowl, whisk together the flour, baking powder, salt, and cinnamon. This ensures everything’s evenly distributed — I learned the hard way that clumping your baking powder is a no-go if you want even rises and fluffiness.
Step 3: Mix Wet Ingredients
In another bowl, whisk the sugars with the oil, then add eggs one at a time, mixing well after each. Stir in vanilla and the grated zucchini. The batter should look slightly thick but moist — don’t overmix at this stage to keep it tender.
Step 4: Combine
Gradually add the dry ingredients into the wet, folding gently until just combined. Overmixing here will make the cake dense, and nobody wants that. It’s better to have a few streaks of flour because they’ll disappear when you swirl the filling later.
Step 5: Prepare Filling
Mix the sugar, cinnamon, and softened butter until crumbly and evenly combined. I like to do this with my fingers or a fork — it’s kind of satisfying, and it makes sure the cinnamon is evenly distributed in every swirl.
Step 6: Layer & Swirl
Pour half the batter into your prepared pan, spread evenly, then sprinkle all that cinnamon-sugar magic over the top. Add the remaining batter and gently dollop it over the filling. Using a knife or skewer, swirl through the batter to create a marbled effect — don’t overdo it; you want to see the beautiful streaks!
Step 7: Bake
Pop it into the oven for about 40-45 minutes. Start checking at 40 — a toothpick inserted in the center should come out clean. If the top is browning too fast, a piece of foil on top helps. Trust your nose — it should smell warm and cinnamony, and the edges will be golden brown.
Step 8: Cool & Glaze
Let the cake cool in the pan for about 15 minutes, then transfer to a wire rack. Mix up your glaze while it cools — just stir powdered sugar with milk and vanilla until smooth. Drizzle it generously over the warm cake. The glaze will seep into the cracks and make everything feel lush and finished.
Step 9: Slice & Serve
Once the glaze is set (a few minutes), slice it into squares or wedges. Hot or slightly warm, this cake melts in your mouth. I love serving it with a cup of coffee or a glass of vanilla almond milk — honestly, it’s good any time of day.
What to Serve It With
This cake is so versatile; I’ve served it in a lot of ways:
- For breakfast: with a dollop of yogurt and fresh berries — it’s almost like a fruit-filled muffin. The kids love it with a splash of hot chocolate or a chai latte on chilly mornings.
- For brunch: cut into small squares and arrange on a platter with other baked goodies. Add some fresh orange slices and a pot of coffee, and you’re set for a cozy gathering.
- As dessert: warm slices with vanilla ice cream or a dusting of powdered sugar make it extra special. The cinnamon flavor pairs nicely with caramel or fruit compotes, too.
- For a quick snack: grab a piece with a napkin — it’s perfect with tea or even a glass of milk after a long day. When I do that, I remember my grandma’s advice about always having “something sweet” at hand. This cake definitely fits that bill.
I love making this cake for family get-togethers, and it’s always met with happy smiles. No one ever guesses there’s zucchini hidden inside — it’s just pure, tasty magic.
Top Tips for Perfecting Your Zucchini Swirl Cake
After making this so many times, I’ve discovered a few tricks that really improve the final result:
- Zucchini Prep: always squeeze out excess moisture — I use a clean towel or paper towels to press out as much water as I can. Moisture can make the batter runny, so less is more here.
- Mixing Advice: don’t overmix after adding the dry ingredients. By folding gently, you keep the batter tender and fluffy, avoiding that dense, heavy crumb.
- Swirl Technique: use a skewer or butter knife to create a gentle swirl. Too much stirring will blend the filling entirely, losing that beautiful spiral. I do light zig-zags, trying not to disturb layer integrity.
- Ingredient Swaps: experiment with alternatives — shredded carrots or sweet potatoes work well, too. Sometimes I add a handful of chopped walnuts or a splash of orange zest to jazz it up. Just remember: balance is key to keeping the batter moist and flavorful.
- Baking Tips: oven placement matters — middle rack is best for even heat. Keep an eye on it after 40 minutes. If it’s browning too fast, cover loosely with foil. When a toothpick comes out with moist crumbs instead of wet batter, you’re golden.
- Glaze Variations: try adding lemon zest or a splash of melted white chocolate to your glaze. It adds a new dimension and makes it feel extra special for guests or holiday celebrations.
Learning these little tricks took a few tries, but now I get perfect slices every time. The secret? Patience, gentle mixing, and really tasting the batter (yes, I do that!). Trust me, a good cake is about the small details, and once you nail them, you’ll keep coming back for more.
Storing and Reheating Tips
This cake is best eaten within a few days, but if you need to store it, here’s how I do it:
- Room temperature: keep it covered loosely with foil or plastic wrap for up to 2 days. It will stay moist and fresh as long as it’s protected.
- Refrigerator: store leftovers in an airtight container or wrapped tightly with plastic wrap. It can last up to 5 days. I recommend reheating slices in the microwave for about 15 seconds to bring back that cozy warmth.
- Freezer: yes, totally! Wrap individual slices in plastic wrap, then a layer of foil or a freezer-safe bag. It keeps well for up to 3 months. Thaw at room temp or in the fridge, and give it a quick microwave zap if needed.
A quick note: add the glaze after reheating if you’re cold — it’s just as good, and the glaze is the finishing touch that makes it special. Honestly, I think this cake tastes just as good on day three as it does fresh out of the oven, especially when warmed up a bit!
Frequently Asked Questions
Final Thoughts
This zucchini swirl cake is one of those recipes that feels like a little secret — a treat you can whip up quickly, enjoy often, and feel good about sharing with loved ones. The subtle zucchini goodness keeps it moist and tender, while the cinnamon swirl adds just enough spice to make each bite feel special. I’ve made this countless times, tweaking little things here and there, and it never fails to bring smiles around my table. It’s perfect for breakfast, snacks, or even a casual dinner dessert. Plus, it’s a sneaky way to get more veggies into your family — trust me, once they taste it, they won’t care what’s inside! I hope you’ll give it a try and put your own spin on it. Happy baking, and I can’t wait to hear how yours turns out — leave a comment or share your photos!
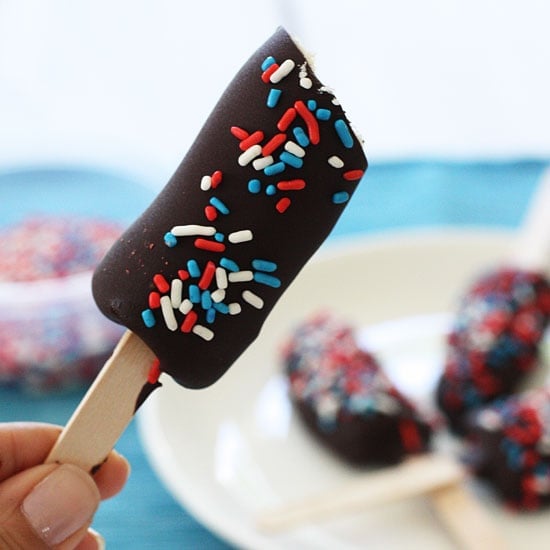
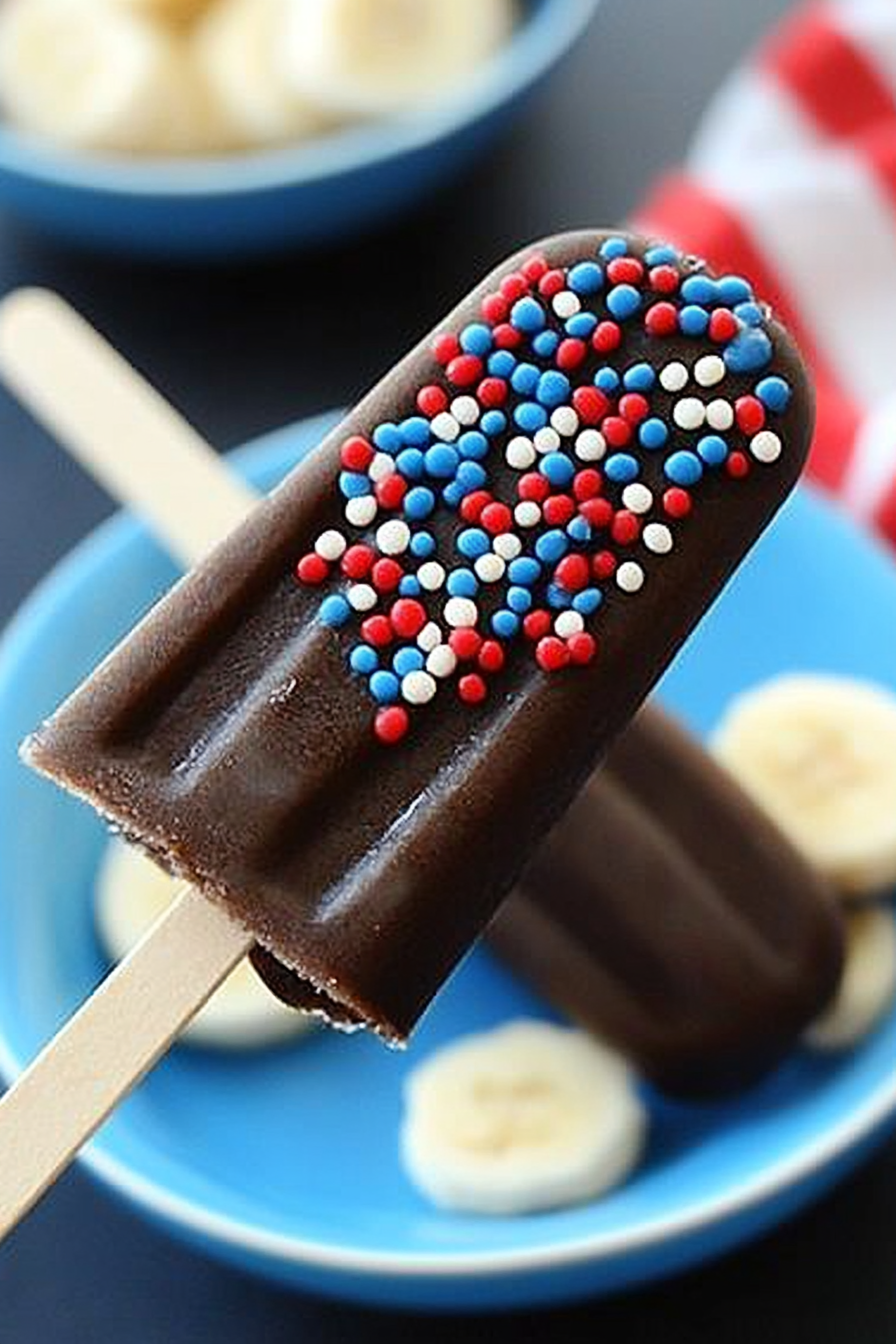
Frozen banana popsicles
Ingredients
Method
- Peel the banana and cut it in half lengthwise, then in half again to make four quarters.
- Insert a popsicle stick into each banana quarter and place on a baking sheet lined with wax paper. Freeze for at least 2 hours until solid.
- Melt the chocolate in a microwave-safe bowl in 30-second intervals, stirring between each, until smooth.
- Add canola oil to the melted chocolate to thin it out slightly.
- Dip each frozen banana into the melted chocolate, allowing excess to drip off. Place back on the wax paper-lined sheet.
- Quickly sprinkle decorations on the chocolate before it hardens, if desired.
- Return the tray to the freezer for about 30 minutes until the chocolate sets.
- Serve immediately or store in an airtight container in the freezer.
I’ve tried this recipe and it’s amazing—so moist and the swirl looks so pretty. Definitely adding this to my summer bake list!
Love how this recipe turns simple ingredients into something so cozy! Perfect for summer—easy and delicious.
These banana treats look perfect for summer—so simple and delicious! I’ll definitely be making them this weekend.
These frozen banana treats look perfect for beating the summer heat—simple and delicious! I’ll definitely try making them this weekend.
These banana treats sound perfect for a hot summer day! I’ve made them before and my kids love them—simple and delicious.