
Easy Frozen Peanut Butter Pie Recipe
There’s something about the smell of a fresh-baked cake that instantly transports me—maybe back to my grandma’s kitchen, or a lazy Sunday afternoon when everything felt just right. I remember sneaking a slice before dinner, stealing crumbs from my fingers, and feeling like all was well in the world. This zucchini swirl cake? It’s like capturing that warm, nostalgic feeling in every bite. It’s surprisingly easy—and honestly, it’s become my go-to when I want a treat that’s decadent but not overly sweet. The best part? It’s a one-pan wonder that you can whip up even on the busiest of weeknights. Plus, it’s packed with shredded zucchini, so it’s almost like sneaking in a veggie—my kids ask for this all the time, and I swear they don’t even notice the sneaky greens. Trust me, this recipe disappeared in minutes at my house. The smell alone brings everyone to the kitchen, and I can’t wait to share it with you. So grab your apron—let’s make some magic!
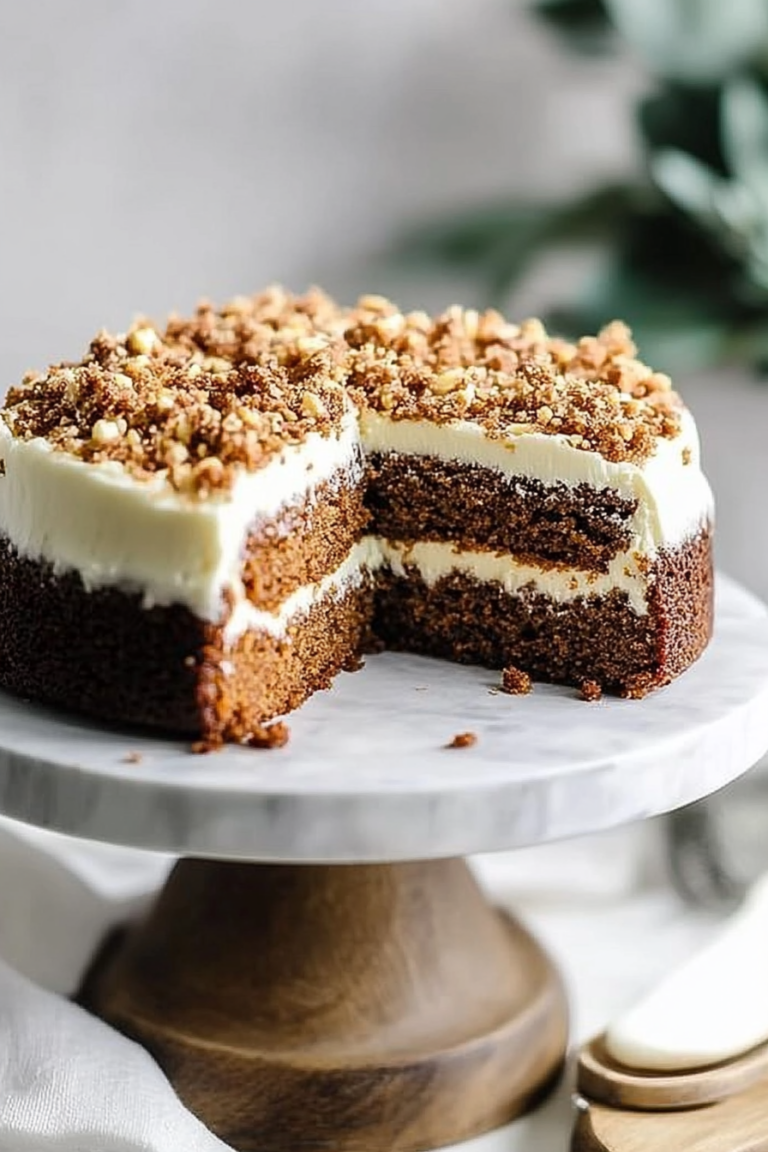
What is Zucchini Swirl Cake?
Think of zucchini swirl cake as a cross between your favorite coffee cake and a decadent dessert, all rolled into one cozy, sliceable package. It’s essentially a moist, tender cake that features a luscious swirl of cinnamon-spiked filling zigzagging through the batter. The name “zucchini swirl” might sound a little fancy, but it’s quite simple—shredded zucchini folded into a sweet, buttery batter, then swirled with a cinnamon-spiced mixture. The zucchini adds moisture, keeps the cake super tender, and sneaks in some extra veg that you hardly notice. It’s almost like a secret family recipe I’ve tweaked over the years—something my grandma would probably love to see! Think of it as comfort food with a bit of a health boost—because who doesn’t want that? It’s incredibly versatile, perfect for breakfast, brunch, or even a casual dessert after dinner. And once you taste that first warm, fragrant bite, I bet you’ll be hooked too. It’s cozy, familiar, and just fancy enough to feel like a special treat.
Why you’ll love this recipe?
What I love most about this zucchini swirl cake is how it combines effortless simplicity with a flavor punch that feels indulgent without going overboard. It’s what I call a “lazy baker’s dream”—all the good stuff, with minimal fuss. The smell alone makes my whole house smell like I’ve been baking all morning, even if I just spent 10 minutes in the kitchen. And trust me, the zucchini keeps this cake unbelievably moist; it’s like a little secret ingredient no one will guess until you tell them. Plus, it’s budget-friendly—shredded zucchini is usually a leftover star, or it’s cheap to grab from the farmer’s market. My kids ask for this all the time, especially when I drizzle a little extra honey on top—serving it warm with a cup of coffee or tea feels so satisfying. The swirl pattern also makes it look pretty fancy, but honestly, I’ve made it in a rush and still had it turn out divine. It’s perfect for cozy weekends, breakfast by the window, or when you want a little sweet something but don’t want to bake a whole cake from scratch. It’s a total comfort food that comes together quickly. And the best part? It’s adaptable! You can tweak the filling, switch up the glaze, or add chopped nuts if you’re feeling a little extra. That’s what makes it special—I’ve tested it with almond milk, and it made the texture even creamier. This one’s a lifesaver on busy nights or when friends drop by unexpectedly. Once you get the hang of it, I swear, you’ll make this over and over—even my little ones pretend they’re top sous-chefs guiding me through every step.
How do I make Zucchini Swirl Cake?
Quick Overview
This cake is as straightforward as it gets. You start by shredding the zucchini—you don’t even need to peel it, just give it a good rinse and go. Then, whisk your dry ingredients, combine your wet ingredients (with a little oil, eggs, and vanilla), and fold everything together. The filling is just cinnamon, brown sugar, and butter—spread that over the batter, swirl it gently, and bake. The entire process takes under an hour, and it’s honestly most fun when you get to see that beautiful swirl come to life. Once it’s cool enough, you can drizzle with a glaze or dust with powdered sugar, but honestly, I love it straight from the oven. It’s perfect for slicing up while still warm, so the flavors really meld together. Trust me, once you’ve done it a few times, it’s almost automatic—plus, it’s a great way to use up those zucchinis lurking in your fridge. Prepare for the smiles—it’s what I call wholesome indulgence.
Ingredients
For the Main Batter:
- 2 cups shredded zucchini (about 2 medium zucchinis, shredded and drained)
- 1 ½ cups all-purpose flour (or gluten-free flour blend, if you prefer)
- 1 teaspoon baking powder
- ½ teaspoon baking soda
- ½ teaspoon salt
- 1 teaspoon ground cinnamon
- 1 cup granulated sugar (or coconut sugar for a healthier twist)
- ½ cup vegetable oil (or melted coconut oil)
- 3 large eggs
- 1 teaspoon vanilla extract
For the Filling:
- ¼ cup brown sugar
- 1 teaspoon cinnamon
- 2 tablespoons softened butter
For the Glaze:
- ½ cup powdered sugar
- 1-2 teaspoons milk (or plant-based milk)
- A splash of vanilla (optional)
Step-by-Step Instructions
Step 1: Preheat & Prep Pan
Set your oven to 350°F (175°C) and line a 9-inch square baking pan with parchment paper or lightly grease it. I always do this early, so I’m not rushing last minute. Having your pan ready makes a big difference—no sticking, easy to remove the baked cake. Plus, I like to give the pan a little dusting of flour or a quick spray of cooking spray just to be safe. While it’s warming up, shred your zucchinis—it’s easiest if you use a box grater or your food processor with a shredding attachment. After shredding, I give the zucchini a quick squeeze to remove excess moisture—this step keeps the cake from getting soggy and helps it bake evenly. It’s one of those tricks I learned after years of trial and error—wet zucchini can turn the batter into a swamp, so squeezing out the moisture is key. Set it aside and let’s move to mixing!
Step 2: Mix Dry Ingredients
In a medium bowl, whisk together the flour, baking powder, baking soda, salt, and cinnamon. Mixing these first really helps distribute everything evenly—no lumps, no uneven pockets of baking soda. Plus, it keeps everything well combined, which is especially helpful if you’re using gluten-free flour blends. When you whisk your dry ingredients, your kitchen will start to smell wonderfully spicy—cinnamon really does magic. This step is quick, but nothing beats having all your dry ingredients ready to go when you add the liquids, so everything mixes smoothly. I learned to do this first because it prevents overmixing the batter later—stirring in dry and wet ingredients all at once can lead to tough cakes, and I don’t want that. Once combined, set this bowl aside—your future cake is coming together!
Step 3: Mix Wet Ingredients
In a large mixing bowl, whisk together the eggs, sugar, oil, and vanilla until smooth and slightly frothy. I always crack my eggs into a small bowl first—just in case one’s got a double yolk or an odd shell that tries to sneak in. Once the eggs are whisked well, pour in your oil and vanilla, then give it a good stir until everything’s combined. The mixture should look glossy and smooth, almost like a light custard. If your eggs are cold and the oil is solidifying, just warm everything slightly—trust me, it helps everything blend better. I’ve tried substituting almond milk or even coconut milk, and honestly, the texture gets even creamier. This is your batter’s foundation, and once you add the shredded zucchini, it’s all about gentle folding so you keep that moisture-rich, tender crumb. Next, we’ll bring it all together!
Step 4: Combine
Next, gently fold the dry ingredients into your wet mixture. Use a spatula or wooden spoon, and do this in stages—start by adding a third, folding carefully, then repeat until just combined. The key here is not to overmix; you want a moistened, slightly lumpy batter, not a smooth pancake-like dough. Overmixing can develop gluten and make the cake tough, which is the opposite of what we want. Now, fold in your shredded zucchini—make sure it’s drained well, so the batter stays nice and moist but not watery. If you want to sneak in a handful of chopped nuts or chocolate chips, now’s the time! It’s your cake, so feel free to get creative. Just don’t overdo it—you want every bite to have that lovely swirl of cinnamon filling, not wall-to-wall zucchini. Almost there!
Step 5: Prepare Filling
For the cinnamon-sugar filling, mix the brown sugar and cinnamon in a small bowl. I find that softening the butter slightly makes it easier to spread—so I pop it in the microwave for about 10 seconds if it’s too stiff. You want a crumbly, but spreadable mixture that you can dollop in teaspoons over the batter. This cinnamon filling is what gives the swirl its signature look and flavor—it’s like a cinnamon-spiced ribbon that runs through every slice. Feel free to add chopped walnuts or shaved coconut if you’re feeling fancy. Trust me, the flavor combinations are endless once you get the hang of it, but simplicity is best for the first few tries. Once mixed, set it aside—next up, pouring the batter into your prepared pan!
Step 6: Layer & Swirl
Pour the batter into your prepared pan, smoothing it out with a spatula. Then, drop spoonfuls of your cinnamon mixture over the batter—don’t go for a perfect pattern here. Instead, dollop randomly, then use a butter knife or skewer to gently swirl the cinnamon through the batter, creating that beautiful spiral pattern. This part always feels like a little artistic adventure—you want a marbled effect, not a perfectly uniform swirl. The goal is to see streaks of cinnamon ebb and flow across the cake. After swirling, give your pan a gentle tap on the counter to settle everything and make sure the batter is evenly distributed. Next, it’s time for the oven to work its magic!
Step 7: Bake
Pop your pan into the oven and bake for 40 to 45 minutes. Start checking around 38 minutes—insert a toothpick into the center; if it comes out clean, you’re golden. If not, give it a few more minutes. The top should be beautifully golden, and the scent will be irresistible—think warm cinnamon, fresh zucchini, and sweet batter. If your oven runs hot or cold, keep an eye on it; I’ve learned to rotate my pan halfway through to ensure even baking. Don’t forget to let it cool in the pan for about 15 minutes before transferring to a wire rack. This helps it set perfectly and prevents crumble-y slices. I prefer it slightly warm, with a little drizzle of glaze or just a dusting of powdered sugar for that extra little treat.
Step 8: Cool & Glaze
Once cooled, you can drizzle your glaze—simply mix powdered sugar with a splash of milk and vanilla, then stir until smooth. Feel free to add a dash of lemon juice, orange zest, or even a splash of caramel for a different flavor twist. Pour it over the cooled cake, letting it drip down the sides. I love this step because it adds that shiny, bakery-shop finish and makes the cake look extra special. If you prefer, sprinkle with a little cinnamon sugar or toasted coconut—whatever makes your heart happy. But trust me, the glaze gives it that finished, restaurant-quality look. You can also enjoy it plain—sometimes I do, especially if I want the full cinnamon flavor shining through.
Step 9: Slice & Serve
Serve slices of this warm or at room temperature—whatever suits your mood. I usually go for a hearty scoop with a dollop of whipped cream or a scoop of vanilla ice cream—because why not? Cutting the cake with a sharp serrated knife helps get clean slices, especially if the glaze has set. My kids love this at breakfast—no joke—and I love how easy it is to make ahead for weekend brunch or weekday treats. Little ones enjoy it with a glass of milk, and adults love a cup of robust coffee on the side. The swirl pattern makes each piece look like a work of art, and I’ve learned that the secret is to cut confidently—slow and steady—to get those pretty, even slices. Honestly, it’s a slice of happiness that’s simple, warm, and always leaves everyone asking for more.
What to Serve It With
This cake is versatile enough to shine in any setting. For breakfast, you can serve it alongside a steaming cup of coffee or tea, maybe with a smear of cream cheese. I like to sprinkle a little extra cinnamon sugar on top when it’s still warm—the kids think it’s like a cinnamon roll in cake form! When I do brunch, I slice it up and arrange it on a platter with fresh berries and some dollops of yogurt—easy, gorgeous, and everyone’s happy. As a dessert, it’s perfect warm with a scoop of vanilla ice cream or a drizzle of caramel sauce. I’ve also taken it on picnics, wrapped in foil—trust me, it travels well and tastes even better the next day. For cozy nights, I’ll warm a slice in the toaster oven and top with a bit of whipped cream. It’s the kind of recipe that’s a family favorite, and it’s adaptable enough for your personal twist—think chopped nuts, coconut flakes, or even a splash of citrus zest. The aroma alone will fill your home with warmth and nostalgia.
Top Tips for Perfecting Your Zucchini Swirl Cake
Zucchini Prep: Make sure to shred and squeeze out moisture—this keeps the cake tender without being overly wet. I’ve tried skipping this step, and let me tell you, it’s a soggy mess. Also, use fresh zucchini for the best flavor and texture. If the zucchinis are extra watery, after shredding, lay them on a clean cloth and press gently—this little trick really helps.
Mixing Advice: When combining your batter, be gentle. Overmixing can lead to a tough texture—think close your eyes and fold, don’t stir like you’re whipping cream. The batter should be moist but slightly lumpy, like a thick pancake mix.
Swirl Customization: Your swirl pattern can be as simple or elaborate as you like. I like a messy, marbled look—more rustic, more charming. Use a skewer or butter knife and create figure-eights or zigzags. Play with layering the cinnamon mixture in spots for uneven, beautiful streaks.
Ingredient Swaps: Want to make this vegan? Use flax eggs instead of real eggs and coconut oil instead of butter. Prefer a sugar-free version? Substitute with maple syrup or honey (reduce liquid slightly). Do what feels right for your diet and tweak the ratios—this recipe’s forgiving!
Baking Tips: Keep an eye on your cake—oven timings vary. When the center springs back gently and a toothpick comes out clean, it’s ready. Rotating the pan halfway through baking ensures an even color and crumb.
Glaze Variations: Try lemon glaze, cream cheese frosting, or a simple dusting of powdered sugar. The consistency should be pourable but not runny—add a little more sugar if needed. For a richer flavor, stir in a teaspoon of bourbon or orange extract.
Over the years, I’ve learned that patience, gentle folding, and a little personal flair make all the difference. This cake is forgiving once you get the rhythm—so don’t stress about perfection, focus on the love you pour into it. The compliments will come, and I promise, once you see the delighted faces grabbing slices, you’ll feel like a baking hero!
Storing and Reheating Tips
This cake keeps beautifully, and I like to think about the best ways to store and enjoy leftovers. If you’re planning to eat it within a day or two, keep it in an airtight container at room temperature—just don’t cover it too tightly, or the moisture will trap and make it soggy. For longer storage, wrap the slices individually in plastic wrap and keep in the refrigerator for up to 4 days. It reheats super well—just give it 20-30 seconds in the microwave or warm in a low oven until toasted and fragrant. If you set the cake with a glaze, wait until it’s cooled to add it—otherwise, it might slide off or become sticky. Freezing? Wrap each slice tightly in foil or place in a freezer-safe container. It’s good for up to 3 months. When you’re ready to enjoy, thaw at room temperature or warm gently—either way, it’s like getting a warm hug. The flavors get better after a day or two, and it’s honestly perfect for making ahead of busy mornings or special brunches.
Frequently Asked Questions
Final Thoughts
This zucchini swirl cake is one of those recipes that I keep coming back to, especially when I need something comforting yet quick. It’s a little piece of home—a cake that feels fancy enough for guests but simple enough for a weeknight treat. I love how versatile it is, how it gets better with each day, and how my kids literally fight over the last slice. Once you get the hang of making that pretty cinnamon swirl, you’ll find endless ways to customize it—whether by swapping ingredients, adding extras, or experimenting with toppings. My hope is that this becomes a new favorite in your family, just like it is in mine. So next time zucchinis are piling up on your counter, or you need a cozy, delicious pick-me-up, give this cake a try. It’s warm, it’s homey, and I promise it’ll make your kitchen smell amazing. Happy baking—and I can’t wait to hear how yours turns out! Feel free to leave a comment or share your own twists—I love hearing about your adventures in the kitchen!
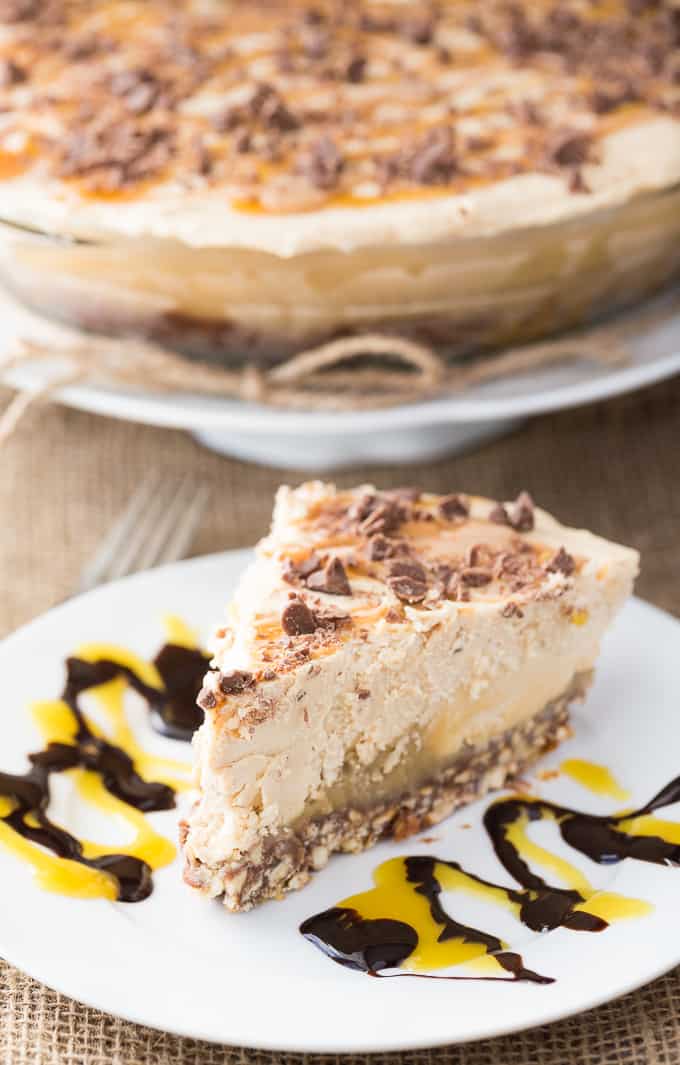
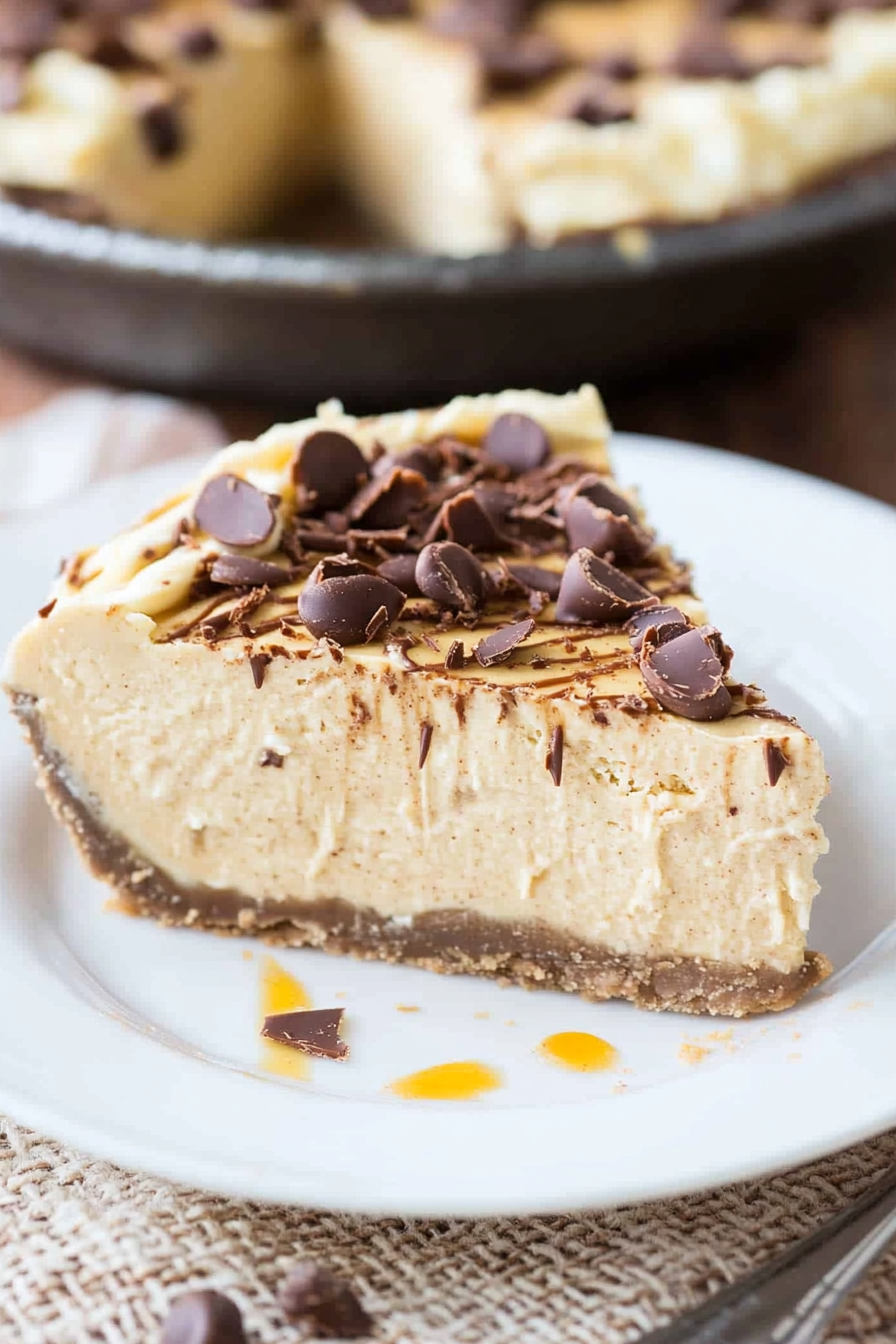
Frozen Peanut Butter Pie
Ingredients
Method
- Combine 1 ½ cups finely crushed pretzels, ¼ cup sugar, and 6 tablespoons melted butter in a 9 inch pie pan, mix well and press firmly into the pan. Bake in a 350℉ oven for 7 to 10 minutes. Set on cooling rack and cool completely.
- In a small saucepan bring ¼ cup heavy cream to a simmer. Once the cream comes to a simmer remove from heat, add 1 cup milk chocolate chips and 1 tablespoon light corn syrup. Cover and let set for about 2 minutes. Beat the chocolate, cream, and light syrup until smooth and glossy. Pour this over the cooled crust and refrigerate until the chocolate is cooled and set.
- In the meantime, prepare caramel layer. In a small saucepan combine ⅔ cup butter, ½ cup brown sugar, 1 tablespoon light corn syrup, and ¼ cup heavy cream. Stirring constantly, bring this to a boil and cook for 2 minutes. Cool to almost room temperature and pour over the chocolate layer. Reserve about 2 tablespoons of caramel sauce to drizzle over top of pie.
- In a large mixing bowl, beat 8 ounces of cream cheese until fluffy. Add 1 ½ cups peanut butter, 2 teaspoons vanilla, 1 tablespoon butter, and 1 ¾ cups powdered sugar. Beat until well blended and fluffy. In another large bowl, beat 2 cups whipping cream until stiff peaks form. Fold into the peanut butter mixture. Pour over the caramel layer.
- Drizzle over the top of the pie with remaining caramel (heated slightly if needed), then drizzle with 3 tablespoons melted peanut butter, and sprinkle with 3 tablespoons chopped milk chocolate chips. Freeze for 3 to 5 hours before serving.


This sounds like such a comforting treat—peanut butter pie is one of those desserts that feels cozy and nostalgic at the same time.
I love this recipe—it brings back such sweet memories of my grandma’s kitchen too! Perfect for those cozy moments.
I love this—it reminds me of my grandma’s kitchen too! The smell of baking always brings back such warm, cozy memories. Thanks for sharing!
I love how this pie combines simplicity with comfort—peanut butter and chocolate are a classic for a reason!
I love how this pie combines comfort and ease—perfect for any occasion! The peanut butter flavor is always a crowd-pleaser.