

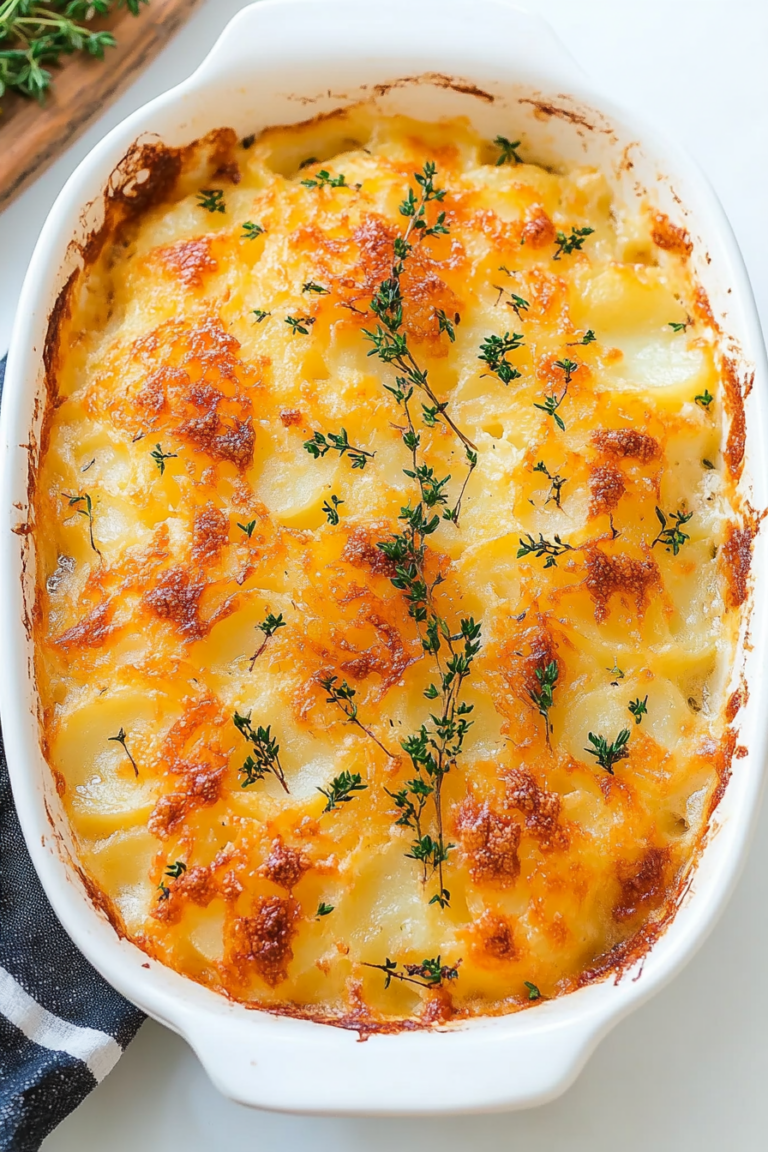
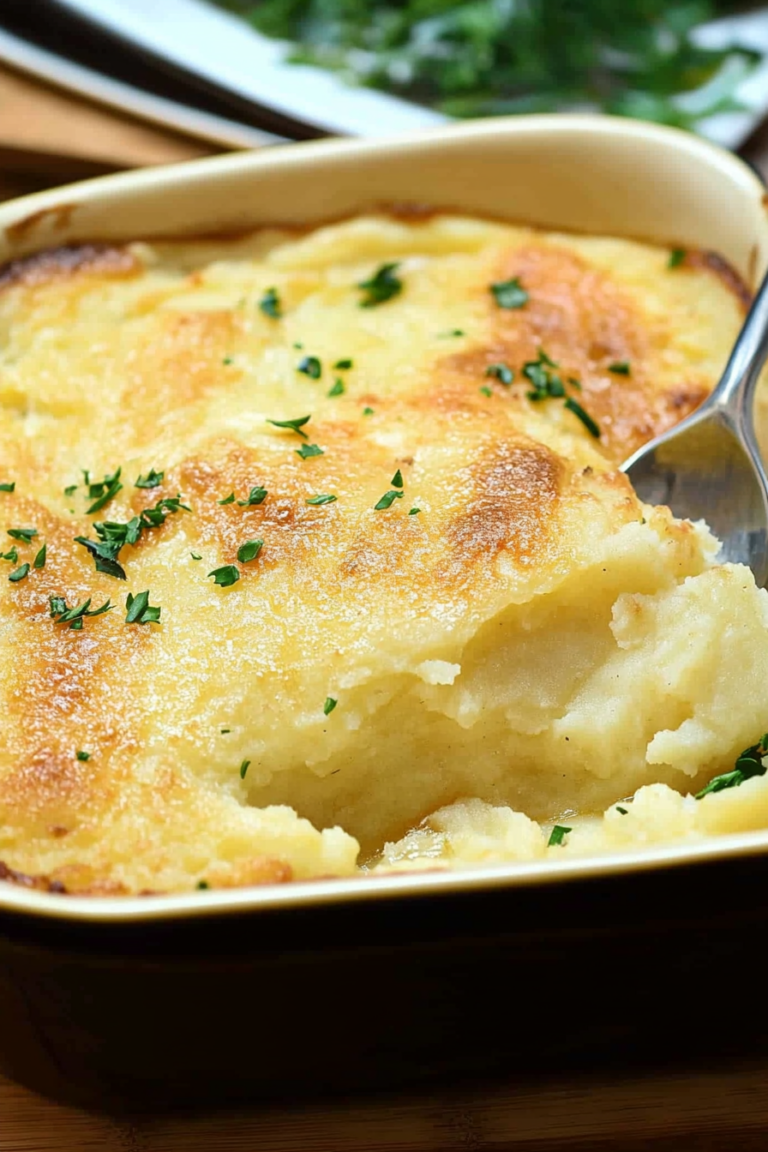
Simple Gluten-Free Ham Cheese Potato Bake
If I had to pick my absolute favorite way to use up those ripe bananas and extra zucchinis from the garden, it’s this zucchini banana bread. Honestly, I make it at least once a month because it’s just that good—moist, fluffy, with a hint of sweetness that hits just right. The smell alone makes my whole house feel warm and inviting, like a big hug from grandma. My kids ask for this all the time, especially when those bananas start to brown faster than I can eat them, and I always do this little happy dance because it’s so simple yet tastes like something from a fancy bakery. It’s one of those recipes that feels like a comfort blanket—familiar, cozy, and just a tiny bit indulgent. Plus, I love how versatile it is: I can swap out ingredients, add chocolate chips, or even throw in a handful of walnuts for crunch. Trust me, once you get your hands on this recipe, it’ll become a staple—perfect for breakfast, an afternoon snack, or even an easy dessert. I’ve tested it with almond flour, coconut oil, and even maple syrup—it always comes out just right, I promise.
What is Zucchini Banana Bread?
This zucchini banana bread is basically a little magic trick in the kitchen. Think of it as a moist, tender loaf that combines the natural sweetness of ripe bananas with the mild, vegetable-y goodness of zucchini—yes, zucchini! It’s basically a sneaky way to get veggies into your kids (or yourself) without feeling like you’re eating something healthy. The name might sound a bit fancy, but it’s honestly one of the easiest baked goods you’ll ever throw together. The batter is forgiving, the flavor is warm and comforting, and the texture is just right—soft yet sturdy enough to cut into perfect slices. It’s essentially a cross between banana bread and a zucchini muffin but in loaf form. I like to imagine this as the ultimate “clean” comfort food, perfect for when you want something sweet but don’t want to overdo it. Plus, it’s a great way to use up those overripe bananas and zucchinis that tend to sit around on my counter begging to be baked into something delicious.
Why you’ll love this recipe?
What I love most about this zucchini banana bread is how effortlessly it comes together. No complicated steps, no special equipment—just a few mixing bowls and a spoon, and you’re golden. The flavor? Oh, it’s a showstopper. The bananas give it this beautiful natural sweetness, while the zucchini keeps it incredibly moist without making it heavy or dense. And let’s not forget the subtle nutty undertones if you toss in some chopped walnuts or a handful of chocolate chips—yum! Plus, it’s budget-friendly. The ingredients are basic pantry staples—nothing fancy or hard to find. I’ve even experimented with coconut sugar or honey for a different touch, and it always turns out fantastic. Now, what’s really fun is how versatile it is. I’ve made it as a quick breakfast, a brunch centerpiece, and even as a cozy snack on rainy afternoons. It’s forgiving if you tweak the ingredients a little or if you’re short on time. Honestly, once this comes out of the oven, the whole house fills with this irresistible aroma—my kids are practically glued to the kitchen counter waiting for the first slice. It’s one of those recipes I can make through tears or in a rush, and it never disappoints.
How do you make Zucchini Banana Bread?
Quick Overview
This zucchini banana bread comes together in a flash. Basically, you mash the bananas, grate the zucchini, toss everything into a bowl, and then bake. It’s a one-bowl wonder that’s perfect for busy mornings or whenever you’re craving a sweet, wholesome treat. What makes this recipe special is that the batter doesn’t require a fancy mixer—just your good old spoon and some patience. I’ve learned over the years that the trick is not overmixing once you add the flour—that keeps the bread light and fluffy. Also, I recommend letting the loaf cool completely before slicing; otherwise, it might fall apart because it’s so moist. Once done, you get this gorgeous golden exterior with a tender crumb inside, and the aroma… oh, it’s magic!
Ingredients
For the Main Batter:
– 3 ripe bananas, mashed (the riper, the sweeter!)
– 1 1/2 cups grated zucchini (squeeze out excess moisture)
– 2 eggs (or flax eggs for vegan version)
– 1/3 cup melted coconut oil or vegetable oil
– 1/2 cup honey, maple syrup, or brown sugar (adjust sweetness to taste)
– 1 teaspoon vanilla extract
– 1 3/4 cups all-purpose flour (or almond flour, see tips!)
– 1 teaspoon baking soda
– 1/2 teaspoon baking powder
– 1/2 teaspoon salt
– 1 teaspoon cinnamon (optional, but highly recommended for warmth and depth)
For the Filling (Optional):
– Chopped walnuts, chocolate chips, or dried fruit (just fold in before baking)—my kids love a handful of chocolate chips mixed in!
For the Glaze:
– 1/2 cup powdered sugar + 1-2 teaspoons milk or lemon juice (for a quick sweet drizzle)
– Or, just dust with a little cinnamon or cocoa powder for a more rustic look.
Step-by-Step Instructions
Step 1: Preheat & Prep Pan
Start by preheating your oven to 350°F (175°C). Grease your favorite loaf pan with butter or line it with parchment paper—this loaf likes to stick if you’re not careful. Setting up your station now makes the whole process smoother, so have your ingredients measured and ready.
Step 2: Mix Dry Ingredients
In a small bowl, whisk together the flour, baking soda, baking powder, salt, and cinnamon. This step is crucial because it ensures all those leavening agents are evenly distributed, giving your bread a nice rise without any weird pockets of baking soda.
Step 3: Mix Wet Ingredients
In a larger bowl, mash your bananas until smooth—get rid of any lumps, but don’t stress if it’s a little chunky; it’ll still taste great. Then beat in the eggs, oil, honey, and vanilla. I always do this with a sturdy spoon because I like to feel the texture and stop mixing as soon as everything’s combined. Overmixing can turn your bread dense, so I just fold until it looks pretty even.
Step 4: Combine
Add the dry ingredients into the wet mixture gradually, folding gently until just combined. No overmixing! If you’re thinking, “Is it okay if there are some lumps?”—yes! That’s what keeps the bread tender. Fold in the grated zucchini (squeeze out excess moisture first—otherwise, your batter might be too wet). If you’re adding chocolate chips or nuts, gently fold them in now.
Step 5: Prepare Filling
If you’re using extras like chocolate chips or chopped nuts, fold them into the batter now. For a fun swirl pattern, pour half the batter into the pan, sprinkle or dollop the filling, then top with the remaining batter and use a skewer or toothpick to swirl it gently—this creates a pretty marbled effect.
Step 6: Layer & Swirl
This step is optional but pretty. Pour about half the batter into your loaf pan, add your filling in the middle, then top with the rest of the batter. Use a toothpick or knife to swirl through it—no need to be perfect, just aim for a marbled look. It’s so satisfying to see that beautiful ribbon inside when you slice later.
Step 7: Bake
Pop it into the oven and bake for 55-65 minutes. Every oven is different, so start checking around the 55-minute mark. Insert a toothpick in the center—if it comes out clean, you’re done. If it’s wet or gooey, give it a few more minutes. Don’t open the oven too often or your loaf might sink.
Step 8: Cool & Glaze
Once baked, let the bread cool in the pan for about 15 minutes before transferring to a wire rack. If you’re adding glaze, do it once it’s completely cooled—otherwise, it’ll melt right off. The aroma during cooling smells like a warm bakery, I swear!
Step 9: Slice & Serve
Use a serrated knife, slicing gently to keep those pretty internal swirls intact. Serve slightly warm or at room temperature. I love it with a pat of butter or a drizzle of honey—dinner table approved! It’s great for breakfast, lunchboxes, or just a cozy snack with tea while you curl up on the sofa.
What to Serve It With
This zucchini banana bread is pretty versatile and perfect for multiple occasions. In the morning, I pair it with a hot cup of coffee or a glass of almond milk. My kids love it toasted with a smear of butter, especially when it’s still a little warm—this disappeared in minutes at my house! For brunch, I like to serve slices alongside fresh fruit, yogurt, and maybe some crispy bacon. It elevates a simple meal into something special. When it’s dinner time, a slice of this bread makes a lovely end—warm, with a little dollop of whipped cream or a drizzle of honey. And honestly, it’s perfect for those chilly afternoons when you just want something sweet that feels like a hug. My family also loves it as a snack on lazy weekends, maybe with a cup of cold milk or herbal tea. The beauty of this bread is that it’s satisfying without being overly sweet, so it balances out a big mug of coffee or a glass of milk perfectly. It’s a crowd-pleaser, and it’s so easy to customize—by adding chocolates, nuts, or even shredded coconut, you can make it your own every time.
Top Tips for Perfecting Your Zucchini Banana Bread
Over the years, I’ve picked up a few tricks to make this zucchini banana bread just perfect every time. First, when grating the zucchini, I always sprinkle a little salt and let it sit for 10 minutes to draw out excess moisture—trust me, it makes a huge difference in keeping the loaf moist but not soggy. Always squeeze out as much water as possible; otherwise, your batter might be too runny, and your bread could sink at the center. I’ve tested with both white and whole wheat flour, and honestly, whole wheat adds a lovely nutty flavor, though the texture can be slightly denser—so I recommend a blend for best results. When mixing, I do the “pseudo-fold” method—just gentle strokes to combine without overworking the gluten, which keeps the bread tender. For a prettier swirl pattern, I like to layer the batter carefully and use a toothpick to create those beautiful ribbon effects. If you want to tweak the sweetness, reduce the honey or sugar by a few tablespoons and taste the batter—it’s surprisingly forgiving. Baking temperature is crucial—if your oven runs hot, rotate the loaf halfway through to avoid burning the top. Using an oven thermometer helps me stay precise. Lastly, if you’re out of cinnamon, cardamom or nutmeg work beautifully as substitutes, giving a different but equally enticing aroma. I’ve learned to trust my nose and judgment—baking is all about improvising and making it your own.
Storing and Reheating Tips
This bread stays fresh for a couple of days if stored properly. At room temperature, I keep it wrapped in a clean tea towel or in a breathable bread box for up to two days—careful not to leave it out in the sun or near heat, which can dry it out. If you want to keep it longer, wrapping slices individually in plastic wrap and popping them in a resealable bag in the refrigerator works great for up to 5 days. Just remember, refrigeration can sometimes make the loaf a tad drier, so I like to toast slices before serving. For freezing, double-wrap the whole loaf or slices tightly with plastic wrap followed by foil—this prevents freezer burn and keeps the moisture intact. When you’re ready to eat, let it thaw at room temperature for about 30 minutes or gently warm slices in the microwave for 20 seconds. If you plan to serve it with glaze, wait until it’s fully cooled; otherwise, the glaze will melt right off. I find that reheating slightly softens the bread just enough to restore some of that freshly-baked softness. It’s honestly just as delightful reheated as fresh out of the oven—maybe even better, because the flavors have had time to marry. And that smell—oh, it’s worth reheating just for that!
Frequently Asked Questions
Final Thoughts
This zucchini banana bread isn’t just a recipe—it’s a little slice of home, of cozy mornings and lazy afternoons. Every time I bake it, I get a rush of nostalgia, images of my family gathered around the table, sharing stories over warm slices. It’s forgiving, adaptable, and downright addictive. Whether you wanna sneak some veggies into your kids’ diet or just indulge in something sweet without all the guilt, this loaf has got you covered. Once you master the basic recipe, feel free to experiment: add some chopped nuts, shredded coconut, even a handful of blueberries. The joy is in its simplicity and how effortlessly it fits into everyday life. So grab your bananas, zucchini, and a smile—let’s get baking. I’d love to hear how yours turns out, so don’t forget to leave a comment or share your favorite variation. Happy baking!

gluten-free
Ingredients
Method
- Preheat the oven to 400°F. Line a baking sheet with parchment paper. Sprinkle parmesan cheese evenly on the sheet to cover the bottom.
- Slice potatoes very thin, about 1/8 inch thick, and shingle them on the prepared baking sheet. Spray lightly with olive oil and season with salt, onion powder, and garlic powder. Bake for 20-25 minutes until golden.
- Layer ham slices and sprinkle with mozzarella cheese over the baked potato slices. Starting from one end, roll tightly and place seam side down on the baking sheet. Bake for an additional 7-10 minutes.
- Garnish with chopped parsley and chili flakes if desired. Serve hot.
This banana zucchini bread recipe sounds perfect for using up summer garden extras—I’ll definitely have to try it! Looks moist and delicious.
I’ve been meaning to try this potato bake recipe – it looks so cozy and easy, perfect for using up leftovers!
I love that banana bread recipe—it’s perfect for using up extra produce! The zucchini keeps it moist and adds great flavor.
I love this idea—zucchini banana bread sounds amazing! I’ve been looking for a new recipe to use up extra veggies, so this is perfect.
I love this idea—banana and zucchini bread is such a clever way to use up garden veggies! Do you add any chocolate chips or nuts?