

Savory Parmesan Chicken with a Texas Twist
If I’m honest, one of my favorite memories growing up is how my grandma’s kitchen always smelled like cinnamon and sunshine. She’d have a batch of her beloved zucchini banana bread cooling on the counter, and I swear, the aroma alone could make even the grumpiest morning a little brighter. Over the years, I’ve tweaked her recipe, adding a splash of vanilla here, swapping whole wheat flour there, trying to make it a bit healthier without losing that cozy, nostalgic flavor. Honestly, this is one of those recipes I can’t keep to myself — it’s just too good. My kids ask for it all the time, especially on weekend mornings, and it’s become a staple whenever I want to whip up something that feels like a warm hug. Plus, I always do this when I have leftover zucchini from the garden — it’s practically a magic trick how those humble veggies turn into something so moist and flavorful. Trust me on this one: if you’ve got bananas and zucchini sitting in your kitchen, you’re just a whisk away from baking happiness. Let’s dive in!
What is Zucchini Banana Bread?
Thinking of zucchini banana bread is like imagining a cozy blanket wrapped around a piece of fresh, sweet bread. It’s essentially a soft, moist quick bread that combines the natural sweetness of ripe bananas with the mild, tender goodness of zucchini. The name might throw you off — it’s no fancy layered cake, just a humble, homey loaf that’s perfect for breakfast, snacks, or even a lazy afternoon treat. The zucchini doesn’t overpower but instead adds an incredible moisture and a tiny bit of goodness disguised as vegetables. It’s like sneaking a health bonus into something everyone loves, and honestly, no one ever notices! The best part? It’s super flexible. You can add nuts, chocolate chips, or your favorite spices. Think of it as the chameleon of baked goods: endlessly adaptable but always comforting. If you love banana bread with a little twist, this one’s definitely worth trying. It’s quick, simple, and guaranteed to disappear in minutes at my house!
Why you’ll love this recipe?
What I love most about this zucchini banana bread is how forgiving and foolproof it is. First off, the flavor — oh my goodness, it’s like a warm hug in every bite. The bananas lend a gentle sweetness, while the zucchini keeps it incredibly moist and tender without making it heavy. Trust me, I’ve made this countless times, and it never fails to impress. Plus, it’s one of those recipes that’s perfect for busy mornings or last-minute snack emergencies because it comes together so quickly. The ingredients are simple — pantry staples most of us have lurking in the fridge or cupboard — so no special trips needed. And you know what? It’s inexpensive! Eggs, bananas, zucchinis, flour, a bit of sugar — all budget-friendly. I’ve also tested this with whole wheat flour, almond milk, and even swapping out some sugar for natural sweeteners, and it still comes out amazing. The versatility is what makes this a keeper. I think the real magic, though, is how this bread can be customized. Add your favorite nuts or chocolate chips, sprinkle some cinnamon or nutmeg, or even drizzle a glaze on top. It’s a canvas for your personal touch, and it’s perfect whether you’re making it for breakfast, brunch, or just because you’re craving something sweet but don’t want to turn on the oven for hours. Honestly, once you try this, you might find yourself baking it every week.
How do you make Zucchini Banana Bread?
Quick Overview
This zucchini banana bread starts with mixing the dry ingredients first, then mashing up the bananas and grating the zucchini. You fold everything together gently — no overmixing! — pour the batter into a loaf pan, swirl in your favorite add-ins or fillings, and bake until golden and a toothpick comes out clean. The whole process takes about an hour from start to finish, but most of that is just waiting for it to bake. What’s special about this method? It’s straightforward, forgiving, and flexible. I love that you don’t need a mixer — just a bowl and a whisk — and the batter comes together quickly, making it perfect for when you’re short on time but craving something homemade and wonderful. The smell as it bakes? Absolute heaven. Trust me, your house will smell like you’ve been baking for hours, when really, it’s just about an hour. You get moist, flavorful bread that’s perfect straight from the oven or toasted the next day.
Ingredients
For the Main Batter:
– 2 cups of all-purpose flour (or whole wheat flour if you prefer a heartier texture)
– 1 teaspoon baking soda
– ½ teaspoon baking powder
– 1 teaspoon ground cinnamon
– ¼ teaspoon salt
– ½ cup granulated sugar (or coconut sugar for a healthier twist)
– ½ cup brown sugar (for richness)
– 1 large ripe banana, mashed (the more spots, the sweeter)
– ½ cup vegetable oil or melted coconut oil
– 2 large eggs
– 1 teaspoon vanilla extract
For the Filling (Optional):
– ½ cup chopped walnuts or pecans
– ½ cup semi-sweet chocolate chips
– 1 teaspoon cinnamon (for extra flavor)
For the Glaze (Optional):
– ½ cup powdered sugar
– 1-2 teaspoons milk or almond milk
– Dash of vanilla or lemon juice for extra zing
Step-by-Step Instructions
Step 1: Preheat & Prep Pan
Preheat your oven to 350°F (175°C). Grease a standard loaf pan with butter or line it with parchment paper — I always do this, so nothing sticks. Set aside. If you like your bread extra moist, I recommend spraying the pan with a bit of baking spray and a light dusting of flour. Trust me, this simple trick makes turning out the loaf so much easier.
Step 2: Mix Dry Ingredients
In a big bowl, whisk together the flour, baking soda, baking powder, cinnamon, and salt. Mixing these first ensures everything is evenly distributed — no clumps or pockets of baking soda that can mess with your bread’s rise. It’s like setting the stage for a perfect bake!
Step 3: Mix Wet Ingredients
In another bowl, mash the banana with a fork until smooth. I like to leave a few tiny lumps because it adds texture, but totally smooth works too. Add the oil, eggs, vanilla, and sugars, and whisk everything together until it’s nice and combined. It should look a little glossy, and your whisk will leave trails — that’s what you want.
Step 4: Combine
Pour the wet mixture into the dry ingredients. Use a spatula or a gentle whisk to fold everything together — don’t overmix. Overmixing can make the bread dense, and nobody wants that! Just mix until no streaks of flour remain. It’s okay if there are a few little lumps; they’ll bake out.
Step 5: Prepare Filling
If you’re adding chocolate chips or nuts, fold them gently into the batter now. Alternatively, you can sprinkle some on top before baking for a pretty topping. If you’re feeling adventurous, swirl in a spoonful of peanut butter or jam — just do it after pouring the batter into the pan.
Step 6: Layer & Swirl
Pour half of the batter into your prepared loaf pan. Then, add your fillings (nuts, chocolate chips) on top, and top with the remaining batter. Use a knife or skewer to swirl through the batter a few times — this creates a marbled look that’s just so pretty when sliced. I love doing a big swirl for a rustic look or subtle zigzags if I want something a little tidier.
Step 7: Bake
Pop it into your preheated oven and bake for about 50-60 minutes. Check doneness by inserting a toothpick in the center — it should come out clean. If it browns too quickly, tent it with foil and keep baking. Every oven is different, so start checking around 50 minutes. My tip? resist opening the oven too often — sudden temperature drops can make your loaf fall.
Step 8: Cool & Glaze
Allow the bread to cool in the pan for at least 15 minutes before transferring to a wire rack. It’s tempting to dig right in, but patience pays off — this helps set the crumb and makes slicing easier. Once cooled, drizzle with your favorite glaze or dust with powdered sugar for that bakery look. For a quick glaze, mix powdered sugar with a splash of milk and vanilla, then pour over the loaf.
Step 9: Slice & Serve
Use a sharp serrated knife to cut clean slices. My favorite way is to serve it slightly warm with a pat of butter or a dollop of cream cheese. It’s also incredible toasted the next day — just pop a slice in the toaster and enjoy. This bread keeps well for a few days wrapped in foil, but honestly, it’s so good, it rarely lasts that long.
What to Serve It With
This zucchini banana bread is a chameleon—really, it pairs with just about anything. For breakfast, I love serving slices alongside a steaming cup of coffee or espresso — the richness of the coffee complements the sweetness perfectly. If you’re hosting brunch, a platter of sliced bread with fresh berries, a smear of butter, and maybe some cream cheese makes a lovely presentation. It’s also fabulous as an afternoon snack, especially when paired with herbal tea or a glass of milk. My kids ask for it for dessert too — a warm slice with a drizzle of honey or caramel sauce, and they’re in heaven. And on lazy weekends, I toast a piece, spread it with almond butter, and call it good. Honestly, this bread has a cozy charm that just feels like home — a little bit of childhood, a lot of warmth, and endless possibilities. It’s perfect for those times when you want comfort, but also something a little special. Trust me, once you get the hang of it, this becomes your go-to bake for any occasion.
Top Tips for Perfecting Your Zucchini Banana Bread
Having made this so many times, I’ve picked up a few pro tips that make all the difference. First, zucchini prep is key: I always use a box grater, and after grating, I squeeze out excess moisture with a clean towel or paper towels. This keeps the bread from getting soggy. I learned that excess water can make the loaf fall flat or turn out gummy, which nobody wants!
When mixing, be gentle — overmixing is the enemy. I fold, not stir vigorously. Also, if your batter seems a little thick, don’t hesitate to stir in a tablespoon or two of milk or almond milk. It makes the batter easier to pour and results in a even more tender crumb. For swirl patterns, I use a toothpick or skewer to create pretty marbling; it’s so satisfying seeing the patterns emerge. If you’re swapping ingredients, whole wheat flour works beautifully, but I recommend adding an extra splash of liquid since whole grains absorb more moisture. I’ve also tested making this with coconut sugar and honey — equally delicious, just adjust the liquids accordingly.
Oven positioning matters, too — I always bake in the center rack for even heat distribution. To test doneness, a toothpick in the middle should come out moist but not sticky — I often start checking at 50 minutes to prevent overbaking. When I make it with chocolate chips, I add them last, gently folding in, so they don’t sink or burn. For a refined look, sprinkle some extra nuts or sugar on top before baking. Honestly, the more you play with the fillings and toppings, the more special your loaf becomes. It’s my little kitchen experiment that always proves happily successful!
Storing and Reheating Tips
This bread is pretty resilient. Keep leftovers in an airtight container at room temperature for up to 2 days; just make sure it’s covered well so it doesn’t dry out. After that, it’s best stored in the fridge — I recommend wrapping individual slices in plastic wrap and placing them in a resealable bag. It stays fresh for about 4-5 days. When you’re ready to enjoy again, I just pop slices in the toaster or microwave for 10-15 seconds; it’s as good as fresh. For longer storage, freezing is your friend. Wrap the whole loaf tightly in plastic wrap, then foil, and freeze for up to 3 months. To reheat, thaw overnight in the fridge and warm slices in the microwave or oven. Honestly, I think this bread even tastes better the next day — the flavors have time to meld, and the moisture stays just right. If you plan to glaze or add toppings later, do that after reheating — it freshens things up even more.
Frequently Asked Questions
Final Thoughts
Honestly, this zucchini banana bread feels like a tiny gift in every slice — moist, flavorful, and just packed with cozy goodness. It’s a real testament to how simple ingredients can come together to create something feel-good and special. I love how versatile it is: perfect for lazy mornings, easy snacks, or even sneaking in a little extra veggie love. Over the years, I’ve shared this with friends, family, and even neighbors, and every time, it disappears faster than I expected. The best part? It’s forgiving — no fancy equipment needed, and you can swap ingredients to suit your pantry. Whether you’re a seasoned baker or just starting out, I promise this is one recipe you’ll keep coming back to. So go ahead, gather your bananas and zucchini, and let your oven work its magic. I can’t wait to hear how yours turns out — happy baking! And don’t forget to leave a comment or share your own twist; I love hearing everyone’s stories and ideas.
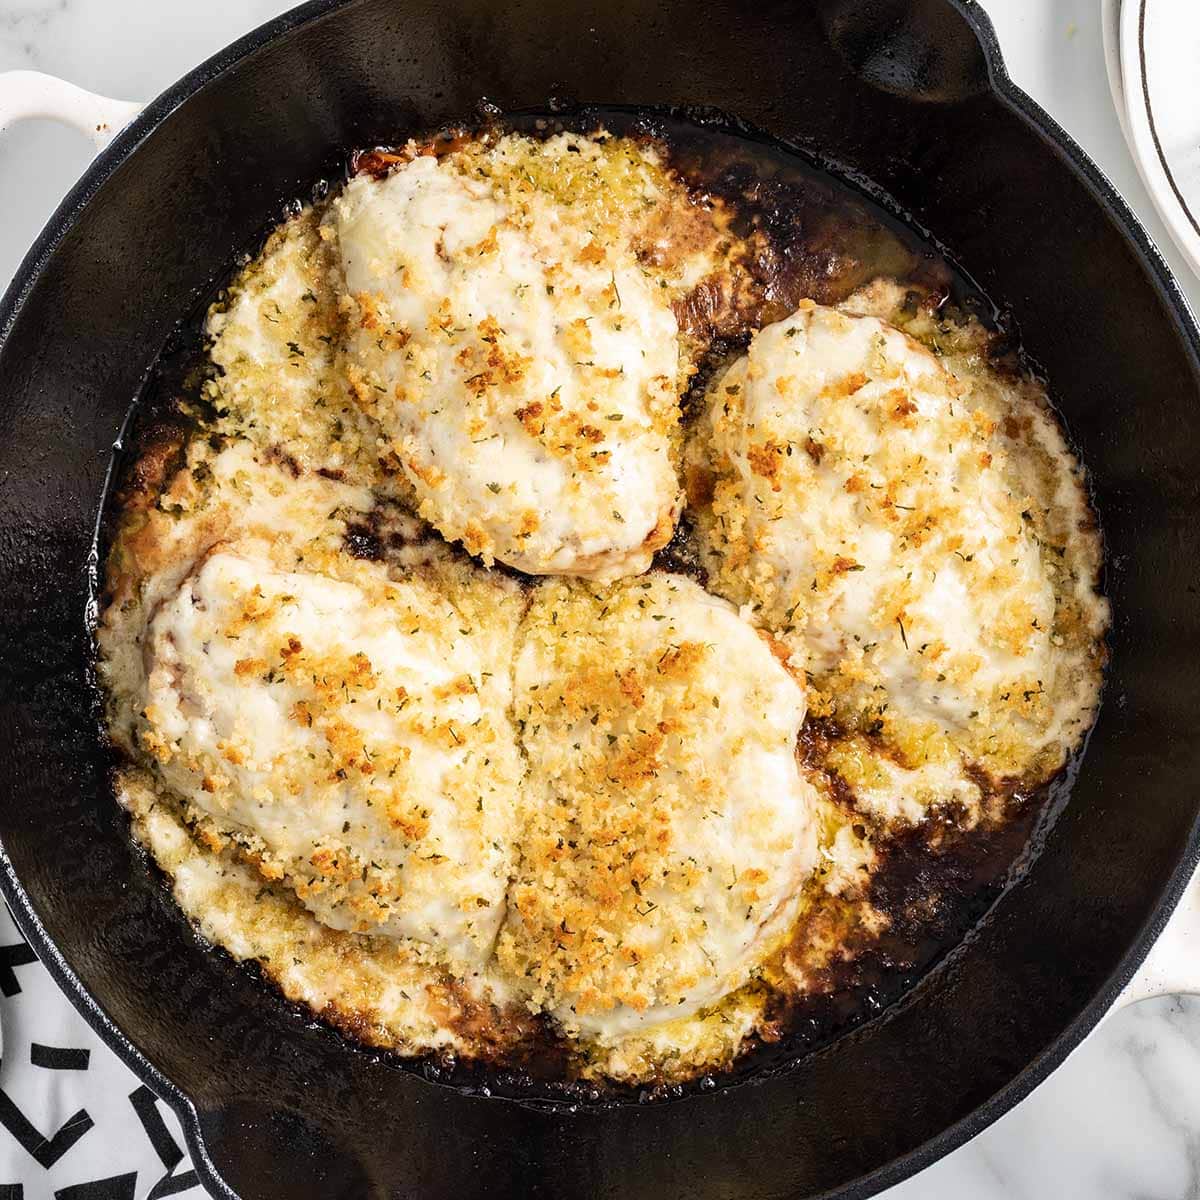
Parmesan Chicken
Ingredients
Method
- Place chicken breast cutlets and Italian salad dressing into a large zip-top bag and marinate for 2 hours or overnight.
- Preheat oven to 475°F. Remove chicken from marinade to come to room temperature.
- Mix shredded Italian cheese blend with ranch dressing and set aside.
- Combine melted butter, panko breadcrumbs, garlic salt, and parsley flakes in a small bowl.
- Heat olive oil in a large oven-safe skillet over medium-high heat.
- Cook chicken cutlets 4-5 minutes per side until golden and internal temperature reaches 165°F.
- Reduce heat, add cheese mixture on top of chicken, and sprinkle with breadcrumb mixture.
- Transfer skillet to oven and bake for 8-10 minutes until cheese is melted and breadcrumbs are golden.
- Remove from oven, let rest 3-5 minutes, then serve.


That sounds so comforting—I love how food can carry such warm memories like that. Zucchini banana bread is a hidden gem!
That recipe sounds amazing—I love how food brings back such warm memories like your grandma’s kitchen!
This sounds delicious! I love how you’re blending comfort food with a personal memory—it makes the dish feel even more special.
This reminds me of my grandma too—her kitchen always smelled like home. I love how food carries such sweet memories!
This reminds me of my abuela’s kitchen too—her cinnamon zucchini bread was the best! Your Texas twist sounds amazing.