
Autumn Spice Cookies with Brown Butter Cream
There’s nothing quite like waking up on a lazy weekend morning to the smell of something sweet baking in the oven. I remember my grandma’s kitchen when she made her famous zucchini coffee cake—how the scent of cinnamon and buttery crumbs would drift through the house, making everyone’s stomach growl in anticipation. It’s one of those recipes that’s so familiar, so cozy, it instantly takes you back to childhood mornings—yet it’s surprisingly effortless to put together. Honestly, I’ve made this countless times, and it never fails to disappear in minutes at my house. My kids ask for this all the time, especially when I want to sneak in some extra veggies without complaining. This particular coffee cake, infused with shredded zucchini, has a tender crumb and just enough sweetness to keep you coming back for more. Plus, it’s a lifesaver on busy nights when I don’t want to spend hours in the kitchen but still want something special. Trust me on this—once you try it, it’s going to become a staple in your baking lineup too!
What is Zucchini Coffee Cake?
Think of zucchini coffee cake as a delightful cross between a quick bread and a classic cinnamon crumb cake—kind of like a warm hug in slice form. It’s essentially a moist, tender cake made with grated zucchini, which keeps it surprisingly light and fluffy. The name “coffee cake” comes from its traditional pairing—enjoyed with a cup of steaming coffee or tea—but honestly, it’s just as good as a breakfast treat or a dessert. The zucchini not only adds moisture but also sneaks in some hidden veggies, so I always do this when I want to get my kids to eat more greens without a fuss. The topping is a buttery, crunchy crumble that balances perfectly with the soft interior. It’s a versatile, family-friendly recipe that’s perfect for lazy weekends, brunch gatherings, or even a cozy snacking moment when you need a little sweetness in your day.
Why you’ll love this recipe?
What I love most about this zucchini coffee cake is how adaptable and forgiving it is. The flavor profile is a warm burst of cinnamon, nutty undertones from the brown sugar, and that comforting aroma that just fills the house—seriously, it’s impossible not to smile when it’s baking. The best part? It’s incredibly simple to make. I always do this when I’m in a rush but still want to deliver something homemade and delicious. It uses common pantry ingredients, and even if you’re not a seasoned baker, you can whip this up with confidence. Plus, it’s pretty budget-friendly; the zucchini is basically free if you’re growing your own or snagging it from the farmer’s market, and the rest are pantry staples. The versatility of this cake means you can enjoy it for breakfast, serve it as a sweet afternoon snack, or cut thick slices as a dessert—my family actually asks for it at every holiday gathering now. I honestly think this recipe hits that sweet spot between simple and spectacular, and I love that it’s a hidden veggie hidden in plain sight. It’s one of those comfort foods that always makes me feel at home, no matter how hectic life gets.
How do I make Zucchini Coffee Cake?
Quick Overview
This zucchini coffee cake comes together quickly—most of the effort is in grating the zucchini and mixing a few ingredients. The batter is ridiculously forgiving; you just toss everything into one bowl, fold in the shredded zucchini, and top it with a buttery crumble. It’s a moist cake with a tender crumb, crowned with a crispy, cinnamon-sugar topping, and baking fills your kitchen with the most inviting smell. What makes this method special is how easy it is to customize—add nuts, swap out spices, or even use different sweeteners. Inside, it’s a surprise sneak of veggies, but once you taste it, the zucchini just melts into the fluffy butteriness, making it a true comfort food.
Ingredients
For the Main Batter:
- 1 ½ cups all-purpose flour (I prefer unbleached for richer flavor)
- 1 teaspoon baking powder
- ½ teaspoon baking soda
- ½ teaspoon salt
- 1 teaspoon ground cinnamon (the more, the merrier!)
- ½ cup granulated sugar
- ½ cup packed light brown sugar
- ⅓ cup vegetable oil or melted unsalted butter
- 2 large eggs
- 1 teaspoon vanilla extract
- 1 cup finely shredded zucchini (about one medium zucchini; squeeze out excess moisture)
For the Filling:
- Optional: ½ cup chopped nuts (walnuts or pecans are perfect)
- For a little extra sweetness, a sprinkle of mini chocolate chips works beautifully too!
For the Glaze (Optional but recommended):
- 1 cup powdered sugar
- 2-3 teaspoons milk or cream
- ½ teaspoon vanilla extract
- A pinch of cinnamon or lemon zest for extra flavor
Step-by-Step Instructions
Step 1: Preheat & Prep Pan
Set your oven to 350°F (175°C). Grease a 9-inch square baking pan or a round cake pan with butter or cooking spray. Lining with parchment paper makes for easier serving—trust me, cleanup will be a breeze.
Step 2: Mix Dry Ingredients
In a large bowl, whisk together the flour, baking powder, baking soda, salt, and cinnamon. Make sure everything is evenly distributed—this helps the cake lift perfectly without lumps or pockets of flour.
Step 3: Mix Wet Ingredients
In a separate bowl, combine the sugars, oil, eggs, and vanilla. Mix well until smooth; I usually do this with a whisk until everything is nicely blended. If the eggs are cold, it helps to warm the eggs a little beforehand or beat everything vigorously to ensure smoothness.
Step 4: Combine
Pour the wet mixture into the dry ingredients and gently fold together. Do not overmix—that’s how you get a dense, tough cake. Just stir until the flour is barely incorporated. Then, fold in the shredded zucchini—this is the secret ingredient that keeps the cake super moist.
Step 5: Prepare Filling
If you’re adding nuts or chocolate chips, stir them into the batter now. For a swirl or layered effect, set some aside for the topping later. It’s also nice to sprinkle a little extra cinnamon-sugar on top before baking for that fragrant crunch.
Step 6: Layer & Swirl
Pour the batter into your prepared pan. If you like, sprinkle chopped nuts or mini chocolate chips directly on the surface. For a pretty swirl, gently drag a knife through the batter to create a marbled effect—this is totally optional but looks stunning when sliced.
Step 7: Bake
Pop it into the oven and bake for about 35-40 minutes. Check don’t open the oven door too early—no one likes a sunken cake! When a toothpick inserted into the center comes out clean, it’s ready. The top should be golden and slightly crackly.
Step 8: Cool & Glaze
Let the cake cool in the pan for at least 15 minutes, then transfer to a wire rack. This helps it set and makes slicing easier. If you’re using the glaze, whisk together the powdered sugar, milk, and vanilla until smooth. Drizzle over the slightly warm cake for a glossy finish and extra flavor.
Step 9: Slice & Serve
Use a sharp serrated knife to cut clean slices—hot or cold, it’s delicious either way. I love serving this with a cup of coffee or a glass of cold milk. The aroma alone will entice everyone to the table, and trust me, your house will smell like a bakery. This cake is just as good fresh as the next day, especially when kept in an airtight container.
What to Serve It With
This zucchini coffee cake is versatile enough to shine at any meal or snack time. For breakfast, pair it with a strong black coffee or a milky latte—something warm to match the cozy vibe. I always do a dollop of cream or a smear of butter on a slice—trust me, it takes it to another level. When I serve it for brunch, I love adding a fresh fruit salad or a handful of berries on the side, balancing the richness of the cake with some tartness. As a dessert, a scoop of vanilla ice cream or a drizzle of caramel sauce makes it irresistible, especially on cooler evenings. Sometimes, I slice it into thicker pieces and pack a slice in my kid’s lunchbox—it disappears faster than I can pack it.
Top Tips for Perfecting Your Zucchini Coffee Cake
Over the years, I’ve picked up a few tricks I couldn’t do without. First, make sure to squeeze out as much moisture as possible from the shredded zucchini—this keeps the cake tender without excess wetness. I learned that using a fine grater gives a smoother crumb, but a bigger shred works great if you want more zucchini bites in each slice. When mixing, be gentle—overmixing the batter makes the cake dense and chewy, which nobody wants. For the swirl effect, I like to reserve a spoonful of batter and create gentle ribbons through the already poured batter—this creates that beautiful marbled look. If you want to swap out ingredients, try whole wheat flour for a nuttier flavor or coconut oil for a hint of tropical aroma. I tested this with almond milk, and it actually made it even creamier—try it for a dairy-free option! When baking, I always position the rack in the middle of the oven to prevent uneven baking. And always do the toothpick test—so simple, but it’s the secret to perfectly baked cake every time. For the glaze, adjusting the amount of milk results in a thicker or thinner drizzle, so experiment to find your perfect consistency.
Storing and Reheating Tips
This cake stays fresh longer than you’d think. If you’re planning to eat it within a day or two, keep slices covered with a clean towel or in an airtight container at room temperature—up to two days tops. Once refrigerated, it preserves for about a week, but I recommend bringing slices to room temp before serving so they’re nice and tender. To freeze, wrap individual slices tightly in plastic wrap, then place in a freezer bag for up to three months. Thaw overnight in the fridge or at room temperature for an hour—either way, it’ll be just as delicious. If you’ve glazed it, wait to add the glaze until after reheating—microwaving briefly (10-15 seconds) is perfect for softening, but avoid overheating to prevent drying out. I’ve tested all these methods, and honestly, this cake holds up beautifully. The moisture from the zucchini helps keep it tender, even after freezing, which is such a relief when baking in bulk or making ahead.
Frequently Asked Questions
Final Thoughts
This zucchini coffee cake is one of those recipes that feels like a warm family secret—something you’ll want to keep making again and again. It’s simple, forgiving, and oh-so-satisfying. The subtle sweetness, the delicate aroma, and the hidden veggie component make it special enough to serve at everyone’s table. I love how easy it is to switch up ingredients—add nuts, swap out the spices, or try different toppings—making it your own. Trust me, once you’ve baked this once, it’ll be a staple in your home too. I hope you enjoy making and sharing this cozy slice of happiness as much as I do. Happy baking! And be sure to leave a comment below with your variations or a photo of your masterpiece—I’d love to hear how yours turns out!
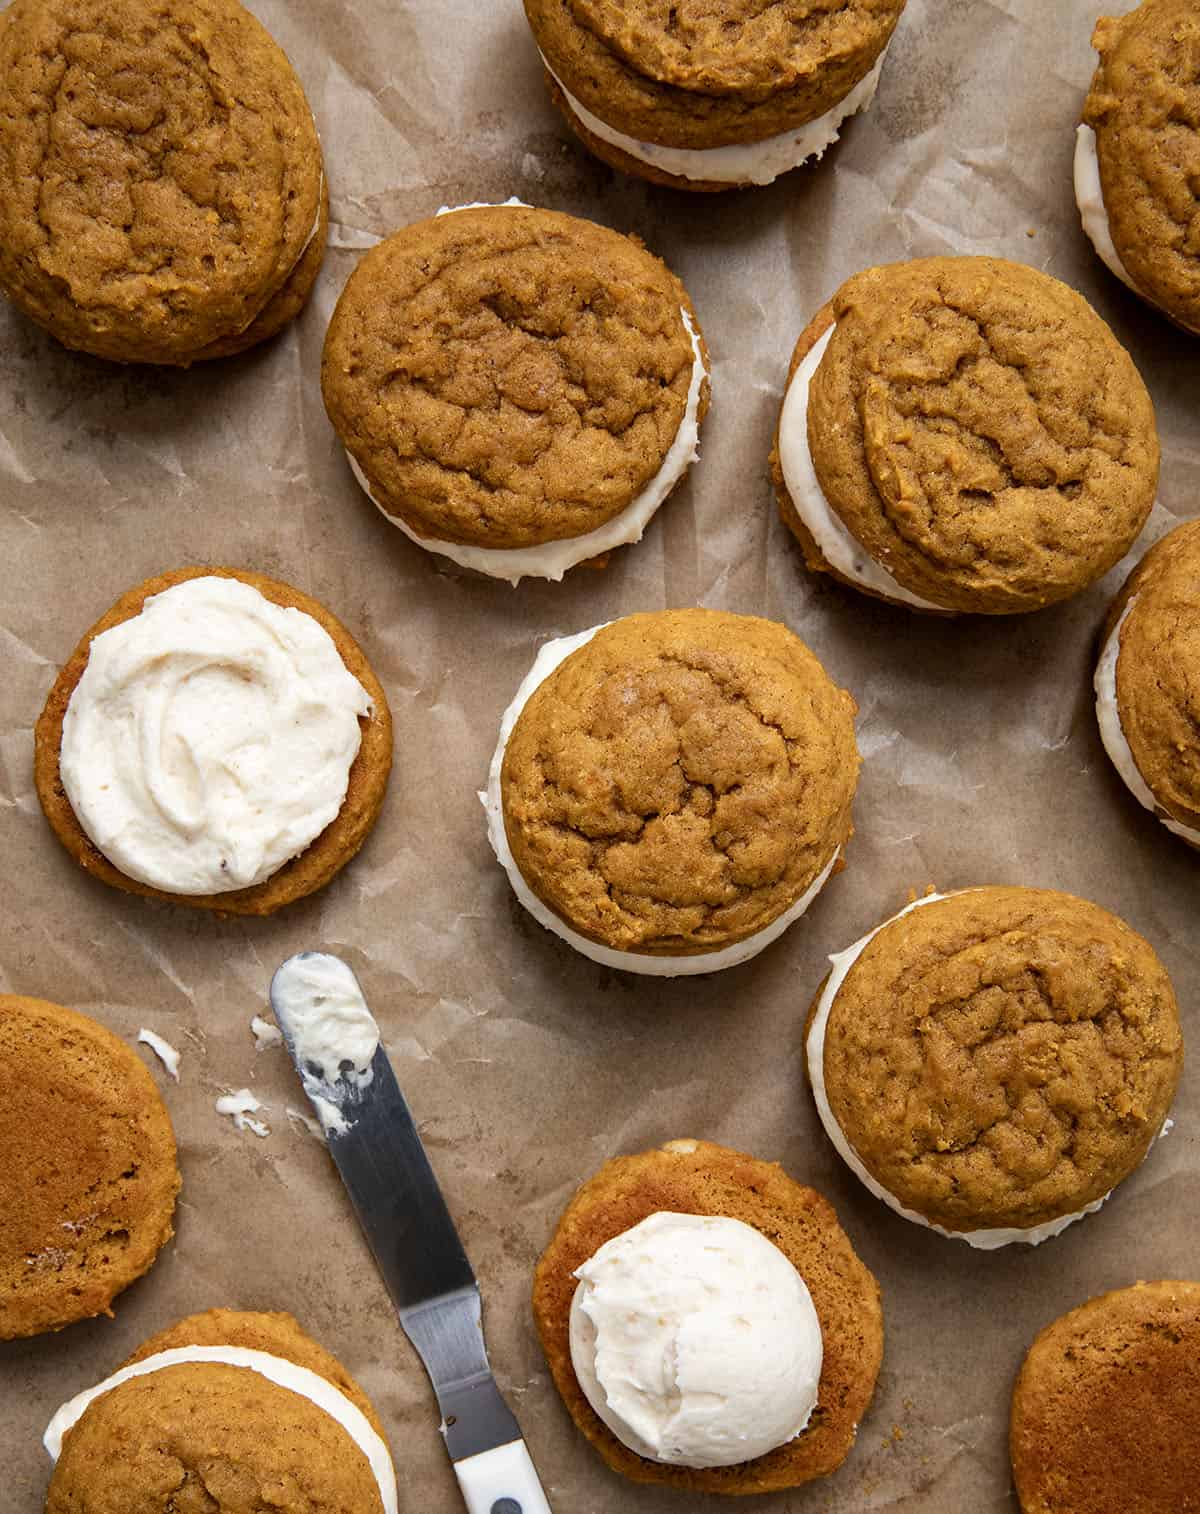
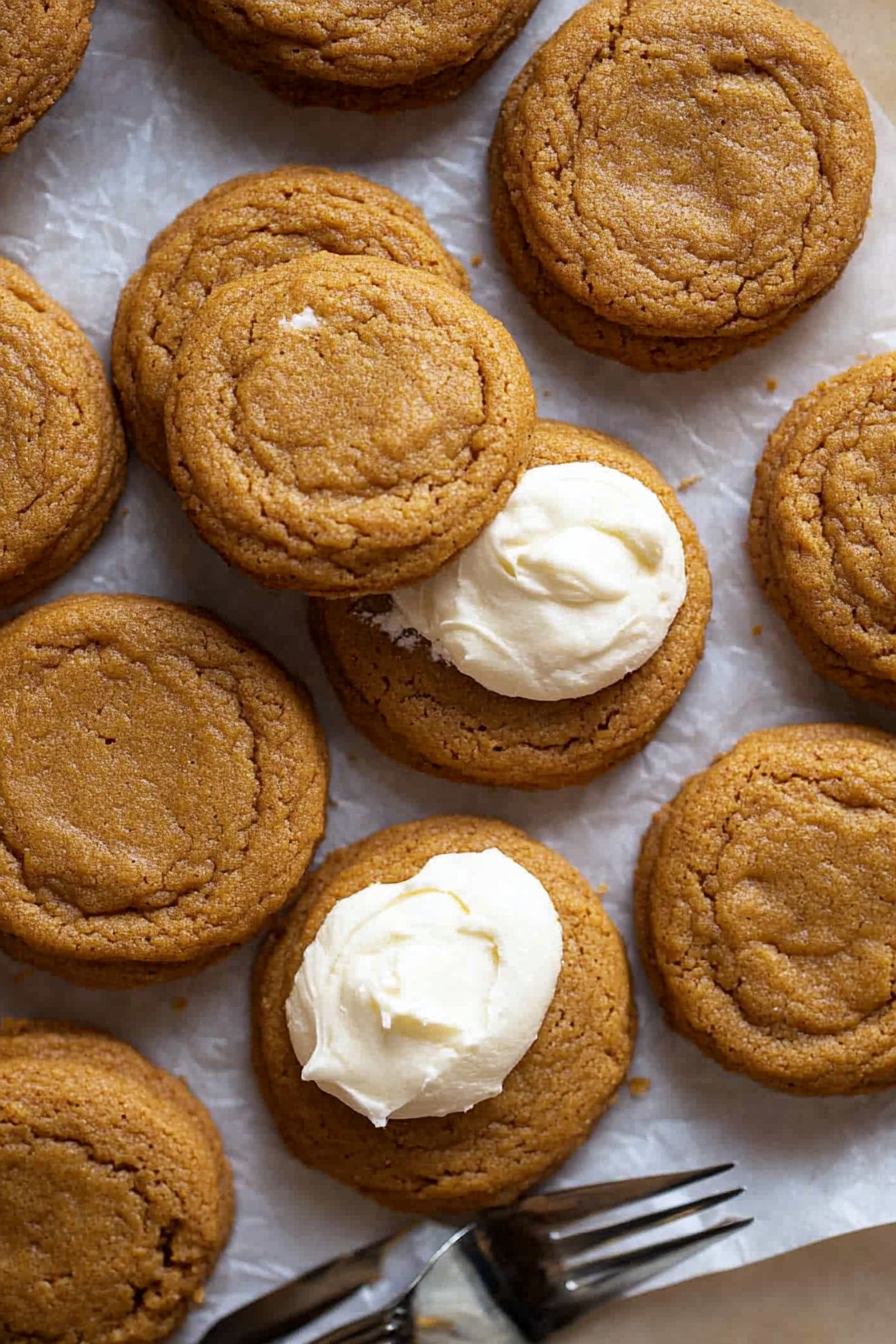
pumpkin cookies
Ingredients
Method
- Preheat oven to 350°F. Line baking sheets with parchment paper.
- Drain the pure pumpkin in a fine mesh strainer for 10-15 minutes to remove excess liquid.
- In a large bowl, whisk together flour, baking powder, baking soda, salt, pumpkin pie spice, cinnamon, and ginger.
- In another bowl, cream softened butter, light brown sugar, and granulated sugar until smooth.
- Add egg and beat on high until combined. Mix in milk and drained pumpkin.
- Gradually add dry ingredients to wet, mixing until just combined. Drop 2-tablespoon portions onto prepared baking sheets.
- Bake for 14-15 minutes until edges are set but centers are soft. Cool completely on racks.


Love the cozy vibes in this post—brown butter and autumn spices sound like pure comfort in cookie form!
This sounds cozy and delicious—I love the idea of brown butter in desserts, it adds such a rich flavor.
I love how baking brings back such warm memories—this sounds like the perfect cozy weekend treat!
I love how baking brings back such sweet memories—your description makes me want to make these cookies right now!
This reminds me of my grandma too—those cozy mornings with warm cookies and brown butter are priceless. I’ll definitely try this recipe!