
Autumn Spice No-Bake Cheesecake Delight
There’s something about the smell of banana bread that instantly takes me back to sunny mornings at my grandma’s house. The scent of sweet, ripened bananas mingling with warm spices—it’s like a cozy hug from the inside out. I’ve always loved how versatile banana bread is, especially when I want something sweet but not overly indulgent. And honestly, I think zucchini banana bread takes that magic to a whole new level. It’s sneaky healthy, incredibly moist, and packed with flavor. Plus, it’s one of those recipes my kids ask for all the time—I swear, they think I have some secret stash of magic zucchinis hidden in the garden! This one’s a lifesaver on busy nights when I crave comfort but don’t want to spend ages in the kitchen. Trust me, once you try it, it’ll become a staple in your house, too.
What is Zucchini Banana Bread?
Think of zucchini banana bread as a cozy twist on the classic banana bread you probably already love. It’s essentially a moist, tender loaf that balances the sweetness of bananas with the subtle earthy flavor of zucchini. The zucchini melts into the batter, giving it a super soft texture and a little extra nutrition—because, let’s be honest, who doesn’t want a sneaky veg in their baked goods? The name might sound fancy, but it’s just a smart way of saying you’re mixing zucchinis into your banana bread batter. It’s kind of like nature’s concealed ingredient—nobody needs to know! This bread is perfect for breakfast, snacking, or even a quick dessert. And because zucchini has such a mild flavor, it blends right in, making each bite wonderfully moist and satisfying. Think of it as a hug for your taste buds, with a little health boost tucked inside.
Why you’ll love this recipe?
What I love most about this zucchini banana bread is how it hits all the right notes—sweet, moist, and just a little wholesome. The flavor combo of ripe bananas and tender zucchini creates a loaf that’s subtly sweet but not cloying, with a depth that comes from the spices and nuts you can toss in. It’s honestly the kind of recipe that’s forgiving—you don’t need to be a baking whiz to get it right, and it’s practically impossible to mess up. The best part? It’s a budget-friendly recipe that uses ingredients I usually already have on hand: ripe bananas, zucchinis, flour, and a handful of pantry staples. Plus, it’s endlessly versatile—swap in different nuts or dried fruits, or skip the glaze if you want a snack on the go. My kids ask for this all the time, and I have to hide slices sometimes because it disappears so fast! And the smell—it’s like my kitchen turns into a bakery every single time. Honestly, this bread is a little comfort, a little nutrition, and a whole lot of love in every slice.
How do you make Zucchini Banana Bread?
Quick Overview
This zucchini banana bread comes together surprisingly quickly and with minimal fuss. I like to start by preheating the oven and preparing my loaf pan—nothing fancy, just a good coating of butter or non-stick spray. The batter comes together in one bowl—mushing bananas, grating zucchini, mixing dry ingredients, and then folding everything together gently. The fun part is layering the batter with a handful of chopped walnuts or chocolate chips if I’m feeling indulgent, and swirling it for that beautiful marbled look. Baking generally takes around 50-60 minutes, and I always check for doneness with a toothpick—once it comes out clean, I know it’s perfect. I let it cool just a bit before glazing, which adds a little extra sweetness and sheen. Once it’s cooled, slicing into it feels like opening a treasure chest—moist, fragrant, and packed with flavor.
Ingredients
For the Main Batter:
– 2 ripe bananas, mashed (the riper, the better – I always do this when they’re super speckled)
– 1 cup grated zucchini (about 1 medium zucchini, grated with a box grater)
– 1/3 cup melted butter or coconut oil
– 2/3 cup brown sugar (or maple syrup if you want it extra moist)
– 2 large eggs
– 1 teaspoon vanilla extract
– 1 1/2 cups all-purpose flour (or whole wheat for a healthier spin)
– 1 teaspoon baking soda
– 1 teaspoon ground cinnamon
– 1/2 teaspoon salt
Tip: I add a pinch of nutmeg sometimes—it really enhances the cozy flavor.
For the Filling:
– A handful of chopped walnuts, pecans, or chocolate chips (your call!). I love walnuts for that crunchy contrast.
– Optional: a sprinkle of oats or shredded coconut for texture.
For the Glaze:
– 1/2 cup powdered sugar
– 1-2 teaspoons milk or lemon juice
– A splash of vanilla or cinnamon for extra flavor
Mix until smooth—if it’s too thick, add a tiny splash more liquid; if too runny, a little extra powdered sugar.
Step-by-Step Instructions
Step 1: Preheat & Prep Pan
I usually set my oven to 350°F (175°C). Grease my loaf pan with butter or non-stick spray—trust me, a little parchment paper lining makes life even easier. While the oven heats, I grate my zucchini and mash my bananas—you’d be surprised how the smell alone makes everyone rush into the kitchen.
Step 2: Mix Dry Ingredients
In a small bowl, whisk together the flour, baking soda, cinnamon, salt, and nutmeg if you’re using it. This step ensures even distribution of leavening and spice, which is key for a fluffy bread.
Step 3: Mix Wet Ingredients
In a big mixing bowl, mash the bananas until smooth. I add the melted butter, sugar, eggs, and vanilla, stirring until everything’s well combined. The batter should be a little thick but pourable. I’ve tested this with almond milk once when I was out of eggs, and it made it a tad creamier—give it a try!
Step 4: Combine
Add the dry ingredients to the wet, folding gently with a spatula just until it’s combined. Don’t overmix—this is where gluten development can make your bread dense. When you see just a few streaks of flour left, stop mixing.
Step 5: Prepare Filling
Stir in the chopped nuts or chocolate chips. If you want a beautifully marbled loaf, don’t overmix—just swirl them in gently with a spoon.
Step 6: Layer & Swirl
Pour half of the batter into your prepared pan. Add the filling layer, then top with the remaining batter. Use a skewer or a toothpick to swirl the layers for a lovely marbled effect—a technique I learned after years of making this. It’s just a gentle swirl, nothing fancy, but it makes a big visual difference.
Step 7: Bake
This beauty bakes for about 55-60 minutes. I start checking around 50 minutes—insert a toothpick into the center; if it comes out clean, you’re good. Ovens vary, so don’t rely solely on time. This bread is pretty forgiving—if the top browns too quickly, cover it with foil.
Step 8: Cool & Glaze
Let it cool in the pan for about 10 minutes, then transfer to a wire rack. Once cooled slightly—about 15 minutes— drizzle the glaze all over. The warmth helps it seep into the cracks, making every bite extra special.
Step 9: Slice & Serve
I love slicing this when it’s just barely warm—it’s soft and gooey inside. Serve with a cup of coffee or tea, and watch everyone ask for seconds. It’s great the next day, too, just toast it lightly for the best texture.
What to Serve It With
This zucchini banana bread is so versatile, I could write an essay on its pairing potential. For breakfast, I love pairing it with a robust black coffee or a chai latte—something warm to complement the cozy flavors. My kids prefer it simply sliced with a pat of butter melting on top, which I think is pure heaven.
At brunch, I often serve it with yogurt and fresh berries—like the ultimate guilt-free treat. It also makes a beautiful dessert—warm with a scoop of vanilla ice cream or a dollop of whipped cream. If I’m feeling fancy, I sprinkle some extra cinnamon or crushed nuts on top before serving.
And when I just need a quick snack to keep the kids happy or myself energized, a slice or two is enough. We sometimes pack it in lunchboxes or take it on picnics. Honestly, it’s become one of those recipes that feels like a warm hug on a busy day, and the fact that I get a little healthy boost with the zucchini makes me feel less guilty about indulging.
Top Tips for Perfecting Your Zucchini Banana Bread
Impressively, this bread is quite forgiving, but here are a few tricks I swear by after dozens of batches:
- Zucchini Prep: Always squeeze out excess moisture after grating. I do this by wrapping the zucchini in a clean towel and giving it a gentle squeeze—this keeps the bread from getting soggy.
- Mixing Advice: Overmixing can be tempting when you’re eager, but it leads to dense bread. Fold gently, stop as soon as everything is just combined, and you’ll get that perfect crumb.
- Swirl Customization: Play with your swirling! Use a skewer or a fork to make fun patterns. It’s like doodling inside your batter—each loaf’s a little work of art.
- Ingredient Swaps: Honey or agave syrup can replace sugar for a more natural sweetness. Whole wheat flour gives a denser texture but adds fiber—just be sure not to overmix with it, or the loaf can be tougher.
- Baking Tips: Keep an eye on the oven. The baking time can vary based on your pan and oven calibration. Use the toothpick test consistently—nothing beats that for knowing it’s done.
- Glaze Variations: For a citrusy kick, add a bit of lemon zest or orange zest to your glaze. Or mix in a teaspoon of espresso powder for a mocha twist. The possibilities are endless!
Honestly, I’ve learned so much through trial and error—sometimes I even mix spinach into the zucchini and no one notices. The key is to enjoy the process and tweak it to your taste. The results? A moist, flavorful loaf that makes your house smell like heaven and your family happy.
Storing and Reheating Tips
To keep your zucchini banana bread fresh and delicious, here’s what I do:
- Room Temperature: Wrap slices tightly in foil or parchment and keep them in a bread box or on a plate covered with a clean towel. They’ll stay good for about 2 days—if they last that long!
- Refrigerator Storage: Store slices in an airtight container or zip-top bag—the bread can stay fresh for up to a week. Just make sure it’s well wrapped to prevent it from drying out.
- Freezer Instructions: Wrap individual slices tightly in plastic wrap, then slide into a freezer-safe container. They last about 3 months. To reheat, microwave for 20-30 seconds or toast lightly. The texture is almost as good as fresh—trust me on this one.
- Glaze Timing: If you plan to freeze it, hold off on glazing until just before serving. The glaze can become a little sticky after freezing, and fresh glaze makes it look beautifully inviting.
Over the years, I’ve learned that proper storage makes all the difference in keeping the bread moist and flavorful. Plus, it’s so satisfying to pull out a slice weeks later and still have that homey aroma and perfect texture. Just a little care goes a long way!
Frequently Asked Questions
Final Thoughts
This zucchini banana bread has become a true family favorite around here. It’s that rare recipe that’s hearty enough to satisfy a sweet craving, sneaky healthy enough to feel good about, and simple enough to whip up even on the busiest mornings. Every time I make it, I feel like I’ve created a little slice of comfort—something that’s deeply personal but easy enough to share with everyone I love. The secret is in the texture: the softness of the bananas, the moistness from the zucchini, and that hint of cinnamon tie it all together perfectly. If you’re looking to add a new twist to your baking repertoire, I highly recommend giving this a try. I promise, once you see how easy it is, you’ll be making it weekly, too. Happy baking, and I’d love to hear how your loaf turned out—leave a comment below or share it with friends! Nothing beats the warmth of a homemade loaf and a cup of coffee beside it.
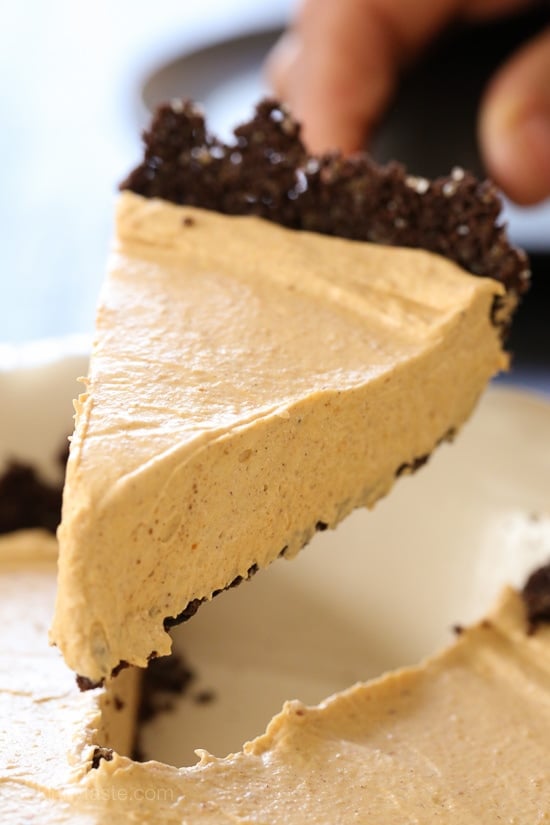
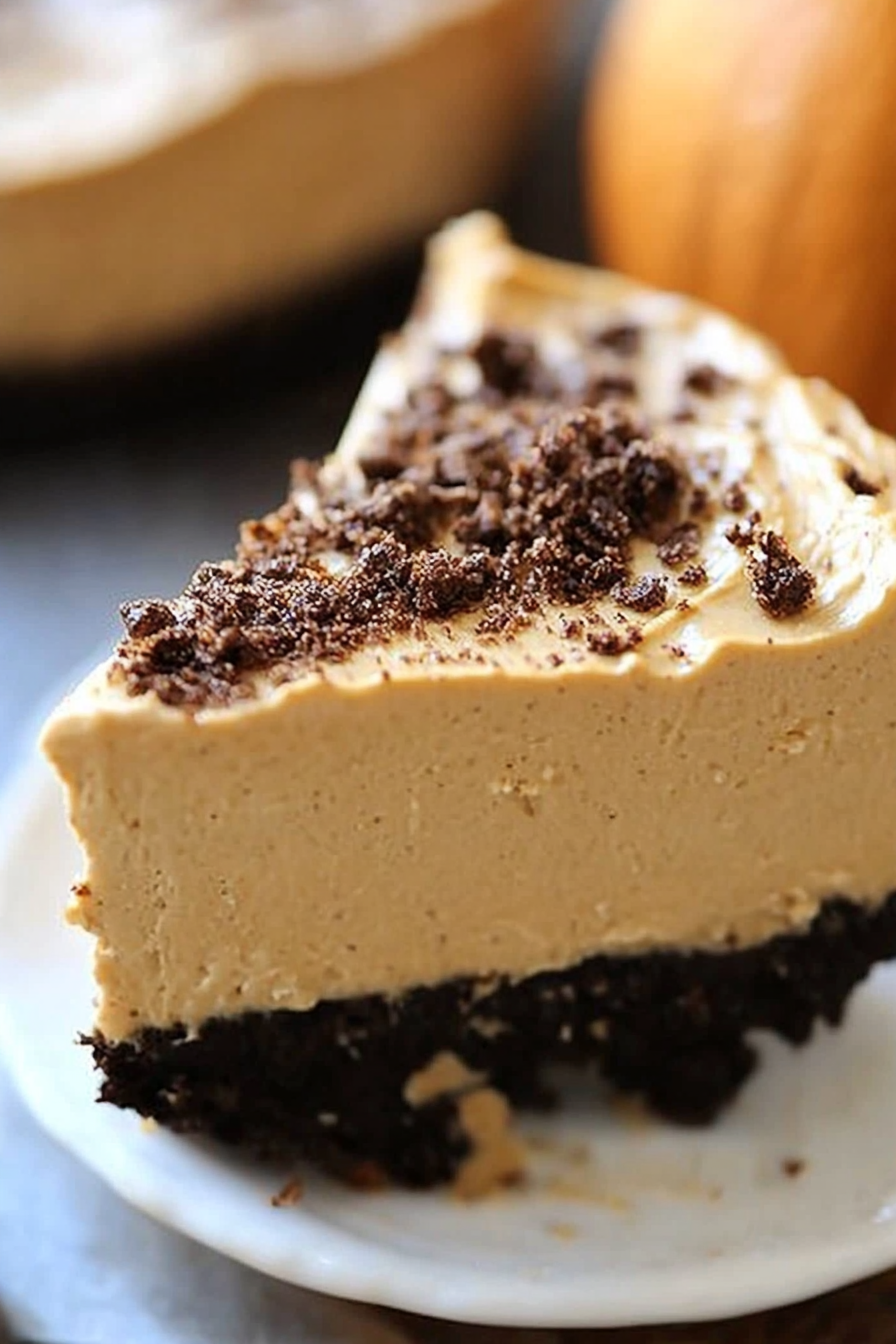
pumpkin cheesecake
Ingredients
Method
- In a large bowl, whip the cream cheese, pumpkin, vanilla, cinnamon, pumpkin pie spice, and brown sugar until fluffy. Use a hand mixer or spatula.
- Add the Thawed Truwhip and whip until smooth and combined.
- Spoon the mixture into the prepared graham cracker crust and chill in the refrigerator for a few hours until set.


This cheesecake sounds absolutely comforting—like a hug in dessert form. That banana bread aroma really does bring back such warm memories.
This cheesecake sounds like the perfect cozy treat—nostalgic and delicious! I can almost smell the warm spices from here.
This cheesecake sounds amazing—I love how it combines comfort food vibes with that cozy autumn feel. Banana bread memories are the best!
This sounds absolutely comforting—I can almost smell it now! Banana bread memories are the best.
This cheesecake sounds amazing—I love how it blends cozy autumn flavors with that comforting banana bread vibe.