
Autumn Spice Swirl Bake How to Make It
I remember the first time I made zucchini banana bread—my grandma’s recipe, but with a little twist of my own. The smell alone when it’s baking is enough to pull everyone into the kitchen, everyone asking, “Is it ready yet?” My kids ask for this all the time, especially when I have zucchinis growing like crazy in the garden. I always do this when I want something cozy, sweet, but also a bit nutritious. Honestly, it’s one of those recipes that feels like a warm hug—moist, flavorful, with just enough sweetness to satisfy that craving without feeling guilty. Plus, the best part? That brown sugar glaze on top—oh my goodness—trust me on this one. It’s a lifesaver on busy nights or when you just want something comforting to share with your loved ones over coffee. Every time I bake this, I find myself inhaling that caramel-y aroma, sighing happily, knowing I’ve created something special. You’re gonna love it, I promise!
What is Moist Zucchini Banana Bread with Brown Sugar Glaze?
This isn’t just any banana bread—it’s a moist, tender loaf hijacked with the sneakiest little addition: shredded zucchini. Think of it as a cozy, elevated banana bread with an extra layer of flavor and moisture. It’s essentially a cross between classic banana bread and a sweet, slightly earthy zucchini loaf—what I love most about this is how the zucchini keeps it super moist without adding any fuss. The bananas bring in that rich, caramel-y sweetness, while the brown sugar glaze on top puts it over the edge, giving it a lovely caramel crunch with every bite. It’s a perfect way to use up those overripe bananas and zucchinis that have taken over your kitchen. Think of this as a breakfast treat, a snack, or even a little dessert—everyone in my family asks for seconds. It’s one of those recipes that feels special but is actually amazingly simple to make, even on busy days.
Why you’ll love this recipe?
What I love most about this zucchini banana bread is how forgiving and adaptable it is. The flavor is just *wow*—sweet, moist, a little nutty with those tiny bursts of banana, and that caramel tang from the glaze. The aroma it releases when baking? Pure comfort. But beyond flavor, it’s super simple to pull together. I’ve made this countless times, tweaking little things here and there, and it’s always a hit. Plus, it’s budget-friendly because it relies on basic pantry staples and those sneaky zucchinis you have lying around. I’ve tested this with ripe plantains and even pear purée, and honestly, it still turns out fantastic. I especially love how flexible it is—adding walnuts or chocolate chips is an easy upgrade if you’re feeling indulgent. This one’s a lifesaver on busy nights when you need a quick, satisfying treat. The best part? It stays incredibly moist for days, my secret weapon when friends come over unexpectedly or I want something to snack on during a lazy weekend. Honestly, I could eat this for breakfast, brunch, or even as dessert—it just works everywhere.
How do I make Moist Zucchini Banana Bread with Brown Sugar Glaze?
Quick Overview
This zucchini banana bread is as straightforward as it sounds. You start with grating the zucchini and bananas, then mix together wet and dry ingredients. The batter comes together with just a few basic steps—no fancy gadgets needed! The magic happens when you swirl in the filling, pop it in the oven, and wait for that incredible smell to fill your house. It’s perfect because the batter is forgiving, so even if you overmix a little, it still turns out moist and tender. Once baked, I like to let it cool a bit before drizzling on a rich, buttery brown sugar glaze. This glaze is the crown jewel—sweet, sticky, and irresistible. Honestly, I’ve tested this with different pans and ovens, and it always delivers. The best part? It’s all done in under an hour from start to finish—great for whenever that sweet craving hits.
Ingredients
For the Main Batter:
– 2 ripe bananas, mashed (trust me, the riper the better)
– 1 cup shredded zucchini (squeeze out the excess moisture—this keeps it moist but not soggy)
– 2 large eggs
– ½ cup vegetable or almond milk
– ½ cup melted butter or neutral oil (I tested with coconut oil, and it’s delicious!)
– 1 cup granulated sugar
– 1 teaspoon vanilla extract
– 2 cups all-purpose flour (or gluten-free blend, see tips below)
– 1 teaspoon baking soda
– ½ teaspoon baking powder
– ½ teaspoon cinnamon
– Pinch of salt
For the Filling:
– ½ cup chopped walnuts or chocolate chips (optional but highly recommended)
– 1 tablespoon brown sugar (for a little extra caramel kick while swirling)
For the Glaze:
– ¼ cup brown sugar
– 2 tablespoons butter
– 1 tablespoon milk
– ½ teaspoon vanilla extract
– Pinch of sea salt (for contrast)
Step-by-Step Instructions
Step 1: Preheat & Prep Pan
I always set my oven to 350°F (175°C). Grease a loaf pan with butter or line it with parchment paper—makes life easier when you’re slicing later. Get everything nearby so you’re not scrambling during the mix process. Trust me, the smell of butter melting in the pan already makes your kitchen feel warm and inviting.
Step 2: Mix Dry Ingredients
In a medium bowl, whisk together the flour, baking soda, baking powder, cinnamon, and salt. The key here is even distribution so you don’t end up with clumps—this guarantees an even rise and a well-balanced crumb. I’ve learned this trick after a few batches—skip this step, and your batter might be uneven, which can lead to weird pockets or dense spots.
Step 3: Mix Wet Ingredients
In a large bowl, mash the bananas really well—no big lumps. Whisk in the eggs, then add the milk, melted butter, sugar, and vanilla. I’ve tested this with almond milk, and honestly, it made the loaf even creamier, so go for what you have. Make sure the wet ingredients are well combined but don’t overmix—you want just enough to incorporate everything smoothly.
Step 4: Combine
Add the dry ingredients to the wet mixture in thirds, gently folding until just combined. Overmixing is my biggest mistake I used to make—it makes the bread dense and gummy. Patience is key here. Once that’s done, fold in the shredded zucchini; it should be evenly distributed without overworking the batter.
Step 5: Prepare Filling
If you’re adding nuts or chocolate chips, sprinkle them in now. For that lovely swirl, melt a little butter and brown sugar together—they’ll add that caramel note. Spoon dollops of batter into your prepared pan, then sprinkle or swirl in the filling. I like to leave some plain batter on top, then swirl with a knife or skewer to create cute ribbons of flavor. It looks pretty when sliced! You can skip this step if you’re in a hurry, but trust me, it’s worth it for the visual flair and flavor boost.
Step 6: Layer & Swirl
Carefully add the remaining batter on top and gently swirl with a skewer or knife. Don’t overdo it—you want pretty marbling, not a muddy mess. The swirl adds a fun visual element but also intensifies the flavor, especially if you add a sprinkle of cinnamon or more nuts. My kids love spotting the swirl layers—it’s almost like a little treasure hunt.
Step 7: Bake
Pop the loaf into your preheated oven and bake for about 50-60 minutes, or until a toothpick inserted in the center comes out clean. Every oven is a little different, so keep an eye on it after 45 minutes. If the top starts browning too quickly, tent it with foil. I learned this trick after a few over-baked loaves—I like a slightly softer top, so this works beautifully.
Step 8: Cool & Glaze
Let the bread cool in the pan for about 10 minutes, then transfer to a wire rack. While it cools, make your glaze: melt the butter with brown sugar and milk, then simmer for a minute or two until thickened slightly. Drizzle generously over the cooled loaf. The glaze will seep into every crack and make the top irresistibly sticky and sweet. If I’m feeling fancy, I sprinkle a tiny bit of sea salt on top—balance that caramel goodness!
Step 9: Slice & Serve
Slice once fully cooled for clean, beautiful pieces. I like to cut thick slices—sometimes I just grab a fork and dig in standing over the counter. This bread is delicious warm or at room temp. Leftovers keep well wrapped tightly for 2-3 days, or you can freeze slices for quick snacks later. Just warm a slice in the microwave for a few seconds, and it’s just as moist and flavorful.
What to Serve It With
This zucchini banana bread is so versatile—it’s perfect for just about any occasion. For breakfast, I love serving it alongside a strong cup of coffee or a cold glass of milk. The kids? They prefer it toasted with a little butter or honey drizzled on top. On weekends, I like to serve it at brunch with fruit salad and a dollop of Greek yogurt—it’s fancy enough to feel special but cozy enough for a lazy morning. As a dessert, it’s exceptional with a scoop of vanilla ice cream or a drizzle of extra glaze for that richness you crave after dinner. My family’s favorite way to enjoy it is with a cup of tea late in the afternoon—perfect for snuggling on the couch with a good book. And if you want to jazz it up, a smear of cream cheese or mascarpone takes it to a new level of indulgence. Honestly, the possibilities are endless, and I always find myself reaching for a slice—because who can resist? It’s become a family classic around here—something I love to bake when I want a cozy, wholesome treat that everyone will savor.
Top Tips for Perfecting Your Moist Zucchini Banana Bread with Brown Sugar Glaze
After baking this a hundred times, I’ve picked up a few tricks that make all the difference. First, as I mentioned, squeeze out as much moisture from the zucchini as possible—no one wants a soggy mess. I use a clean kitchen towel or paper towels to press out excess water; this keeps the bread moist but not wet. When it comes to mixing, fold rather than stir—overworking the batter toughens the crumb. If you want a little more depth, add a pinch of ground ginger or nutmeg to the dry ingredients—that subtle spice elevates the flavor without overpowering. I’ve also tried swapping in whole wheat flour, and if you do, just add a couple of extra tablespoons of milk—whole wheat gives it a nuttier texture, which is delicious. For the swirl, I recommend playing with different fillings—crumbled cookie bits, dried fruit, or even a smear of your favorite jam. For baking, I always place the loaf pan on the center rack and rotate halfway through—this ensures even baking and prevents hotspots. When making the glaze, if you want a creamier, richer finish, replace the milk with cream or half-and-half. I like to add a pinch of sea salt to contrast the sweetness—it balances everything out beautifully. Over the years, I’ve learned that patience is key—don’t rush cooling or glazing, or you risk melting the glaze or ending up with uneven cuts. The result is always worth the wait. Oh, and don’t forget, fresh zucchini is way better than frozen—more flavor, less moisture—I promise!
Storing and Reheating Tips
This bread keeps surprisingly well. Once cooled, I wrap the loaf tightly in plastic wrap or store it in an airtight container. It stays moist and delicious for up to three days at room temperature, especially if you keep it out of direct sunlight. For longer storage, I pop slices into the refrigerator—just seal them in a zip-top bag or container. Reheat slices in the microwave for about 10-15 seconds—instant warmth and softness. If you want to make it last even longer, slice and freeze individual pieces—just wrap them well and keep them for up to a month. When ready to enjoy, microwave from frozen for about 20 seconds, and you’re good to go. Keep in mind that the glaze is best added fresh—if you’re storing the bread, wait to drizzle until just before serving, or it might get a little sticky. If you love a little crunch on top, re-glazing after reheating adds that fresh, caramel-y layer again. Trust me, I’ve tried all sorts of storage options, and this method keeps the bread tasting just as good as the day I baked it.
Frequently Asked Questions
Final Thoughts
Honestly, this moist zucchini banana bread has become my go-to when I want something sweet but wholesome. It’s a recipe I’ve shared with friends, handed down to my kids, and even turned into muffins for quick snacks. The combination of bananas and zucchini keeps it lush and tender, while the brown sugar glaze adds that irresistible caramel touch. Plus, it’s surprisingly versatile—I’ve swapped ingredients, added extras, and still loved how it turns out every time. If you’re like me and love baking something that feels cozy and homemade, give this recipe a try. I promise it’ll become a new favorite in your house, too! Happy baking—and I’d love to hear how yours turns out, so drop a comment or tag me in your pictures. Now, grab those zucchinis and bananas, and let’s get baking!
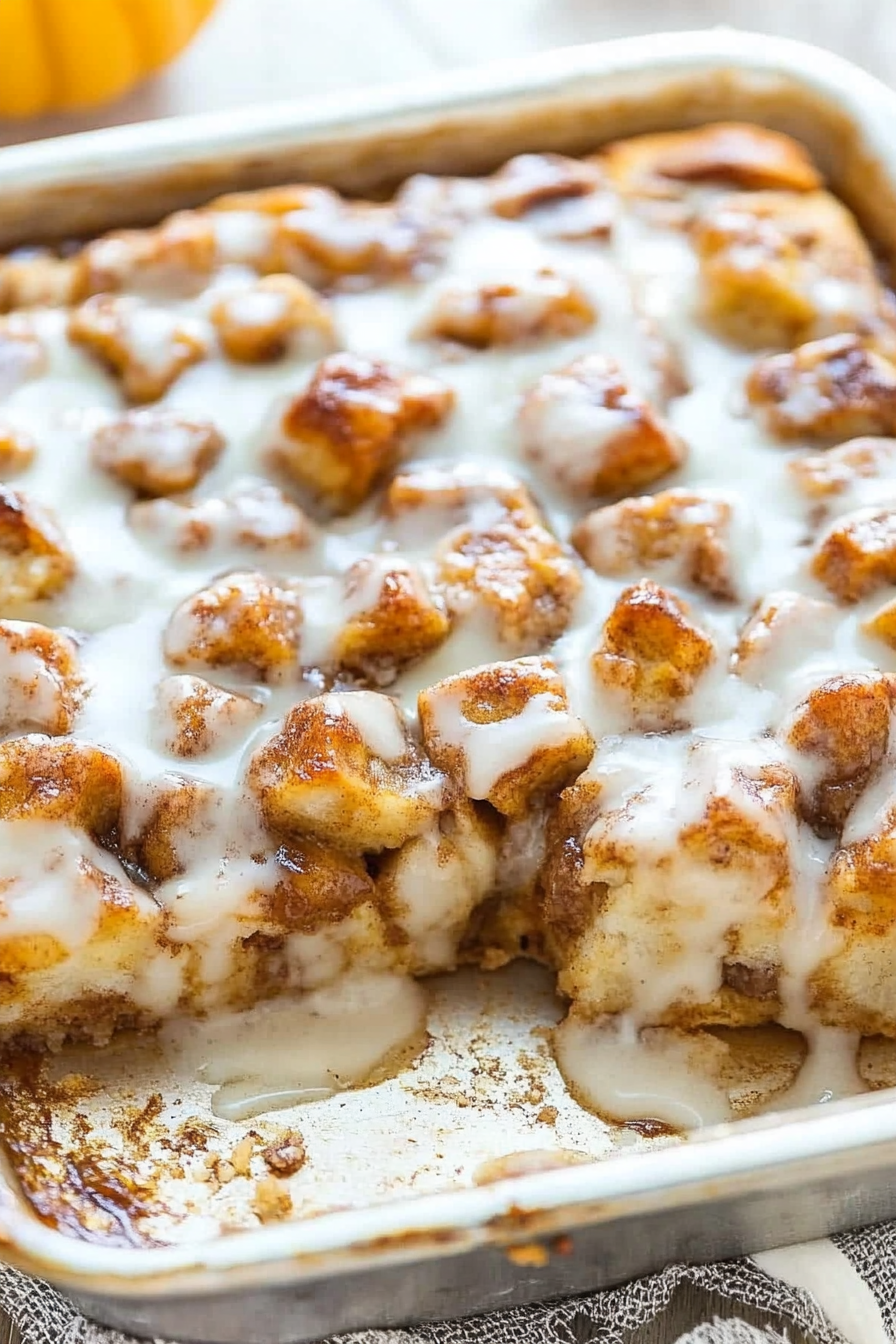
pumpkin cinnamon roll bake
Ingredients
Method
- Preheat oven to 375°F. Line a 9×9-inch pan with foil and spray with cooking spray; set aside.
- Cut the cinnamon roll dough into 3 even strips, then cut those strips into 3 pieces, making 9 pieces total per cinnamon roll. Scatter in prepared pan, separating the pieces from one another because they stick together if you slice them in stacks; set pan and the icing from the packaging aside.
- To a medium bowl, add the eggs, pumpkin puree, 1/2 cup milk, brown sugar, granulated sugar, pumpkin pie spice, vanilla, cinnamon, salt, and whisk until smooth.
- Evenly pour the mixture over the cinnamon rolls.
- Evenly drizzle the icing. If the icing is cold, heating it in the microwave for 10 seconds will make drizzling easier.
- Place pan on a baking sheet (insurance against overflow and highly recommended) and bake for about 40 minutes, or until the top is set in the center and lightly golden brown. Place pan on a wire rack to cool momentarily while you make the frosting.
- To a medium bowl, add the confectioners’ sugar, 2 tablespoons cream or milk, and whisk to combine until smooth.
- Evenly drizzle the frosting over the rolls and optionally serve with ice cream or whipped topping. Serve immediately.


This sounds cozy and delicious! I love how baking brings back such warm memories.
This reminds me of my own baking experiments! The smell of banana zucchini bread is pure comfort food.
This sounds so cozy! I love how baking brings back such sweet memories—your twist must have been delicious too.
This sounds so cozy—I love how baking brings back such sweet memories. That twist in the recipe must have been delicious too!