

Autumn Waffle Casserole How to Make It
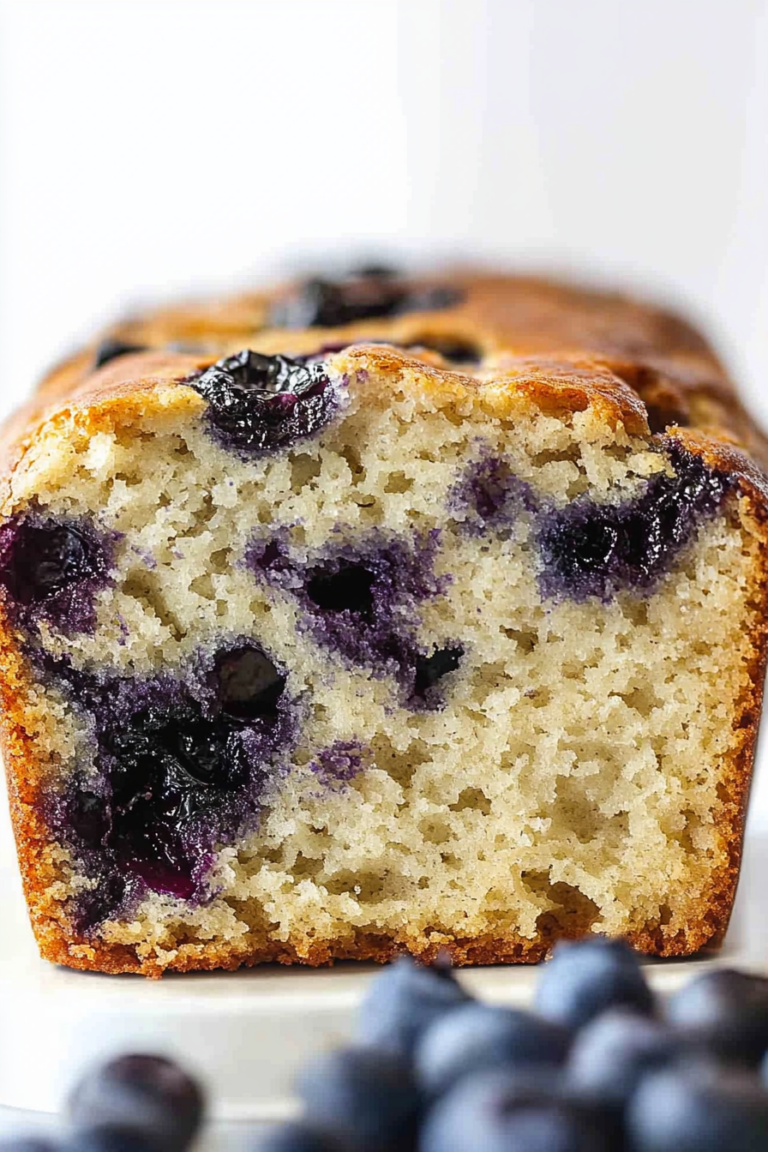
You know that feeling of walking into your kitchen and being hit with the warm, sweet scent of freshly baked bread? That’s exactly how I feel every time I whip up this zucchini banana bread. It’s one of those recipes that feels like a hug in food form—moist, tender, with just the right touch of sweetness and a sneaky veggie boost that makes me feel a little better about seconds. I remember making this for the first time on a chilly Sunday morning, and my kids asking if they could have “just one more slice, pretty please?” It’s such a simple recipe, yet every time I bake it, I can’t help but think, “This is it—the comfort food I want to share with friends, family, or just myself after a long day.” Honestly, it’s kind of my secret weapon when I want something homey but don’t want to fuss in the kitchen for hours. Plus, it disappears in minutes at my house—trust me on this one. It’s incredible how a handful of humble ingredients come together to create something so wonderfully satisfying. If you’ve ever struggled with overripe bananas or surplus zucchini, this recipe is your new best friend.
What is Zucchini Banana Bread?
Think of zucchini banana bread as the cozy, slightly healthier cousin of the classic banana bread. It’s essentially a moist, tender loaf that combines the sweetness of ripe bananas with the mild, slightly earthy flavor of grated zucchini. The zucchini acts like a secret ingredient, adding moisture and a gentle veggie boost—without making it taste “healthy,” if you catch my drift. The name might sound fancy, but it’s really just a flavor-packed, easy-to-make loaf that you can whip up in your sleep (okay, maybe not quite…but almost). My version is a cross between a breakfast treat and an afternoon snack—something that’s great when you want to indulge but not feel heavy afterward. It’s also super versatile—you can throw in nuts, chocolate chips, or even dried fruit if you’re feeling creative. The concept is simple: combine ripe bananas and shredded zucchini, add some warm spices and a touch of sweetness, bake, and enjoy. That’s it. No fuss, just pure, honest comfort in every slice.
Why you’ll love this recipe?
Honestly, what I love most about this zucchini banana bread is how it hits all the right notes—flavor, texture, and ease. First, the flavor is absolutely divine. The bananas give it that rich, sweet aroma, while the zucchini keeps it moist and tender, almost like a gentle hug for your taste buds. It’s not overly sweet—just enough—making it perfect for breakfast, snack, or even a quick dessert. And the smell alone will have everyone asking what you’re baking. Second, it’s stupid-easy to make. No fancy equipment needed, just a mixing bowl, a grater, and a loaf pan. Plus, the ingredients are everyday staples—ripe bananas, zucchini, flour, eggs, and a few spices. What I also appreciate is how budget-friendly it is; you probably already have everything in your pantry and fridge. Third, the versatility is fantastic. You can tweak it however you like—add nuts, swap the sugar for honey, or even throw in some chocolate chips for that extra indulgence. My kids ask for this all the time and love that it’s a treat you don’t feel guilty about. It’s also a forgiving recipe—you can overmix a little, forget to level the flour, and it still somehow turns out perfect. That’s the sign of a true keeper, in my book.
How do you make Zucchini Banana Bread?
Quick Overview
This recipe is all about quick, straightforward steps that come together in one bowl. I start by preheating my oven and prepping the loaf pan, then I whisk together the dry ingredients and mash the bananas. I grate the zucchini and squeeze out excess moisture—this step is key to keeping the bread super moist without being soggy. After mixing the wet ingredients, I just fold everything together gently—no overmixing! Then, I layer the batter with some chopped nuts or chocolate chips if I’m feeling fancy, swirl it a bit, and bake until golden and a toothpick comes out clean. Trust me, it’s one of those recipes that makes the whole house smell like Sunday mornings, and it’s ready before you even know it. Perfect for a lazy weekend or a quick weekday treat when you’re craving something sweet and homemade.
Ingredients
For the Main Batter:
– 2 large ripe bananas, mashed (the sweeter, the better!)
– 1 cup grated zucchini (don’t forget to squeeze out the excess moisture!)
– 2 eggs, beaten
– 1/3 cup melted butter or neutral oil
– 1 teaspoon vanilla extract
– 1 1/2 cups all-purpose flour (I’ve tested with almond flour, too, which is pretty great if you’re gluten-free)
– 1 teaspoon baking soda
– 1 teaspoon baking powder
– 1/2 teaspoon salt
– 1 teaspoon ground cinnamon (trust me, it’s magic)
– 1/2 cup sugar or honey (adjust to your taste)
For the Filling (Optional):
– 1/2 cup chopped walnuts or pecans
– 1/2 cup mini chocolate chips
– 1/4 cup dried cranberries or raisins
For the Glaze (Optional):
– 1/2 cup powdered sugar
– 1 tablespoon milk or cream
– A dash of vanilla or almond extract (for extra flavor) – mix till smooth. If you want a more decadent glaze, add a little squeeze of lemon juice or a sprinkle of cinnamon.
Step-by-Step Instructions
Step 1: Preheat & Prep Pan
Set your oven to 350°F (175°C)—pretty standard for quick breads. Grease your loaf pan with butter or line it with parchment paper. This step makes sure nothing sticks and your slices come out perfect.
Step 2: Mix Dry Ingredients
In a large bowl, whisk together the flour, baking soda, baking powder, salt, and cinnamon. I always do this step first because it evenly distributes the leavening agents and spices. It’s a small step but makes a big difference in the even rise and flavor distribution.
Step 3: Mix Wet Ingredients
In a separate bowl, mash the bananas really well until smooth—your kids will love to do this part. Add the eggs, melted butter, vanilla, and sugar. Whisk until everything’s nicely combined and a little frothy. The smell alone here is worth it—like warm banana pudding.
Step 4: Combine
Pour the wet mixture into the dry ingredients and fold gently. Do not overmix! A few lumps are okay—this keeps the bread tender. If you overmix, it can turn dense or gummy, and nobody wants that.
Step 5: Prepare Filling
If you’re adding nuts or chocolate chips, fold them in now. I like to reserve a few for sprinkling on top for that pretty finishing touch. You can also swirl in a spoonful of peanut butter for a salty contrast or add dried fruit for a chewy surprise.
Step 6: Layer & Swirl
Pour about half the batter into your prepared loaf pan. Then add your filling, and top with the rest of the batter. Use a knife or skewer to gently swirl through the batter—this gives that beautiful marbled look and adds fun flavor pockets.
Step 7: Bake
Pop it into the oven and bake for about 50-60 minutes. Check for doneness with a toothpick—if it comes out clean, you’re good. Every oven is a little different, so start checking around 50 minutes. Let it cool in the pan for about 10 minutes, then transfer to a wire rack.
Step 8: Cool & Glaze
Allow the bread to cool completely before glazing or slicing. The aroma here is heavenly, and slicing too early might cause it to fall apart. Once cooled, drizzle with your prepared glaze—this adds that perfect sweet finishing touch. It’s honestly optional but makes it look so inviting!
Step 9: Slice & Serve
Use a serrated bread knife and cut with a gentle sawing motion. Serve it warm or at room temperature. Trust me, it’s incredible with a cup of coffee or a glass of milk. My family loves to toast slices the next day for an added crispy edge—they think it’s even better then!
What to Serve It With
This zucchini banana bread is incredibly versatile. For breakfast, serve it with a dollop of Greek yogurt or a smear of almond butter, alongside some fresh fruit. It pairs beautifully with a hot mug of coffee—trust me, the aroma alone will wake everyone up. On weekends, I love presenting slices on a pretty platter for brunch, maybe with some poached eggs or a fresh fruit salad. It’s also a fantastic dessert—warm slices with a scoop of vanilla ice cream and a drizzle of caramel are pure heaven. And it makes a cozy snack anytime—my kids ask for this almost daily. I often pack leftovers into lunchboxes or freeze slices for busy mornings when I want that comforting home-baked flavor. Honestly, I haven’t met anyone who doesn’t love this loaf—it’s that universally appealing. Plus, it’s great for last-minute guests or when you’re craving something sweet but don’t want to spend hours baking. It’s like having a secret stash of happiness in your freezer!
Top Tips for Perfecting Your Zucchini Banana Bread
After making this so many times, I’ve picked up a few tricks that keep it consistently perfect. First, always squeeze out as much moisture as possible from the grated zucchini. I use a clean kitchen towel or cheesecloth—I learned this trick after a few too-dense loaves early on. Moisture is the enemy of tender bread, but a little extra moisture from zucchini keeps it juicy and rich. Second, don’t overmix the batter—this is probably the most frequent mistake I see. Overmixing develops gluten and makes the loaf dense, so fold gently until just combined. Third, for a beautiful swirl pattern, I recommend pouring half the batter, then dolloping spoonfuls of the filling, swirling with a skewer or knife, then topping with the rest of the batter. It looks fancy but is so easy! For ingredient swaps, I’ve tested coconut oil instead of butter, which still yields moist bread with a subtle tropical flavor. Almond flour works well, but you might need a bit more liquid. Always keep an eye on timing because ovens vary; start checking around 50 minutes. Lastly, if you want a shiny glaze, add a tiny splash of lemon juice to your powdered sugar icing—it’s a game-changer. My biggest lesson is that a little patience during cooling ensures your slices stay neat and beautiful. This is a forgiving recipe, but I’ve found that these little tweaks make a big difference.
Storing and Reheating Tips
This bread stays moist and delicious for days if stored properly. After cooling completely, wrap the loaf tightly in plastic wrap or store it in an airtight container. At room temperature, it’ll stay fresh for about 2 days—just make sure it’s not in direct sunlight or a warm spot. For longer storage, pop the wrapped loaf in the refrigerator—it’ll last up to a week without drying out. I prefer slicing it before freezing, stacked with parchment paper in between, so I can grab a slice whenever I want. To reheat, just microwave for about 15-20 seconds or toast slices for a crunchy edge. If you plan to add glaze later, wait until it’s fully thawed and at room temp. When reheated, it’s almost like fresh out of the oven—soft, warm, and inviting. Just a quick tip—if it ever feels a little dry after storage, brushing a tiny bit of melted butter on top or giving it a quick warm-up in the oven (about 350°F for 10 minutes) works wonders. This bread is so fuss-free, you’ll find yourself making it again and again.
Frequently Asked Questions
Final Thoughts
If you’re searching for a way to enjoy the magic of baking without losing your mind in complicated steps, this zucchini banana bread is a total treasure. It’s cozy, wholesome, and honestly just what I need after a busy week—something quick to make but packed with love and flavor. The zucchini keeps it irresistibly moist, the bananas add natural sweetness, and everybody around here asks for seconds. It’s a butcher-proof confidence-builder that’s forgiving enough for a kitchen beginner but satisfying enough for a seasoned baker. I love it because it’s adaptable—throw in your favorite nuts or chocolate chips—and it always turns out beautifully. Plus, it’s fantastic for using up ripe bananas and zucchinis that would otherwise go to waste. I’d love to hear how yours turns out or any variations you try. Don’t forget to share your photos and stories—I think food tastes best when shared! Happy baking and enjoy every slice of this warm, comforting loaf. Your kitchen (and your family) will thank you.

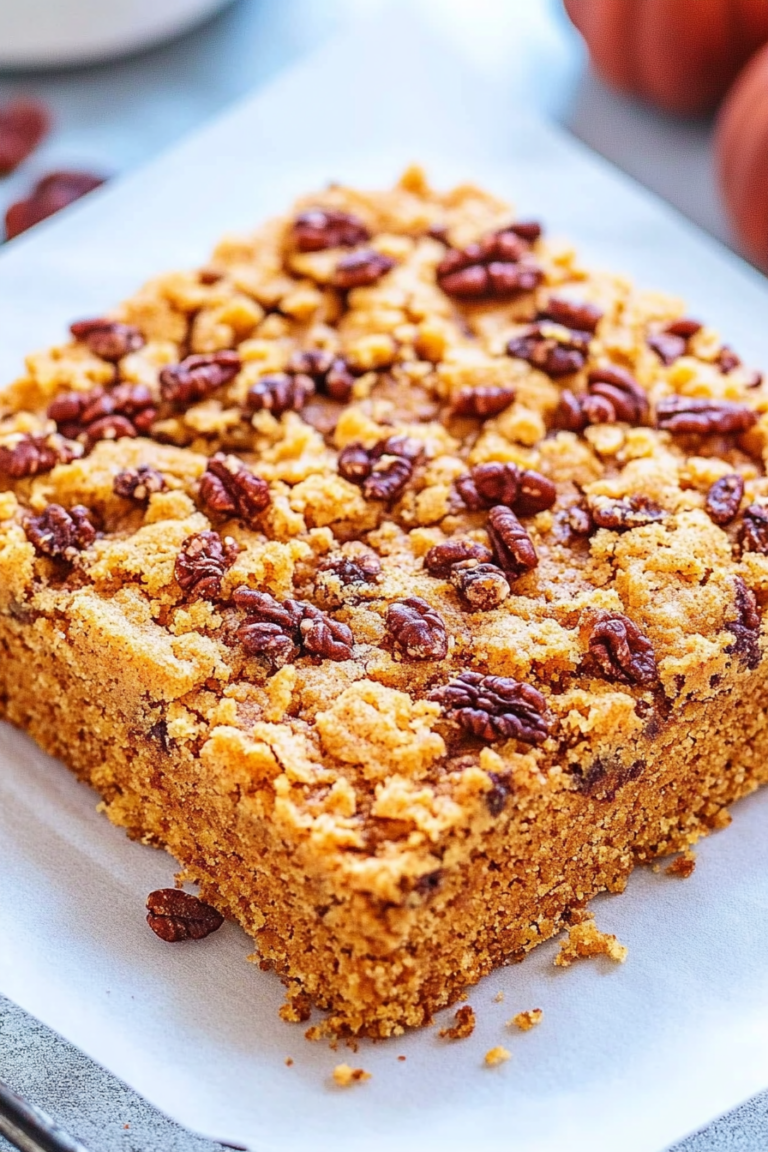
pumpkin waffle casserole
Ingredients
Method
- Preheat the oven to 350°F and line a 9x13-inch baking dish with parchment paper.
- Add the waffles to the lined baking dish and set aside.
- Prepare the brown sugar streusel by cutting together pumpkin spice, butter, pecans, brown sugar, and flour until crumbly.
- Fold the crumble into the waffle pieces and set aside.
- Whisk eggs, pumpkin puree, almond milk, and maple syrup until combined.
- Pour the egg mixture over the waffles and press down to coat. Cover and rest for 15 minutes.
- Bake covered for 30 minutes, then uncover and bake for an additional 15 minutes until golden.
- Rest for 10 minutes before serving with toppings.


Love this idea! The scent of waffles baking sounds so cozy and comforting—perfect for fall mornings.
I love how this casserole smells—it’s like a cozy hug in food form! Perfect for lazy weekend mornings.
I love the cozy, comforting vibe of this recipe—perfect for fall mornings! Can’t wait to try it and fill my kitchen with that warm bread aroma.
I love the cozy autumn vibes in this recipe! The scent of warm waffles baking is such a comforting feeling.