
Crispy Air Fryer Calamari Recipe
There’s just something about baking that feels like wrapping a warm hug around your family. I remember the first time I tried making this zucchini banana swirl cake—my kitchen was filled with the sweet aroma of ripening bananas mingling with the fresh, earthy scent of zucchini. It’s a recipe I’ve tested over and over, tweaking here and there, and let me tell you—this one’s a lifesaver on busy nights when I want something sweet, comforting, and homemade without spending hours in the kitchen. My kids ask for this all the time — they love how it looks with that beautiful marbled swirl, and I adore how forgiving it is with all those ripe bananas and zucchinis lurking in my fridge. Plus, it’s a sneaky way to get some veggies into dessert! Trust me on this one—once you make it, it’ll become a staple in your own kitchen too. So, grab those bananas and zucchinis, and let’s bake something that smells like childhood and tastes like a warm, happy memory.
What is a Zucchini Banana Swirl Cake?
This zucchini banana swirl cake is like a cozy hug in cake form. Think of it as a moist, tender loaf with pockets of sweet banana and a hint of zucchini’s freshness, all marbled together with a swirl of cinnamon-spiced batter. It’s essentially a mash-up between a banana bread and a classic zucchini cake, but with a fun, artistic twist in the swirling pattern. The name might sound fancy, but it’s really just a straightforward, homey dessert that feels special but is super simple to make. The bananas give it richness and moisture, while the zucchini adds a subtle earthy flavor that keeps it from feeling overly sweet or heavy. It’s perfect for breakfast, brunch, or a sneaky afternoon snack — always better with a cup of coffee in hand. Think of it as a forgiving, adaptable cake that’s as cozy as your favorite childhood blanket, but with a modern, delicious upgrade.
Why you’ll love this recipe?
What I love most about this zucchini banana swirl cake is how it combines all the flavors and textures I adore, into one effortless loaf. First, the flavor profile—sweet bananas and tender zucchini come together in a harmony that’s neither too sweet nor too dense, with just a whisper of cinnamon and vanilla to warm it up. The aroma alone can turn anyone into a baking enthusiast in minutes. Then, the best part? It couldn’t be easier to make. No fancy equipment required—just a mixing bowl, a spoon, and a loaf pan. I always do this when I need something quick, especially on mornings when I’m rushing but still crave that homemade touch. The cost is quite budget-friendly, since it uses ingredients I usually already have in my kitchen—ripe bananas, a zucchini, some baking staples. Plus, this cake is so versatile; you can swap out ingredients, add nuts or chocolate chips, or enjoy it plain. It’s a great way to use up those bananas that are getting a little too ripe and zucchinis that are taking over my crisper drawer. Honestly, what’s not to love?
How do you make a Zucchini Banana Swirl Cake?
Quick Overview
This cake comes together in just a handful of steps—mix the moist ingredients, combine with the dry, swirl in the batter, and bake. I love how forgiving it is—overmixing is a no-no, but that’s easy to remember. The swirling part is fun and gives the cake that pretty marbled look no one can resist. It’s a great way to turn everyday ingredients into something special. The oven does all the work, and soon your entire kitchen will be filled with the smell of cinnamon and sweet fruit—trust me, you’ll want to make a double batch!
Ingredients
For the Main Batter:
– 2 ripe bananas, mashed (the riper, the better—trust me, it makes the cake extra moist)
– 1 cup grated zucchini (squeeze out excess moisture—you don’t want it to be soggy!)
– 1/2 cup vegetable oil or melted butter
– 2 large eggs
– 1 teaspoon vanilla extract
– 1 1/2 cups all-purpose flour (I’ve tested with almond flour too, and it works great for a gluten-free version!)
– 1 teaspoon baking powder
– 1/2 teaspoon baking soda
– 1/2 teaspoon ground cinnamon
– 1/4 teaspoon salt
– 1/2 cup brown sugar (or you can use honey or maple syrup if you prefer a touch of natural sweetness)
For the Filling (optional but highly recommended):
– 1/2 teaspoon cinnamon mixed with 2 tablespoons sugar for extra swirl flavor
For the Glaze:
– 1/2 cup powdered sugar (sifted)
– 1-2 teaspoons milk or cream (adjust for desired consistency)
– A dash of vanilla or lemon juice for zing (optional)
Step-by-Step Instructions
Step 1: Preheat & Prep Pan
Set your oven to 350°F (175°C). Grease a standard loaf pan with butter or non-stick spray and line it with parchment paper if you like a cleaner release. This step just makes life easier later, especially when you’re eager to dig in!
Step 2: Mix Dry Ingredients
In a medium bowl, whisk together the flour, baking powder, baking soda, cinnamon, and salt. This is where I’ve learned to be gentle—overmixing at this stage can make the cake a bit dense, so just combine until everything’s evenly distributed without fuss.
Step 3: Mix Wet Ingredients
In a large bowl, mash your bananas really well—use a fork or a potato masher—until smooth. Add the grated zucchini, oil, eggs, vanilla, and sugar. Mix until everything’s just combined. I’ve tested this with almond milk instead of oil, and it actually made it even creamier—so feel free to experiment!
Step 4: Combine
Pour the dry ingredients into the wet, and gently fold them together until you see no more streaks of flour but don’t overdo it. The batter might be a little lumpy—that’s fine. Just keep it tender and avoid overmixing.
Step 5: Prepare Filling
If you’re using the cinnamon-sugar for swirling, mix those together. Set aside a few spoonfuls of batter to add later for layering the swirl.
Step 6: Layer & Swirl
Spread half your batter into the prepared pan. Drop dollops of the cinnamon-sugar mixture and the reserved batter on top. Use a toothpick or skewer to gently swirl the two layers into a marbled pattern—don’t overdo it, or the swirl can blend into a muddy mess! Think of it as painting—random but controlled.
Step 7: Bake
Bake for about 50-60 minutes, or until a toothpick inserted in the center comes out clean. Oven times vary—I’ve had mine ready in 55 minutes, but keep an eye on it after 50. The top should be golden, and the smell will entice everyone in the house!
Step 8: Cool & Glaze
Let the cake cool in the pan for about 15 minutes before transferring it to a wire rack. Once completely cool, drizzle with your glaze, which I love to keep simple and sweet. The glaze adds that finishing touch—trust me, it’s the perfect sweet bite at the end.
Step 9: Slice & Serve
This cake is best sliced when fully cooled (warm slices can be a bit crumbly). Use a serrated knife for neat cuts, and serve on a pretty plate with a cup of coffee or tea. I actually think it’s even better the next day, once the flavors have melded overnight.
What to Serve It With
This zucchini banana swirl cake is a chameleon—perfect for multiple occasions. For breakfast, pair it with a robust dark roast or a cinnamon-spiced latte. My kids love it warm with a smear of butter or a dollop of Greek yogurt—it’s like a healthier banana bread alternative. For brunch, serve slices with fresh berries and a side of scrambled eggs; nothing says cozy weekend mornings like this combo. As a dessert, it’s lovely on its own, but I often dust it with powdered sugar or add a fruity compote on the side. And if you’re just craving a quick snack, cut a slice, wrap it up, and save it for later—trust me, it disappears in minutes at my house!
Top Tips for Perfecting Your Zucchini Banana Swirl Cake
Over the years, I’ve gathered a few tricks to make this cake even better. First, always squeeze out excess moisture from the zucchini—nothing ruins the texture faster than soggy cake. I’ve learned that a microplane is perfect for grating zucchini finely and then pressing out the juice through a clean dish towel. When mixing the batter, avoid overmixing after adding the dry ingredients; this keeps the cake tender. For the swirl, I’ve played around with different patterns—sometimes I do a zig-zag, other times a spiral—just have fun with it and make it your signature look. Ingredient swaps are also fun: I’ve tested swapping applesauce for oil for a lower-fat version, and it came out just as moist. Baked this way, it’s a forgiving recipe that adapts to what you have at home. For the glaze, I prefer to keep it simple, but adding a splash of lemon juice or a hint of vanilla can really elevate the flavor. The key is patience—let it cool fully before glazing so the top stays crisp and the glaze doesn’t drip into the cake. Trust me, with these tips, your cake will look and taste like a pro’s — but with the warmth of a home kitchen.
Storing and Reheating Tips
This cake keeps surprisingly well. At room temperature, wrapped tightly with plastic wrap, it stays fresh for about 2 days—though I find it’s even better the next day when the flavors settle in. For longer storage, pop it in an airtight container and refrigerate for up to 4 days. It’s a great make-ahead treat; just give it a few minutes at room temp before slicing so it’s soft and luscious. If you want to keep it even longer, freeze slices individually wrapped in foil or plastic wrap for up to 3 months. To reheat, microwave for 20-30 seconds or warm in a low oven — it’s just as delicious as fresh. If you’re adding the glaze later, do it once the cake is completely cooled; otherwise, the glaze might melt too quickly and lose its glossy charm. Trust me, properly stored, this cake retains its lovely moist crumb, and the swirl remains pretty even after a few days.
Frequently Asked Questions
Final Thoughts
This zucchini banana swirl cake has become one of those recipes I turn to when I want something cheerful and comforting. It’s a testament to how humble ingredients—ripe bananas and zucchinis—can come together to create something unexpectedly beautiful and delicious. Every time I bake it, I feel a little nostalgic, remembering childhood mornings with warm slices and cold milk, or lazy weekend brunches with friends. I love that it’s so adaptable—I’ve swapped in different flours, added chocolate chips, or even made mini versions for quick snacks. It’s perfect for those days when you’re craving something sweet but don’t want to fuss in the kitchen for hours. Plus, it’s a great way to sneak veggies into dessert without anyone noticing! I hope you give this a try—share your own twists, your stories, or just send me pictures of how yours turned out. Happy baking, and enjoy every bite of this cozy, moist, beautifully marbled cake!
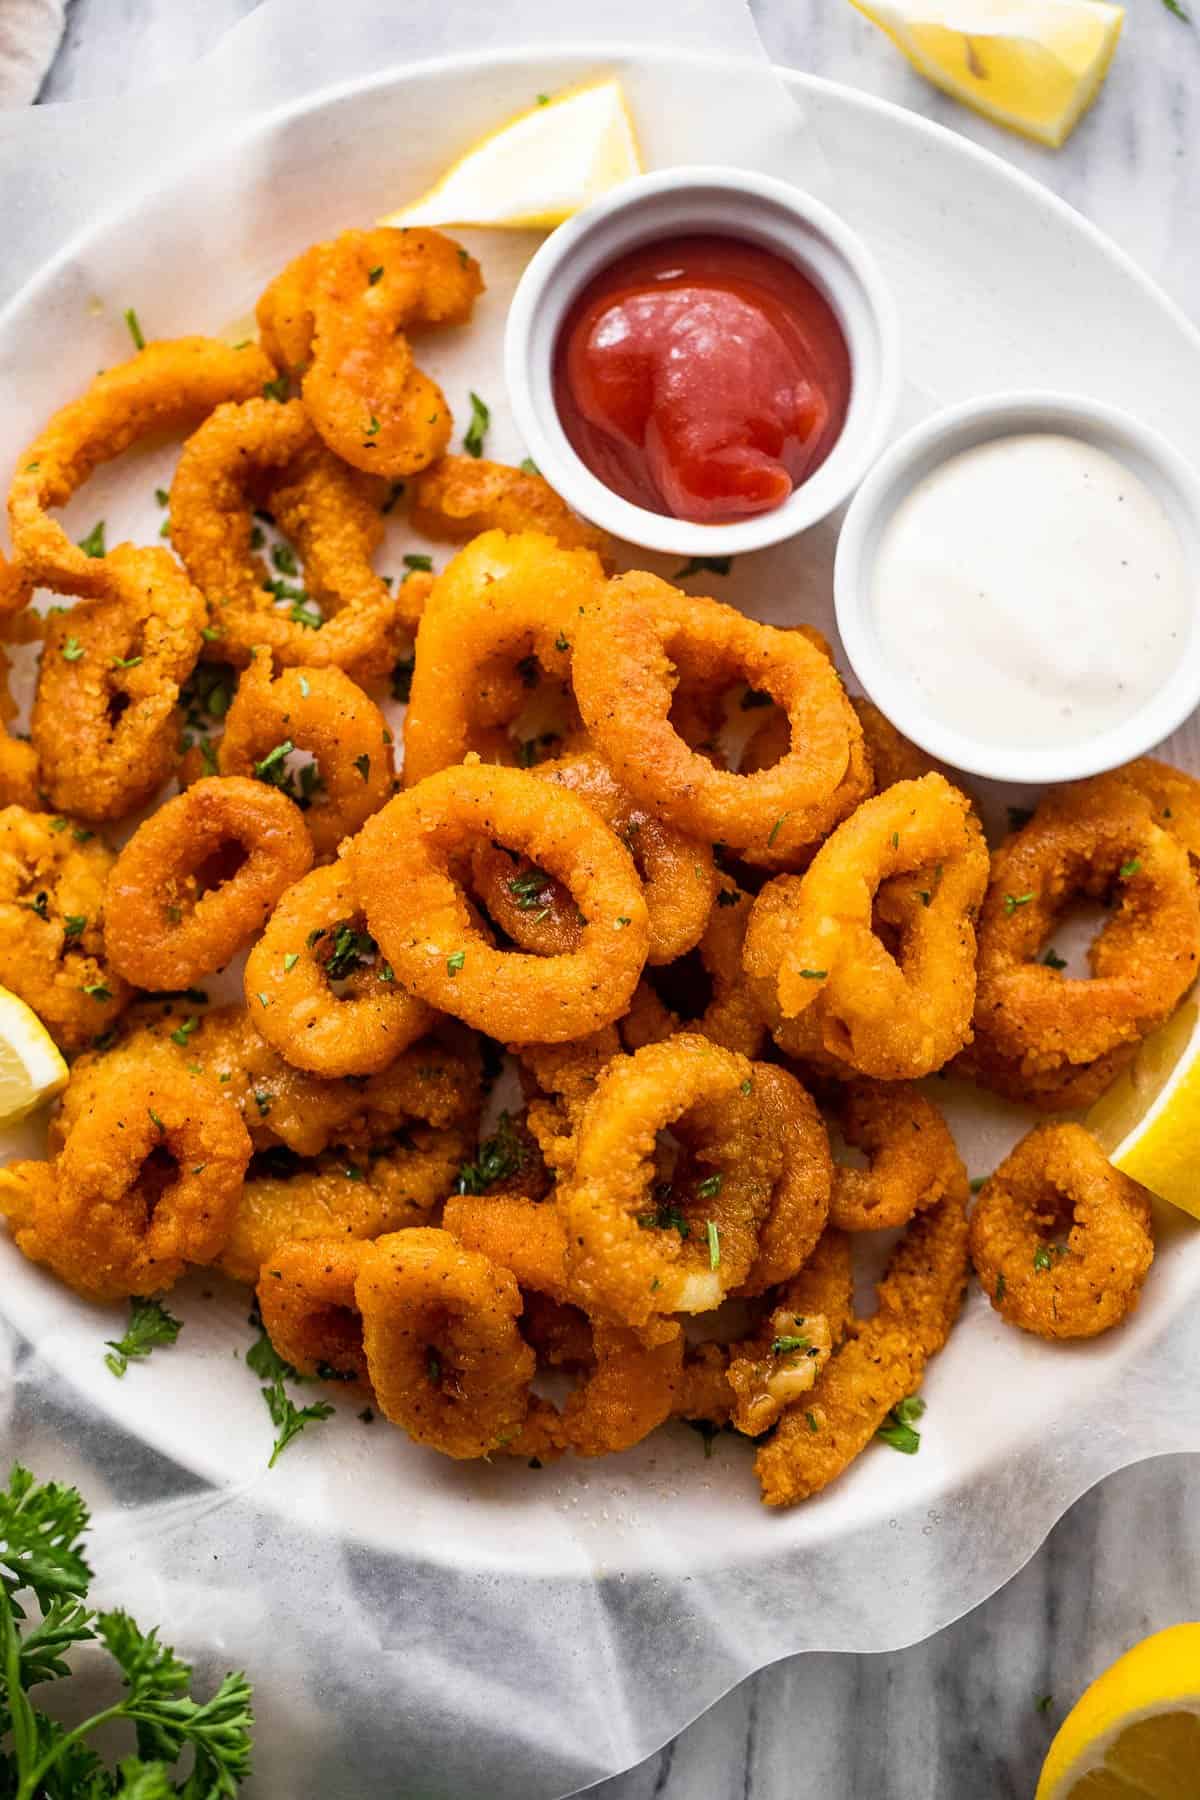
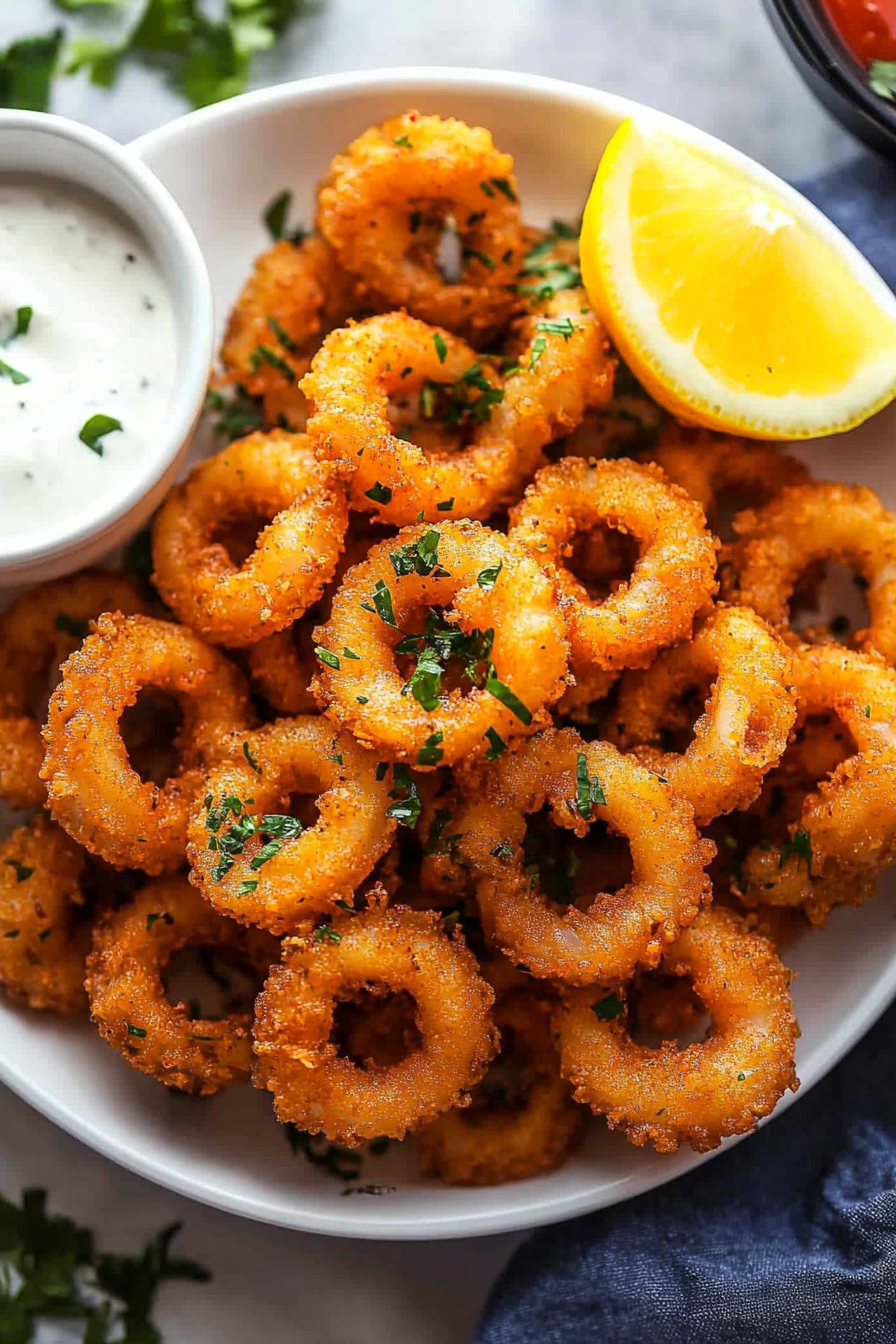
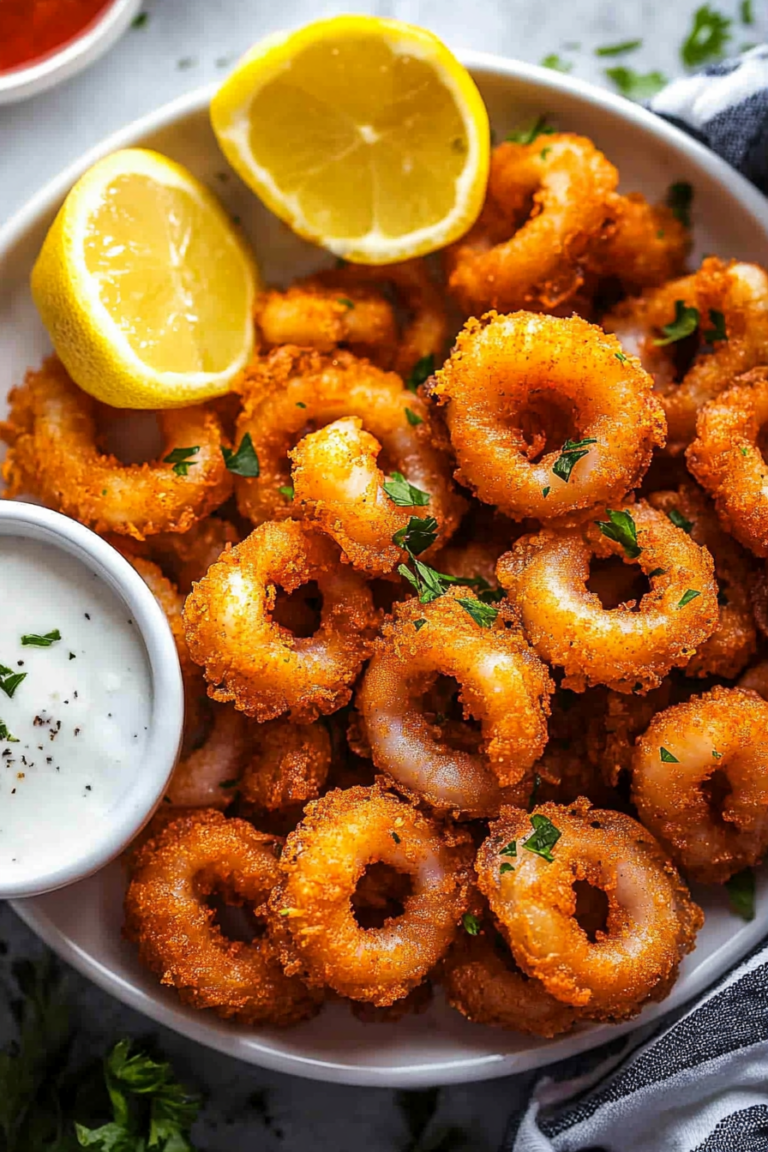
air fryer calamari
Ingredients
Method
- Place calamari rings in a large bowl and add the buttermilk; stir to coat all the rings.
- Cover and refrigerate for 30 minutes to an hour.
- Preheat air fryer to 400°F.
- In a large shallow bowl, whisk together the coconut flour, cornstarch, oregano, salt, pepper, paprika, and cayenne.
- Remove calamari rings from buttermilk and shake off excess.
- Dredge the rings in the flour mixture.
- Place rings in the basket of the air fryer in a single layer. Cook in batches if needed.
- Spray the tops with cooking oil spray.
- Air fry for 4 minutes.
- Flip rings, spray again if needed, and cook for an additional 3 to 4 minutes until golden and crispy.
- Serve immediately with lemon wedges and marinara sauce for dipping.

I love how baking brings everyone together! This calamari looks perfect—crispy on the outside, tender inside. Can’t wait to try it!
Love this recipe! I’ve been craving calamari lately and this sounds perfect.