
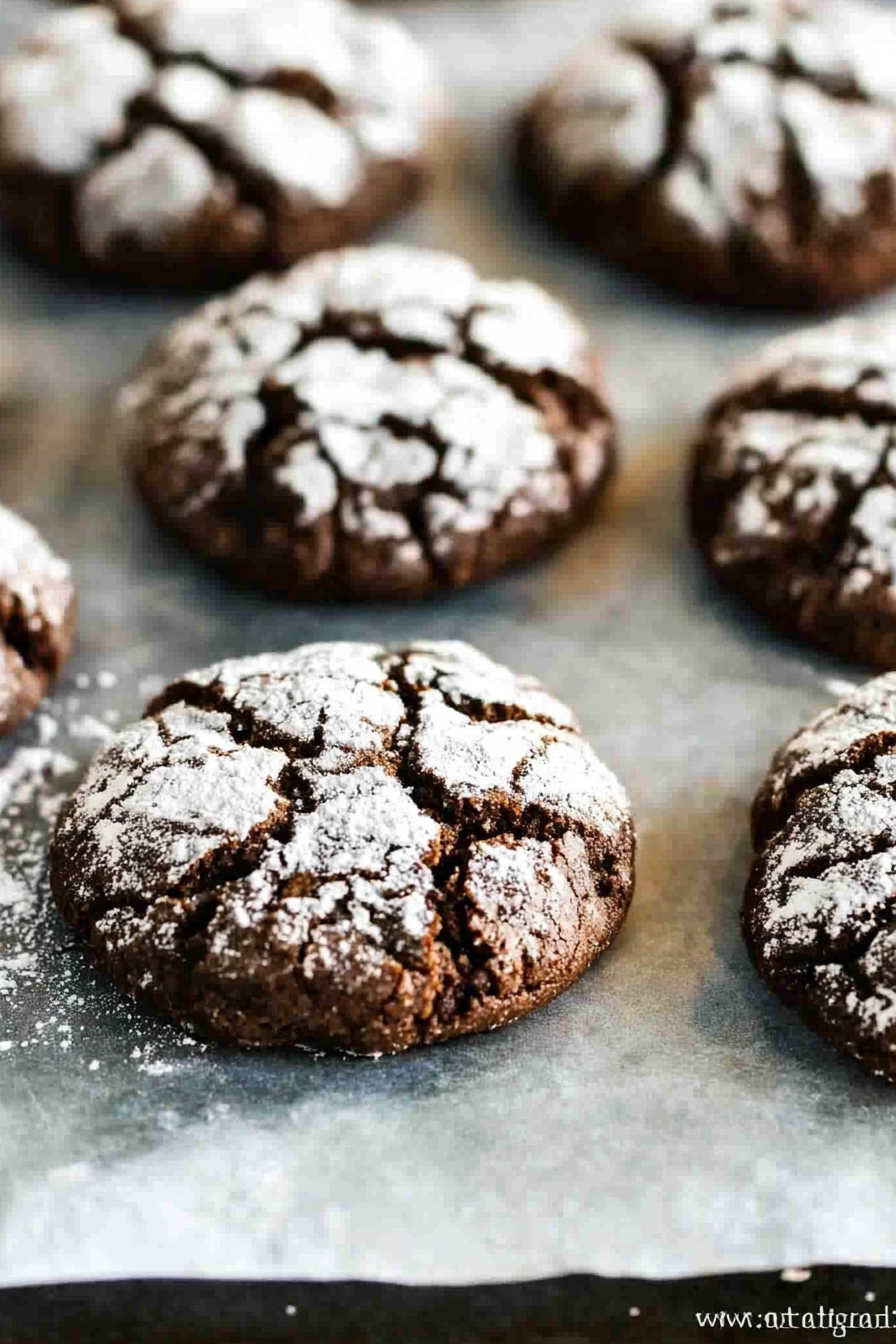
Easy Chocolate Crinkles Recipe
There’s something truly magic about a slice of cake that’s sweet, moist, and loaded with hidden veggies—yes, zucchini! I remember the first time I tried making a zucchini cake, thinking, “Can this really work?” But oh my gosh, it was an instant hit. The kids loved it, my husband raved about how moist and tender it was, and best of all, I felt good about sneaking some greens into their day. This recipe has become a backup plan for those times when I want something comforting but also a little sneaky (in the best way). It’s basically a cross between a homemade coffee cake and a cozy slice of nostalgia, with the bonus of that secret veggie punch. Trust me, it’s one of those recipes that disappears in minutes at my house—I always do this when I want a treat that’s both special and effortless. Plus, it’s so versatile—you can dress it up with a simple glaze or keep it rustic with just a dusting of powdered sugar. Either way, you’ll love how this turns out every single time.
What is Zucchini cake?
Think of zucchini cake as a cozy, slightly crumbly, sweet ‘n’ tender dessert that’s packed with grated zucchini. It’s essentially a moist, flavorful cake with a crumbly top, kind of like a coffee cake but with the added surprise of the veggie inside. The name might throw you off — you’re expecting something plain or healthy—and honestly, it’s got that homey, “I’m made with love” feel. It’s been a family favorite for years, passed down from my grandma’s recipe box, though she called it her “secret stash cake” because of how it sneaks in veggies. The beauty of this cake is that it’s super forgiving: you can add nuts, swap in different spices, or even play around with the filling and glaze. The concept is simple—moist, tender cake with a little crumble topping and a drizzle of sweet glaze—but it’s the combination of sweetness and that juicy zucchini flavor that makes it addictive. Think of it as a comforting hug on a plate, perfect for breakfast, dessert, or a cozy snack.
Why you’ll love this recipe?
What I love most about this zucchini cake is how it manages to be surprisingly indulgent yet honestly pretty healthy—kind of like a sneaky treat for your sweet tooth that knows you’re getting some greens. The flavor is rich and comforting, with warm notes from cinnamon and nutmeg that remind me of fall mornings. The texture? Off the charts—moist but tender, with a slight crumble on top that’s just crispy enough. And the best part? It’s dead simple to make. I always do this when I need a quick dessert — it comes together in one bowl, no crazy gadgets required. Trust me, this is a lifesaver on busy nights or when unexpected guests pop in because it’s ready in less than an hour. Plus, it costs next to nothing to whip up, and ingredients are staples in my pantry—flour, sugar, spice, and zucchini, of course. I’ve made variations with apple, banana, and even vegan versions using almond milk, and each time it’s just as delicious. Versatility is key, and this cake definitely checks that box.
And, honestly, what makes it stand out from other quick cakes is the filling and glaze combo. The filling adds a sweet, gooey layer that makes every bite just a little more decadent. It’s a perfect bring-along for potlucks, family gatherings, or simply a sweet afternoon treat to enjoy with a cup of coffee. Every time I bake this, I get asked for the recipe, and seeing loved ones smile when they taste it makes me think, “Yep, this one’s a keeper.” It’s like hugging a warm blanket—familiar, cozy, and oh-so-satisfying.
How do I make Zucchini cake?
Quick Overview
This zucchini cake comes together with basic ingredients: flour, sugar, eggs, a bit of oil, and freshly grated zucchini. The trick is to fold everything gently so the batter remains light and airy. Once you’ve mixed your batter, you’ll pour half into your prepared pan, spread a layer of sweet filling—think cream cheese, jam, or even Nutella if you’re feeling indulgent—and then top with more batter. A quick swirl of a knife or skewer creates a marbled pattern that looks so pretty when baked. After a short bake, you’ll brush on a simple glaze that adds just the right extra sweetness. The result is a perfectly moist, flavorful cake that’s best enjoyed slightly warm or at room temperature. It’s everything I love about baking—easy, cozy, and makes the house smell incredible.
Ingredients
For the Main Batter:
– 2 cups all-purpose flour (or gluten-free blend, see tips below)
– 1 1/2 cups granulated sugar
– 1 teaspoon baking powder
– 1/2 teaspoon baking soda
– 1 teaspoon ground cinnamon
– 1/2 teaspoon nutmeg
– 1/2 teaspoon salt
– 1/2 cup vegetable oil or melted coconut oil
– 3 large eggs
– 1 teaspoon vanilla extract
– 1 1/2 cups grated zucchini (squeeze out excess moisture)
For the Filling:
– 1/2 cup cream cheese (softened)
– 1/4 cup brown sugar or honey
– 1 teaspoon vanilla
– 2 tablespoons chopped nuts or chocolate chips (optional but delicious!)
For the Glaze:
– 1 cup powdered sugar
– 2-3 tablespoons milk or cream
– 1/2 teaspoon vanilla
– Lemon zest or cocoa powder for variation (feel free to experiment!)
Step-by-Step Instructions
Step 1: Preheat & Prepare Pan
Set your oven to 350°F (175°C). Grease your 9-inch round or square pan with butter or non-stick spray. Line it with parchment paper if you want extra reassurance that nothing sticks—trust me, this makes life easier when you’re ready to slice!
Step 2: Mix Dry Ingredients
In a large bowl, whisk together the flour, sugar, baking powder, baking soda, cinnamon, nutmeg, and salt. This step helps distribute everything evenly—nothing annoying like clumps of baking soda in your batter. I’ve learned the hard way that dry ingredients first, then wet, makes a fluffier cake.
Step 3: Mix Wet Ingredients
In a separate bowl, beat the eggs, then stir in the oil and vanilla until well combined. I like to do this in a small pitcher for easy pouring. If you want a richer flavor, try swapping in melted butter or even coconut milk here—my secret upgrade. Then, fold in the grated zucchini. I always squeeze out the moisture first; too much moisture makes the batter tricky to handle, and can cause a dense cake.
Step 4: Combine
Add the wet mixture into the dry ingredients and stir gently until just combined. Do not overmix—that’s the tip that’ll keep your cake light and tender. Overmixing is my downfall, but I’ve learned to stop just when the batter looks evenly hydrated.
Step 5: Prepare Filling
Mix together the softened cream cheese, brown sugar (or honey), and vanilla. If you’re feeling adventurous, jazz it up with some lemon zest or cinnamon. Spread this over the batter once it’s in the pan, leaving a little border around the edges to prevent spilling over. I also sometimes sprinkle chopped nuts or chocolate chips on top of the filling for an extra surprise.
Step 6: Layer & Swirl
Pour the remaining batter on top, carefully spreading it evenly. Use a butter knife or skewer to gently swirl through the batter, creating a marbled effect. This is such a fun step—your cake will look gorgeous once baked, with beautiful ripples.
Step 7: Bake
Bake for about 40-45 minutes or until a toothpick inserted in the center comes out clean. Every oven is different, so start checking at 40 minutes. The smell alone will lure everyone to the kitchen—I promise it’s worth the wait! If it browns too quickly, loosely cover with foil the last 10 minutes.
Step 8: Cool & Glaze
Let the cake cool in the pan for 10-15 minutes, then transfer to a wire rack. While it’s still warm, whisk together the powdered sugar, milk, and vanilla. Drizzle generously over the cake. I like to add a bit of lemon zest here—it brightens the flavor beautifully, especially if you plan to serve it the next day.
Step 9: Slice & Serve
Slice once fully cooled—wait, I know, it’s hard! But a sharp serrated knife helps prevent squashing the edges. Serve with a cup of coffee or a glass of milk, and watch everyone ask for seconds. My kids ask for this all the time, and honestly, I don’t mind at all—they’re getting veggies, after all!
What to Serve It With
This cake really shines no matter the time of day. For breakfast, serve a warm slice with fresh berries and a dollop of Greek yogurt—it’s like a healthy dessert disguised as morning comfort. During brunch, pair it with a bright citrus mimosa or a milky chai latte. As a dessert, I love drizzling it with a slightly tangy lemon glaze or even a splash of bourbon caramel if I’m feeling fancy. When I want something casual and cozy, I just dust it with powdered sugar and add a side of crispy bacon or a handful of nuts. It’s a crowd-pleaser in every sense, and I’ve made it for birthdays, potlucks, and “just because” afternoons. Honestly, a slice of this cake and a cup of coffee is all I need—simple, warm, and totally satisfying.
Top Tips for Perfecting Your Zucchini Cake
Over the years, I’ve tinkered a lot with this recipe—here are my top tips for always getting it just right:
- Zucchini Prep: Always squeeze out excess moisture—this makes a huge difference in how moist your cake turns out. I use a clean kitchen towel or cheesecloth for best results.
- Mixing Advice: Mix just until combined. Overmixing creates gluten strands that make the cake tougher and denser. Use light folding motions and don’t rush this part.
- Swirl Customization: To make it prettier, swirl less or more depending on your pattern preference. I sometimes add a little cocoa powder to the top layer for a marbled effect.
- Ingredient Swaps: Switch-out applesauce or mashed banana for oil for a healthier version—just remember to reduce the liquid slightly. Vegan? Use flax eggs or applesauce.
- Baking Tips: Every oven is different. Use the toothpick test and check at 40 minutes, but don’t panic if it needs a few extra minutes.
- Glaze Variations: Add lemon zest, vanilla, or even a splash of bourbon to your glaze. For a dairy-free option, replace milk with almond or coconut milk.
It took me a few tries to perfect this one, but trust me, the patience pays off. I learned to always have a backup stash of grated zucchini in the freezer for when the craving hits. Oh! And don’t forget, a bit of extra cinnamon or nutmeg never hurts—these warm spices really make the flavors sing.
Storing and Reheating Tips
To keep this cake fresh and delicious, here’s what I do:
- Room Temperature: Cover it with a clean towel or airtight container and eat within 2 days for the best flavor—after that, it tends to dry out a bit.
- Refrigerator Storage: Wrap tightly with plastic wrap or store in an airtight container for up to 5 days. The fridge slows down mold and keeps it tasting fresh.
- Freezer: Slice and wrap individual pieces tightly in plastic wrap, then store in a zip-top bag for up to 3 months. To reheat, microwave for about 20-30 seconds or let it come to room temperature—still soft, still delightful.
- Glaze Timing: It’s best to add the glaze once the cake is cooled completely to prevent it from melting or soaking in too quickly. If you store it later, reapply the glaze just before serving for the best visual and taste appeal.
I’ve tested freezing and reheating, and honestly, it still tastes great! It might lose a little of that just-baked fluffiness, but the flavor remains spot on. Plus, it’s so convenient to make ahead.
Frequently Asked Questions
Final Thoughts
Honestly, I think this zucchini cake is one of my all-time favorites. It’s cozy, forgiving, and moist in all the right places, with that perfect hint of spice and sweetness. It’s become my go-to when I want to whip up something quick that feels just a little special. Every time I bake it, I get a wave of nostalgia—reminding me of lazy Sunday mornings and family kitchen gigs. Plus, the secret zucchini keeps everyone surprised, and trust me, that grin on my kids’ faces when they realize is priceless. I encourage you to experiment with the fillings and toppings—maybe add some chai spices or swap in apples for a different twist. No matter what, I promise it’ll become a family staple in your house, too. Happy baking! And I can’t wait to hear how yours turns out—share your pics and variations in the comments!
chocolate crinkle cookies
Ingredients
Method
- Using a stand mixer, combine cocoa powder, vegetable oil, and granulated sugar. Mix until it forms a thick, black dough.
- Add eggs, one at a time, mixing well in between each addition. Stir in vanilla extract.
- In a separate bowl, whisk together the flour, salt, and baking powder. Gradually add this mixture to the dough on low speed, mixing until just combined. Be careful not to overmix!
- Cover the dough with plastic wrap and chill for at least 4 hours or overnight (this step is crucial!).
- Preheat your oven to 350°F. Line a baking sheet with parchment paper or lightly grease it with nonstick spray.
- Roll the chilled dough into 1-inch balls using your hands, then coat each ball in powdered sugar.
- Place the dough balls on the prepared baking sheet, leaving at least 2 inches of space between each one.
- Bake for 10-12 minutes, until the cookies crack on top. Allow to cool for 2 minutes before transferring to a wire rack to cool completely.


I’ve tried this recipe before and it turned out so moist! The chocolate glaze is the perfect finishing touch—definitely adding this to my holiday baking list.
I love how this recipe combines chocolate and veggies—so clever and delicious! Can’t wait to try it.
I love how zucchini adds moisture without sacrificing flavor—this recipe sounds perfect for a cozy dessert!