
Easy Cookie Dough Cheesecake Delight
Some of my most cherished memories happen in the kitchen, especially when my kids are bouncing around, excited for something sweet. That smell of cinnamon wafting through the house, mingling with the fresh cut zucchini—it’s like a warm hug. I remember the first time I made this zucchini cinnamon swirl bread — I was craving something cozy but didn’t want to mess around with a complicated baking project. Instead, I whipped this up in less than an hour, and let me tell you, it disappeared in minutes at my house. It’s so good, I keep making it over and over, tweaking just a little each time. Trust me on this one, if you’re looking for a way to use up those zucchinis from your garden or store-bought ones hiding in your fridge, this is it. It’s moist, flavorful, and frankly, a little addictive. My kids ask for this all the time—sometimes just as a snack, other times for breakfast—because they love the swirl of cinnamon and that tender, sweet crumb. It’s a go-to when I’m short on time but still want to serve something homemade and comforting, and honestly, it’s perfect when you’re craving something sweet at 10 pm but don’t want to bake a whole cake. Grab that zucchini, and let’s get baking!
What is Zucchini cinnamon swirl bread?
This bread is basically the love child of a cozy cinnamon roll and a moist zucchini bread. Think of it as a breakfast loaf that’s equally fantastic for an afternoon snack or a light dessert. The secret is the grated zucchini, which keeps it incredibly tender and adds a subtle vegetable boost—without sacrificing that irresistible sweet flavor. The cinnamon swirl waves through the batter, making each slice look like a piece of art, and the aroma alone will make you want to grab a knife and dig in. It’s called that because of the beautiful cinnamon and sugar mixture layered in the batter, creating a delightful marbled effect. It’s essentially just a quick bread, so no yeast involved, which makes it super approachable even if you’re new to baking. Plus, it’s flexible—swap in different nuts, add a splash of vanilla, or even sneak in a handful of blueberries if you’re feeling fancy. It’s a humble loaf, but one that feels like a warm hug on a chilly morning or a lazy weekend afternoon.
Why you’ll love this recipe?
What I love most about this zucchini cinnamon swirl bread is how it hits all the right notes—moist, sweet, with a lovely hint of spice—yet it’s so simple to make. The ingredients are pantry staples, and honestly, you probably already have everything you need in your kitchen. It’s a great way to sneak some veggies into your kids’ day without any fuss—a perfect family hack if you ask me. The flavor is just enough cinnamon to feel indulgent but not overpowering, and the bread stays tender for days, making it great for make-ahead breakfasts or snacks to pack in school lunches.
Another thing that keeps me coming back to this recipe is versatility. You can make it a little healthier by reducing sugar or substituting with honey or maple syrup. I’ve tested this with almond milk, and it actually made it even creamier! And if you’re feeling decadent, a drizzle of caramel or cream cheese frosting on top transforms it into an incredible dessert. The smell alone brings everyone to the kitchen, and it’s wonderful for brunch spreads or cozy weekend mornings. Plus, it’s budget-friendly—using simple ingredients means you don’t have to break the bank. Whenever I make this, my house fills with a scent that makes everyone smile, and I love how it turns a regular day into something special. Honestly, the best part is how forgiving it is—I’ve overmix it, underbaked it once or twice, and still, it turned out delicious. That’s the sign of a good, family-friendly recipe, in my opinion!
How do you make Zucchini Swirl Bread?
Quick Overview
This bread comes together quickly, thanks to just one bowl for the wet ingredients and another for the dry. The key to keeping it moist is to gently fold the grated zucchini into the batter, making sure not to overmix. The cinnamon swirl is simply a mix of sugar and cinnamon spread over the batter before you swirl it gently with a toothpick or knife. Bake it until a tester comes out clean, let it cool just enough so the slices hold their shape, and then glaze or serve plain. It’s foolproof and perfect for when you want homemade comfort without hours of prep. What makes this special is how moist it stays, and that swirl—each slice looks pretty enough to share, but trust me, it’s hard to resist taking a second piece.
Ingredients
For the Main Batter:
– 1 ½ cups all-purpose flour (or a mixture with whole wheat for extra fiber)
– 1 teaspoon baking powder
– ½ teaspoon baking soda
– ½ teaspoon salt
– 1 teaspoon cinnamon
– ½ cup granulated sugar (feel free to reduce if you want less sweetness)
– 2 large eggs
– ½ cup vegetable oil or melted butter
– ½ cup milk (can swap with almond milk or another plant-based milk)
– 1 teaspoon vanilla extract
– 1 ½ cups grated zucchini (squeeze out excess moisture for best texture)
For the Filling:
– ¼ cup brown sugar (or coconut sugar for a healthier twist)
– 1 tablespoon cinnamon
For the Glaze:
– ½ cup powdered sugar
– 1-2 teaspoons milk or lemon juice
– Optional: a splash of vanilla or maple extract for flavor
Step-by-Step Instructions
Step 1: Preheat & Prep Pan
Set your oven to 350°F (180°C). Grease a standard loaf pan with butter or non-stick spray and line it with parchment paper if you like, to make removal easier. I always do this because it prevents sticking, and cleaning up afterward is a breeze. Let the pan sit while you prepare the batter—you’ll thank me later!
Step 2: Mix Dry Ingredients
In a large bowl, whisk together the flour, baking powder, baking soda, salt, and cinnamon. This step ensures everything is evenly distributed and gives that lovely lift to the bread. Don’t skip this, especially the cinnamon — it’s the backbone of that warm, cozy flavor you want to taste in every bite.
Step 3: Mix Wet Ingredients
In another bowl, beat the eggs, then add in the sugar, oil, milk, and vanilla. Whisk until smooth—it should look slightly frothy. I sometimes warm the milk a little if I want the batter to come together faster, but make sure it’s not hot, or you risk cooking the eggs. This mixture should be bright, fragrant, and smooth, clueing you in that it’s ready for the next step.
Step 4: Combine
Pour the wet mixture into the dry ingredients. Gently fold everything together with a spatula, just until combined—overmixing makes it dense. The batter will be thick but shouldn’t be gloopy. If it feels too stiff, a splash more milk can help loosen it up.
Step 5: Prepare Filling
In a small bowl, mix the brown sugar and cinnamon. This will be the swirl that gives the bread that irresistible cinnamon roll vibe. You can add a pinch of nutmeg or cardamom if you’re feeling fancy or want a more complex spice rhythm.
Step 6: Layer & Swirl
Spread half the batter into your prepared loaf pan. Sprinkle the cinnamon-sugar mixture over, then add the remaining batter on top. Use a skewer or knife to swirl gently through the batter, creating beautiful streaks and marbled patterns. Don’t overdo it—just enough to get a pretty swirl. I love how each slice turns out with those cinnamon ribbons running through it.
Step 7: Bake
Pop it into the oven and bake for about 50-60 minutes. The top should turn golden and a toothpick inserted in the center should come out clean. If it starts to brown too quickly, cover loosely with foil. Every oven is different, so keep an eye on it around the 45-minute mark. Trust me, the smell is already worth the wait!
Step 8: Cool & Glaze
Let the bread sit in the pan for about 10 minutes, then transfer to a wire rack to cool completely. Once cooled, mix your glaze ingredients and drizzle over the top. If you prefer a more decadent finish, a smear of cream cheese frosting works beautifully too. The glaze adds a touch of sweetness and shiny finish that’s just irresistible.
Step 9: Slice & Serve
Use a serrated knife to cut gently, slices should be tender but hold their shape. Serve warm or at room temperature—either way, it’s fabulous. I love pairing this with a hot cup of coffee or a glass of cold milk. It’s perfect for breakfast, brunch, or even as a cozy midnight snack while binge-watching my favorite show.
What to Serve It With
This zucchini cinnamon swirl bread is quite versatile. For breakfast, I highly recommend pairing it with your favorite brew—coffee, latte, or a spicy chai—nothing beats the comforting aroma as you serve it warm. Sometimes I toast a slice and spread a little butter or cream cheese; it’s just so indulgent. For brunch, I love stacking slices on a pretty platter topped with fresh berries and whipped cream—looks fancy but so simple. As a dessert, I toss a handful of chopped nuts or drizzle extra caramel for that wow factor. Or, for a quick snack, just grab a slice with a glass of milk or a cup of tea. This bread feels like a warm hug in every bite, and my family loves it for any occasion—big or small.
Top Tips for Perfecting Your Zucchini Cinnamon Swirl Bread
Over the years, I’ve learned a few tricks that make this bread turn out perfect every time. First, squeezing excess moisture from the grated zucchini is crucial — too much moisture makes the bread dense instead of tender. I always do this by pressing it between paper towels or cheesecloth; trust me, it’s worth the extra minute. When mixing the batter, be gentle. Overmixing can make it tough, and nobody wants a bread with a tight crumb. Swirling the cinnamon sugar is my favorite step—it’s like creating little cinnamon art pieces! Use a toothpick or skewer to swirl, going back and forth in the batter without overmixing the whole loaf. If you want to swap ingredients, try replacing half the all-purpose flour with whole wheat or add a handful of chopped nuts or chocolate chips. Baked it once at a higher temperature, but I found that 350°F gives a more even, tender crumb. And don’t forget to test for doneness with a toothpick; every oven is different! For the glaze, I sometimes add a splash of vanilla or lemon zest to brighten it up. Little tweaks like these make a huge difference—after a few batches, I had it down pat. The key really is to keep it simple but pay attention to those tiny details. That’s how you get bread that’s moist, flavorful, and just a little bit addictive.
Storing and Reheating Tips
This bread stays moist for days if stored properly. I usually wrap it tightly in plastic wrap or keep it in an airtight container. If you’re planning to keep it for more than a day, refrigerate it—just make sure it’s wrapped well to prevent it from drying out. To reheat, I pop a slice in the microwave for about 15-20 seconds, and it’s like fresh out of the oven—especially delicious with a dab of butter. For longer storage, you can freeze slices individually wrapped in foil or plastic wrap. They’ll last up to three months! When you’re ready to enjoy, just thaw at room temperature, or reheat directly in the microwave. A tip: if you’re adding glaze or frosting, do it just before serving to keep the bread from getting soggy. Nothing beats that fresh-baked feeling, but this method keeps it as close as possible, no matter how long it’s been waiting.
Frequently Asked Questions
Final Thoughts
If you’re anything like me, baking is a way to share love — and this zucchini cinnamon swirl bread is one of those recipes that feels special but is so easy that even a beginner can feel like a pro. The combination of moist zucchini batter with that spicy cinnamon swirl is pure comfort food, and I’ll bet once you try it, it’ll become a staple in your house too. There’s something about the smell, the look of those pretty ribbons swirling through the bread, and the satisfying bite that gets everyone’s attention. Plus, it’s a sneaky way to get some veggies into your kids’ diet, which is a win in my book. I love experimenting with tweaks—adding nuts, swapping flavors, or even drizzling chocolate over the top for a treat. Every time I bake this, I’m reminded that simple ingredients can create something truly special. Happy baking, friends! And don’t forget to leave a comment with your variations or a photo of your gorgeous loaf—I’d love to hear about your adventures in the kitchen!
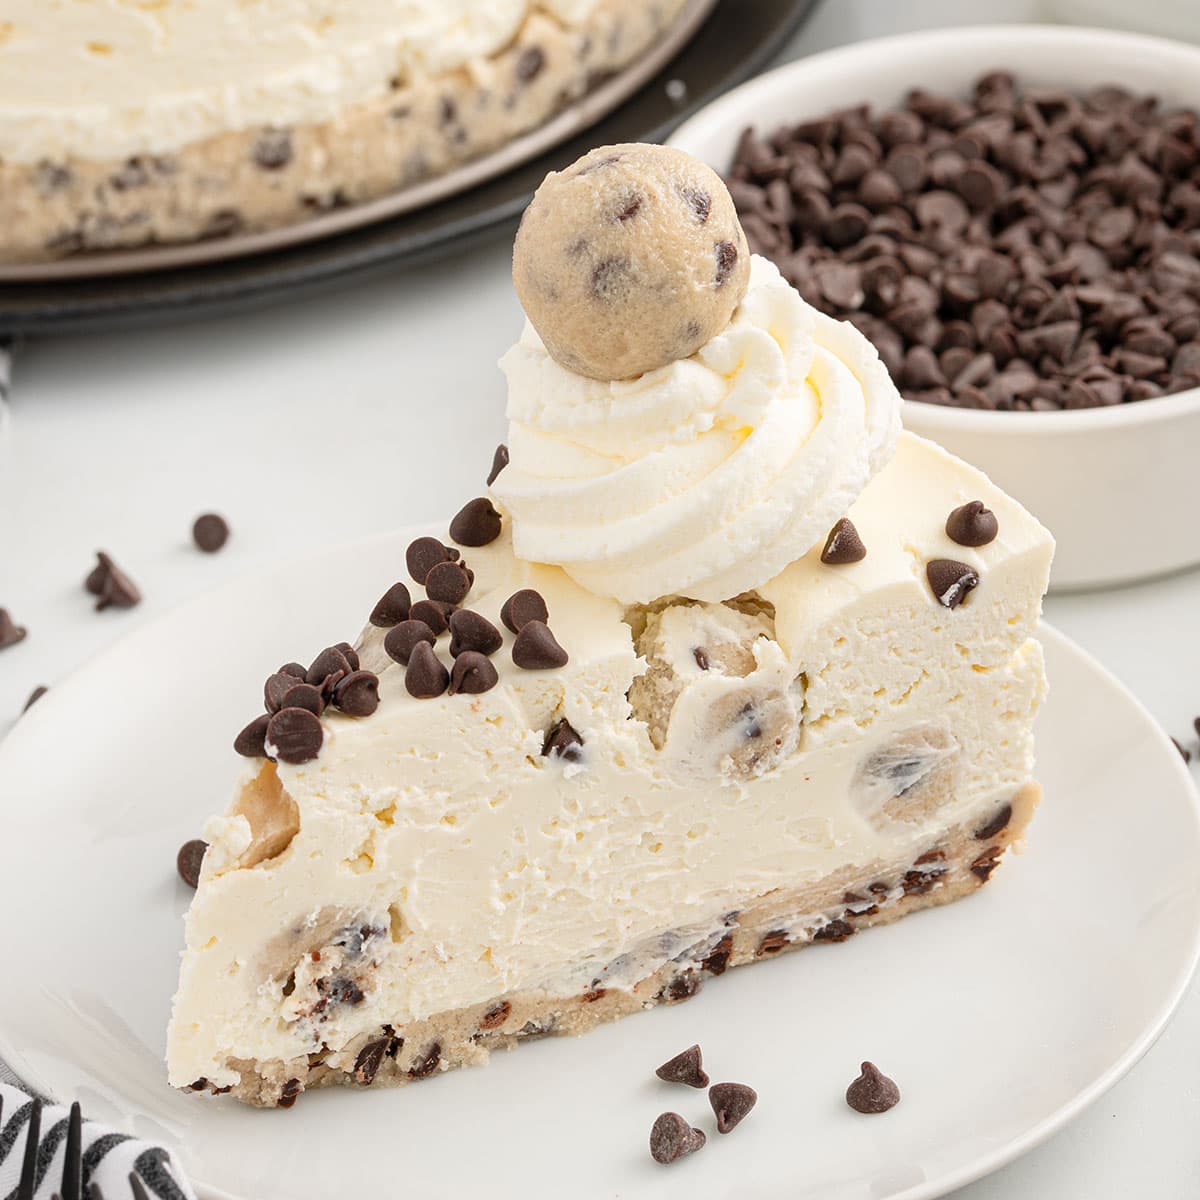
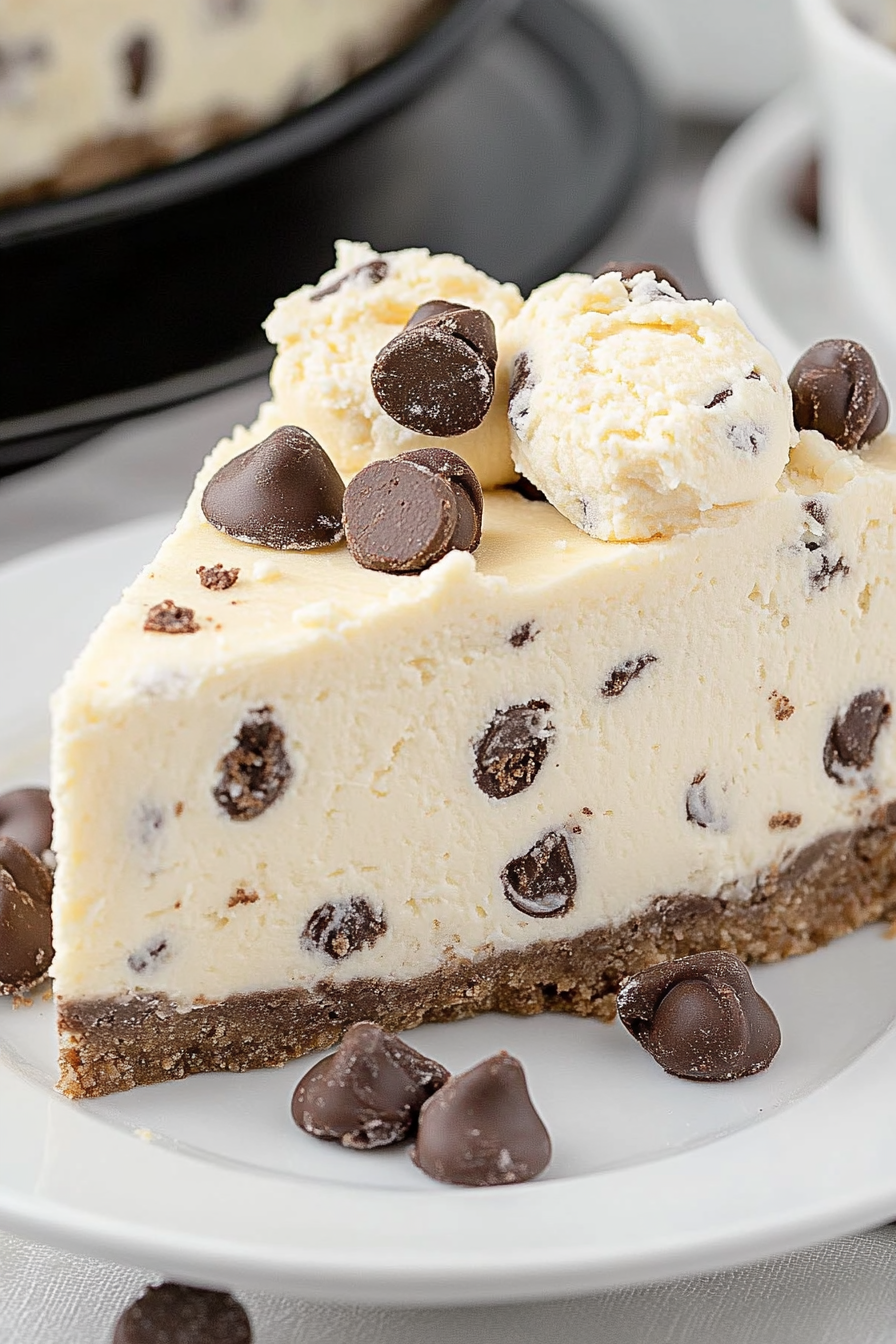
cookie dough cheesecake
Ingredients
Method
- Preheat the oven to 300°F (150°C).
- Line a large rimmed baking sheet with parchment paper. Evenly spread the all-purpose flour over the parchment paper.
- Heat the flour in the oven for 5-7 minutes, ensuring it does not burn. Remove and let it cool completely.
- In a large mixing bowl, beat together the butter, light brown sugar, and granulated sugar until light and fluffy, about 1-2 minutes.
- Add the heavy cream, vanilla extract, and salt. Mix until fully incorporated.
- Add the heat-treated flour gradually, mixing on low until fully incorporated. The batter will be thick.
- Stir in the mini semi-sweet chocolate chips until evenly distributed.
- Press 2 cups of edible cookie dough into an even layer at the bottom of a springform pan. Chill in the refrigerator.
- Shape remaining cookie dough into 10 balls for garnish and refrigerate.
- For the filling, beat together softened cream cheese and 1 cup powdered sugar until smooth.
- In a separate bowl, beat heavy cream, remaining powdered sugar, and vanilla until stiff peaks form.
- Gently fold the whipped cream into the cream cheese mixture. Fold in chopped cookie dough balls.
- Spread the cheesecake batter over the crust. Chill for at least 6 hours.
- Top with whipped topping, chocolate chips, and garnish with cookie dough balls. Slice and serve.


Love this! The kitchen memories are the best—especially with kids eagerly waiting for something sweet. So cozy and delicious!
This looks absolutely delicious! I can just imagine how cozy and sweet your kitchen must feel when you’re baking with your kids. The cinnamon scent alone sounds heavenly.
This sounds so comforting—I love how baking with kids creates such sweet memories. That cinnamon scent must be amazing!
This sounds like such a warm and cozy recipe! I love how it brings back memories of baking with family—definitely adding this to my list!