
Easy Frozen Banana Peanut Cake
If there’s one thing I’ve learned over the years, it’s that some of the simplest recipes are the ones that become part of your family’s story. This zucchini swirl cake is exactly that for me. I remember the first time I made it—my kids asked if I had swapped out the cake for a vegetable, because they couldn’t believe how it was almost too good to be true. The smell alone—warm cinnamon and sweet vanilla—fills the house and instantly turns any afternoon into a special occasion. It’s moist, flavorful, and, honestly, a sneaky way to get more veggies into my kid’s diet. Forget complicated gourmet desserts; this one’s a lifesaver on busy nights when I want something comforting but don’t want to spend hours in the kitchen. Trust me, every time I bake this, it disappears in minutes at my house, and I can’t help but smile knowing I’ve cracked the code for a treat everyone loves. And the best part? It’s so simple that I always do this when I need a little homey happiness—perfect for mornings, afternoons, or whenever the craving hits.
What is Zucchini Swirl Cake?
Think of this zucchini swirl cake as the lovechild between a classic coffee cake and a moist, veggie-packed loaf. It’s basically a tender, cinnamon-spiced cake layered with a subtle zucchini sweetness, swirling beautifully through the batter. The name “swirl” comes from that gorgeous marbled effect you get when the cinnamon-sugar mixture is gently folded into the batter before baking. It’s kind of like those beloved morning muffins, but a little more indulgent and, honestly, a bit more special because of the texture and unexpected vegetable surprise inside. I love how it’s all about cozy comfort—think of it as a gentle hug for your taste buds. It isn’t just for breakfast, either; I can see it shining at casual brunches or as an after-dinner sweet paired with a good cup of coffee or tea. Think of this as that one recipe you want to keep in your back pocket when you need something simple, tasty, and unexpectedly impressive.
Why you’ll love this recipe?
What I love most about this zucchini swirl cake is how it hits all the right notes without any fuss. First off, the flavor—moist, cinnamon-spiced with just a hint of zucchini’s natural sweetness—makes each bite feel like a warm hug. It’s not overly sweet, which means you can enjoy a slice with your morning coffee or sneak a piece post-lunch without feeling guilty. The recipe itself is straightforward; I’ve tested it with ingredients I always keep around—like plain yogurt instead of sour cream, or even a splash of almond milk when I run out of regular milk, and it actually made it even creamier! The batter comes together fast, and the swirl idea allows for a beautiful presentation without complicated piping or decorating. And budget-wise, it’s a win—mostly pantry staples and a single fresh zucchini that won’t break the bank. What I love most is its versatility: serve it warm, at room temp, or even chilled. This cake is a real crowd-pleaser and a personal comfort food rolled into one—perfect for those days when you need a little sweetness but don’t want to go overboard.
How do I make Zucchini Swirl Cake?
Quick Overview
This cake comes together in just one bowl for the batter, with a quick homemade cinnamon-sugar swirl that makes each slice stunning. First, you grate the zucchini, squeeze out the excess moisture (trust me, this extra step keeps it from becoming soggy!), then mix your wet ingredients. Meanwhile, you whisk your dry ingredients until well combined. After pouring the batter into your prepared pan, you sprinkle and swirl the cinnamon mixture through the batter—no fancy techniques needed—then bake until golden and irresistibly fragrant. It’s a simple process that transforms everyday ingredients into a homemade treat that feels like a special gift.
Ingredients
For the Main Batter:
– 2 cups all-purpose flour (I like to use unbleached for that extra warmth)
– 1 teaspoon baking powder
– ½ teaspoon baking soda
– ½ teaspoon salt
– 1 teaspoon ground cinnamon (because, yes, flavor is everything)
– 1 cup sugar (or honey/maple syrup for a natural twist)
– ½ cup unsalted butter, melted (trust me, melted butter gives the best moistness)
– 2 large eggs
– ½ cup plain yogurt or sour cream (makes it extra tender)
– 1 teaspoon vanilla extract
– 1 cup grated zucchini (squeeze out all the moisture and pat dry with a paper towel)
For the Filling:
– 2 tablespoons brown sugar
– 1 teaspoon ground cinnamon
For the Glaze:
– ½ cup powdered sugar
– 1-2 teaspoons milk or cream
– Drop of vanilla (optional, but makes it pretty and tasty)
Step-by-Step Instructions
Step 1: Preheat & Prep Pan
Set your oven to 350°F (175°C). Grease a square or round baking pan—you can also line it with parchment for easy removal. I like using a springform pan if I want the edges to stay neat and look fancy, but a regular loaf or square pan works just as well. Make sure to give it a light coat of butter or non-stick spray. This cake is moist, so I find that a proper prep helps with easy slicing later.
Step 2: Mix Dry Ingredients
In a large bowl, whisk together the flour, baking powder, baking soda, salt, and cinnamon. This step ensures everything combines evenly. I once skipped this and had uneven pockets of baking soda—lesson learned. Prevent clumps, and your cake will bake evenly and look professional.
Step 3: Mix Wet Ingredients
In a separate bowl, beat the eggs, then add the sugar, melted butter, yogurt, and vanilla. Whisk until smooth and slightly fluffy—that’s your sign it’s well combined. I tested this with a splash of almond milk instead of yogurt once, and it made the batter even creamier, so feel free to experiment!
Step 4: Combine
Pour the wet mixture into the dry ingredients and gently fold until just combined—don’t overmix. You want a luscious, thick batter with a few lumps, but no dry flour spots. Overmixing can make the cake dense, and nobody wants that.
Step 5: Prepare Filling
Mix the brown sugar with cinnamon in a small bowl. This sweet, spicy combo is what creates that irresistible swirl. If you’re feeling fancy, add a pinch of nutmeg or chopped nuts for extra texture.
Step 6: Layer & Swirl
Pour half the batter into your prepared pan, then sprinkle half of the cinnamon-sugar mixture over it. Add the remaining batter on top, then sprinkle with the rest of the cinnamon mixture. Use a butter knife or skewer to swirl gently through the batter—think of it as creating waves, not stirring—this creates that gorgeous marbled effect. My kids love spotting the swirl patterns before I pop it in the oven!
Step 7: Bake
Place in the oven and bake for 40-45 minutes. The top should be golden, and a toothpick inserted in the center should come out clean. I’ve baked this just a tad longer when I used a deeper pan—every oven is different, so trust your nose and eyes. The smell of cinnamon baking is my favorite motivator to keep the oven door closed in those last few minutes.
Step 8: Cool & Glaze
Let the cake cool in the pan for about 15 minutes before transferring it to a wire rack. Then, drizzle the powdered sugar glaze over it while still warm—this helps it seep into every crevice. I like giving it a gentle shake of extra cinnamon or a few chopped pecans on top for presentation and crunch.
Step 9: Slice & Serve
Use a sharp serrated knife to cut clean slices. Let it cool completely if you want tidy squares, or serve warm for an extra gooey experience. The swirl makes each piece look like a little piece of art—everyone will want seconds. Trust me on this one, it’s just as good the next day, especially if you microwave a slice for 10 seconds first—it’s like fresh again.
What to Serve It With
This cake is versatile, so honestly, I’d serve it pretty much anytime. For breakfast, it pairs beautifully with a strong black coffee or a mug of herbal tea. If I have guests over for brunch, I add a dollop of whipped cream or a scoop of vanilla yogurt on the side—it elevates the entire experience. As a dessert, warm slices with a scoop of vanilla ice cream or a drizzle of caramel melt everyone’s hearts. My family loves it with a glass of cold milk or a spicy chai latte in the afternoon or evening. I’ve even packed it in lunchboxes—a slice of love packed into a little paper bag. It’s perfect for a casual tea party, family get-togethers, or just a cozy treat when I need a pick-me-up. I find it’s the kind of dessert that makes everyone smile, even if they’re not big zucchini fans—trust me, they don’t taste the vegetable. Just the cinnamon and sweetness do all the talking.
Top Tips for Perfecting Your Zucchini Swirl Cake
Over the years, I’ve picked up a few tricks to make this cake even better. First, always squeeze out as much moisture as possible from the grated zucchini—this keeps the cake fluffy and prevents sogginess. I’ve learned that a fine grater gives a smoother texture, but I love a little coarser grate for more bites of zucchini in each slice. When mixing the batter, fold gently to keep it airy—I used to overmix and end up with a dense crumb. The swirl pattern? I practice a lightly marbled effect—no need for perfection, but a pretty swirl makes it special. Want to switch things up? Add chopped walnuts or mini chocolate chips into the batter or cinnamon mixture. For a dairy-free version, I’ve used coconut yogurt and coconut oil, which results in a slightly different crumb but still delicious. Baking tip: always check your oven’s heat—mine runs a bit hot, so I lower the temperature slightly after 10 minutes to prevent overbrowning. If you want a glossy glaze, reduce the powdered sugar to two-thirds and add a splash of lemon juice—brightens up the whole cake. Trust me when I say, a little patience while cooling makes all the difference for clean slices. And don’t skip the squeeze-out step; it’s the secret to moist but not soggy perfection.
Storing and Reheating Tips
This cake keeps well for a few days if stored properly. I prefer wrapping slices tightly in plastic wrap or placing them in an airtight container—nothing beats the smell of cinnamon filling the house, even days later. At room temperature, it’s best eaten within two days; after that, the zucchini can start to lose its freshness, but it’s still tasty. If you want to make it last longer, pop it into the refrigerator—just make sure it’s well covered to prevent dryness. It also freezes beautifully—wrap tightly in plastic and foil before storing in a freezer bag. I usually let a slice thaw at room temperature for 20 minutes or warm it in the microwave for 10-15 seconds, just enough to make it feel fresh again. If you’ve glazed the cake, wait until it’s fully thawed before adding the glaze, to prevent sogginess. One trick I’ve learned? Reheat individual slices covered with a damp towel—this keeps the surface moist and avoids that dry-out sensation. Honestly, it tastes just like freshly baked when reheated properly, which is a massive win in my book.
Frequently Asked Questions
Final Thoughts
This zucchini swirl cake is a recipe I keep coming back to, whether I need a quick comfort dessert or a sneaky way to sneak those veggies onto the breakfast table. Its moist crumb, lovely cinnamon swirl, and ever-so-slight zucchini undertone make it a real family favorite. I’ve made it countless times, tweaking a little here, swapping an ingredient there, and it never fails to make everyone happy. The way it fills the kitchen with those cozy aromas is worth every minute. Bonus points: it’s budget-friendly, flexible, and adaptable to many dietary needs. If you try this recipe, I’d love to hear your twists—add chocolate chips, switch up the spices, or top it with your favorite frosting. Happy baking, and don’t forget to share a slice with someone you love—you’ll be glad you did!
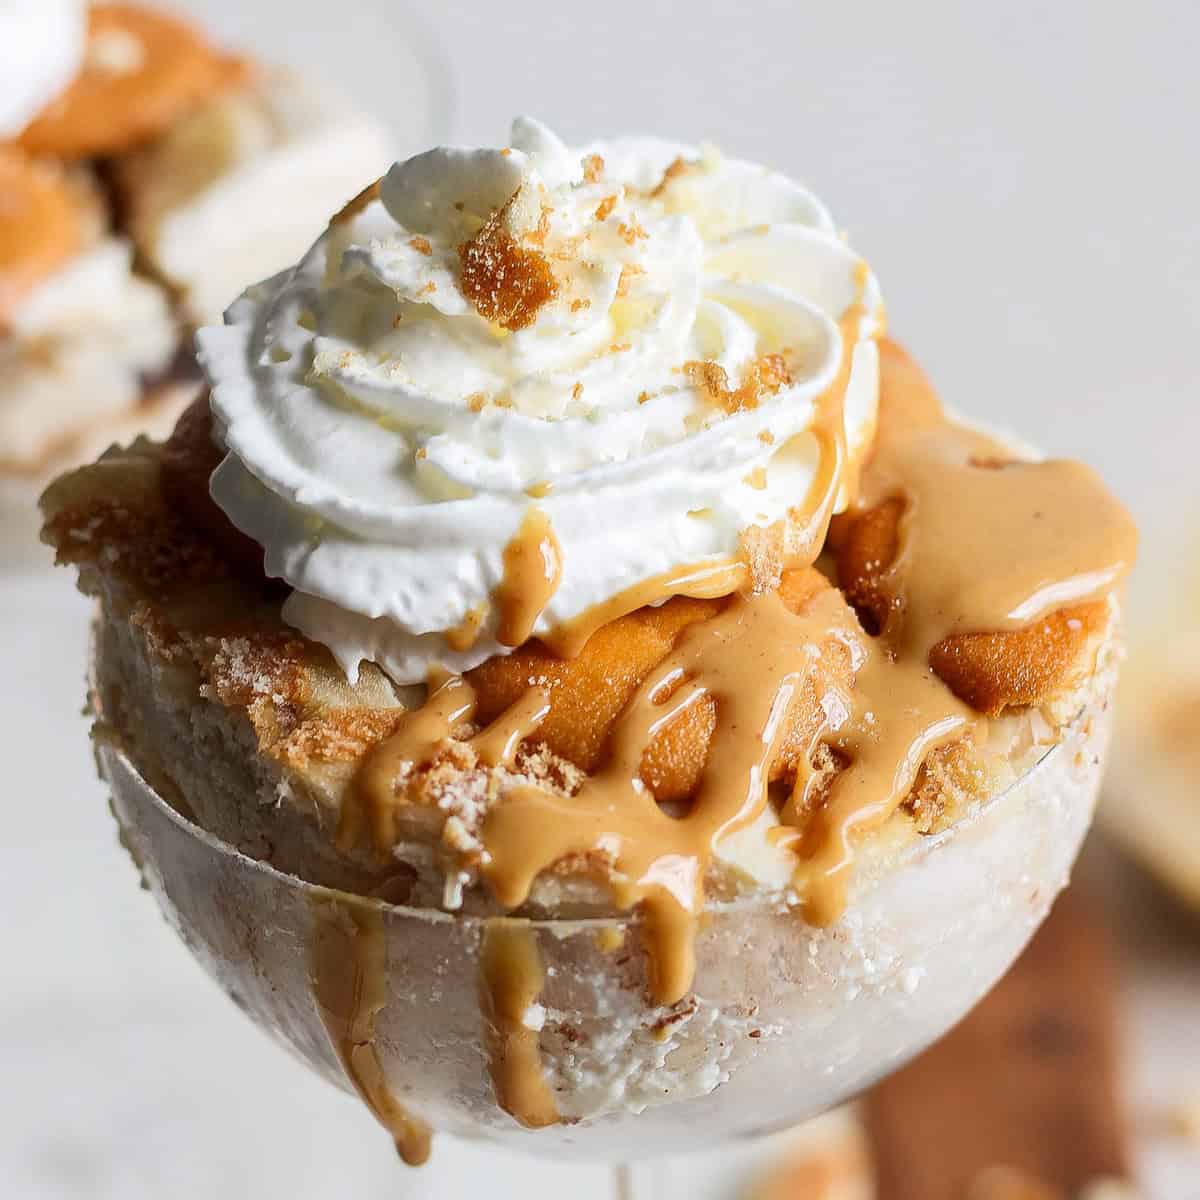
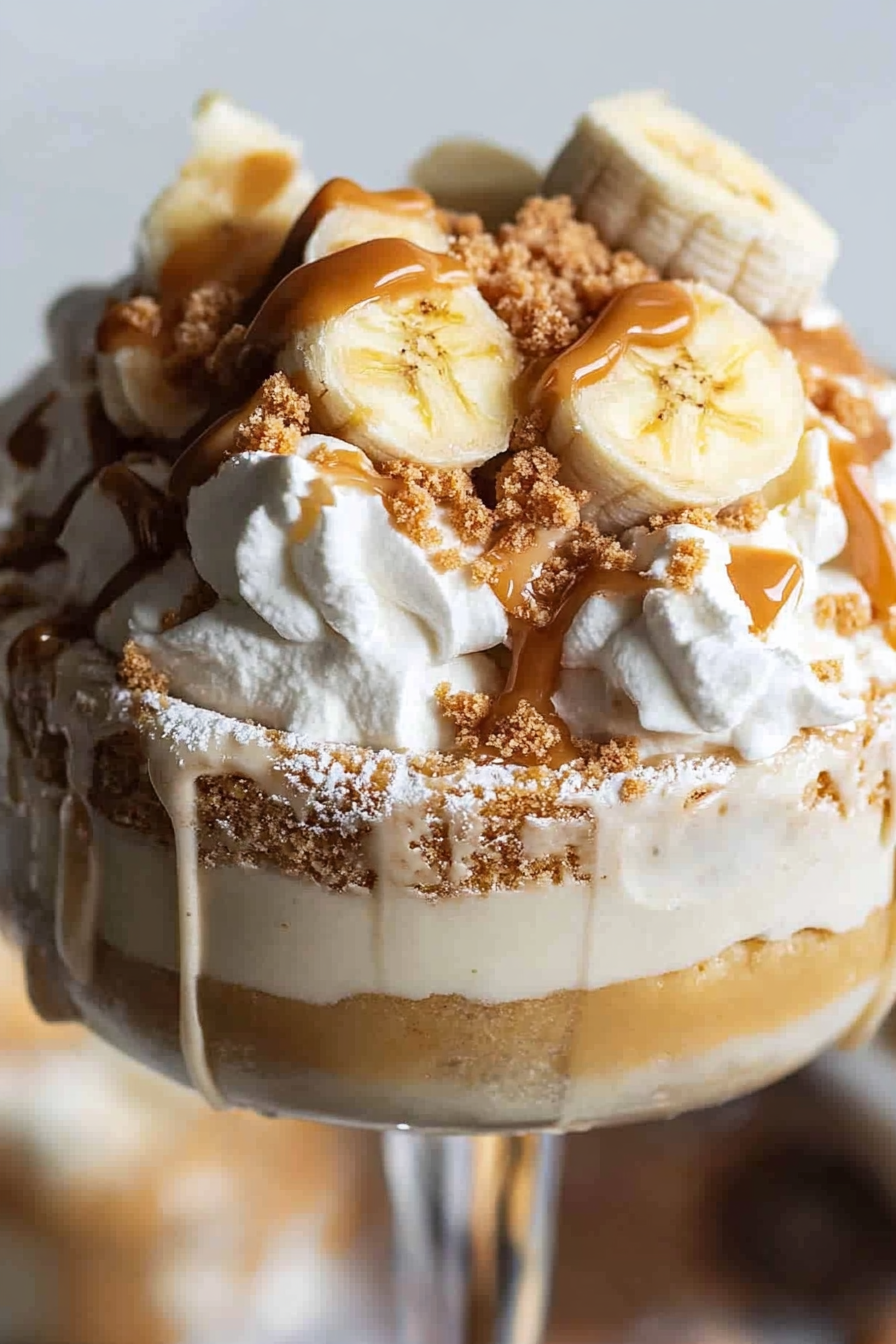
peanut butter banana cake
Ingredients
Method
- Place the cottage cheese into a blender and blend until smooth. Then add the peanut butter and maple syrup and blend until combined. Set aside.
- Lay parchment paper into an 8x8-inch baking dish.
- Sprinkle 2 tablespoons of chocolate chips on the bottom of the baking dish.
- Pour half of the cottage cheese mixture on top of the chocolate chips.
- Lay half of the banana slices flat across the top of the cottage cheese mixture.
- Next, layer 24 of the vanilla wafers making sure to keep them flat and not overlapping.
- Repeat the above for the second layer.
- Gently press the final layer of vanilla wafers into the dish and cover with plastic wrap or tin foil.
- Freeze for at least 8 hours or overnight.
- To serve, flip the baking dish onto a cutting board. Allow the icebox cake to sit for 30 minutes before cutting.


So simple yet so delicious—this recipe sounds perfect for my next family treat!
This looks so simple and delicious! I’ll definitely try it with my kids—healthy and fun. Thanks for sharing!
I love how simple recipes can become family favorites—this sounds so cozy and delicious!
I love how simple recipes like this can become family favorites—this looks so easy and delicious!
I love this idea! Simple recipes like this are perfect for family memories—plus it looks super delicious and fun to make.