
Easy Frozen Banana Pops for Summer
When I think back to my childhood summers, I remember the smell of fresh zucchini from our garden and Grandma’s squeals of delight whenever she whipped up her famous zucchini cake. I always do this when I want a little piece of home — a treat that’s moist, flavorful, and surprisingly easy to whip up on a busy weeknight. This zucchini swirl cake isn’t just about the taste; it’s about those cozy memories, that comforting aroma filling the kitchen, and the way everyone asks for seconds—no matter the time of day. Honestly, I’ve made this countless times, tweaking the recipe slightly each round, and I swear, it never disappoints. It’s like a warm hug in cake form. Plus, it’s a sneaky way to sneak in some veggies—my kids actually ask for this all the time! Trust me, this one’s a lifesaver on busy nights or when I’m craving something sweet but don’t want to bake a whole fancy dessert. You’re going to love how simple it is and how everyone raves about it—promise.
What is Zucchini Swirl Cake?
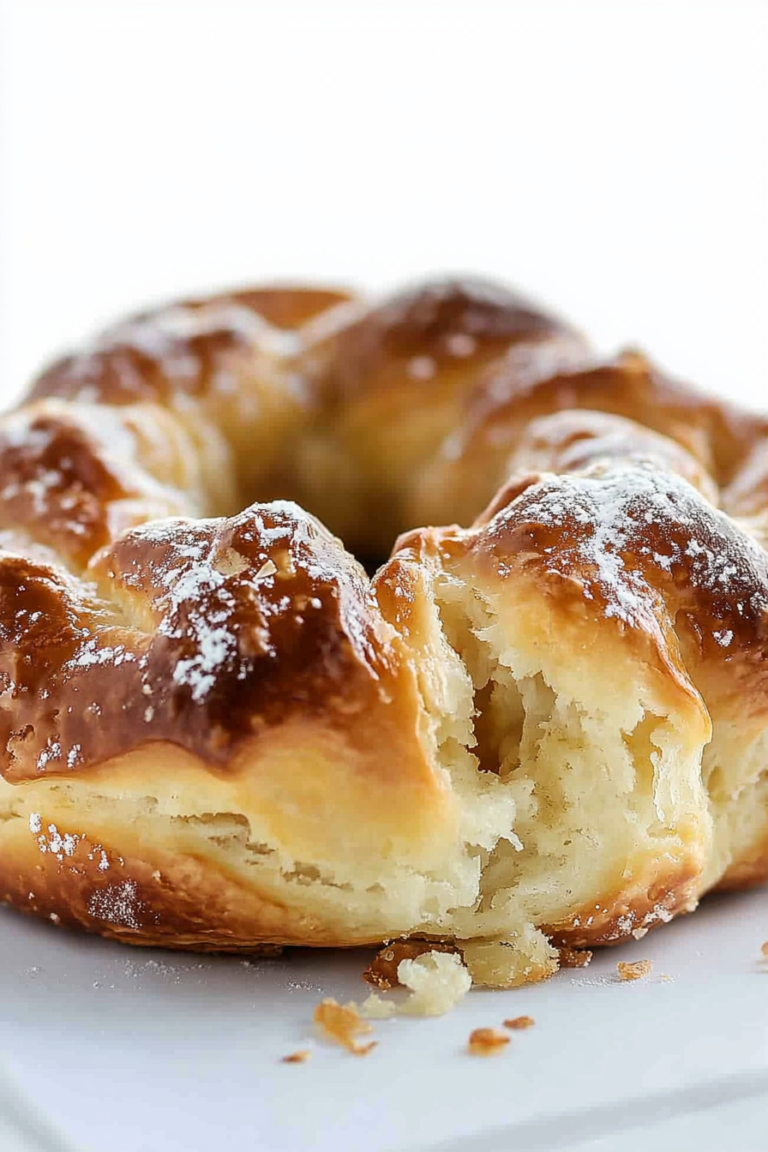
This Zucchini Swirl Cake is essentially a tender, moist loaf infused with grated zucchini and topped with a beautiful swirl of cinnamon-spiced batter and cream cheese filling. Think of it as a cross between your favorite zucchini bread and a quick breakfast coffee cake—only more decadent and prettier! The name “swirl” comes from how you layer and twist the batter, creating pretty marbled streaks that make each slice special. It’s an easy, one-bowl kinda recipe with a few simple ingredients, but the results look like you fussed over them all morning. The best part? That sprinkle of cinnamon and a hint of vanilla make the whole house smell like fall, even in the middle of summer. I love that it’s versatile enough to serve as breakfast, a cozy snack, or even dessert — all depending on how sweet you go. Think of it as a little gift for your taste buds, made with love and just a dash of pantry magic.
Why you’ll love this recipe?
First off, the flavor. Wow, the flavor! That warm cinnamon swirl combined with the gentle sweetness of zucchini makes every bite a delight. It’s like a cozy hug from your favorite grandma, but in cake form. What I love most about this is how ridiculously simple it is to make—literally one bowl, no fancy gadgets needed—and it’s perfect for when I want something homemade but don’t have hours to spare. Trust me, I’ve tested this with almond milk instead of regular and it actually made it even creamier — so feel free to experiment! It’s also budget-friendly; most of the ingredients are staples, and the zucchini is from my garden or the farmers’ market, so it’s super fresh and inexpensive. Plus, this cake is versatile. You can make it gluten-free by swapping in almond flour, add chopped nuts for crunch, or even swap the cream cheese filling for fruit compote. What I love most is how it disappears in minutes at my house—kids ask for this all the time, and my friends always leave with a tupperware full. Honestly, I think it’s become a family classic for good reason.
How do I make Zucchini Swirl Cake?
Quick Overview
This cake is as straightforward as it gets. You’ll grate the zucchini, mix up a simple batter, and pour half into your pan. Then, you spread a luscious cream cheese mixture on top, layer the rest of the batter, and swirl it all together with a knife. The magic happens in the oven, where it bakes into this gorgeous, fragrant loaf. It’s forgiving—if you overmix slightly, still good—and the swirl pattern just looks so fancy, even if you’re just winging it. The real trick is not overbaking—trust me, it’s moist when slightly underdone—and letting it cool completely before slicing so the layers hold. It’s one of those recipes I’ve made so often I could do it with my eyes closed, but I love that it still surprises everyone with its pretty marbling and tender crumb.
Ingredients
For the Main Batter:
– 2 cups all-purpose flour (I’ve also used half almond flour for a nuttier flavor)
– 1 cup sugar (can reduce to ¾ cup for less sweetness)
– 1 tsp baking powder
– ½ tsp baking soda
– 1 tsp cinnamon
– ½ tsp salt
– ½ cup vegetable oil (or melted coconut oil for a richer taste)
– 2 large eggs
– 1 tsp vanilla extract
– 1 ½ cups grated zucchini (don’t skip the moisture squeeze — it’s key! Use a paper towel to pat out excess water)
For the Filling:
– 8 oz cream cheese, softened
– ¼ cup powdered sugar (or honey if you prefer a natural sweetener)
– 1 tsp vanilla
– 1 tsp cinnamon (optional but totally recommended for that warm flavor)
For the Glaze (optional but nice!):
– ½ cup powdered sugar
– 1-2 tbsp milk or lemon juice
– A sprinkle of cinnamon or lemon zest for added flavor
Step-by-Step Instructions
Step 1: Preheat & Prep Pan
Set your oven to 350°F (175°C). Grease a standard loaf pan or line it with parchment paper—you want an easy release! I always do this first to save myself from scrambling near the end. Make sure your ingredients are ready to go; I like everything measured out so I’m not rushing.
Step 2: Mix Dry Ingredients
In a big bowl, whisk together the flour, sugar, baking powder, baking soda, cinnamon, and salt. It’s the dry foundation, so give it a good mix to ensure everything’s evenly distributed. This step keeps your batter uniform, so you won’t get weird pockets of flour or baking soda.
Step 3: Mix Wet Ingredients
In a separate bowl, whisk the eggs, oil, vanilla, and grated zucchini. I find that using room temperature eggs helps everything blend smoothly. If I’m in a rush, I pop the eggs in warm water for 5 minutes — works like a charm! Mix until it’s well combined, and the zucchini’s coated in the batter just slightly.
Step 4: Combine
Pour the wet mixture into the dry ingredients and fold gently with a spatula. Resist the temptation to overmix; just until no streaks of flour remain. A few lumps are okay — they’ll bake out. Overmixing makes the cake dense, and nobody wants that.
Step 5: Prepare Filling
In a small bowl, beat the softened cream cheese with powdered sugar, vanilla, and cinnamon until smooth. I like to taste it at this point and adjust the sweetness — sometimes I add more powdered sugar, sometimes a splash of lemon juice for brightness.
Step 6: Layer & Swirl
Pour about half the batter into your pan. Spread the cream cheese mixture evenly over it, and then pour the rest of the batter on top. Using a knife or skewer, swirl through the layers to create beautiful marbled patterns. Be gentle—more swirls mean prettier cake!
Step 7: Bake
Pop it in the oven for about 50-60 minutes. Check doneness by inserting a toothpick—if it comes out clean or with just a few moist crumbs, you’re good! Every oven is different, so start checking around 50 minutes. Cover loosely with foil if it browns too quickly on top.
Step 8: Cool & Glaze
Let the cake cool in the pan for at least 15 minutes, then transfer to a wire rack. I like to wait until it’s room temperature before glazing—this prevents melting. Mix the powdered sugar with milk or lemon juice until smooth, then drizzle over the top. If I want it extra special, I sprinkle a pinch of cinnamon or lemon zest.
Step 9: Slice & Serve
Use a sharp serrated knife to cut neat slices. For the prettiest presentation, wipe your knife after each cut. Serve it at room temperature, or slightly warm. My family loves this with a dollop of whipped cream or a cup of cold milk. It’s a comfort, a celebration, and honestly, kind of addictive.
What to Serve It With
This cake is so adaptable that I often change it up depending on the occasion. For breakfast, I serve it with a strong cup of coffee or a drizzle of honey on top — the sweetness balances perfectly with the bitterness of espresso. It makes a lovely brunch presentation too, paired with fresh fruit and a glass of fresh juice or mimosa. When I want to elevate it as a dessert, I add a scoop of vanilla ice cream or a dollop of Greek yogurt on the side — such a decadent combo! And for those cozy afternoons, I like to enjoy a slice with hot tea and a good book. My kids ask for this all the time after school, and I always keep a batch in the freezer for quick snacks. It’s become our little family tradition — a simple pleasure that everyone looks forward to.
Top Tips for Perfecting Your Zucchini Swirl Cake
Over the years, I’ve picked up a few tricks to make this recipe foolproof. First, squeeze out as much moisture as you can from the zucchini—trust me, the wetter the zucchini, the denser your cake might be. I’ve tested using a cheesecloth or paper towels to blot out excess water, and it makes a huge difference. Second, don’t overmix the batter once you combine wet and dry ingredients; I teach my kids this, and now they can do it with their eyes closed! Overmixing introduces gluten, which makes the cake tough, not tender. Third, when swirling the batter and filling, try to create a marbling pattern that’s consistent but natural—more swirling means more beautiful, like a painter’s masterpiece. Experiment with adding nuts, chocolate chips, or dried cranberries if you’re feeling adventurous. I’ve also found that using sour cream or Greek yogurt instead of all milk makes the cake extra moist and rich. And a last-minute tip: if you keep the cake just a little underbaked, it stays moist longer and gets even better the next day. Trust me, these little tweaks make a noticeable difference!
Storing and Reheating Tips
Keep any leftovers covered tightly with plastic wrap or stored in an airtight container. At room temperature, it’s best to enjoy within 2 days—after that, it can dry out. If you want to keep it longer, pop slices into the refrigerator for up to 5 days. For longer storage, wrap individual slices in plastic and freeze for up to 3 months. When ready to serve, I let the slices thaw at room temperature for about 15 minutes — they regain their moistness and aroma. Reheating in the microwave for about 20 seconds works well if you want a warm slice, but honestly, it’s just as good at room temp. If you glazed it, I recommend adding the glaze just before serving to keep that shiny, inviting look. That way, the glaze stays fresh and adds that last special touch.
Frequently Asked Questions
Final Thoughts
Honestly, this Zucchini Swirl Cake has become a staple in my home, not just because it’s tasty, but because it’s forgiving, adaptable, and just plain cozy. I love that you can dress it up with a fancy glaze or keep it simple with just a dusting of powdered sugar. It’s a way to enjoy those late summer zucchinis and still feel like you’ve made something special with your own hands. Whether it’s a quick breakfast, a snack for the kids, or dessert after dinner, it fits all the moments that matter most. I hope you try it and find all the joy I do in each slice. And hey, don’t forget to share your version—I’m always excited to hear about your tweaks and discoveries. Happy baking, my friend!
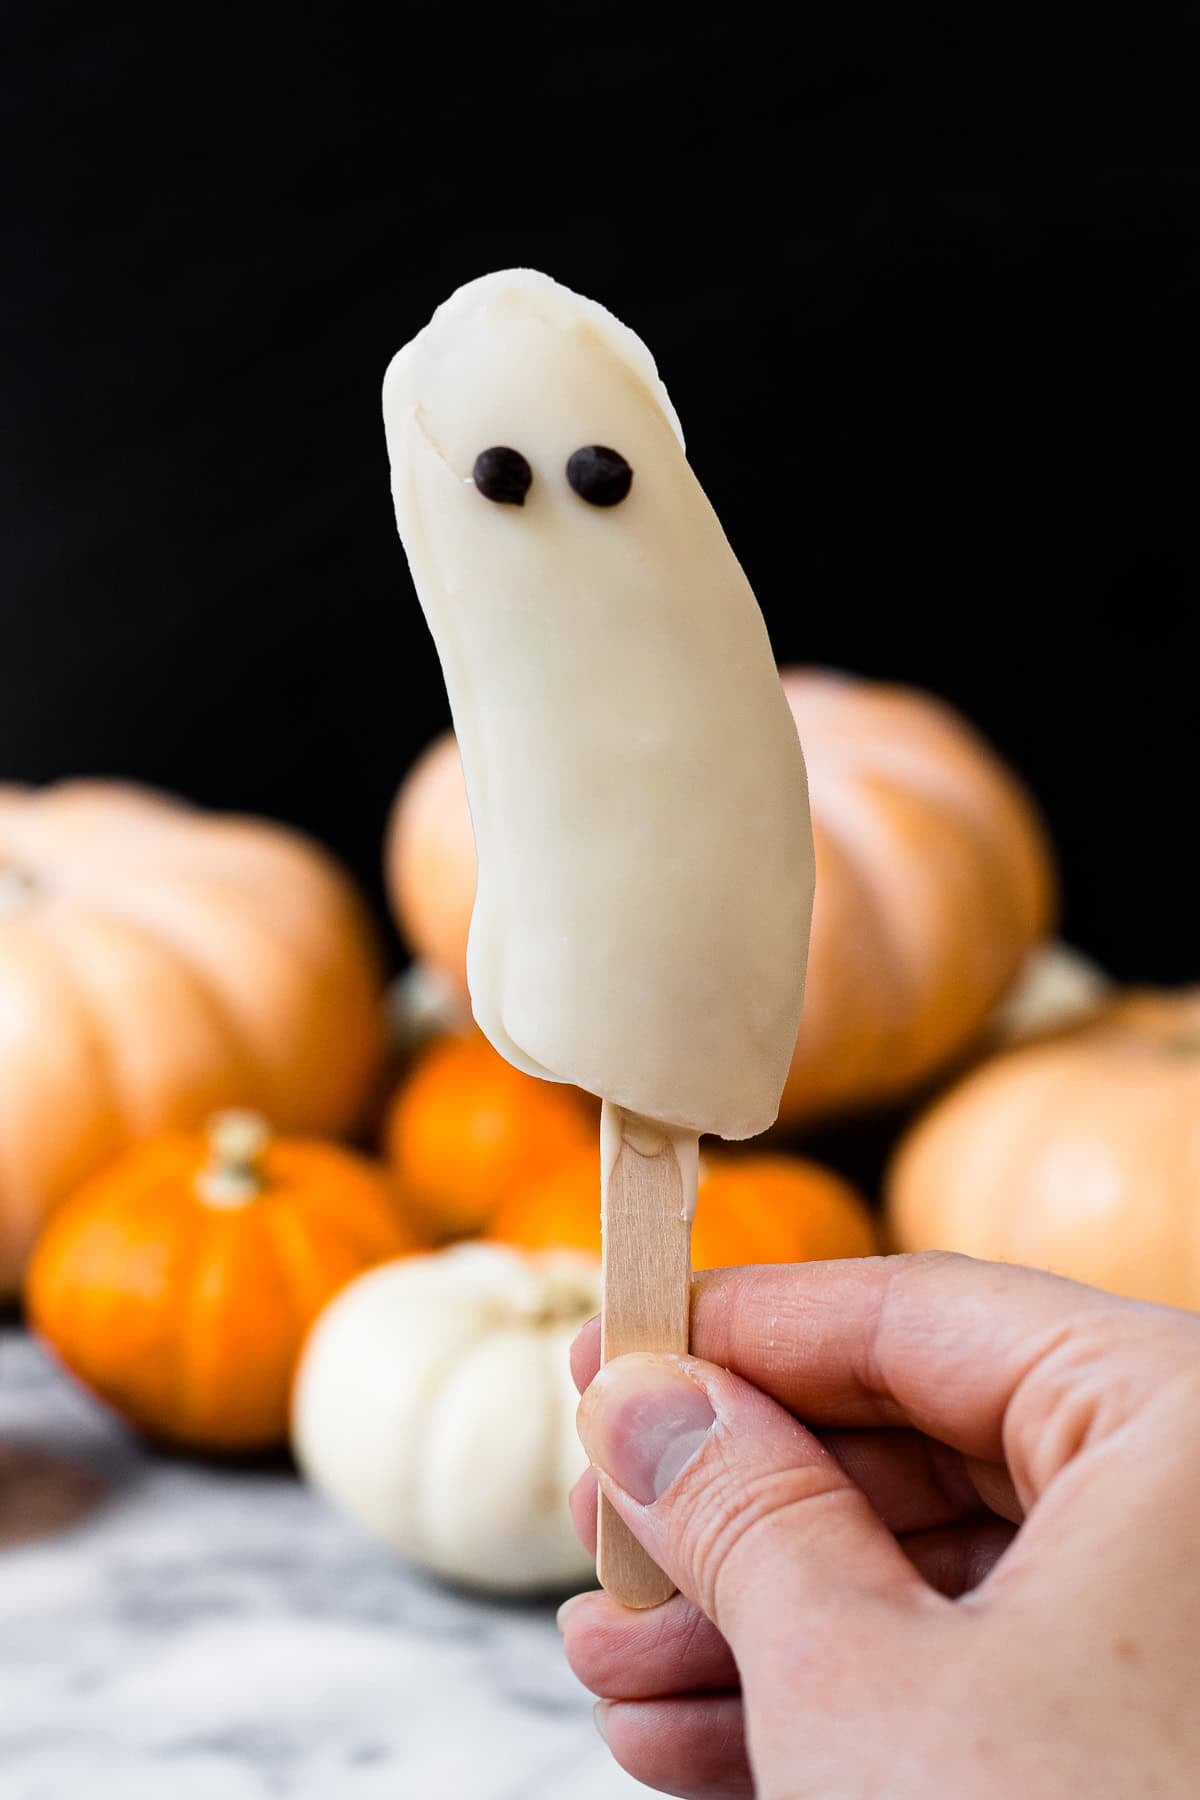
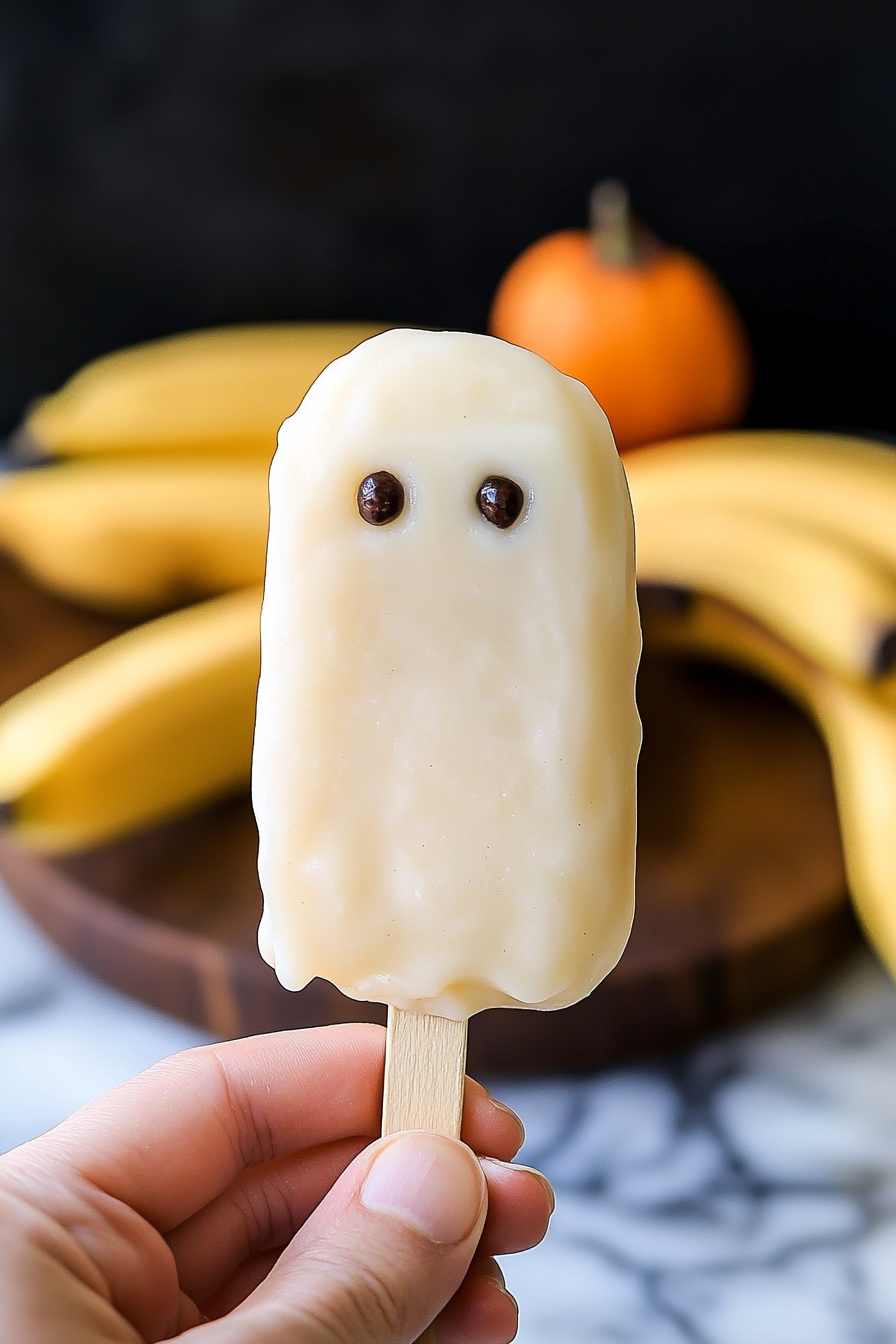
banana pops
Ingredients
Method
- Peel the bananas and cut each into two halves.
- Insert a popsicle stick into each banana half and place them on a baking sheet lined with parchment paper. Freeze for at least 2 hours.
- Melt the white chocolate chips in a microwave-safe bowl in 30-second intervals, stirring well after each, until smooth.
- Dip each frozen banana into the melted chocolate, letting the excess drip off, then place back on the parchment-lined sheet.
- Return the dipped bananas to the freezer and freeze until the chocolate is set, about 30 minutes.


So many good memories tied to food! These banana pops sound perfect for hot summer days—simple and fun to make.
This brings back so many warm memories! I love how simple treats like these can spark nostalgia.
I love the nostalgic vibe—frozen banana pops sound perfect for hot summer days! Any tips for preventing them from getting too soft?