
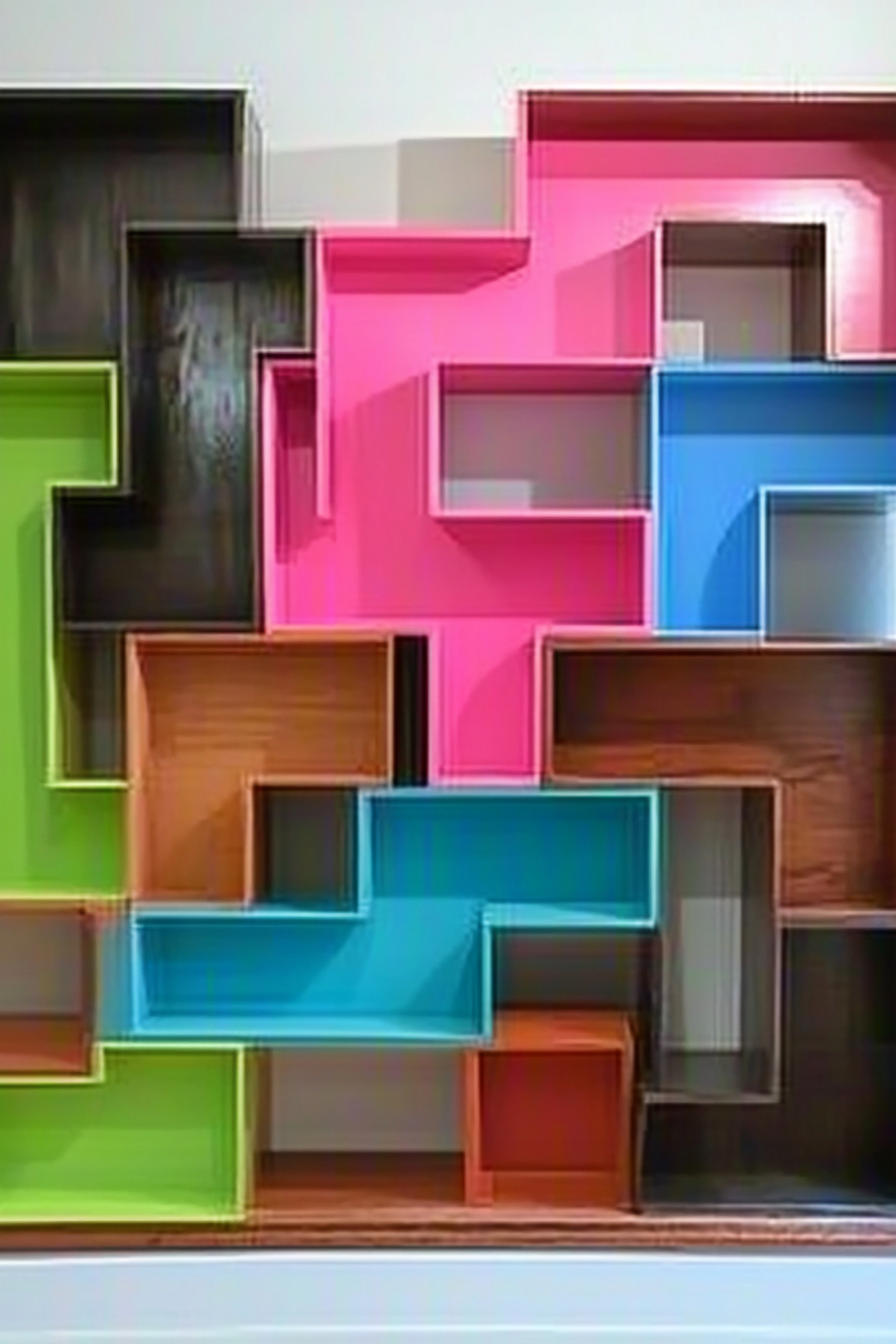
Easy Geometric Shelves with Colorful Dye
I remember the first time I ever tasted a zucchini swirl cake. It was at my grandma’s house — simple, humble, yet somehow magical. She always said, “Veggies are just desserts in disguise,” and I swore she was onto something. Fast forward a few years, and I’ve made this zucchini swirl cake more times than I can count. Honestly, it’s perfect for those days when you want something sweet but don’t want to break the bank or spend hours in the kitchen. Plus, it’s a sneaky way to get veggies into the kids’ diets without a fuss. My kids ask for this all the time — they love the swirl, the smell, the velvety glaze. Trust me, this one’s a lifesaver on busy nights when dessert is the last thing you want to stress about. The smell alone will have everyone following your kitchen like a bunch of eager puppies. You’re gonna love how easy it is to make, and it’s so moist and tender — a true comfort food baked right into every slice.
What is Zucchini Swirl Cake?
Think of zucchini swirl cake as a cozy, slightly rustic delight that combines the gentle sweetness of a quick bread with the visual charm of a marbled dessert. It’s essentially a simple cake batter layered with a cinnamon-sweetened zucchini mixture, then swirled to create those beautiful marbled patterns. The name might sound fancy, but honestly, it’s just a way to sneak in some healthy greens while baking up something irresistibly tender and moist. The “swirl” part refers to that gorgeous marbled look you’ll see when you slice into it. It’s a bit like a loaf cake, but with a surprise surprise in every piece. This dessert is an old family favorite of mine, passed down from my mother, who always used to say, “A little zucchini goes a long way—especially in baking!” It’s perfect when you have a bunch of zucchinis from the garden or the farmers’ market, and you’re not quite sure what to do with them all.
Why you’ll love this recipe?
What I love most about this zucchini swirl cake is how it manages to be both comforting and a little surprising. The flavor is softly sweet with hints of cinnamon and vanilla, but that swirl of zucchini adds a subtle vegetable earthiness that keeps it interesting. Every bite feels like a warm hug, especially when served fresh out of the oven. It’s so simple — I always do this when I need a quick special treat without fussing over complicated ingredients or lengthy prep. You probably already have everything you need in your pantry and fridge! Plus, it’s budget-friendly, especially if you grow your own zucchinis like I do, or pick some up from the local farmers’ market. This cake is amazingly versatile, too. My family loves it as an after-dinner dessert, but I also pack slices for school lunchboxes or serve it alongside coffee on lazy weekend mornings. The texture is divine — tender, moist, with a slight crumb that melts in your mouth. And the best part? The swirls make it look like bakery-level, but honestly, it’s a straightforward bake that’s foolproof once you get the rhythm down. I’ve tested this with almond milk to make it even creamier, and let me tell you — that little tweak totally elevates it!
How do I make Zucchini Swirl Cake?
Quick Overview
This cake comes together in just a few straightforward steps: mix your dry ingredients, cream your wet ones, fold everything gently, then layer the zucchini mixture and swirl it beautifully into your batter. It’s a no-fuss process — the hardest part is waiting for it to bake! The magic lies in that marbled swirl, which you create by layering and swirling the zucchini mixture in the batter before baking. It’s almost hypnotic. Once out of the oven, a quick glaze and a cooling period turn this humble loaf into a showstopper. I promise, once you try this, it’ll become a go-to when you want a treat that feels special but isn’t complicated. Best part? The whole house smells like cinnamon and baked goodness — it’s a sensory hug.
Ingredients
For the Main Batter:
- 1 ½ cups all-purpose flour (or a gluten-free blend if you prefer)
- 1 teaspoon baking powder
- ½ teaspoon baking soda
- ¼ teaspoon salt
- 1 teaspoon ground cinnamon
- ⅓ cup granulated sugar
- ⅓ cup brown sugar (for richer flavor)
- ¼ cup vegetable oil or melted butter
- 2 large eggs
- 1 teaspoon vanilla extract
- 1 cup grated zucchini (squeeze out excess moisture)
- ½ cup milk (dairy or plant-based)
For the Filling:
- 1 cup grated zucchini (squeezed dry)
- 2 tablespoons brown sugar
- 1 teaspoon cinnamon
- Optional: 1 tablespoon chopped nuts or raisins
For the Glaze:
- ¾ cup powdered sugar
- 1-2 teaspoons milk or lemon juice
- Optional: a dash of vanilla or almond extract
Step-by-Step Instructions
Step 1: Preheat & Prep Pan
Set your oven to 350°F (175°C). Grease a loaf pan or line it with parchment paper — I like to give it a quick spray with non-stick spray and dust it lightly with flour, just to be safe. Once preheated, prepare the zucchini filling so it can sit ready. Trust me, this makes the swirling process smoother.
Step 2: Mix Dry Ingredients
In a large bowl, whisk together the flour, baking powder, baking soda, salt, and cinnamon. I’ve learned that doing this first ensures even distribution of leavening, which means a lift in every slice. Sifting isn’t necessary, but it helps get rid of lumps, especially if your cinnamon clumps up.
Step 3: Mix Wet Ingredients
In a separate bowl, beat the eggs, then add the sugars, oil, vanilla, and milk. Mix until smooth — it’ll look a little thick, but don’t worry. I like to use a whisk here to avoid overmixing later; overmixing can make the cake dense, and nobody wants that.
Step 4: Combine
Pour the wet mixture into the dry ingredients and fold gently — no vigorous stirring! The key to that tender crumb is minimal mixing at this stage. A few streaks of flour are okay; overmixing ruins the texture.
Step 5: Prepare Filling
Mix your grated zucchini with brown sugar and cinnamon. I add a handful of chopped nuts or raisins sometimes — turns it into a little surprise. This filling should be moist but not watery; squeeze out excess moisture from the zucchini with a clean kitchen towel or paper towel before mixing.
Step 6: Layer & Swirl
Pour about half the batter into your loaf pan. Spread evenly, then dollop spoonfuls of the zucchini mixture on top. Cover with the remaining batter — then, grab a knife or skewer and gently swirl from the top down, creating beautiful marbled patterns. That swirl is what makes it look fancy without extra effort. Just don’t overdo it — a few gentle zigzags are plenty.
Step 7: Bake
Pop it into the oven and bake for about 45-50 minutes. Check doneness by inserting a toothpick in the center; it should come out clean. Every oven is different, so start checking at 45 minutes. If the top browns too quickly, tent with foil — I learned this trick after a few burnt tops!
Step 8: Cool & Glaze
Let the cake cool in the pan for about 15 minutes, then transfer it to a wire rack. While it cools, whisk together powdered sugar and milk or lemon juice for your glaze. Pour or drizzle over the top when it’s just warm — the glaze will seep into the cracks and make it look irresistibly homemade.
Step 9: Slice & Serve
Use a serrated knife for clean cuts. Wait until it’s completely cooled to prevent squishing the layers. Slice thick or thin — your call — and serve with a hot cup of coffee or tea. Honestly, I think a dollop of whipped cream or a sprinkle of extra cinnamon makes this even better.
What to Serve It With
When I serve this zucchini swirl cake, I love pairing it with a good mug of black coffee or a latte — the bitterness balances the sweetness beautifully. For brunch, I toss in a few fresh berries or a side of vanilla yogurt. This cake is delightful warm or at room temperature, so I often make it ahead for breakfast or a quick afternoon treat. My family’s favorite is when I serve it with a drizzle of cream cheese frosting — it turns into a decadent, crowd-pleasing dessert. Nutty or fruity accompaniments make for a lovely variation too — I’ve tried chopped walnuts or a handful of blueberries swirled right into the batter. This cake’s versatility means I can tweak it based on what I have in the fridge or what mood I’m in — it’s like baking magic without much effort.
Top Tips for Perfecting Your Zucchini Swirl Cake
Here are a few tips I’ve picked up over the years to make sure every bake comes out just right:
- Zucchini Prep: Always squeeze out excess moisture from your zucchini before mixing. Wet zucchini can make the batter too thin and cause your cake to be dense or soggy. I use a cheesecloth or a clean kitchen towel — it’s quick and keeps the zucchini’s texture nice.
- Mixing Advice: Resist the urge to overmix once you combine wet and dry ingredients. Overmixing develops gluten and results in a chewy crumb instead of tender. Gently fold until just combined and see those valleys and peaks—not smooth batter.
- Swirl Customization: Play with your pattern! Use a skewer or toothpick to create a marbled effect, but don’t overdo it — too much swirling can blend the layers into a muddy mess. Keep it gentle and visual.
- Ingredient Swaps: Want more health benefits? Swap half the flour with whole wheat. Feeling adventurous? Add a teaspoon of ground ginger or nutmeg in the batter for a nice twist. Or, replace sugar with honey or maple syrup—just reduce the liquid slightly to keep the batter from becoming runny.
- Baking Tips: Keep an eye on the oven and check for doneness early, especially if your oven runs hot. Every 5 minutes, start testing at the 45-minute mark. If the top browns too quickly, lightly tent with foil to prevent burning yet keep baking evenly.
- Glaze Variations: For a tangy kick, add a splash of lemon juice or vanilla. For richer flavor, mix in a spoonful of cream cheese to the powdered sugar before glazing. For fun, sprinkle some edible glitter or toasted coconut on top after glazing — perfect for special occasions!
This cake has become my go-to for cozy weekends and last-minute gatherings. Every time I tweak the filling or finish it with a different glaze, it feels like I’ve discovered a new version of an old favorite. Trust me, once you get the rhythm down, it’s practically foolproof and always a crowd-pleaser. Just be ready for the “Can I have a second slice?” requests — four out of five times, my family and friends ask for seconds!
Storing and Reheating Tips
This cake keeps beautifully — I always wrap it tightly in plastic wrap or store it in an airtight container. Room temperature works well for about a day, especially if you plan to eat it the same day. Just keep it away from direct sunlight and humid spots. If you want to make it last longer, pop it in the fridge for up to 3 days. The fridge can make it a tad denser, so I like to warm slices gently in the microwave for about 15 seconds before serving — it’s just like fresh out of the oven. Want to stretch its life even more? Freeze slices individually wrapped for up to 2 months. Thaw at room temp or in the fridge, then reheat if desired. Just remember, if you glazed it, add the glaze fresh when serving instead of freezing, as the moisture can mess with the shine and texture.
Frequently Asked Questions
Final Thoughts
If you’ve ever wondered how to turn a humble vegetable into a dessert that makes everyone smile, this zucchini swirl cake is it. It’s like capturing a little bit of childhood magic and baking it right into your oven. The flavors, textures, and the visual appeal make it a perfect way to celebrate simple ingredients — all while making your kitchen smell like cinnamon dreams. I always say, if you want to add a personal touch, toss in some chopped nuts or even a handful of dark chocolate chips—anything that makes it yours. My advice? Don’t be afraid to experiment and let your instincts guide you. Once you’ve made this a few times, it’ll feel like second nature. I’d love to hear how yours turns out — leave a comment or share your tweaks! Happy baking, and enjoy every cozy, delicious bite.

pentomino shelves
Ingredients
Method
- Cut the pine wood boards into shapes of pentomino pieces and sand edges smoothly.
- Paint each shape in different colors or designs and let dry completely.
- Mount the metal brackets on the wall at desired heights, then place the painted shapes on brackets to create modular shelves.


Love this memory! Simple treats with grandma always feel the most special.
Love this — reminds me of my grandma’s kitchen too! That zucchini swirl cake was pure magic.
Love this—simple memories like that always make cooking feel more meaningful. The zucchini swirl cake must have been amazing!
Love this idea! I’ve been wanting to try colorful dye for crafts — any tips on making the colors last longer?
Love this! I’ve always wanted to try making geometric shelves—such a fun DIY project.