
Easy Homemade Kit Kat Bites Recipe
There’s something about the smell of zucchini baking that immediately takes me back to my grandma’s kitchen — warm, inviting, with just a hint of sweetness floating in the air. I used to sit on the counter with a glass of milk, watching her grate zucchini faster than I could blink, all while she hummed her favorite tune. Even when it’s not necessarily zucchini season, I still find myself craving this cozy coffee cake at least once a month. It’s like a hug in cake form, and honestly, it’s way easier to make than most people think. If you’re anything like me — someone who needs a quick, delicious pick-me-up in the middle of a hectic day — this recipe is your new best friend. Trust me on this one: it disappeared in minutes at my house, and every time I make it, I get that nostalgic, “family special” feeling. It’s incredible how a simple combination of ingredients can bring so much warmth, isn’t it?
What is Zucchini Coffee Cake?
Think of zucchini coffee cake as a mash-up of your favorite breakfast muffin and a decadent dessert — minus the fuss. It’s essentially a moist, tender cake spiked with grated zucchini, which keeps it unbelievably soft and just a tad sneaky (I mean that in the best way!) because you get your veggie fix without even noticing. The name “coffee cake” probably comes from how perfect it is with a hot cup of coffee or tea, quick to whip up on a lazy weekend or a busy weekday morning. What I love most about this zucchini coffee cake is how the shredded zucchini acts like a secret ingredient — it adds moisture and texture, making each bite so satisfying. Plus, the cinnamon and crumb topping give it that classic cozy vibe, like you’re snuggling in your favorite sweater. It’s a simple, hearty treat that’s loved by kids and adults alike — and once you make it, you’ll see why this one’s a staple in my kitchen.
Why you’ll love this recipe?
There are a million reasons why I keep coming back to this zucchini coffee cake — it’s honestly become part of my comfort food arsenal. First, the flavor. The cinnamon swirl combined with that sweet crumb topping? Absolutely addictive. It’s got just enough warmth and spice to make each slice feel special, especially early in the morning or with an afternoon coffee. And the best part? It’s so straightforward I can toss it together even when I’m running on fumes. No fancy ingredients needed, and it’s budget-friendly — most of us have what it takes already in the pantry. This cake is also versatile — my kids love it warmed up with a smear of butter, but I honestly enjoy a slice straight from the fridge (don’t knock it till you try it!). Whether it’s for breakfast, brunch, or dessert, it fits every occasion. And if you’re like me, you appreciate a recipe that *never* fails — I’ve made this countless times, tweaking tiny things here and there, and it’s always a hit. Plus, it’s pretty forgiving if you’re new to baking; you just mix, layer, and bake — easy peasy. This one’s truly a lifesaver on busy nights or when you have last-minute guests — guaranteed smiles all around. And honestly, I think what makes it stand out is the subtle way the zucchini makes every bite moist and tender without harshly changing the flavor. It’s the kind of recipe that makes me feel like I’m cheating because it looks fancy but is actually a breeze to make.
How do I make Zucchini Coffee Cake?
Quick Overview
This zucchini coffee cake is a one-bowl wonder, honestly. It starts with a simple batter brewed from basic pantry staples like flour, sugar, and eggs, to which you add grated zucchini, cinnamon, and vanilla for flavor. While that’s baking, I whip up a quick crumb topping made from butter, brown sugar, and flour — and perhaps a sprinkle of walnuts if I’m feeling fancy. The batter is layered in a pan, sprinkled with the crumb, and baked until golden and fragrant. The best part? It’s so forgiving! You can easily modify the sugar or spice to your taste, and if you don’t have zucchini on hand, you can even swap in shredded carrots or apples for a fun twist. Honestly, I love how this recipe balances ease and flavor — it’s foolproof and perfect for making ahead.
Ingredients
For the Main Batter:
– 2 cups all-purpose flour (I like unbleached for that rustic feel)
– ¾ cup granulated sugar
– 1 teaspoon baking powder
– ½ teaspoon baking soda
– ½ teaspoon salt
– 1 teaspoon cinnamon (the smell alone gets everyone excited)
– 2 large eggs
– ½ cup vegetable oil (or melted coconut oil for a richer touch)
– 1 teaspoon vanilla extract
– 1 cup grated zucchini (squeeze out excess moisture; I always do this with a clean dish towel)
For the Filling:
– ¼ cup brown sugar
– 1 teaspoon cinnamon
– Optional: ½ cup chopped walnuts or pecans (adds a nice crunch)
For the Glaze:
– ½ cup powdered sugar
– 1-2 teaspoons milk or cream
– A dash of vanilla (or lemon zest, if you want a bright kick)
Step-by-Step Instructions
Step 1: Preheat & Prep Pan
I always set my oven to 350°F (175°C) and lightly grease my square baking dish or cake pan with butter or spray. Lining it with parchment paper makes removing the cake easier, especially if you want that perfect, clean slice. Trust me, I’ve learned the hard way — sticking cake ruins the presentation!
Step 2: Mix Dry Ingredients
In a large bowl, whisk together the flour, sugar, baking powder, baking soda, salt, and cinnamon. This step is super important because it ensures all your flavors are evenly distributed and that your baking soda activates properly. I always do this first so I have peace of mind before moving to the wet ingredients.
Step 3: Mix Wet Ingredients
In another bowl, beat your eggs, then stir in the oil and vanilla. I like to do this separately because I want the eggs fully incorporated without overmixing once combined with the flour. When I add my grated zucchini here, I make sure to squeeze out a little moisture — too much wetness can make the batter drier or mess with baking time, so don’t skip this step.
Step 4: Combine
Pour the wet into the dry, and gently fold everything together just until you see no dry streaks. No overmixing — I usually stop as soon as it’s combined because overworking the batter can lead to a dense cake, which I personally don’t love. Mix until it’s just smooth and slightly thick.
Step 5: Prepare Filling
Mix the brown sugar with cinnamon and nuts, if using. Setting this aside, I like to sprinkle this evenly over the batter once poured into the pan for a swirled, layered effect. You can also sprinkle extra zucchini or even chocolate chips — I’ve tested both, and they work wonders.
Step 6: Layer & Swirl
Pour about half of the batter into your prepared pan, sprinkle half of the cinnamon sugar mixture, then add the rest of the batter. Use a butter knife or skewer to swirl gently through the layers — you want those beautiful marbled streaks that hint at hidden goodies inside.
Step 7: Bake
Pop it in the oven and bake for 35-40 minutes, or until a toothpick inserted in the center comes out clean. My oven runs hot, so I start checking around 33 minutes. The smell of cinnamon baking is just divine, and your whole kitchen will smell like heaven.
Step 8: Cool & Glaze
Allow the cake to cool in the pan for 10 minutes, then transfer it to a wire rack. Drizzle with the glaze while the cake is still slightly warm so it melts into every crevice — yum! If you want less sweetness, skip the glaze or dust with powdered sugar instead. I think the glaze makes it irresistibly festive, especially if I’m serving it for brunch or a casual gathering.
Step 9: Slice & Serve
Use a sharp serrated knife for clean cuts. I like to let it sit for at least 15 minutes after glazing so flavors can meld. Serve it warm or at room temp, with extra coffee or a dollop of whipped cream if you’re feeling fancy. My kids ask for this all the time, and honestly, it’s best enjoyed with a big mug of your favorite roast.
What to Serve It With
There’s a whole universe of ways to enjoy this zucchini coffee cake, depending on the occasion. At breakfast, I love serving it warm with a splash of cream or a side of fresh berries. It’s also perfect for brunch — slice it up and add a dollop of mascarpone or Greek yogurt. For dessert, a scoop of vanilla ice cream or a drizzle of caramel makes it a showstopper. And… if you’re craving something sweet at 10 pm but don’t want to turn on the oven? It’s just as good cold from the fridge, sliced thin and enjoyed with a hot cup of tea. This cake has become my go-to when I need cozy comfort, and I swear, my family could eat it every day if I let ’em!
Top Tips for Perfecting Your Zucchini Coffee Cake
Having made this cake dozens of times, I’ve picked up quite a few tricks. First, when grating zucchini, always squeeze out excess moisture — I keep a clean dish towel or paper towels nearby. Too much moisture can make the batter watery, which messes with baking time and texture. As for mixing, I’ve learned that overworking the batter makes the final product dense and heavy; I fold until just combined, then stop.
I also experimented with the crumb topping, adding a little oats or a pinch of nutmeg for extra flavor. Trust me, cinnamon and brown sugar are classic, but don’t be afraid to customize — it’s how I also tested a version with toasted pecans on top, which adds crunch and richness. If you want it gluten-free, swap out the all-purpose flour for a 1:1 gluten-free blend — just note that baking times might vary slightly.
When baking, oven positioning matters — I always put my cake on the middle rack to ensure even heat. Check the doneness with a toothpick; if it comes out with batter, give it a few more minutes. Also, I love adding a splash of lemon zest to the glaze for a bright pop — it balances the sweetness beautifully. My number one tip? Be patient and let it cool completely before slicing. A warm cake can be crumbly, but a cooled slice holds together perfectly, showcasing those lovely marbled layers.
For storage, I keep leftovers in an airtight container at room temperature for a day or two, or in the fridge for up to a week. If freezing, wrap tightly in plastic wrap and foil — it defrosts beautifully at room temp. Reheat slices gently in the microwave or oven to revive that fresh-baked aroma. Honestly, with just a little planning, this cake will stay delicious for days, and it tastes even better on day two.
Storing and Reheating Tips
I’ve tested quite a few storage tricks with this coffee cake. If you’re planning to keep it for a day or two, simply cover it with plastic wrap or store in an airtight container — it stays moist and flavorful, especially if you’ve added the glaze. For longer storage, the freezer is your friend; just wrap individual slices tightly and store for up to three months. To reheat, I like to microwave for about 20 seconds until warm and gooey again, or warm it in a low oven (around 300°F) for about 10 minutes. Just be careful not to dry it out — I find that the key is to reheat gently. If you’ve glazed it, I recommend adding the glaze after reheating to keep that fresh, glossy look.
Generally, the cake tastes best within the first three days, but I’ve eaten leftovers even a week later and they’re still fantastic. I just make sure to store it properly to keep that tender crumb intact. Honestly, whether you’re making it ahead of time for a brunch or baking it fresh for a family dinner, you really can’t go wrong. This cake is a keeper — simple, forgiving, and utterly cozy.
Frequently Asked Questions
Final Thoughts
Honestly, this zucchini coffee cake has become one of my favorite Sunday morning rituals. It’s simple, forgiving, and packed with cozy flavors that make everyone feel right at home. I love how the grated zucchini adds a subtle moisture boost — no one needs to know it’s secretly sneaking in a vegetable! Over the years, I’ve tweaked and tested this recipe so many times that I feel confident it’ll become your new go-to too. Whether you’re baking for a family brunch or grabbing a quick slice on your way out the door, you can’t go wrong with this warm, cinnamon-scented treat. It’s one of those recipes that makes me pause and really savor the moment — the smell, the taste, the comfort of sharing something homemade. I hope you love it as much as I do! And hey, if you give it a try, I’d love to hear how yours turns out — leave a comment, share your twists, or just tell me about that first bite. Happy baking, my friend!
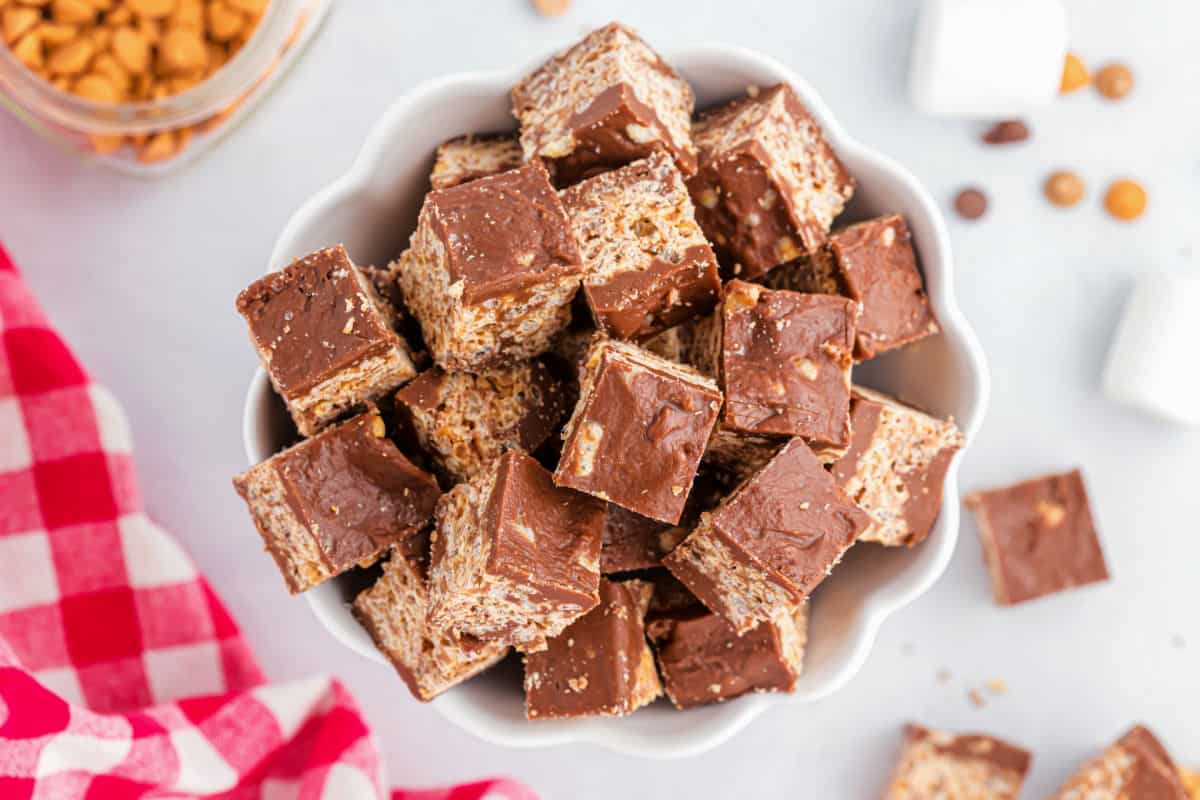
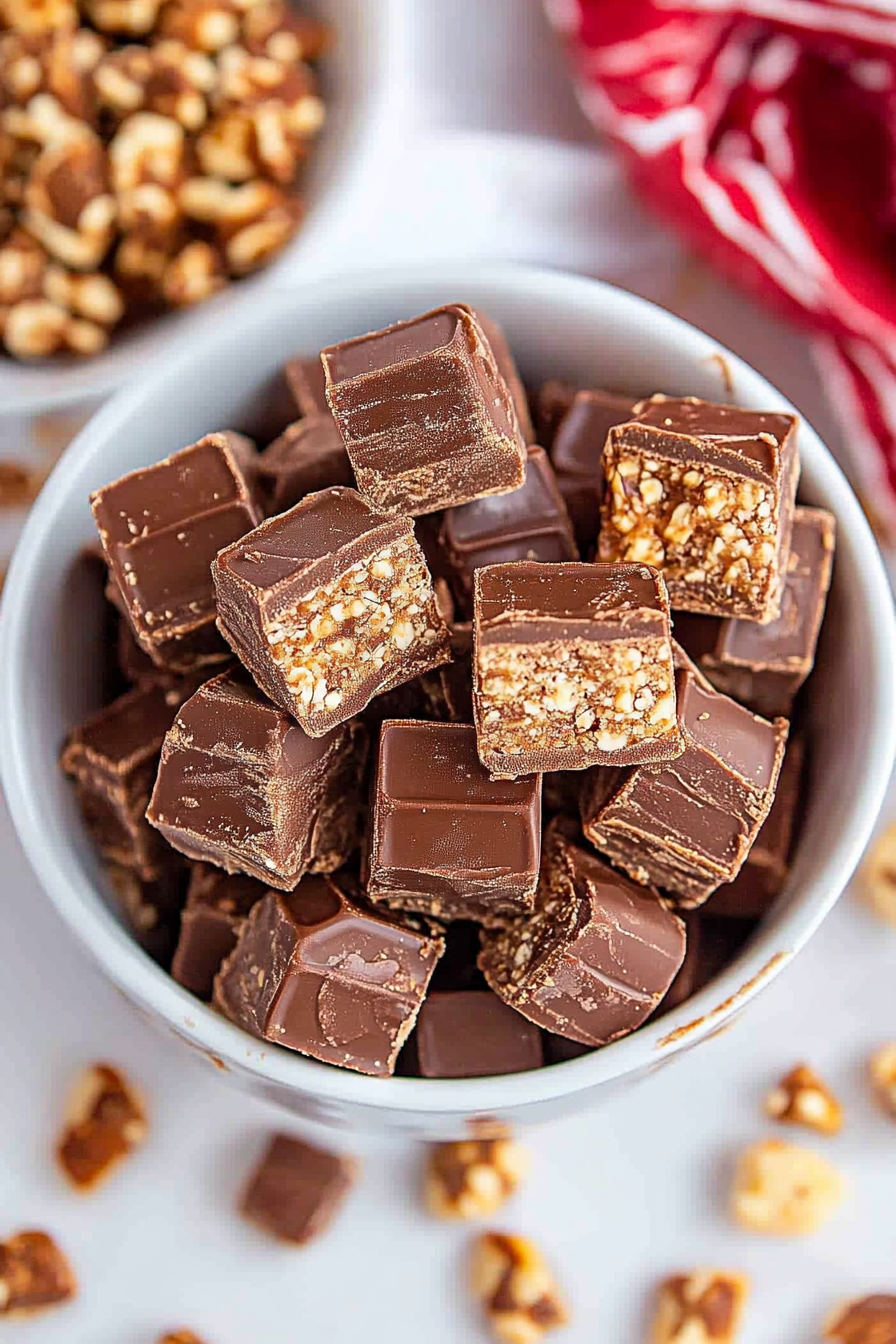
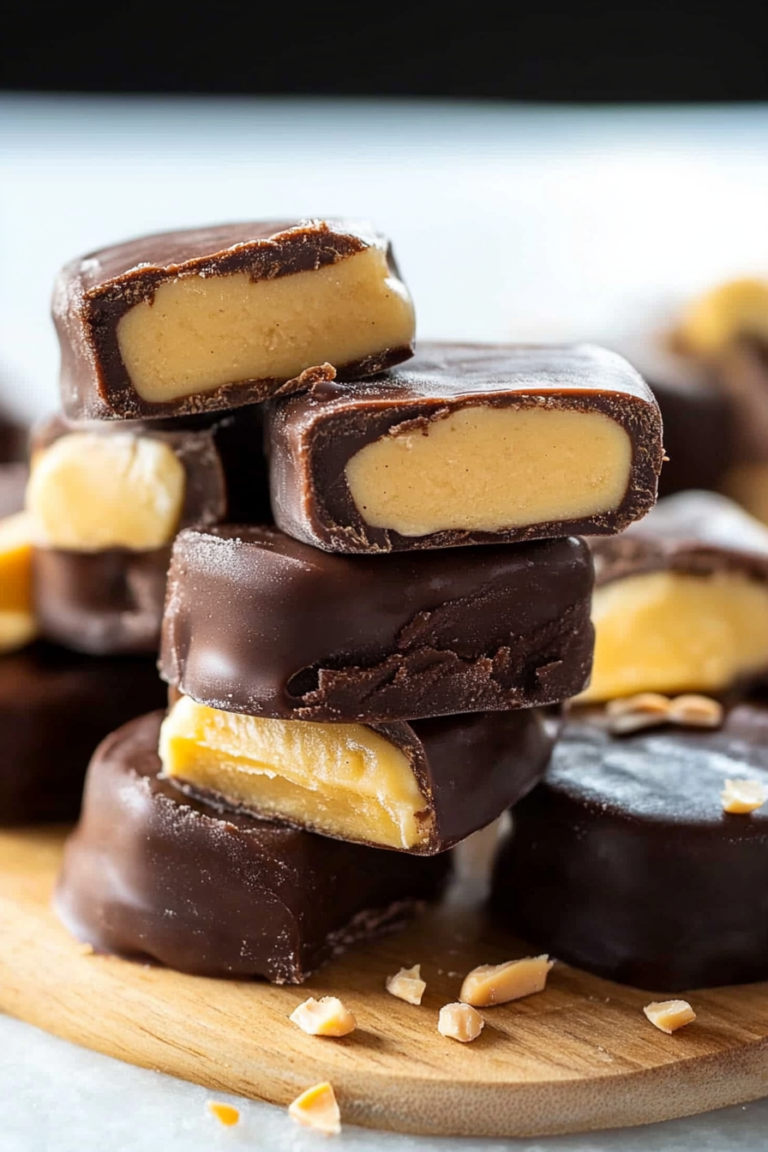
Kit Kat Bites
Ingredients
Method
- In a large mixing bowl, add marshmallows, milk chocolate morsels, and baking chocolate. Set aside.
- In a large pot, bring to a boil the sugar, cream, and butter over medium-high heat. Continue boiling for 4 minutes, stirring constantly. Remove from heat and pour hot mixture over marshmallows and chocolate. Beat until melted and smooth.
- Melt butterscotch and peanut butter morsels together in microwave at 30-second intervals, stirring until fully melted.
- In a large bowl, combine rice cereal, melted butterscotch, and about one-third of the chocolate mixture. Mix thoroughly.
- In a parchment-lined 9x13 inch baking dish, pour one-third of the chocolate mixture onto the bottom, spreading evenly. Top with cereal mixture, press down, then cover with remaining chocolate mix and spread smoothly.
- Refrigerate for 1-2 hours. Once set, cut into bite-sized pieces and enjoy!


I love how zucchini baking brings back such warm memories — your recipe sounds perfect for capturing that same cozy feeling at home!
I love the comforting vibe of this recipe — reminds me of home-baked goodness every time!
Love the nostalgia! That zucchini baking smell really does bring back such cozy memories — reminds me of home too.
I love this recipe! It reminds me of my grandma’s kitchen too—there’s nothing like that cozy zucchini smell baking in the oven.