
Easy No-Bake Oreo Treat Recipe
There’s something truly magical about baking bread that’s secretly a dessert in disguise. I remember the first time I stumbled upon this zucchini banana bread recipe—my grandmother’s old cookbook was tinged with years of splatters and love. That aroma of warm cinnamon, ripe bananas, and the hint of zucchini—trust me, it smells like cozy mornings and lazy afternoons. This one’s a lifesaver on busy nights when I want something sweet and satisfying but don’t want to fuss with complicated ingredients or fancy equipment. My kids ask for this all the time, and honestly, I don’t blame them. It’s moist, tender, and packed with flavor yet somehow feels like a treat that you can justify having for breakfast or as a perfect afternoon snack. Plus, the sneaky zucchini keeps it moist and adds a touch of nutrition. No one ever guesses how healthy and indulgent can go hand in hand. Ready to make something that’ll make your house smell like heaven? Buckle up—we’re about to bake a masterpiece!
What is Zucchini Banana Bread?
Think of zucchini banana bread as the lovechild of a comforting muffin and a hearty loaf, but with a special secret—shredded zucchini! It’s essentially a moist, dense bread that combines the natural sweetness of ripe bananas with the subtle, fresh flavor of zucchini. The name says it all: “zucchini” gives you extra moisture and a little boost of veggies, while “banana bread” brings the sweetness and rich aroma. It’s a time-tested family favorite that’s perfect for breakfast, a snack, or even an unexpected dessert. The beauty of this recipe is how versatile it is—you can keep it simple with just bananas and zucchini, or add nuts, chocolate chips, or even a swirl of nut butter. It’s a recipe that doesn’t demand perfection, just a loving touch, a few humble ingredients, and a little patience. Think of it as a cozy hug in bread form—something that’s familiar but with a bit of a twist!
Why you’ll love this recipe?
Honestly, what I love most about this zucchini banana bread is how forgiving and flexible it is—no fancy ingredients required, and it always turns out moist and flavorful. The smell alone makes my kitchen feel like a warm hug; the cinnamon, the caramelized bananas, and that hint of zucchini? Pure magic. Plus, it’s super easy to whip up, even on those days when you’re scrambling to get dinner or just craving something sweet without turning on the oven for hours. The ingredients are budget-friendly—ripe bananas and a zucchini from last week’s veggie haul are probably already sitting in your fridge—and it’s so adaptable. Want to make it healthier? Swap out the sugar for honey or maple syrup. Need gluten free? Use almond or oat flour. This bread is versatile enough to suit just about any craving or dietary need. And what’s better than feeding your family something you made from scratch that’s both wholesome and totally delicious? Trust me, I’ve made this countless times, and it’s a guaranteed hit every single time. Every slice is a little piece of comfort, and I’ve learned that a little extra cinnamon on top makes it even cozier. Truly, this recipe’s a keeper.
How do you make Zucchini Banana Bread?
Quick Overview
This zucchini banana bread is a simple one-bowl wonder that comes together quickly. It starts with mashing ripe bananas, shredding zucchini (no peeling needed!), and mixing everything together in a few minutes. The batter is thick but pourable, and I love layering in chopped nuts or chocolate chips for added texture. Once baked to golden perfection, your home will be filled with the aroma of warm spices and sweet fruit. This recipe is perfect because it’s so forgiving; if you overmix a little or forget a teaspoon of cinnamon, it still turns out fabulous. The first few times I made it, I was surprised how moist and tender it stayed overnight—great for next-day snacking or breakfast. If you’re looking for a quick, cozy baking project that everyone will love, this is it!
Ingredients
For the Main Batter:
– 3 ripe bananas, mashed (the softer, the sweeter)
– 1 cup shredded zucchini (squeeze out excess moisture)
– 2 cups all-purpose flour (or gluten-free blend)
– 1 teaspoon baking soda
– 1 teaspoon baking powder
– 1 teaspoon cinnamon (more if you love spice!)
– 1/2 teaspoon salt
– 1/2 cup brown sugar or coconut sugar
– 1/3 cup vegetable oil or melted coconut oil
– 2 large eggs
– 1 teaspoon vanilla extract
For the Filling (Optional):
– 1/2 cup chopped walnuts or pecans
– 1/2 cup chocolate chips (trust me, don’t skip this!)
For the Glaze (Optional but delicious):
– 1/2 cup powdered sugar
– 1 tablespoon milk or almond milk
– A dash of vanilla or lemon zest for extra flavor
Step-by-Step Instructions
Step 1: Preheat & Prep Pan
I always start by preheating my oven to 350°F (175°C). Grease your loaf pan with butter or spray with non-stick spray—trust me, this is the secret to getting that perfect crust and easy removal. Lining it with parchment paper can be a game-changer if you want hand-free slicing later. While the oven heats up, grab your banana mash and zucchini ready to go.
Step 2: Mix Dry Ingredients
In a large mixing bowl, whisk together the flour, baking soda, baking powder, cinnamon, and salt. I find that sifting them or giving it a good whisk helps prevent clumps and results in an evenly risen bread. Properly combining these dry ingredients is key for a light, fluffy texture.
Step 3: Mix Wet Ingredients
In a separate bowl, mash your bananas until smooth—yes, the riper, the better! I always do this when my bananas are at that perfect brown stage. Add the brown sugar, oil, eggs, and vanilla. Whisk until everything’s well blended and the mixture feels smooth and kinda glossy. I’ve tested this with almond milk sometimes—makes it a little creamier, and honestly, I love the subtle nutty flavor it adds.
Step 4: Combine
Pour the wet mixture into the dry ingredients and fold gently. The goal here is to combine everything with minimal stirring—overmixing can make the bread dense. Just until you see no streaks of flour. At this point, fold in the shredded zucchini, nuts, or chocolate chips if using. Don’t overthink it—just a few folds, and you’re good to go.
Step 5: Prepare Filling
If you’re adding chocolate chips or nuts, sprinkle some on top or fold them in the batter. I love mixing chopped walnuts into the batter and sprinkling some on top—gives the loaf a lovely crunch. For a sweet swirl, you can also spoon a little extra banana or jam into the batter and swirl with a knife.
Step 6: Layer & Swirl
Pour the batter into your prepared pan. If you want to get fancy, add a few spoonfuls of jam or nut butter on top and swirl your knife through for beautiful marbled effects. It’s a little trick I learned after years of making this—it not only looks fancy but adds extra bursts of flavor.
Step 7: Bake
Pop it into your preheated oven and bake for about 50-60 minutes. Every oven is different, so start checking at 50 minutes. Insert a toothpick or cake tester in the center—if it comes out clean, it’s done. The top should be beautifully golden. If it browns too quickly but isn’t cooked inside, tent it with foil and keep baking. Trust me, patience pays off here!
Step 8: Cool & Glaze
Let the bread cool in the pan for about 10 minutes, then transfer it to a wire rack to cool completely. I’m impatient—so I usually wait about 20 minutes before slicing, but you’ll get cleaner cuts if you wait until it’s fully cooled. Mix your glaze ingredients and drizzle over the cooled loaf. The glaze adds a lovely shiny finish and a little extra sweetness.
Step 9: Slice & Serve
Use a serrated knife for clean slices—trust me, this bread is a little delicate when fresh out of the oven. Serve warm or at room temperature, maybe with a pat of butter or a dollop of Greek yogurt. It’s perfect for breakfast, snack time, or even a light dessert paired with tea or coffee. I love slicing a big piece, wrapping the rest tightly, and keeping it on the counter. It disappears in minutes at my house!
What to Serve It With
This zucchini banana bread is so versatile; I always have a plan for it. For breakfast, I love serving it with a good strong coffee or a glass of cold milk—It’s like the ultimate morning hug! During brunch, a dollop of whipped cream or a drizzle of honey takes it to the next level. As a dessert, warm slices topped with a scoop of vanilla ice cream or a drizzle of caramel sauce turn it into an indulgent treat. And for a cozy snack, I often cut thick slabs and smear them with almond butter or cream cheese. My family’s favorite is pairing it with fresh berries and a sprinkle of powdered sugar. It’s great on its own, but these little extras make it feel special—perfect for family gatherings or just a regular Tuesday afternoon. Honestly, this bread has a way of bringing everyone to the table, and I never get tired of making it.
Top Tips for Perfecting Your Zucchini Banana Bread
Every time I make this, I learn a little more about what makes it perfect. Here are some tips I swear by after lots of experiments:
- Zucchini Prep: Always squeeze out excess moisture after shredding. If you leave too much water in, your bread might turn out a little too dense or soggy. I use a clean dish towel or even cheesecloth—I learned this trick after my first bread was a bit too damp.
- Mixing Advice: Don’t overmix once you add the wet and dry. Overstirring can lead to a rubbery texture. Just fold gently until combined. The batter should be thick but sticky, almost like muffin dough.
- Swirl Customization: Want some extra flair? Drop spoonfuls of peanut butter, jam, or Nutella on top of the batter and swirl with a toothpick. It makes each slice a little surprise!
- Ingredient Swaps: Swapping in coconut sugar gives it a caramel flavor, while applesauce can replace some of the oil for a healthier spin. Just keep in mind that substitutions can slightly alter the texture or sweetness, so start small and taste-test if you can.
- Baking Tips: Always check your bread around the 50-minute mark. Every oven heats differently, and you want it just right—golden top, a little crackle, and a clean toothpick probe.
- Glaze Variations: Lemon glaze or cream cheese frosting taste amazing too, adding a tangy or creamy note. Just adjust the liquid accordingly to keep it pourable but not runny.
Storing and Reheating Tips
This bread is best enjoyed within the first 2-3 days, but with proper storage, it stays moist and delicious longer. Wrap slices tightly in plastic wrap or store in an airtight container. It’ll stay fresh at room temperature for about 2 days—just keep it away from direct sunlight or heat sources. If you want to keep it overnight or longer, pop it into the refrigerator—just make sure it’s well wrapped to prevent drying out. I like to reheat slices in the microwave for about 15-20 seconds—so cozy and perfect when you want that just-baked warmth. Freezing is also a good idea if you want to make this ahead; wrap individual slices or the whole loaf tightly in foil, then place in a freezer bag. It’ll last up to 3 months! When ready to eat, thaw at room temperature or give it a quick warm-up in the microwave. Just don’t forget to add the glaze again if you want that shiny, sweet finish.
Frequently Asked Questions
Final Thoughts
This zucchini banana bread is a classic comfort wrapped in a slightly modern twist. It’s one of those recipes I keep going back to because it’s forgiving, endlessly customizable, and always a hit. I love how it brings my family together—whether it’s a lazy Sunday morning or a quick after-school treat. Over the years, I’ve tweaked it—adding chocolate chips, swapping in coconut sugar, experimenting with gluten-free flours—and every version turns out deliciously moist and deeply flavorful. I truly believe everyone needs a go-to recipe like this in their collection; it’s reliable, cozy, and kind of magical how it can turn simple ingredients into something so special. So grab those bananas and zucchinis—your kitchen is about to become the coziest, sweetest place on earth. Happy baking! And I’d love to hear your tweaks and favorites—drop a comment below or share this recipe with someone who needs a little extra comfort today.

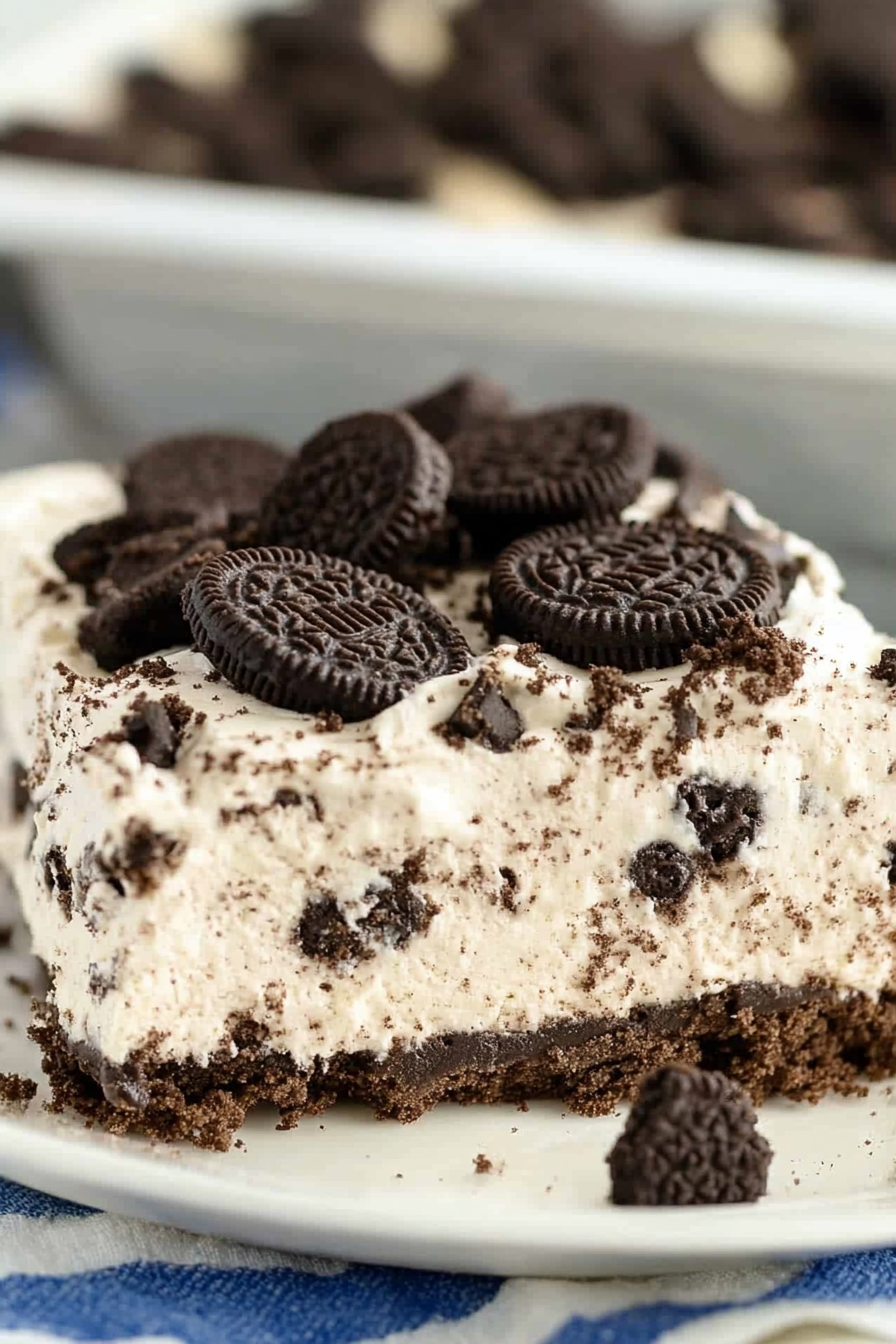
Oreo dessert
Ingredients
Method
- Remove 12 Oreos from the package.
- Crush the remaining Oreos either by placing in a Ziploc bag and using a rolling pin or placing in a food processor.
- Mix half of the crushed Oreo crumbs with the melted butter. Press into a 9x9 inch pan to form the crust. Place into the refrigerator while preparing the filling. Set the rest of the Oreo crumbs aside.
- In a large bowl whip the heavy cream until stiff peaks form. Set aside.
- In another large bowl, cream together the cream cheese and sugar. Add the vanilla and mix again.
- Next, add the heavy whipping cream to the cream cheese mixture folding gently with a spatula.
- Add the sweetened condensed milk and continue mixing gently until fully combined.
- Mix in the remaining Oreo crumbs.
- Spread the mixture evenly over your cookie base.
- Crush the remaining 12 Oreos and sprinkle them on top of the filling.
- Cover with foil. Return to the freezer and chill until solid (3-4 hours, overnight is best).
- Remove from the freezer 15 minutes before serving.


This recipe sounds amazing! I love the idea of a sweet bread that feels like both dessert and comfort food—definitely trying this.
Love how this blends comfort and creativity—simple yet so satisfying. The Oreo twist is pure genius!
That sounds delicious! I love no-bake treats, especially ones with Oreo.
Ooooh this sounds so cozy and delicious—my grandma used to make treats like this too! Can’t wait to try it.