
Easy Slow Cooker Sweet Treats
There’s something about baking that instantly takes me back to my childhood, to those lazy Sunday afternoons at Grandma’s house. The smell of cinnamon drifting through the air, a loaf cooling on the windowsill, and everyone gathered around the table, plates in hand, eager for that first slice. Over the years, I’ve tweaked and adapted my grandma’s classic recipes—adding a little twist here, reducing sugar there—but nothing has stuck quite like this zucchini swirl cake. Honestly, I think it’s because it feels like a warm hug in every slice. It’s incredible how something so simple, like grated zucchini spun into a moist, tender cake with a swirl of sweet filling, can become a family favorite. This one’s a lifesaver on busy nights when dessert feels out of reach but craving something sweet hits hard. Plus, I love how sneaky this is—your kids won’t even realize they’re eating veggies, and that makes me feel like a bit of a kitchen magician. It’s perfect when I want something comforting, but I don’t want to spend hours baking. Trust me on this—once you try it, it’ll become your go-to too.
What is Zucchini Swirl Cake?
Think of this zucchini swirl cake as a cozy cross between your favorite coffee cake and a carrot cake, but with a summer twist. It’s essentially a moist, tender cake batter infused with grated zucchini—yes, zucchini!—which keeps it unbelievably soft and juicy. The “swirl” part is a sweet, cinnamon-spiced filling that gets marbled through the batter, creating beautiful ribbons of flavor and texture in every slice. It’s called a “swirl cake” because of how the filling snakes through the batter before baking, making each piece a little masterpiece. The name alone makes it sound fancy, but I promise, this is totally doable for home cooks of all skill levels. It’s kind of like giving a classic cinnamon roll or coffee cake a healthier upgrade—moist, flavorful, and with that irresistible swirled surprise inside. My friends always ask for the recipe when I bring it to brunch, and even my pickiest eaters can’t resist the aroma when it’s baking. Honestly, it’s become such a staple—kind of my kitchen secret weapon for breakfast, dessert, or a cozy snack.
Why you’ll love this recipe?
What I love most about this zucchini swirl cake is how it combines simple ingredients into something surprisingly special. The flavor profile is warm and comforting—a tender crumb with hints of cinnamon and a subtle sweetness that balances beautifully with the savory notes of zucchini. The swirl of filling adds that little bit of excitement, making each bite interesting without fuss. Plus, this recipe is incredibly straightforward—no fancy equipment, no complicated steps. I always do this when I want a quick dessert that feels homey and nostalgic. It’s budget-friendly, too, since zucchini and pantry staples like sugar, flour, and cinnamon are usually sitting around—no special trips necessary. And oh boy, the versatility! You can tweak the filling—add nuts, wean off sugar, or throw in some berries for a seasonal twist. My kids ask for this all the time, especially when I don’t have the energy to bake a big cake but still want something homemade and heartfelt. This cake disappears in minutes at my house, and I’ve made it countless times, each batch better than the last. Whether it’s for breakfast, a casual coffee date, or a cozy evening treat, this one’s a keeper.
How do I make Zucchini Swirl Cake?
Quick Overview
This zucchini swirl cake comes together in under an hour from start to finish, mostly thanks to how straightforward the steps are. You’ll start by preheating your oven and prepping your pan—nothing fancy, just some butter and parchment paper. Then, you’ll whisk together your dry ingredients before blending your wet ingredients. The grated zucchini is mixed right into the batter, adding moisture and a touch of freshness. The filling is a simple cinnamon-sugar mixture that you’ll swirl through the batter before baking. Once it’s out of the oven, I love letting it cool just a bit before glazing—if you want that extra shine and a little sweetness on top. It’s honestly a “set it and forget it” kind of recipe with a big wow factor. Trust me, once you get the hang of swirling and layering, it’s addictive. Plus, the smell that fills your kitchen while baking? Pure magic. You’ll love how forgiving the process is—perfect for both novice bakers and seasoned cooks looking for a cozy home-baked treat.
Ingredients
For the Main Batter:
– 2 cups all-purpose flour (I like to use unbleached for a richer flavor)
– 1 cup sugar (brown sugar works beautifully for a deeper caramel touch)
– 1 teaspoon baking powder
– ½ teaspoon baking soda
– 1 teaspoon cinnamon (trust me, this is where the magic starts)
– ½ teaspoon salt
– ½ cup vegetable oil or melted coconut oil
– 3 large eggs
– 1 teaspoon vanilla extract
– 1 cup grated zucchini (don’t squeeze out all the moisture—this keeps it super moist!)
For the Filling:
– ¼ cup packed brown sugar
– 1 tablespoon cinnamon
– 2 tablespoons softened butter (or coconut oil)
– Optional: chopped nuts, like pecans or walnuts, for added crunch
For the Glaze:
– ½ cup powdered sugar
– 1-2 tablespoons milk (almond, dairy, or oat—whatever you like)
– ½ teaspoon vanilla (or a splash of lemon juice for a fresh tang)
Step-by-Step Instructions
Step 1: Preheat & Prep Pan
Set your oven to 350°F (175°C). Grease a 9-inch square baking pan or line it with parchment paper. I always do this even if I have non-stick—it’s just easier to get the cake out without crumbs. Let it sit while you prepare the batter. It’s the kind of prep I do to keep everything calm and organized, especially when multitasking in the kitchen.
Step 2: Mix Dry Ingredients
In a big bowl, whisk together the flour, sugar, baking powder, baking soda, cinnamon, and salt. This step feels satisfying—seeing everything come together in a cloud of powder before adding the wet ingredients. It also helps ensure the leavening agents are evenly distributed, so each slice rises beautifully.
Step 3: Mix Wet Ingredients
In another bowl, beat the eggs then whisk in the oil, vanilla, and grated zucchini. I always test the temperature of my eggs first—trust me, cold eggs make the batter lumpy! Once everything’s combined, the batter should be smooth, a little thick but pourable. The zucchini will add a tiny bit of moisture, so don’t overmix.
Step 4: Combine
Pour the wet mixture into the dry ingredients and gently fold together just until combined. This part’s crucial—overmixing can make your cake dense, and nobody wants that! I usually stop when I see no more streaks of flour. The batter will be relatively thick, which is perfect for holding the swirl filling later on.
Step 5: Prepare Filling
Combine the brown sugar, cinnamon, and softened butter in a small bowl. Mix until crumbly but cohesive—kind of like making a streusel topping. If you want a nutty twist, toss in chopped pecans or walnuts here. This filling is what makes the cake special—imagine spicy-sweet ribbons running through each slice!
Step 6: Layer & Swirl
Pour half of the batter into your prepared pan. Spread it evenly with a spatula. Sprinkle half the cinnamon-sugar filling over this layer, then add the rest of the batter on top. Finish by dolloping the remaining filling on top, then take a toothpick or skewer and give it a gentle swirl—patterns are fun, but don’t obsess, it’s rustic and charming that way. The swirling makes each bite a little surprise.
Step 7: Bake
Pop it in the oven for about 40-45 minutes. Do the toothpick test—insert it in the center, and if it comes out clean, you’re good to go. If not, give it a few more minutes. The house will fill with that warm cinnamon smell, which alone makes the effort worth it. Watch the edges—they should be golden and slightly pulling away from the pan.
Step 8: Cool & Glaze
Let the cake cool in the pan for about 15 minutes before transferring to a wire rack. I sometimes brush it with a quick simple glaze—powdered sugar mixed with vanilla and a splash of milk—while it’s still warm so it soaks into every crevice. The glaze adds that finishing touch, making it look almost too pretty to cut.
Step 9: Slice & Serve
Once cooled, slice with a sharp serrated knife for clean edges. I love serving this slightly warm or at room temperature, with a steaming cup of coffee or tea. For extra indulgence, a dollop of whipped cream or a scoop of vanilla ice cream pairs beautifully—trust me on that one. It’s great as breakfast too; yes, I have been known to have a slice with my morning coffee!
What to Serve It With
This cake is so versatile, it’s almost like a chameleon. For breakfast, I love pairing it with a strong black coffee or a frothy cappuccino—so cozy and indulgent. My family enjoys it as a hearty brunch addition, especially when I serve it alongside fresh fruit and a bit of yogurt. It’s essentially my go-to for lazy weekend mornings where I want something sweet but not overly heavy. As a dessert, I dress it up with a drizzle of honey or a dusting of powdered sugar and maybe a few fresh berries on top. The cinnamon aroma alone is enough to draw everyone into the kitchen for a second slice. And on casual days, it makes a perfect afternoon snack—paired with a glass of milk or even a hot cup of tea. We always have it at the ready for spontaneous get-togethers, and I’ve even frozen slices for easy grab-and-go treats. The kids love it, especially when I tell them it’s secretly a veggie cake—trust me, that makes it all the more fun!
Top Tips for Perfecting Your Zucchini Swirl Cake
Over the years, I’ve learned a few tricks that make this cake turn out even better. First, don’t squeeze out all the moisture from your zucchini—keeping some of it helps keep the cake super moist and tender. Grate your zucchini on a fine grater, then give it a little squeeze—just enough to remove excess water, but don’t go overboard. I’ve tested this with different zucchinis, and the fresher the better for flavor and texture. When mixing, I avoid overworking the batter—stop as soon as everything’s combined—it’s tempting to keep stirring, but that can make the cake dense. For the swirl pattern, don’t stress about perfect lines—rustic, random swirls look adorable and are easier! If you want a richer filling, try adding a tablespoon of cream cheese to the cinnamon-sugar mixture. Also, I’ve tested this with coconut sugar and maple syrup instead of regular sugar, and it works beautifully—just adjust the liquids a bit. When baking, keep an eye on the edges—they tend to brown quickly, especially if your oven runs hot. I always rotate the pan halfway through baking for even color. Lastly, the glaze: I like mine a little runny so it soaks in, but you can make it thicker if you prefer a more defined drizzle. Trust your instincts—you know your oven best—and don’t be afraid to adjust the timing slightly. This is one of those recipes where a little personal touch makes all the difference.
Storing and Reheating Tips
This cake stays surprisingly fresh for a couple of days, especially if you store it properly. Once cooled, wrap it tightly in plastic wrap or store in an airtight container. I prefer slicing it first, then wrapping individual pieces—makes grabbing a snack later super easy. At room temperature, it’s good for about 2 days; after that, I pop leftovers in the fridge. When refrigerating, I keep it covered—I’ve found that uncovered cake can dry out faster. To enjoy it later, I warm slices in the microwave for about 10-15 seconds, just enough to take the chill off without drying it out. If freezing, I wrap slices tightly in plastic wrap, then foil, and store in a zip-top freezer bag for up to 3 months. Thaw at room temperature or in the fridge overnight. Just remember, if you add a glaze or frosting, it’s best to apply it fresh or just before serving—otherwise, it might get a little dull. I’ve frozen this cake multiple times, and it still tastes just as good, especially when you warm it up slightly. It drapes beautifully with a drizzle of honey or a dusting of cinnamon after reheating, making it almost like new. The key is to avoid over-warming, so the cake stays moist and tender.
Frequently Asked Questions
Final Thoughts
If you’re looking for a recipe that feels like a warm hug and comes together with ease, this zucchini swirl cake is your new best friend. It’s one of those comforting treats that looks impressive, tastes incredible, and makes the kitchen smell like pure happiness. Over the years, I’ve shared this with friends, family, even neighbors, and every time, it gets rave reviews—and honest inquiries for the recipe. I love how adaptable it is, how forgiving, and how it turns humble zucchini into a star of the show. Whether you’re baking for a special occasion or just because a sweet craving struck after a long day, this cake never disappoints. So, go ahead—grab those zucchinis, a handful of pantry staples, and give this a try. I promise, once you taste that first slice, you’ll understand why I keep making it over and over. Happy baking, and I can’t wait to hear how yours turns out! Don’t forget to leave a comment or share your twists—I love hearing from fellow home cooks.
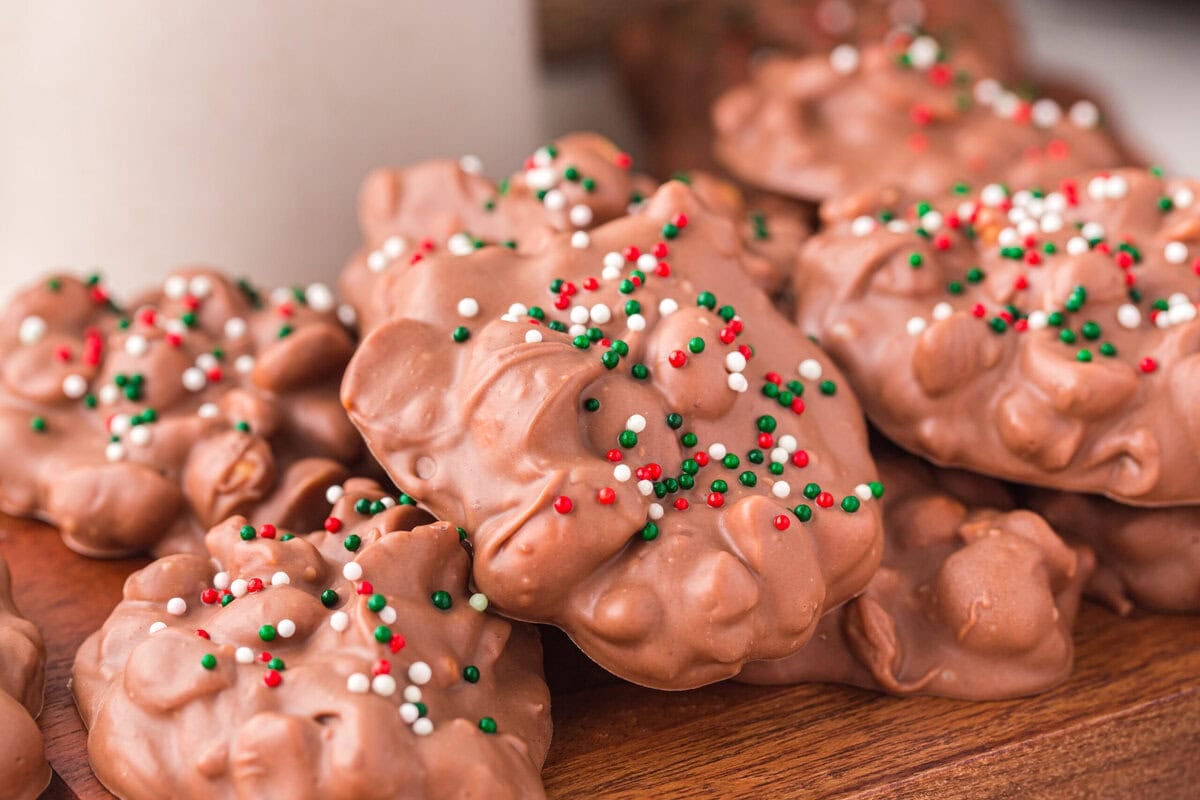
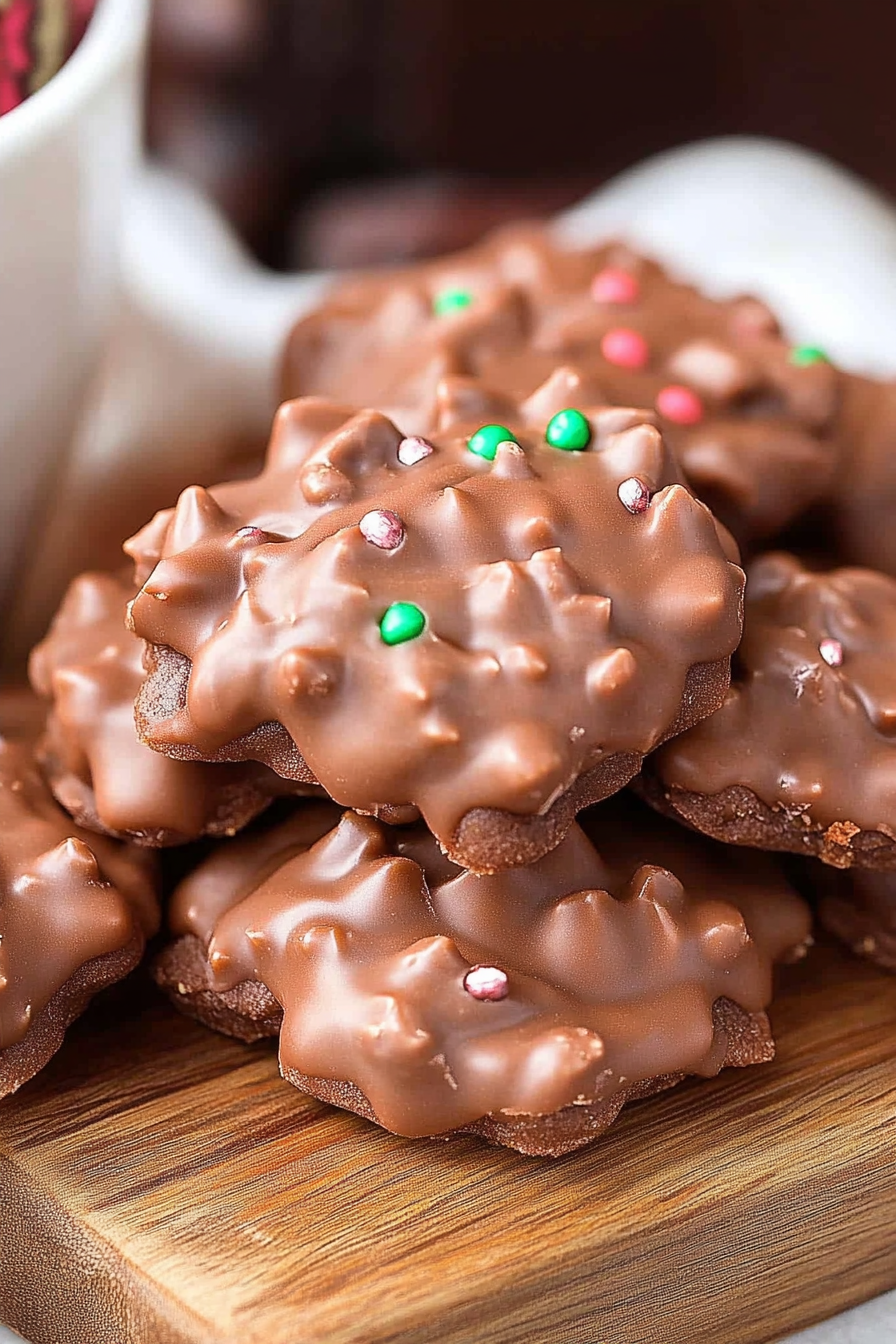
Crockpot Candy
Ingredients
Method
- Place the peanuts at the bottom of a crock pot.
- Add the white chocolate chips, dark chocolate chips, peanut butter, and toffee bits into the crock pot.
- Let it cook on low for one hour and then stir everything together so that the chocolate mixture completely coats the peanuts.
- Cook for another thirty minutes and prepare a sheet pan or two by lining them with parchment paper.
- Once the thirty minutes has passed, drop spoonfuls of the chocolate and peanut mixture onto the parchment paper and sprinkle with festive sprinkles and sea salt, optional. (I love to use a cookie scoop)
- Let cool completely, about 30-60 minutes or until set, before plating and serving.

This brings back such sweet memories! I love how baking can feel so comforting and nostalgic.
This reminds me of my grandma’s kitchen—those slow cooker treats bring back such sweet memories. Love this idea!