

Easy Snowman Pizzas: A Winter Treat
If I had to pick one baking obsession, it’s this chocolate zucchini marble cake. It’s a recipe I’ve been whipping up for years, and honestly, it feels like a warm hug every time I make it. The smell alone brings my family rushing into the kitchen — that burst of cocoa and fresh zucchini fills the house with a cozy, homey scent that makes everyone smile. And here’s the funny part: I always do this when I want a quiet moment or when someone drops by unexpectedly — I bake this, and suddenly, I have a little edible magic to share. It’s rich but sneaky healthy-ish with zucchini, and it’s one of those desserts that feels fancy but secretly isn’t complicated at all. My kids ask for this all the time, especially when there’s zucchini in the garden waiting to be used up. Trust me, once you’ve made this a couple of times, it’ll be your go-to for keeping the family happy and sweetening busy weeknights. This truly is my forever favorite — moist, tender, with just enough chocolate and a swirl of beauty that makes every slice special.
What is chocolate Zucchini Marble Cake?
This cake is like a cozy secret that I love to keep – think of it as a tender, moist loaf with two irresistible flavors swirled together: chocolate and zucchini. It’s essentially a marvelous marriage of simple ingredients—r pantry staples—turned into something a little fancier than your average humble loaf. The “marble” part comes from swirling rich chocolate batter into the lighter, zucchini-infused vanilla one, creating beautiful, marbled stripes when sliced. I call it a “secret weapon” because the zucchini makes it super moist and almost disappears into the chocolate flavor, meaning everyone loves it without realizing there’s a vegetable hiding in plain sight. It’s like a little piece of comfort you can enjoy anytime – perfect for your morning coffee, a casual get-together, or a quiet slice when you need some chocolate therapy. Basically, it’s a cake that whispers “homemade love” in every bite.
Why you’ll love this recipe?
What I love most about this chocolate zucchini marble cake is how incredibly versatile and forgiving it is. First, the flavor? Oh, it’s a symphony of rich cocoa paired with the subtle, earthy sweetness of fresh zucchini. The best part? The zucchini keeps it unbelievably moist—seriously, I’ve made this so many times I know exactly how it should feel at each step. And forget fancy ingredients; it’s all about the pantry staples—flour, sugar, cocoa, and zucchini from the garden or store, whichever you have. This one’s a lifesaver on busy nights because it’s straightforward, yet always seems fancy enough to impress family or friends. Plus, you can customize it easily—swap out dark chocolate chips for white chocolate, add nuts if you feel fancy, or skip the glaze for a simple dusting of powdered sugar. What I love most about this is how it brings my family together: everyone’s happy to have a slice, and I never get tired of seeing that marbled swirl in each piece. It’s a quiet, comforting kind of baking that makes me feel connected to the kitchen and my loved ones, no matter how hectic the day. And trust me, once you’ve tried this, it’ll be on your “must-bake” list too.
How do I make a chocolate Zucchini Marble Cake?
Quick Overview
This cake is honestly as easy as it gets—no complicated steps, just a simple batter that gets split into two. One part gets a good cocoa boost, while the other gets grated zucchini plus a splash of vanilla. Then, it’s all about swirling the two together before baking. The hardest part? Resisting the temptation to overmix once you combine everything—that’s where the marbling magic comes alive. The oven does all the work, and in just about an hour, you’ve got a dense, moist cake that’s perfect for slicing and serving. It’s perfect when you’re craving chocolate but wanna sneak in a veggie or two, and it’s honestly my secret to turning a humble ingredient like zucchini into something show-stopping. Once out of the oven, I love glazing it while it’s still warm—the shiny, fudgy top just pulls everything together. Trust me on this one: once you make it, your kitchen will smell like a dream, and your family will be coming back for seconds in no time.
Ingredients
For the Main Batter:
– 2 cups all-purpose flour (I always use unbleached because it just feels a little fancier)
– 1 cup granulated sugar
– 1/2 cup unsweetened cocoa powder (good quality, trust me)
– 1 teaspoon baking soda
– 1/2 teaspoon salt
– 1 teaspoon vanilla extract or vanilla bean paste for that extra richness
– 1/2 cup vegetable oil (or melted coconut oil for a tropical twist)
– 3 large eggs
– 1 cup finely grated zucchini (squeeze out excess moisture; I learned this trick after a few soggy disasters!)
For the Filling:
– 1/2 cup mini chocolate chips (I like semi-sweet, but dark or white is fine)
– Optional: a handful of chopped nuts for crunch (pecans or walnuts are lovely)
For the Glaze:
– 1 cup powdered sugar
– 2-3 teaspoons milk or cream
– 1 teaspoon cocoa powder (for that extra chocolate hit)
– A splash of vanilla (if you like)
Step-by-Step Instructions
Step 1: Preheat & Prep Pan
I always start by preheating my oven to 350°F (175°C). Then, I grease my loaf pan generously with butter or non-stick spray and line it with parchment paper—nothing worse than a sticky cake! Keep in mind, an 8×4-inch pan works best here. Once prepped, set it aside to keep everything ready for assembly.
Step 2: Mix Dry Ingredients
In a large bowl, whisk together the flour, cocoa powder, sugar, baking soda, and salt. This ensures everything is evenly distributed—trust me, lumpy batter is a no-go! I always do this step first, so I know the dry ingredients are well combined before adding the wet stuff.
Step 3: Mix Wet Ingredients
In a separate bowl, whisk the eggs, oil, and vanilla until smooth. Then, stir in the grated zucchini—make sure it’s well drained, or your batter might get too wet. I like to do this quickly and then fold in the wet mixture into the dry ingredients, gently, just until combined. Overmixing can lead to a dense cake, and that’s not what we want!
Step 4: Combine
Divide the batter in half. In one bowl, mix in the mini chocolate chips. In the other, leave it plain—that’s your vanilla base. Now, here’s the fun part: pour the chocolate batter into your prepared pan, then dollop spoonfuls of the plain zucchini batter on top. Use a knife or skewer to swirl the two together—don’t overdo it, just enough to see a pretty marbled effect emerge.
Step 5: Prepare Filling
If you’re adding nuts or extra chocolate chips, sprinkle them on top of the batter before swirling, or mix them into the batter gently. This step is totally customizable. I often toss in a handful of pecans for added crunch, but honestly, the chocolate chips are enough to make everyone happy.
Step 6: Layer & Swirl
Pour spoonfuls of the plain batter in between the chocolate batter, then use a skewer or knife to swirl it through. The goal is to create a beautiful marbled pattern without overmixing—the visual appeal is half the fun!
Step 7: Bake
Pop it into the oven and bake for about 50-60 minutes. Check with a toothpick inserted in the center—it should come out clean or with a couple of moist crumbs. Every oven is a little different, so start checking at 50 minutes and go from there. If the top starts to crack or smell intensely of cocoa, it’s close!
Step 8: Cool & Glaze
Let the cake sit in the pan for about 15 minutes, then transfer to a wire rack to cool completely. This prevents sogginess and makes slicing easier. While still warm, I like to drizzle on the glaze. Mix powdered sugar with a splash of milk and vanilla until smooth—add more milk if it’s too thick, or more sugar if you want it thicker. The shiny glaze makes it look so inviting!
Step 9: Slice & Serve
Once cooled and glazed, slice with a sharp serrated knife—patience is key here! Serve slightly warm or at room temperature, and watch everyone’s eyes light up. I swear, this slices beautifully and looks almost too pretty to eat. Pair it with a cup of strong coffee or maybe a glass of milk. Oh, and leftovers? They’re perfect wrapped tightly in foil at room temperature for a day or two—though, let’s be honest, I’ve never had leftover this time of day.
What to Serve It With
This cake is pretty versatile, so I love pairing it with different things depending on the occasion. For breakfast, I serve it with a good strong coffee and a little dollop of whipped cream if I’m feeling indulgent. It’s fantastic with a drizzle of extra chocolate sauce or a dusting of powdered sugar—makes for a gorgeous brunch centerpiece. After dinner, it’s a classic with a scoop of vanilla ice cream or a dollop of whipped cream — the richness of the cocoa and the freshness of zucchini balance beautifully with creamy sides. And honestly, it’s become my go-to cozy snack on lazy afternoons. Whenever I bake this, my kitchen fills with warmth and the smell of home — I swear, it’s a hug in cake form. Plus, it’s perfect for when I have friends dropping by unexpectedly. Nobody ever guesses there’s zucchini hiding in this, which makes it all the more fun to share.
Top Tips for Perfecting Your Chocolate Zucchini Marble Cake
Over the years, I’ve picked up a few tricks that make this cake turn out just right every single time. First, grated zucchini is key—make sure to squeeze out as much moisture as possible to prevent a soggy bottom. I’ve tested it with grated carrots, and while delicious, zucchini keeps the moisture perfect without overwhelming the batter. When mixing, resist the urge to overdo it—less is more here, or you get a dense, rubbery cake, and no one wants that. Swirling the batter is my favorite part; I like a good marbled effect, so I take my time, swirling gently for pretty, feathered lines. If you want a richer chocolate flavor, try adding a tablespoon of espresso powder to the cocoa—trust me, it amplifies the cocoa without making it bitter. Sometimes I switch to dark chocolate chunks for an extra decadent touch. Also, I’ve learned that baking in the middle rack ensures even cooking without burning the top. If you notice the cake browning too quickly, tent it with foil and keep baking. For the glaze, I prefer whipping the powdered sugar into a smooth, pourable consistency—adding a splash more milk if needed. Or, for a different flavor, I sometimes stir in a teaspoon of cinnamon or a dash of chili powder for a surprising kick. This recipe has been my baking comfort zone for years, and I keep discovering new ways to make it even better.
Storing and Reheating Tips
This cake stays good for a couple of days—trust me, it’s a winner catered to the “eats first, saves for later” mindset. I usually wrap leftovers tightly with plastic wrap or keep them in an airtight container at room temperature if it’s going to be within a day or two. Don’t forget: moisture is king, so sealing it well keeps it from drying out. If I want to keep it longer, the fridge is safe, especially if I’ve added glaze; just make sure it’s well covered. In the fridge, it lasts about 4-5 days, and the best part? It tastes just as good cooled or slightly warmed—my kids actually ask for their slices heated up for about 10 seconds in the microwave. For longer storage, freezing is fantastic: I wrap slices individually in plastic wrap, then pop them into a resealable bag. They keep perfectly for a month or so. When I want to enjoy a slice, I pop it straight into the microwave or enjoy it cold—either way, the flavors and moisture are preserved beautifully. And if you’re planning to glaze later, I suggest doing that just before serving for a shiny, fresh finish—nothing beats that just-baked look!
Frequently Asked Questions
Final Thoughts
If you’re looking for a cozy, foolproof chocolate cake that’s got a secret ingredient tucked in—namely, zucchini—this is the one. It’s the kind of treat that feels like a little gift from the oven, bringing comfort and joy in every bite. Over the years, I’ve baked countless variations, and it never fails to impress. The moistness, the swirl of chocolate, that gorgeous marbled look—these are what make it special to me. It’s also an easy recipe to personalize: swap in different chocolates, sprinkle nuts, or add spices. Whether you’re baking for family, friends, or just yourself (no judgment here!), I promise this will be a new favorite. So, get your ingredients ready, fire up the oven, and let this cake become a new family favorite. Can’t wait to hear how yours turns out! Drop a comment below if you try it or share your own tweaks—I’d love to share in your baking adventure.
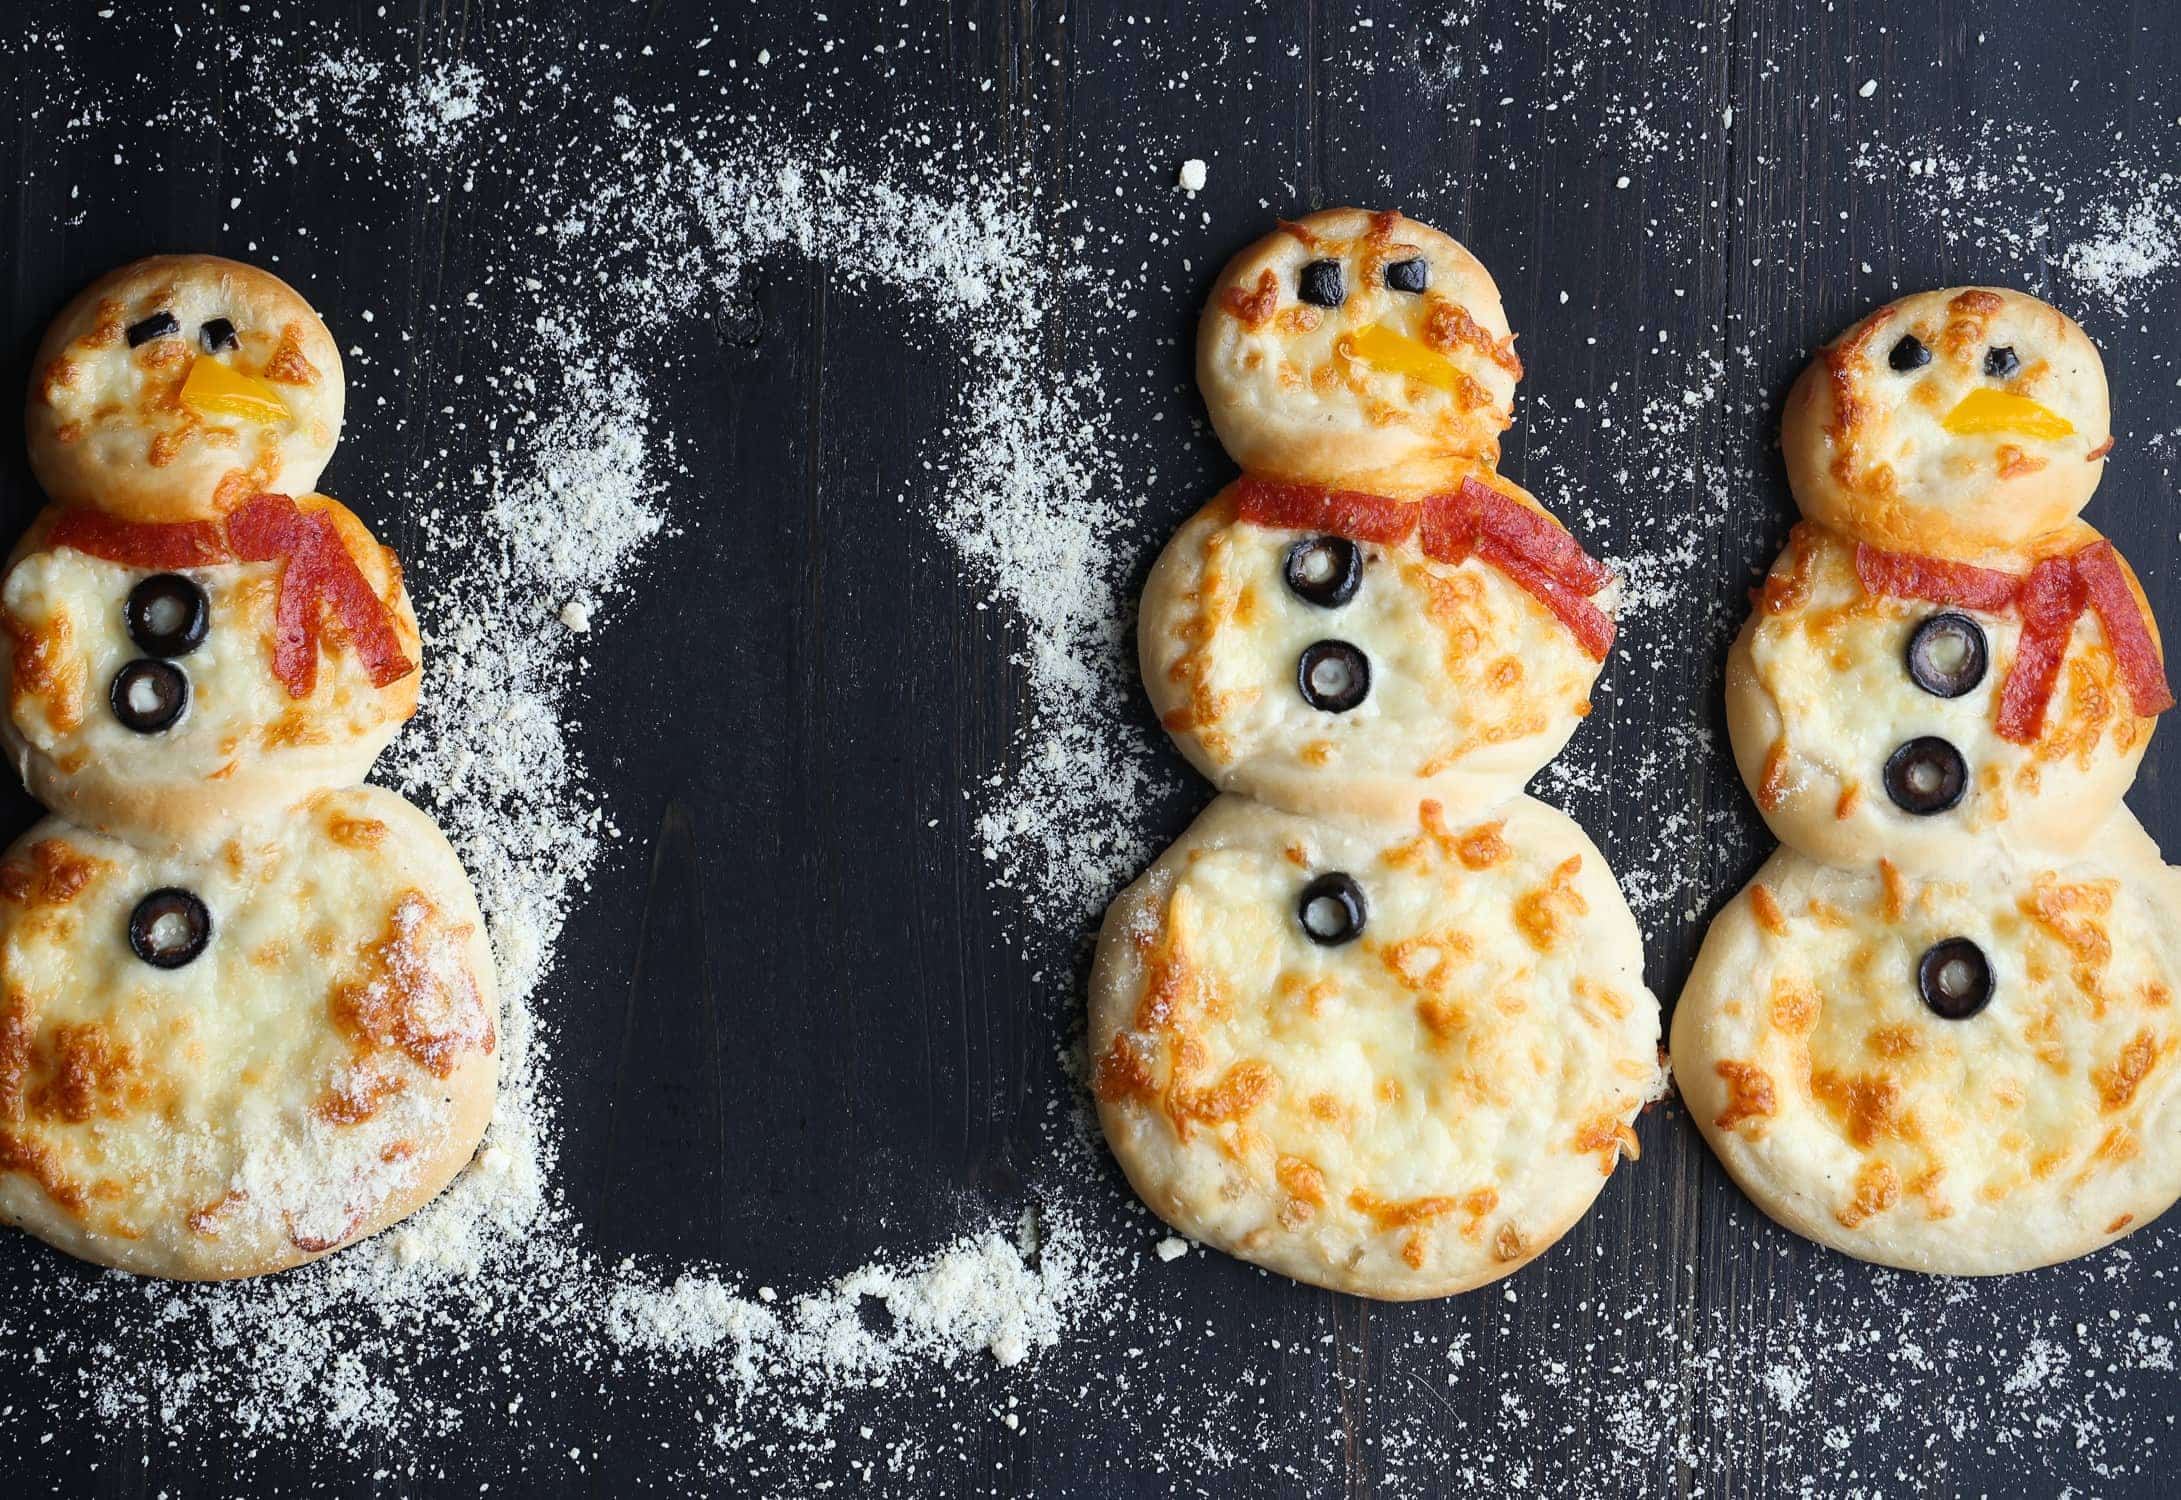
snowman pizzas
Ingredients
Method
- Preheat oven to 425°F. Line a large baking sheet with parchment paper.
- In a large bowl, combine 1 cup of flour, yeast, sugar, salt, water, and oil. Mix until a sticky dough forms.
- Knead the dough on a floured surface for 4 minutes until smooth. Alternatively, use a stand mixer with a dough hook.
- Divide the dough into 4 equal portions. Roll or pat each portion into a 4-inch circle for the snowman’s body.
- Form the head by rolling a small dough circle about 2 inches in diameter and place it overlapping the body for each snowman.
- Pinch the edges to seal and create small borders to hold toppings.
- Spread Alfredo sauce on each pizza.
- Decorate with black olives for eyes and buttons, pepperoni for scarves, and yellow bell pepper triangles for noses.
- Bake in the preheated oven for 15 minutes until crust is golden and cheese is bubbly.
- Sprinkle Parmesan cheese on top and serve warm.


Love this idea! My kids would absolutely go for snowman pizzas. Great twist on a classic winter treat.
Love the idea of fun pizza shapes with the kids! That zucchini cake sounds amazing too—healthy but still indulgent.
This looks adorable! My kids would love making these snowman pizzas—fun and tasty.