
Easy Spiced Apple Butter Recipe
You know those evenings when I’m craving something sweet but I really don’t want to turn on the oven for a huge cake? That’s when my favorite zucchini coffee cake comes to the rescue. It’s surprisingly indulgent, moist, and packed with flavor, yet simple enough to whip up on a busy weeknight. My kids ask for this all the time, especially because they love the cinnamon swirl and the way it smells in the oven — it’s like a warm hug in every bite. And let me tell you, I’ve tested this with pretty much every variation you can imagine, from almond milk to coconut oil, and honestly, it’s always a hit. It’s one of those recipes that makes you feel like a total bakery pro, without any fancy ingredients or complicated steps. Plus, it’s a clever way to sneak in some veggies for the kids—no one suspects a thing when it tastes this good.
What is Zucchini Coffee Cake?
Think of this zucchini coffee cake as a cozy twist on your classic cinnamon swirl coffee cake—but with a secret ingredient—zucchini! It’s essentially a moist, tender cake that’s subtly sweet, with a swirl of cinnamon-spiced goodness running through the middle. The name might sound fancy, but it’s super approachable. The zucchini keeps the cake incredibly moist, and because it’s grated finely, no one ever guesses that vegetable is sneaking into the batter. It’s a perfect pairing for your morning coffee or tea, and honestly, it’s just as good for an afternoon treat. What I love most about this is it gives me that nostalgic bakery vibe at home, but with my own little personal twist. Plus, it’s a great way to use up summer zucchinis—because those garden harvests can get overwhelming fast!
Why you’ll love this recipe?
There are so many reasons why I keep coming back to this zucchini coffee cake. First, the flavor — it’s a warm, cinnamon-spiced wonder that hits all the comforting notes of a bakery treat. Then, the texture — moist, tender, with just enough crumb that makes each bite addictive. What really makes this one special is how easy it is to prepare. No fancy equipment needed; I always do this when I need something cozy but don’t have hours to spend in the kitchen. Budget-wise, it’s wonderful because zucchini is cheap and readily available, especially in summer. And the best part? This cake is versatile. I’ve served it for brunch with cream cheese frosting, cut it into squares for a quick snack, or eaten it straight out of the fridge after a long day. Trust me on this one: once you try it, it’ll become a staple in your house too.
How do I make Zucchini Coffee Cake?
Quick Overview
This zucchini coffee cake is an easy assembly affair. You start by mixing a simple batter, making a cinnamon sugar swirl, layering it all together, and baking until golden. The magic is in how straightforward it is — you don’t need any fancy gadgets or long processes. I love that the batter comes together in one bowl, and the swirl is just a quick sprinkle of cinnamon-sugar. It’s perfect for when you want something homemade but don’t want to spend hours in the kitchen. Once baked, the house smells incredible, and minutes later, you’re all set to slice into a piece that’s moist, cinnamony, and comforting.
Ingredients
For the Main Batter:
- 1 ½ cups all-purpose flour (or your favorite gluten-free blend)
- ¾ cup sugar (white or a mix of white and brown for extra richness)
- 1 teaspoon baking powder
- ½ teaspoon baking soda
- ½ teaspoon salt
- ½ teaspoon ground cinnamon (for that cozy flavor)
- 2 large eggs
- ¾ cup vegetable oil or melted butter (I tested this with olive oil and it worked beautifully)
- 1 teaspoon vanilla extract
- 1 cup finely grated zucchini (squeeze out excess moisture so the batter isn’t watery)
For the Filling:
- ¼ cup brown sugar
- 1 teaspoon ground cinnamon
- 2 tablespoons butter, melted (for mixing with sugar and cinnamon)
For the Glaze:
- ½ cup powdered sugar
- 1-2 teaspoons milk or cream (add more if you like a thinner glaze)
- ½ teaspoon vanilla extract (optional but recommended)
Step-by-Step Instructions
Step 1: Preheat & Prep Pan
Preheat your oven to 350°F (175°C). Grease a 9-inch round or square pan with butter or non-stick spray. Line the bottom with parchment if you want easy removal. I always do this because it helps keep the cake pristine when slicing — no sticking! Make sure your zucchini is grated and excess moisture squeezed out — I use a clean kitchen towel for this; it’s a small step but HUGE for getting that perfect texture.
Step 2: Mix Dry Ingredients
In a large bowl, whisk together the flour, sugar, baking powder, baking soda, salt, and cinnamon. Breaking up any clumps ensures even distribution of the leavening agents. This step is crucial because it sets the base for a light, fluffy cake rather than a dense one.
Step 3: Mix Wet Ingredients
In a separate bowl, beat the eggs, then stir in the oil (or melted butter) and vanilla. I like to do this right in my measuring cup — makes fewer dirty dishes! Add the grated zucchini last, folding gently to combine. I’ve learned that making sure the eggs are at room temperature helps everything blend smoothly.
Step 4: Combine
Pour the wet mixture into the dry ingredients. Gently fold until just combined — do not overmix! Overmixing can lead to a tougher crumb, and you want this cake soft and airy, so mix until no streaks of flour remain, that’s it.
Step 5: Prepare Filling
Mix the brown sugar, cinnamon, and melted butter in a small bowl to make the cinnamon-sugar filling. You can add a dash of nutmeg or cardamom if you’re feeling adventurous. This mixture will give your cake that irresistible swirl.
Step 6: Layer & Swirl
Pour half of the batter into your prepared pan, then sprinkle half of the cinnamon-sugar filling evenly over it. Add the rest of the batter on top, then sprinkle the remaining cinnamon-sugar in a swirling motion — don’t worry about perfect patterns because the swirl will look gorgeous once it’s baked. Use a butter knife or skewer to gently create a marbled effect if you want even more visual flair.
Step 7: Bake
Bake in the preheated oven for about 35-40 minutes. Check for doneness by inserting a toothpick in the center — it should come out clean. Every oven is a little different, so start checking around 33 minutes. The top should be golden, and the house will smell like cinnamon heaven.
Step 8: Cool & Glaze
Allow the cake to cool in the pan for about 15 minutes, then transfer to a wire rack if you used parchment. Once cooled slightly but still warm, drizzle your glaze over the top. I like to wait until it’s just warm—glaze melts into the cake, making each bite even more luscious.
Step 9: Slice & Serve
Use a sharp knife to slice into squares or wedges. Serve with a dollop of whipped cream or a sprinkle of powdered sugar if you’re feeling fancy. I love enjoying a warm slice with my morning coffee or even as weekend brunch with a cold glass of milk. It’s cozy, satisfying, and honestly, pretty addictive.
What to Serve It With
This cake is incredibly versatile. For breakfast, serve it with a strong cup of coffee or a latte — the warmth of cinnamon and zucchini is perfect to start your day. If you’re hosting brunch, fancy it up with some fresh berries and a dollop of whipped cream or a smear of cream cheese. It’s also a wonderful after-dinner dessert, especially paired with a mug of hot chocolate or tea. I’ve even sliced it into tiny squares for a cozy snack with friends — trust me, it disappears faster than you’d think! When I make this, my kitchen fills with that sweet cinnamon aroma that instantly makes everyone feel at home. It’s like capturing a little piece of bakery magic in your own oven.
Top Tips for Perfecting Your Zucchini Coffee Cake
Over the years, I’ve learned a few tricks that make this cake extra special. First, always squeeze out the excess moisture from your zucchini. I keep a clean kitchen towel handy — it’s a game-changer because wet zucchini can make your batter watery and mess with the rising. Second, don’t rush the mixing — fold gently, and just until combined. Overmixing is the biggest culprit for a dense crumb. When layering the cinnamon swirl, don’t be tempted to overdo it; a light sprinkle is enough to create that beautiful marbled effect. I’ve experimented with different spices — nutmeg, allspice, even a pinch of cloves — and honestly, they all work well, so feel free to get creative! If you want to make it gluten-free, swap in a good blend of gluten-free flour and a little extra baking powder, and it still turns out moist and tender. One personal tip — I always bake this cake a little longer if I want a slightly crispier top, but watch closely so it doesn’t overbrown. The glaze? Just powdered sugar mixed with a splash of milk — add a touch more if you prefer it drizzlier. I tested this with honey instead of sugar, and it gave the glaze a lovely floral sweetness that balanced perfectly with the cinnamon. Little tweaks like that are what keep me excited about baking this repeatedly.
Storing and Reheating Tips
This cake stays delicious for days — I usually cover it tightly with plastic wrap or keep it in an airtight container at room temperature for up to two days. After that, I pop it into the fridge, where it will last another 2-3 days. I prefer eating it cold or room temp, but if you’re craving it warm, just pop a slice in the microwave for about 10 seconds — it’s like fresh from the oven again. To freeze, wrap individual slices tightly in plastic wrap, then place in a zip-top bag. It’ll keep for up to a month — great for making ahead or for those times when you just can’t resist a snack. When ready to eat, let it thaw at room temperature or microwave briefly. Just hold off on glazing until you’re about to serve — it keeps the glaze from getting soggy or sticky over time. Trust me, the flavor intensifies after a day or two, and the cinnamon swirl seeps deeper into the cake, making each bite more luscious.
Frequently Asked Questions
Final Thoughts
Honestly, this zucchini coffee cake has become one of my favorite recipes to make when I want something from the bakery but also want to feel a little bit at home. It’s simple, comforting, and just a little clever—perfect for those busy mornings, lazy weekends, or whenever you need a cozy pick-me-up. I love how versatile it is, and every time I make it, I feel like I’m sharing a little piece of my kitchen magic. I hope you try it and find your own moments of comfort and joy in every bite. If you give it a shot, I’d love to hear how yours turns out! Don’t forget to leave a comment or share a photo — happy baking, my friend!
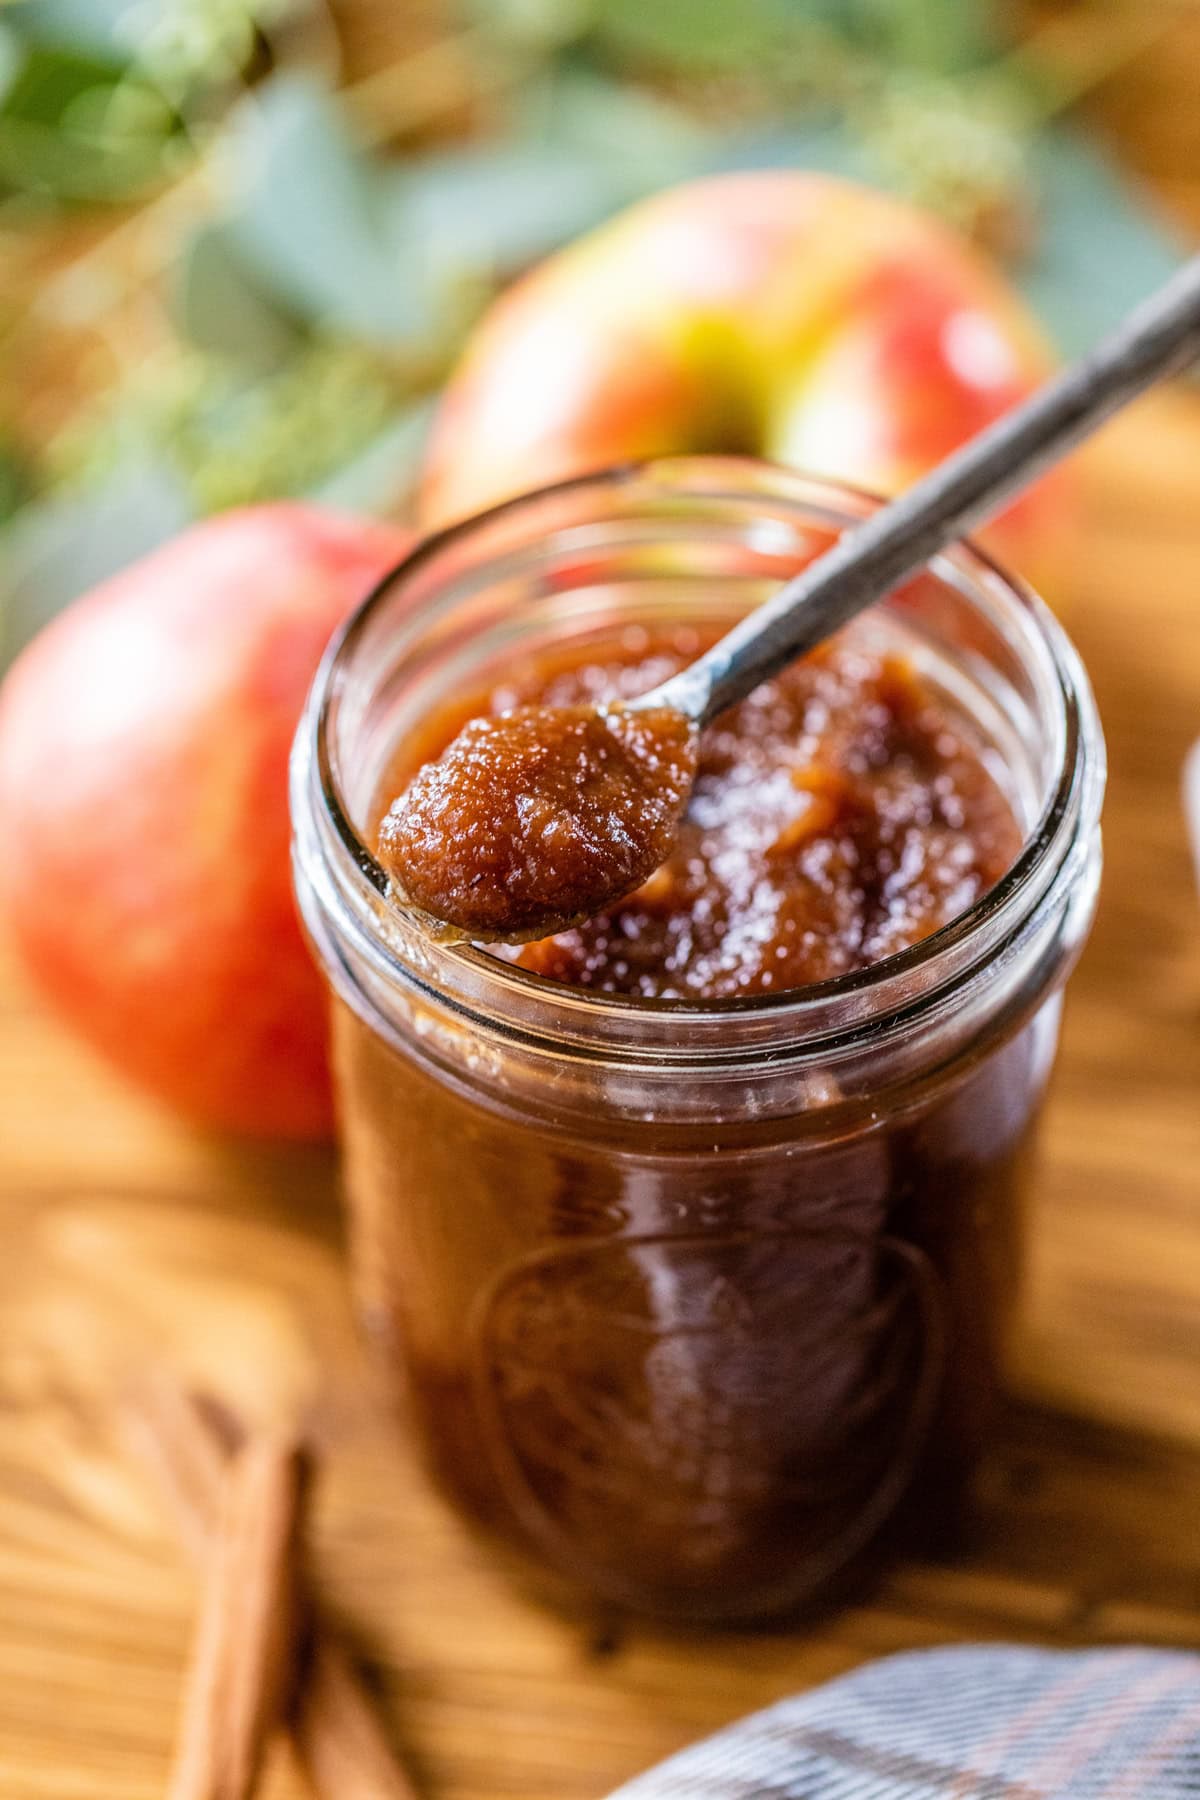
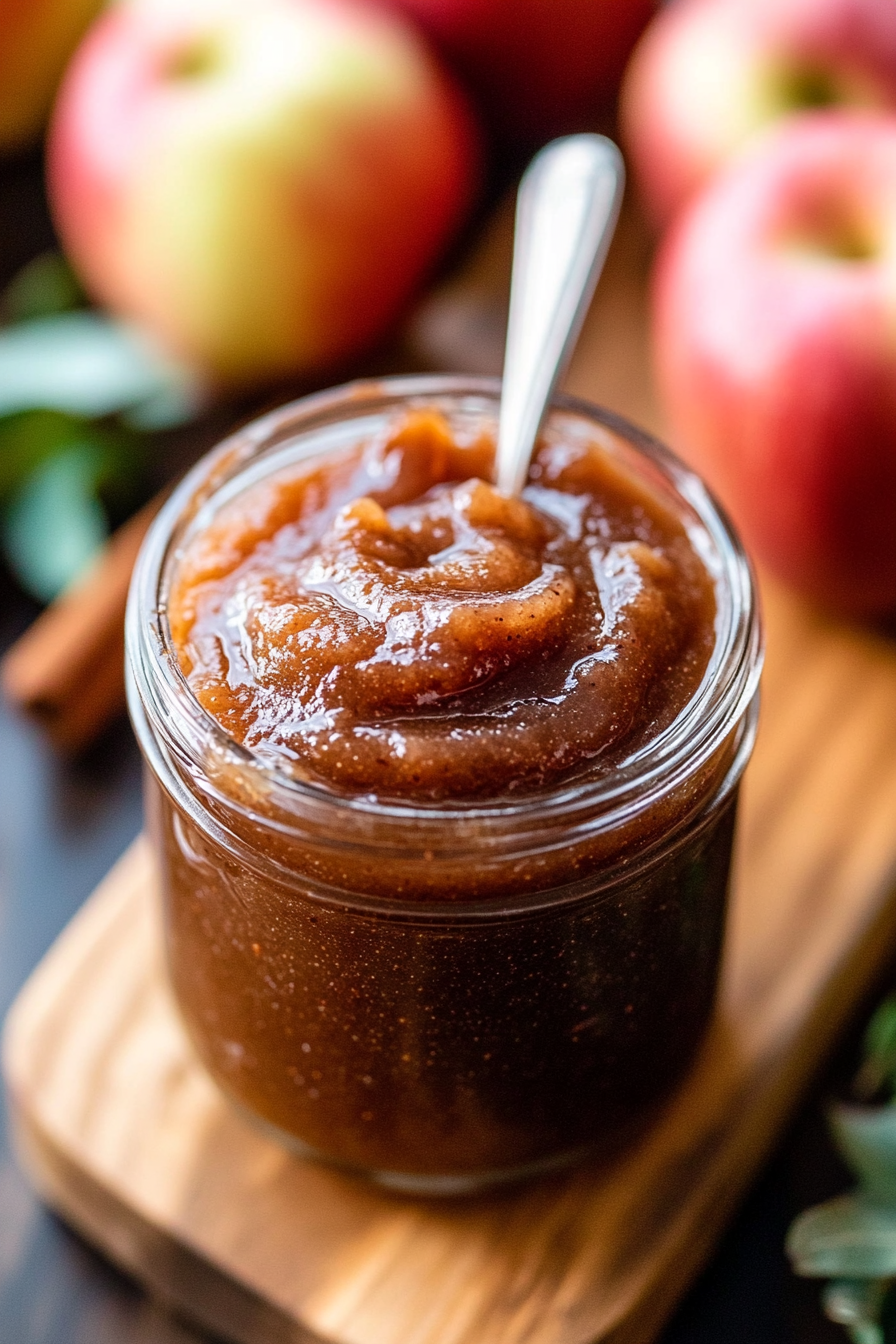
apple butter
Ingredients
Method
- Place the apples in a slow cooker. Top with sugar, brown sugar, cinnamon, allspice, and nutmeg, then mix well.
- Cover and cook on high for 5 hours or low for 10 hours, stirring once halfway through until the apples are tender and dark brown.
- Uncover and blend with an immersion blender until smooth.
- Cook on high uncovered for an additional 2 hours, stirring occasionally until thickened.
- Spoon into jars or containers, cover, and refrigerate.

This sounds perfect for cozy evenings! I’ll definitely have to try this spiced apple butter recipe.
I love this recipe — so cozy and perfect for fall! I’ll definitely be making it soon.
I love this idea—perfect for a cozy evening treat without all the baking hassle. Thanks for sharing this easy recipe!
Love this recipe! I’ve made it a few times now and it never disappoints—so cozy and perfect for those lazy sweet cravings.