
Flaky Cherry Pastries How to Make Them
If there’s one thing I adore about baking, it’s how a simple dish can fill the house with the warm, inviting smell of cinnamon and fresh-baked joy. I remember my grandma making her zucchini bread, and that aroma always made me feel cozy, like everything was right in the world. Over the years, I’ve tinkered with her recipes, and somehow, this zucchini coffee cake with a luscious cream cheese swirl became our new family favorite. It’s moist, tender, and packed with that perfect hint of sweetness, all while sneaking in a veggie—because why not? This one’s a lifesaver on busy mornings or lazy weekends when you just want to indulge without feeling guilty. Plus, the flavor is outstanding. I’ve made it a dozen times, testing different fillings and glazes, and each time, it disappears in minutes at my house. Trust me on this one—your family will ask for seconds, and you’ll want the recipe forever!
What is Moist Zucchini Coffee Cake with Cream Cheese Swirl?
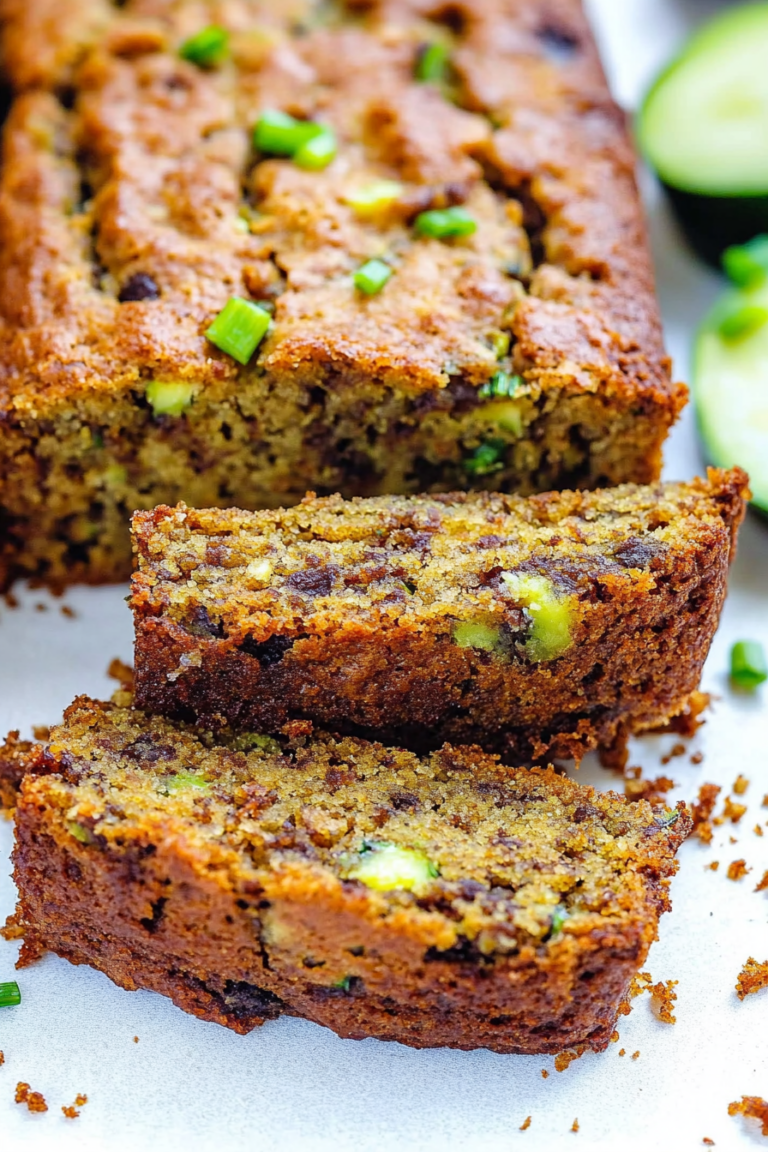
This cake is a delightful twist on classic coffee cake, but with grated zucchini infused into the batter to keep it super moist and tender. The term “coffee cake” usually brings to mind something crumbly and sweet to enjoy with a cup of coffee, and this cake fits the bill perfectly. Think of it as a lightly spiced, subtly sweet cake with a creamy, tangy cream cheese swirl running through it—like a little surprise in every bite. It’s essentially a cross between a bread and a cake, with the added bonus of sneaking in a vegetable that keeps it incredibly moist. The name “moist zucchini coffee cake” might sound fancy, but honestly, it’s just a cozy, straightforward recipe that’s perfect for breakfast, brunch, or an afternoon treat. The best part? It’s so easy to make, you’ll wonder why you haven’t been enjoying this kind of comfort food all along.
Why you’ll love this recipe?
What I love most about this zucchini coffee cake is how it combines simplicity with stunning flavor. The moment it hits the oven, the aroma alone can turn any cloudy day into a reason to celebrate. The flavor profile is pretty unbeatable—warm cinnamon, hints of vanilla, and that tangy cream cheese swirl creating a perfect balance of sweet and tart. Plus, it’s a total crowd-pleaser; my kids actually ask for this all the time, even when I tuck it into their lunchboxes. Budget-wise, it’s a winner, too—really just pantry staples and a fresh zucchini you probably already have. The versatility is another plus: serve it sliced for breakfast, crumble it over yogurt for a quick snack, or toast it for a cozy dessert. Over the years, I’ve tested different fillings and toppings, and I always come back to this classic version because it’s just the right mix of moist, flavorful, and downright addictive. Honestly, once you try it, you might find yourself craving this on a weekly basis—not that I blame you.
How do I make Zucchini Coffee Cake with Cream Cheese Swirl?
Quick Overview
This cake comes together with a simple batter, grated zucchini squeezed dry, and a swirl of sweet cream cheese layered in the middle. You mix the dry ingredients first, then whisk the wet ones separately, combine carefully, and swirl in the filling before baking. No complicated techniques, just good, honest baking with a cozy, homemade touch. The trick is to not overmix—trust me, the more gently you handle the batter, the fluffier and moister it’ll stay. Once baked, it’s fluffy, moist, and practically melts in your mouth. Plus, I’ve tested this with different zucchinis and even swapped in some apples on occasion—it’s super adaptable. The best part? Your house will smell like cinnamon and vanilla for hours. And, if you follow the step-by-step, you’ll have a perfectly layered, stunning-looking cake that’s just begging to be shared.
Ingredients
For the Main Batter:
– 2 cups all-purpose flour (I usually use unbleached for a richer flavor)
– 1 1/2 teaspoons baking powder
– 1/2 teaspoon baking soda
– 1 teaspoon ground cinnamon
– 1/4 teaspoon nutmeg (optional but adds cozy warmth)
– 1/2 teaspoon salt
– 1 cup granulated sugar
– 1/2 cup vegetable oil or melted unsalted butter
– 2 large eggs
– 1 teaspoon vanilla extract
– 1 cup grated zucchini (about 1 small zucchini)
– 1/4 cup buttermilk or milk (or almond milk for dairy-free; I tested with almond milk and it made it even creamier!)
For the Filling:
– 8 oz cream cheese, softened
– 1/4 cup powdered sugar
– 1 teaspoon vanilla extract
For the Glaze:
– 1 cup powdered sugar
– 2-3 tablespoons milk or cream
– A splash of vanilla (optional)
Step-by-Step Instructions
Step 1: Preheat & Prep Pan
Set your oven to 350°F (175°C). Grease a 9-inch round or square baking pan, or line it with parchment paper. Trust me, lining the pan makes life so much easier when it’s time to serve—no sticking mess to deal with. Make sure your oven rack is in the middle so everything bakes evenly.
Step 2: Mix Dry Ingredients
In a large bowl, whisk together the flour, baking powder, baking soda, cinnamon, nutmeg, and salt. Sifting these ingredients helps everything blend smoothly and avoids clumps—this is a little tip I learned after too many lumpy batters. Set aside while you mix the wet ingredients.
Step 3: Mix Wet Ingredients
In a separate bowl, whisk together the sugar, oil, eggs, and vanilla until smooth and slightly frothy. Then, stir in the grated zucchini and buttermilk. The zucchini should be squeezed dry beforehand (I do this by pressing it in a clean dish towel or paper towels) to prevent your batter from turning into a soggy mess. The batter will look a little thick—this is good, it means your cake will stay moist.
Step 4: Combine
Gradually add the dry ingredients into the wet mixture, gently folding everything together with a spatula. Don’t overmix—just until the flour disappears. This keeps the cake light and fluffy. If you overmix, you risk a dense texture, and nobody wants that!
Step 5: Prepare Filling
While your batter rests, beat the softened cream cheese with the powdered sugar and vanilla until smooth. It should be silky and spreadable but still hold its shape. If you want an extra layer of flavor, toss in a pinch of lemon zest or a dash of cinnamon.
Step 6: Layer & Swirl
Pour half of the batter into your prepared pan. Drop spoonfuls of the cream cheese mixture on top in little dollops. Then pour the remaining batter over and, with a skewer or knife, gently swirl the cream cheese through the batter—don’t overdo it, you want pretty marbled streaks. This creates that lovely visual contrast and keeps everyone excited when they cut into it.
Step 7: Bake
Pop it into the oven and bake for about 40-45 minutes. The edges should be golden, and a toothpick inserted in the center should come out clean or with just a few moist crumbs. Every oven is different, so start checking around 38 minutes. If it’s browning too quickly, cover it loosely with foil for the remaining minutes.
Step 8: Cool & Glaze
Let the cake cool in the pan for at least 15 minutes, then transfer it to a wire rack. Once mostly cooled, drizzle the glaze over the top—this adds just the right touch of sweetness. Whisk together the powdered sugar, milk, and vanilla until smooth. Add a splash more milk if it’s too thick, or a pinch more powdered sugar if it’s too runny.
Step 9: Slice & Serve
Cut into squares or wedges, serve slightly warm or at room temperature. For an extra special touch, add a dollop of whipped cream or a sprinkle of cinnamon on top. This cake is tempting just plain, but a little salty butter on a warm slice is honestly divine.
What to Serve It With
This cake is pretty versatile. For breakfast or brunch, serve it with a cup of strong black coffee or a glass of cold milk—trust me, that’s my favorite combo. I also love it with a drizzle of extra glaze and a side of fresh berries—blueberries or raspberries really brighten it up. When I make this for dessert, I like to add a scoop of vanilla ice cream or a dollop of Greek yogurt—makes it feel even more indulgent. My kids, of course, ask for it with a layer of extra cream cheese swirl because they’re convinced it makes it special. On cozy weekend mornings, I like to toast a slice and spread a thin layer of butter; it’s like a warm hug.
Top Tips for Perfecting Your Moist Zucchini Coffee Cake
One of my biggest lessons? Always squeeze out the zucchini well—moisture is the enemy of fluffy cakes. I keep a pile of paper towels nearby to press the grated zucchini and blot out excess water. That little trick makes all the difference in achieving a tender crumb.
Another tip is gentle mixing. Overmixing can lead to dense, rubbery texture, and nobody wants that. I’ve learned to fold the dry ingredients in just until the flour disappears—no more, no less. Patience makes this cake come out perfect every time.
The cream cheese swirl—trust me—don’t skip it. Swirling it just a little gives a couple of delightful pockets of tangy richness throughout the cake, and my family loves that surprise. Want to change it up? Toss in some lemon zest or a pinch of ginger in the cream cheese for a zing.
For baking, I’ve found that oven racks in the middle work best, but if your oven runs hot or cold, start checking around 38 minutes. A toothpick should come out with a few moist crumbs—perfectly moist but not gooey. I’ve also tested baking at 355°F just to see if it makes a difference, and honestly, the cake baked a little more evenly that way.
For the glaze, I recommend adding the milk a tablespoon at a time. Sometimes, when the cake is warm, the glaze spreads perfectly; other times, I chill it a little for a thicker drizzle. Play around and see what looks best on your cake. I like a shiny, slightly runny glaze that soaks in just a bit—yum.
All in all, this cake has become a go-to in my kitchen because it’s forgiving and simply delicious. It’s a stunner with minimal fuss—a real crowd-pleaser and a comforting staple I bet you’ll be making again and again.
Storing and Reheating Tips
This cake keeps beautifully on the counter for about two days if covered tightly with plastic wrap or kept in an airtight container. I usually wrap leftovers in foil or store in a cake carrier—they stay moist and fresh that way. If you want to keep it longer, pop slices into the refrigerator; just be sure to let it come back to room temp or warm slightly in the microwave before serving. Honestly, it’s almost better the next day, as the flavors meld together. To freeze, wrap individual slices tightly in plastic wrap, then foil, and store in a freezer-safe bag for up to 3 months. Thaw at room temperature or give it a quick warm-up in the microwave. I don’t recommend glazing if you plan to freeze—wait until it’s fully thawed to keep that shiny finish perfect. About the glaze—you can add it right before serving or store it separately to keep it fresh and glossy. If the glaze gets a little thick, just whisk in a splash more milk. Experimenting with these storage tricks has saved me many times when I overbaked or made too much. Give yourself a little room—this cake tastes just as good a second day, maybe even better!
Frequently Asked Questions
Final Thoughts
This moist zucchini coffee cake with cream cheese swirl has become a beloved staple in my home—and I bet it will in yours too. It’s the kind of dessert or breakfast that feels special enough for guests but straightforward enough to whip up on a weekday morning. The combination of tender, zucchini-infused cake, creamy swirl, and warm spices makes every bite feel like a cozy hug. Plus, it’s a sneaky way to get some veggies into the family without resistance. Over the years, I’ve made a few tweaks, but the core remains unbeatable. I love how you can customize the swirl, add extra spices, or swap in different fillings to keep things interesting. If you try it, I promise you’ll fall in love with how moist and flavorful it is—and I’d love to hear your own variations or tips! Remember, the best recipes are the ones you tweak to make your own. Happy baking, and enjoy every bite!
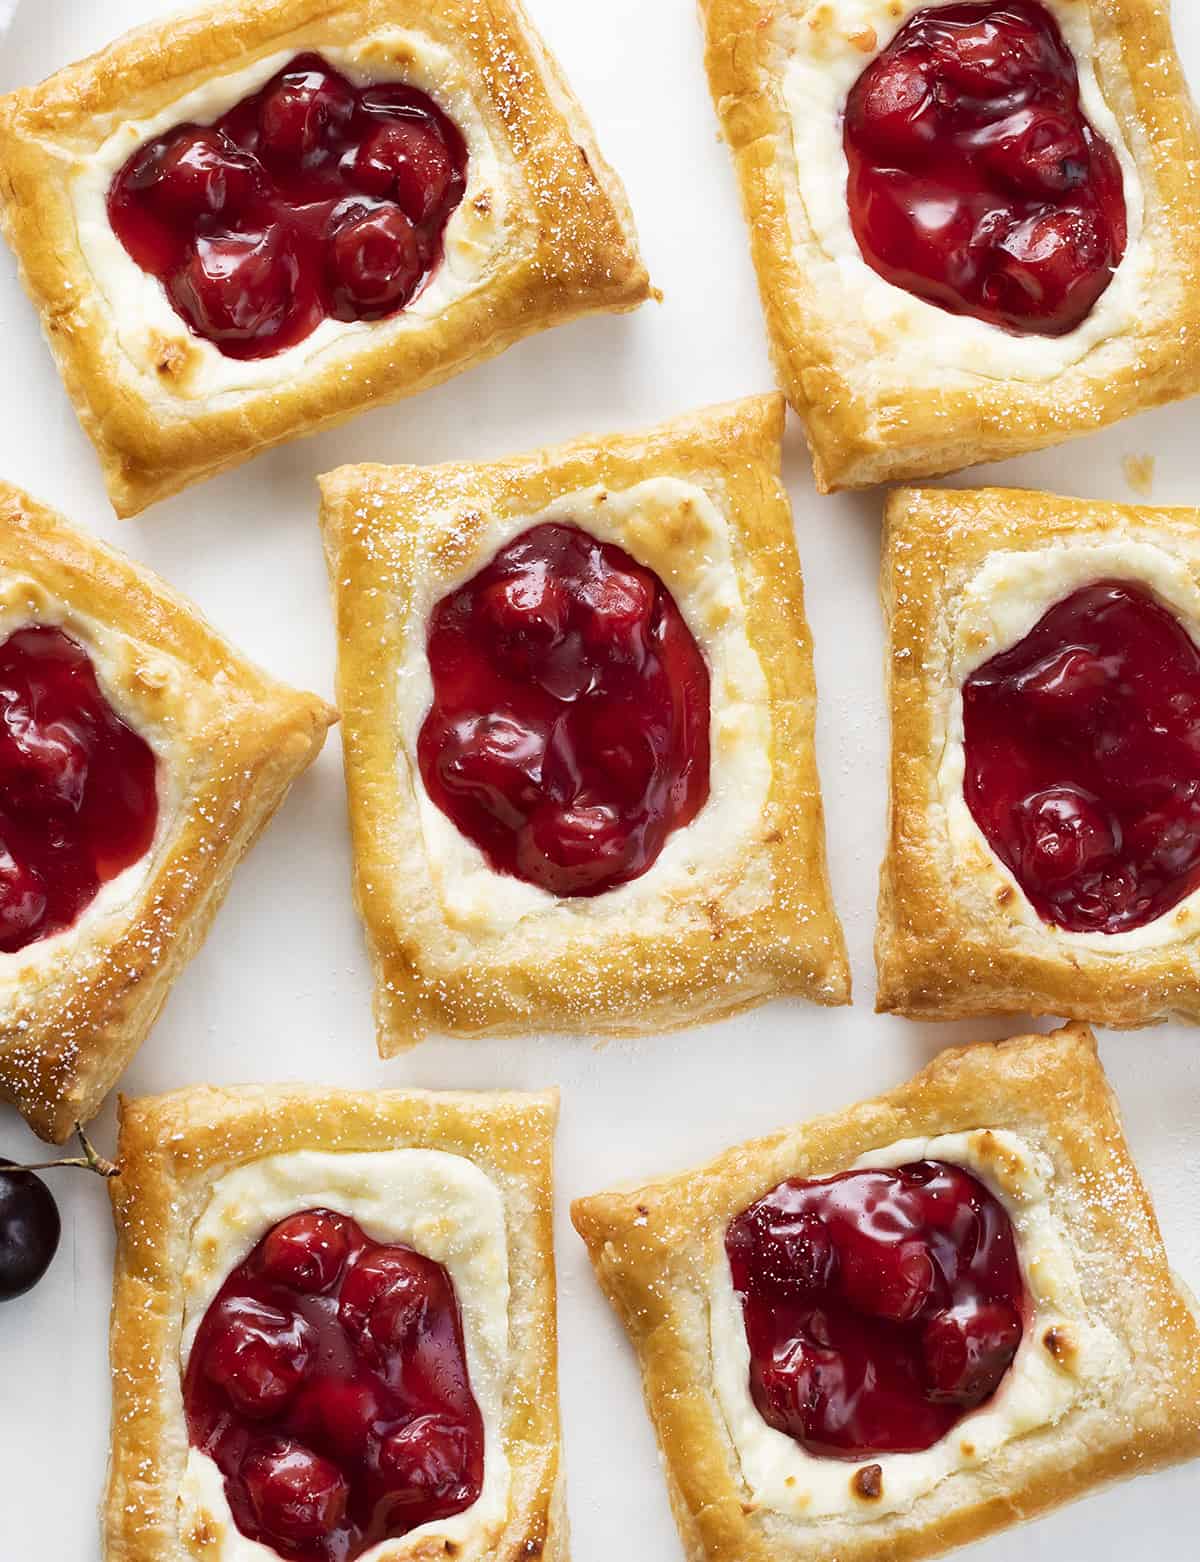
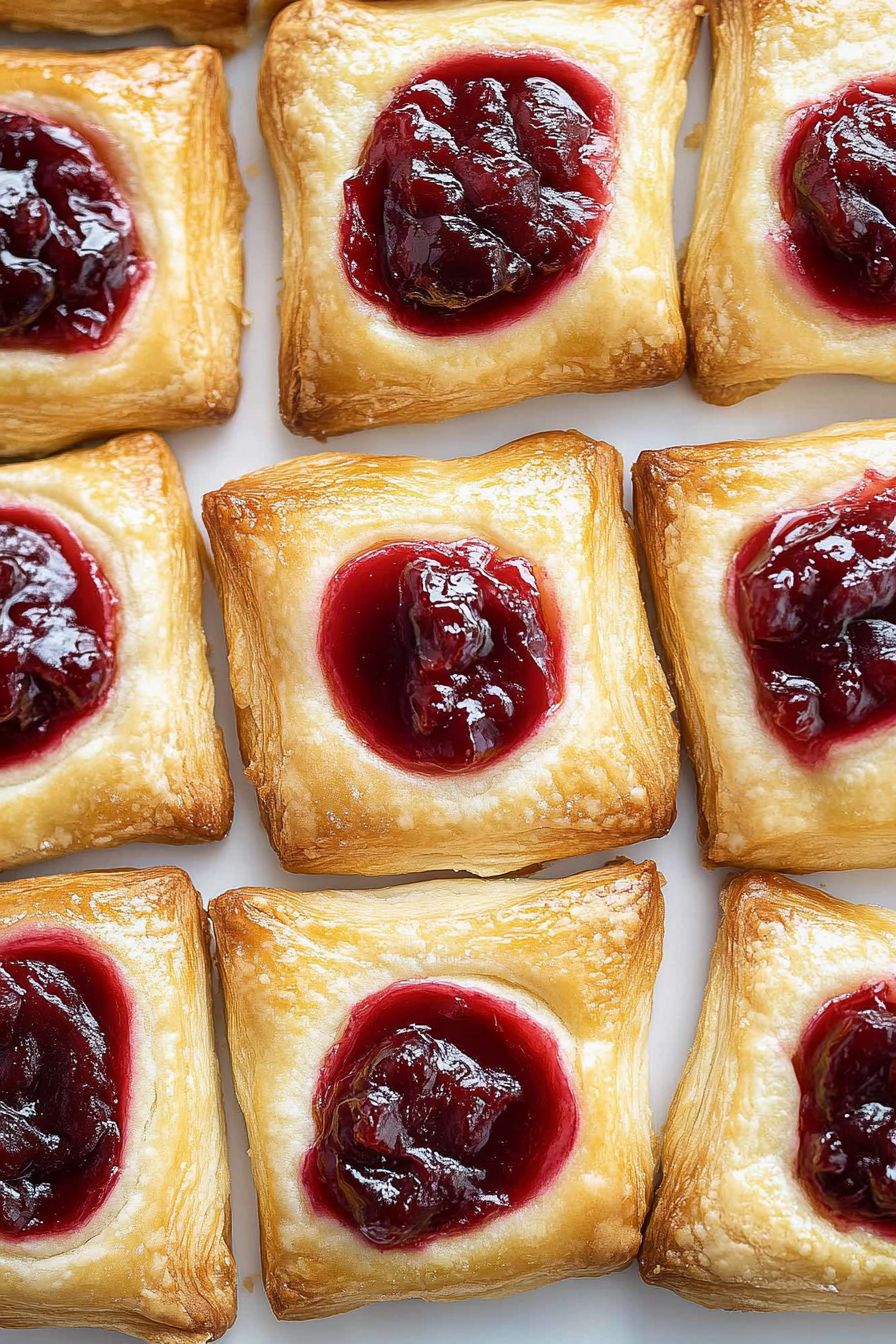
cherry danish
Ingredients
Method
- Preheat the oven to 400°F. Line 2 large baking sheets with parchment paper and set aside.
- Lay the puff pastry sheets on a lightly floured surface, and cut each sheet into 6 equal-sized rectangles. You will have a total of 12 rectangles, about 4.5x3 inches in size.
- Arrange the puff pastries evenly onto the lined baking sheets, leaving about 1 inch between each pastry.
- Use a fork to poke a few holes into the middle of the pastry sheet. Be sure to leave about a 0.5-inch perimeter around the edge. This will allow the outside border to puff up while the center stays low and holds the filling.
- In a medium bowl stir together the cream cheese, sugar, and almond extract until fully combined.
- Spread 1 heaping tablespoon of the cream cheese mixture onto the center of each puff pastry.
- Top the cream cheese mixture with 2 heaping tablespoons of cherry pie filling.
- In a small bowl, whisk the egg and water together. Brush onto the outside edges of the pastry.
- Bake for 15-18 minutes, or until golden.
- Remove from oven and dust with confectioners' sugar. Set aside to cool slightly before serving.
I love how simple ingredients can create such a comforting aroma! These flaky cherry pastries look absolutely delicious—definitely trying this recipe soon.
I love the cozy, comforting vibe of these pastries! The cinnamon aroma alone makes me want to bake them right now.
I’ve been wanting to try this recipe for ages—cherries and flaky pastry sound absolutely perfect together!
I love how these pastries smell while baking—it’s like a warm hug in the kitchen! Do you find cinnamon adds the most comfort?