
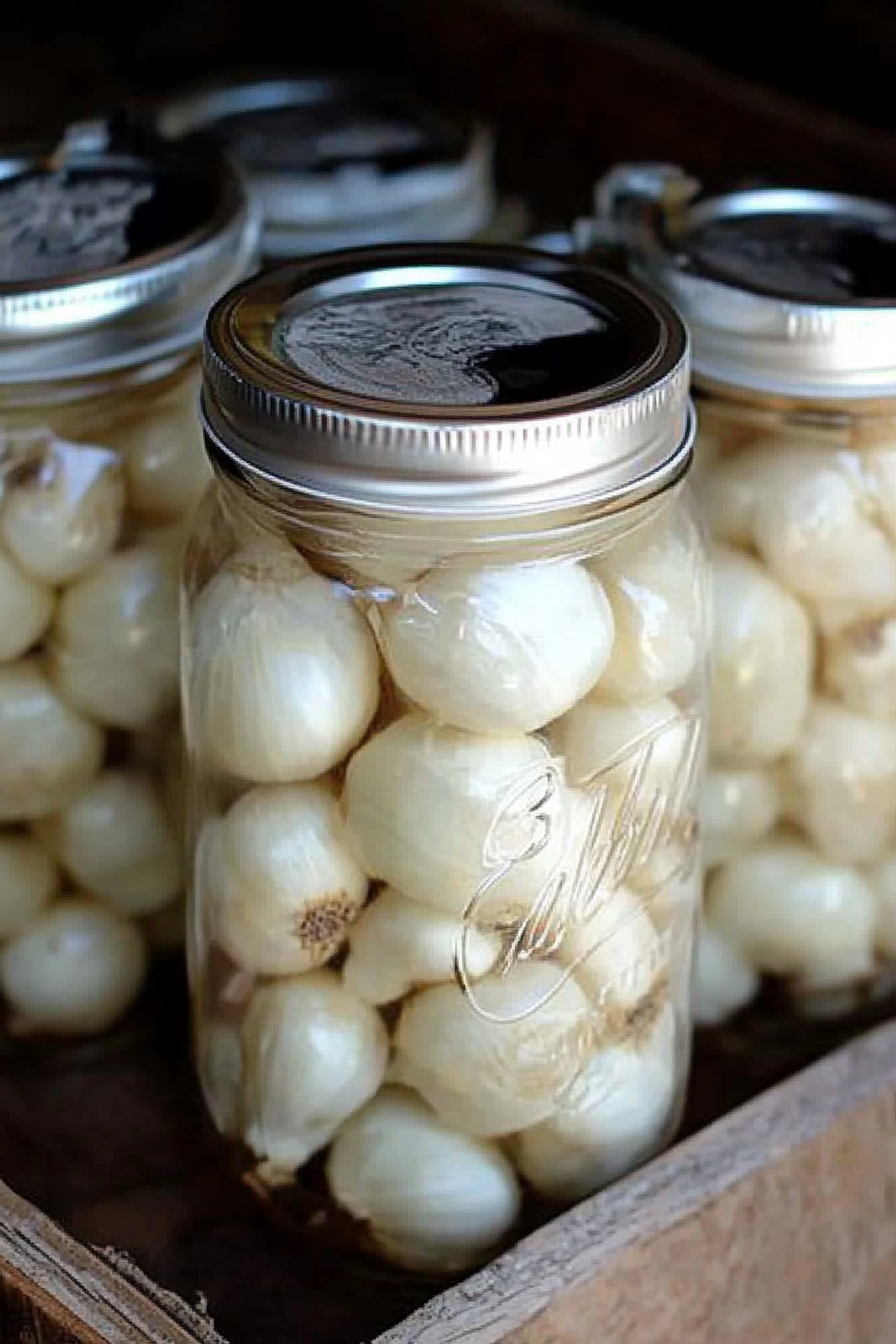
How to Store Garlic for Winter
There’s just something about warm, homemade banana bread that instantly makes my house feel cozy and inviting. I remember my grandma baking banana bread on chilly Saturday mornings, the sweet smell wafting through the kitchen while she’d hum softly in the background. Honestly, no matter how many fancy desserts I try, nothing beats this humble yet incredibly tasty loaf that I keep coming back to, especially when bananas on my counter start looking a little too ripe. It’s like comfort food in bread form — familiar, forgiving, and ridiculously easy to make. Plus, I always do this when I want a quick sweet fix; my kids ask for this all the time, and it disappears in minutes at my house. Trust me, once you’ve tried this recipe, it’ll become a staple in your kitchen too, especially on those mornings when you need something sweet but don’t want to fuss with complicated baking. Best of all? It’s just as good toasted with a smear of butter as it is plain — perfect for breakfast, snack, or even dessert!
What is the best banana bread recipe?
Think of this banana bread as a cozy hug wrapped in a slice of bread. It’s essentially a moist, tender loaf made from ripe bananas, flour, sugar, and a few simple staples that you probably already have in your pantry. The name is no joke — I’ve tested countless banana bread recipes over the years, and this one hits all the sweet spots: it’s flavorful, perfectly moist, and has just the right amount of sweetness. It’s not overly dense or gummy; instead, it’s light enough to slice easily but hearty enough to hold its shape. The miracle of this bread is how forgiving it is — even if you forget to mash the bananas perfectly smooth or add an extra pinch of cinnamon, the end result is always delicious. Plus, it’s a great way to use up those overripe bananas sitting on your counter that no one wants to eat plain anymore. Think of it as a simple, honest, no-fail recipe that feels like a warm blanket — perfect for any day, any time.
Why you’ll love this recipe?
What I love most about this banana bread is how it feels like a little slice of nostalgia every time I bake it. The smell alone — sweet, banana-y, with a hint of cinnamon — instantly takes me back to lazy weekend mornings. But beyond that, it’s seriously a lifesaver on busy nights when dessert needs to be quick and satisfying. You don’t need fancy ingredients or fancy skills; just ripe bananas, a handful of pantry staples, and a mixing bowl. The whole process is so straightforward — I’ve made this no fewer than a hundred times, and it never fails to turn out perfect. Plus, it’s budget-friendly, using ingredients I already keep stocked. What’s more, it’s incredibly versatile. Want to mix in some chocolate chips? Banana walnut chunks? Or swirl in a spoonful of peanut butter for extra richness? Go for it! This recipe is a blank canvas, waiting for your personal touch. And I swear, everyone who tastes it can’t believe how moist and flavorful it is. I’ve served this at brunch, packed it in school lunches, and even enjoyed it warmed up with a scoop of vanilla ice cream after dinner. It’s just one of those comforting, go-to recipes that I hope becomes part of your family’s baked favorites too.
What is the best way to make banana bread?
Quick Overview
This banana bread recipe comes together in about an hour with minimal fuss. You start by mashing ripe bananas until smooth, then mix dry ingredients in one bowl while whisking wet ingredients in another. Combine gently, fold in any extras you like, layer in the loaf pan, and bake until golden. The best part? It’s so forgiving — overmixing is a common mistake, so I always remind myself to mix only until just combined. The smell alone while baking is enough to make everyone gather in the kitchen. It cools quickly enough to slice into while still warm, and I swear, the texture is just spot on — moist, tender, and with a slightly chewy crust that’s irresistible.
Ingredients
For the Main Batter:
– 4 ripe bananas (the browner, the better — they mash easily and add sweetness)
– 1/2 cup unsalted butter, melted (I’ve tested with almond milk and it made the bread even creamier!)
– 1 cup granulated sugar
– 2 large eggs
– 1 teaspoon vanilla extract
– 2 cups all-purpose flour (if you want gluten-free, I recommend rice flour or gluten-free blends, but expect a slightly different texture)
– 1 teaspoon baking soda
– 1/2 teaspoon salt
– Optional: 1/2 teaspoon cinnamon or nutmeg for extra warmth
For the Filling (Optional):
– A handful of chopped walnuts or chocolate chips — your choice!
– I often stir in a handful of chopped walnuts for a bit of crunch or dark chocolate chips for that little extra indulgence.
For the Glaze (Optional):
– 1/2 cup powdered sugar
– 1 tablespoon milk or lemon juice
– A pinch of vanilla or citrus zest for flavor
– Whisk until smooth and drizzle over cooled bread for that beautiful finish
Step-by-Step Instructions
Step 1: Preheat & Prep Pan
Preheat your oven to 350°F (175°C). Grease a standard 9×5-inch loaf pan with butter or non-stick spray, and line it with parchment paper if you like for easy removal. I always do this when I want a clean slice — no tearing at the edges! Set it aside while you prepare the batter. Just taking a few extra seconds now saves hassle later.
Step 2: Mix Dry Ingredients
In a small bowl, whisk together the flour, baking soda, salt, and cinnamon if using. Doing this first prevents clumping and ensures even distribution of leavening — trust me, it makes a difference. It’s like giving the dry ingredients a nice little coat of love before combining them with the wet stuff.
Step 3: Mix Wet Ingredients
In a large bowl, mash the bananas with a fork until mostly smooth — I leave a few chunks for texture. Add the melted butter, sugar, eggs, and vanilla. Whisk until everything is well blended and the mixture looks glossy and smooth. I like to make sure the eggs are at room temperature so everything mixes effortlessly. The smell alone when you do this step? So good — sweet, earthy banana, and buttery warmth.
Step 4: Combine
Gradually add the dry ingredients to the wet, mixing just until combined. Do not overmix — that’s how you end up with dense bread. A few lumps are okay! Overmixing can develop gluten and make the bread chewy instead of tender. I usually fold it gently with a rubber spatula until I see no dry streaks.
Step 5: Prepare Filling
If you’re using nuts or chocolate chips, now’s the time to fold them in gently. I always add a handful of chopped walnuts for crunch, but chocolate chips are a favorite to make it feel extra special — especially for the kids. You can also toss in blueberries or swirl in peanut butter if you like — this recipe is really flexible.
Step 6: Layer & Swirl
Pour half the batter into your prepared pan. If you’re doing a swirl, add spoons of peanut butter or spooned-in jam, then top with the remaining batter. Use a knife or skewer to swirl gently, creating pretty marbled patterns. This part is the fun, slightly chaotic bit — just don’t overwork it, or you’ll lose the swirl effect.
Step 7: Bake
Pop it into the oven and bake for 55-60 minutes. I always check for doneness around 55 minutes by inserting a toothpick into the center — it should come out clean, or with just a few moist crumbs. If you notice the top browning too quickly, tent it with foil to prevent burning. Every oven is different, so keep an eye on it!
Step 8: Cool & Glaze
After baking, let the bread cool in the pan for about 10 minutes, then transfer to a wire rack. I love glazing it while still just a bit warm so the glaze seeps into the cracks and adds an extra layer of sweetness and shine. Drizzle your glaze evenly over the top and wait a few minutes for it to set.
Step 9: Slice & Serve
Use a serrated knife for clean cuts, and slice once it’s completely cooled. I like serving thick slices, warm or at room temperature, with a pat of butter or just plain. It’s fabulous for breakfast with coffee, or a quick snack with a glass of milk. If you’ve got leftovers, wrap tightly with plastic wrap or store in an airtight container — it stays moist and delicious for days.
What to Serve It With
This banana bread is incredibly versatile. For a cozy breakfast, pair it with your favorite morning brew — coffee or a strong black tea work wonders. I often toast slices the next morning and spread a little butter or cream cheese on top — it’s like an indulgent little treat to start the day. At brunch, serve alongside fresh fruit and a drizzle of honey, maybe with some scrambled eggs or breakfast sausage for hearty contrast.
As a dessert, I love slicing it thin and serving it warm with a scoop of vanilla ice cream or a dollop of whipped cream. Even at a casual gathering, it’s a crowd-pleaser that accompanies coffee and tea beautifully. And when I need a quick pick-me-up, one slice does the trick — filling, flavorful, and totally satisfying. My kids love to have it as an afternoon snack, and breakfast on busy weekdays always feels a bit more special when this is on the table.
Top Tips for Perfecting Your Banana Bread
Even after making this countless times, I’ve picked up a few tricks that really make a difference. First, always use overripe bananas — the blacker, the better. They’re sweeter and mash so easily, adding maximum flavor. I’ve tested with frozen bananas too; just thaw thoroughly and mash well, and it works great. For mixing, don’t overdo it — resist the urge to stir too vigorously or the bread might turn out dense. I keep a gentle touch and use folding techniques to keep that tender crumb.
If you want a prettier swirl, I recommend spooning in your filling in the middle, then smoothing the top before swirling with a skewer or toothpick. For adding nuts or chips, fold them in last to prevent sinking. About baking — I always position my rack in the middle and check doneness a little early the first time I bake a new batch because oven temperatures can vary. A toothpick inserted into the center should come out with moist crumbs but no batter.
Regarding optional ingredients, I’ve experimented with coconut flakes, dried cranberries, and even a splash of orange zest — all delicious variations. I’ve also tried reducing the sugar slightly, especially if you prefer a less sweet loaf, and it still turns out moist and flavorful. Just remember, the bananas do some of the sweetening work, so don’t skip those ripe ones!
Lastly, don’t skip the cooling stage. I’ve learned that a warm, freshly baked loaf is tempting — but letting it cool completely helps it set, preventing you from ending up with a crumbly mess when slicing. Trust me on this one; patience pays off.
Storing and Reheating Tips
This banana bread keeps wonderfully — I usually store it in an airtight container at room temperature for about 2 days. Cover it loosely with foil or plastic wrap, especially if it’s warm outside, to keep it fresh. If I want to keep it longer, I pop slices into the refrigerator where it stays good for up to a week. Just keep it well-wrapped to prevent it from drying out.
In the freezer? Definitely! Wrap slices tightly in plastic wrap and then double-wrap with foil or place in a freezer-safe bag. It’ll stay fresh for up to 3 months. When you’re ready, thaw at room temperature or warm slices in the microwave for 15-20 seconds — perfect for that just-baked feel. If you’ve glazed it, consider adding the glaze after reheating for optimal flavor. The warmth helps the glaze seep into the bread, making it even more delightful.
Note that if you like your banana bread glazed, it’s best to add the glaze just before serving to keep that glossy look and fresh flavor. Otherwise, the glaze might get a little soggy if stored for too long.
Frequently Asked Questions
Final Thoughts
Honestly, this recipe is one of those treasures I keep in my back pocket. It’s simple, reliable, and always a hit with family and friends. Every time I bake it, I remember why I fell in love with baking in the first place — the joy it brings to sharing something warm and homemade. It’s funny how something as humble as banana bread can evoke such nostalgia and comfort. I encourage you to try it exactly as described or tweak it to your liking — add nuts, chocolate, or spices — whatever makes it special for you. Once you master the basic recipe, it’s such a fun base for experimentation. So grab those overripe bananas, and let’s get baking! I’d love to hear how yours turns out — drop a comment below or share your variations. Happy baking!
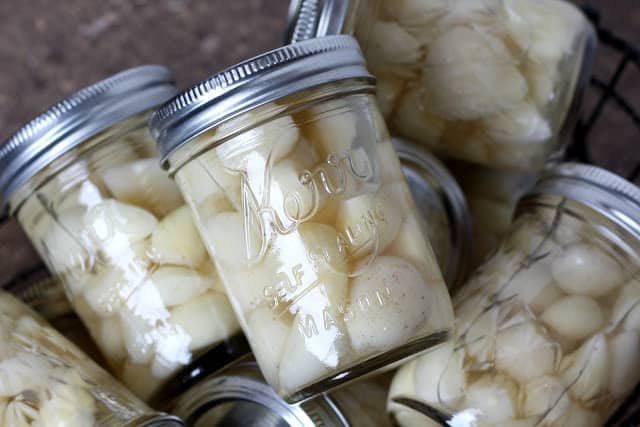
preserving garlic
Ingredients
Method
- Break apart your heads of garlic and peel the cloves. Place the peeled cloves of garlic in a large mixing bowl and fill with water. Use your fingertips to scrub any dirt off of the cloves. Once the cloves are cleaned, transfer them to a large strainer and rinse well.
- Depending on when your garlic was harvested, you might have very few brown spots on the cloves. Use a small paring knife to trim the spots and then transfer the cleaned and trimmed cloves back to the strainer. Rinse again.
- Bring the vinegar to a boil in a large pot. Place the clean garlic cloves into small jars. Once the vinegar has boiled, pour it over the garlic and screw the lids on tight.
- Let the jars come to room temperature on the counter overnight and then store in the refrigerator. This will keep in the refrigerator for up to a year. Enjoy!
I love this! My mom does the same with her banana bread—it’s such a comforting tradition.
I love how banana bread brings back those warm, nostalgic memories! It’s amazing how food can make a house feel so cozy.
I totally get that cozy feeling! Nothing beats the smell of banana bread baking in the kitchen—just like your grandma’s did.