
Spooky Snack Mix Recipe is Easy to Make
There’s something about baking that instantly transports me back to lazy Sunday mornings with my family, the smell of warm bread filling the house, and my kids giggling as they wait eagerly by the kitchen table. This zucchini banana bread is a little slice of those memories—moist, sweet, and bursting with cozy flavors. I always do this when I want something comforting but also a little sneaky with those veggies. Honestly, it’s become a family favorite — my kids ask for this all the time, and friends always ask for the recipe when they visit. It’s incredible how something so simple can taste so indulgent, and it’s shockingly easy to make, which is why it’s a lifesaver on busy nights or when I have ripe bananas that need using up. Plus, the swirl of cinnamon-spiced filling makes every bite feel special. Trust me, once you try making this zucchini banana bread, it’ll be on your weekly rotation—so good, you’ll want to keep a banana stash just for this!
What is Zucchini Banana Bread?
Think of zucchini banana bread as a cozy, slightly grown-up version of your classic quick bread. It’s essentially a soft, moist loaf that combines ripe bananas and shredded zucchini—two ingredients that might seem like an unlikely pair but work beautifully together. The name comes from the fact that zucchini is grated and folded into the batter, adding moisture and a hint of earthiness, while bananas lend their natural sweetness. This bread isn’t just about hiding veggies — it’s about celebrating them. It’s like a warm hug in every slice, with the added bonus of feeling a little smarter about sneaking in some greens. The swirl inside? That’s a cinnamon-spiced fruit filling that makes each bite extra indulgent. Think of it as a cozy morning treat, an afternoon snack, or even a light dessert. The best part? It’s quick to whip up and totally customizable, perfect for lazy weekends or busy weekday mornings.
Why you’ll love this recipe?
What I love most about this zucchini banana bread is how it hits all the right notes: incredible flavor, effortless prep, and a little healthy twist. The bananas give it a natural sweetness that doesn’t require a ton of sugar, and the zucchini keeps the bread unbelievably moist—seriously, I’ve made this with those slightly overripe bananas that nobody else wants, and it turned out amazing! Plus, it’s budget-friendly; I almost always have all these ingredients sitting in my pantry and fridge. The versatility is a big win; you can jazz it up with nuts or chocolate chips, or keep it simple and pure. I also like that it’s a fantastic way to use up those lonely, overripe bananas and veggies that might otherwise go to waste. And FYI, what I love most about this recipe is how forgiving it is. Even if you’re not a baking pro, you’ll find this surprisingly easy—just mix, layer, and bake. Trust me, this disappeared in minutes at my house!
How do you make Zucchini Banana Bread?
Quick Overview
This zucchini banana bread is a one-bowl wonder that comes together in under an hour. You start by shredding the zucchini and mashing the bananas, then mix everything together quickly—no fancy equipment needed. The secret is not overmixing the batter to keep it tender. The filling is a simple cinnamon-sugar mixture that gets layered and swirled into the batter before baking. It bakes until golden and a toothpick comes out clean—perfectly moist inside and slightly caramelized on top. The best part? It cools just enough to slice beautifully, revealing a gorgeous marbled swirl inside. Once cooled, a quick drizzle of glaze or dusting of powdered sugar, and you’re ready to serve. It’s honestly so straightforward that even beginners can nail it—and I promise, the flavor totally impresses!
Ingredients
For the Main Batter:
– 2 cups all-purpose flour (or whole wheat for added fiber, your call!)
– 1 teaspoon baking soda
– 1 teaspoon baking powder
– ½ teaspoon salt
– 1 teaspoon cinnamon (your new best friend)
– 1 cup sugar (or honey/maple syrup if you prefer natural sweeteners)
– ½ cup vegetable oil (or melted coconut oil for a richer taste)
– 2 large eggs
– 1½ cups mashed ripe bananas (about 3 medium bananas)
– 1 cup shredded zucchini (squeeze out excess moisture!)
– 1 teaspoon vanilla extract
For the Filling:
– ¼ cup brown sugar
– 1 teaspoon cinnamon
– 1 cup finely chopped nuts or chocolate chips (optional, but totally worth it)
For the Glaze:
– ½ cup powdered sugar
– 1-2 teaspoons milk or lemon juice
– Optional: a splash of vanilla or citrus zest for extra zing
Step-by-Step Instructions
Step 1: Preheat & Prep Pan
Heat your oven to 350°F (175°C). Grease a loaf pan with butter or non-stick spray and line it with parchment paper for easy removal. I always do this because it prevents sticking and makes slicing a breeze. Set it aside while you mix up the batter.
Step 2: Mix Dry Ingredients
In a big mixing bowl, whisk together the flour, baking soda, baking powder, salt, and cinnamon. This step is key to ensuring everything is evenly distributed—trust me, it helps prevent pockets of baking soda or uneven flavor. The dry ingredients should look uniform, like a fluffy cloud ready to embrace the wet stuff.
Step 3: Mix Wet Ingredients
In a separate bowl, mash those bananas until smooth. I use a fork, but a potato masher works great too. Then, whisk in the eggs, oil, vanilla, and sugar until well combined—like a little golden sunbeam. If your bananas are super ripe, the mixture will smell amazing and be easy to mash. It’s okay if there are tiny lumps—they lend charm and texture.
Step 4: Combine
Pour the wet mixture into the dry ingredients, and gently fold everything together—don’t overmix! Stir just until no streaks of flour remain. Overmixing can lead to dense bread, and nobody wants that. If you’re feeling fancy, fold in some chocolate chips or nuts here.
Step 5: Prepare Filling
Mix together the brown sugar, cinnamon, and optional nuts or chocolate chips. This sweet, spicy filling is what makes this zucchini banana bread special. If you want a gooey swirl instead, you can make a simple cinnamon-sugar paste. Set aside, ready for layering.
Step 6: Layer & Swirl
Pour about half the batter into your prepared loaf pan. Spoon the filling over the batter, then top with the rest of the batter. Use a knife or skewer to swirl gently—this creates the gorgeous marbled look and distributes the cinnamon goodness. Be playful here—swirling too much can blend the layers, but a few zig-zags make it pretty!
Step 7: Bake
Pop it in the oven and bake for 55-60 minutes. You’ll know it’s done when the top is golden and a toothpick inserted into the center comes out clean. If the top browns too quickly, tent it with foil for the last 10 minutes—your bread stays moist and doesn’t burn. Let it cool in the pan for about 15 minutes before transferring to a wire rack.
Step 8: Cool & Glaze
Once cooled slightly, drizzle with your glaze or dust with powdered sugar. I love this step because it adds a little finishing touch that makes it look shop-worthy. Trust me on this: don’t skip the glaze. It ties everything together and adds a lovely sweet contrast.
Step 9: Slice & Serve
Use a serrated knife to cut slices once fully cooled. Wait at least 20 minutes—if you cut it too early, it might fall apart. Serve warm or at room temperature. I love it with a cup of coffee or a dollop of yogurt. Oh, and it’s even better the next day—if it lasts that long!
What to Serve It With
This bread is so versatile that it plays well with everything. For breakfast, pair it with a steaming cup of black coffee or a frothy latte—nothing beats the smell pulling everyone to the table. For brunch, serve slices with fresh berries and whipped cream to make it feel a little fancy. As a dessert, I like to add a scoop of vanilla ice cream or a drizzle of honey—totally decadent. And when I need a cozy snack, I simply microwave a slice for 10 seconds and enjoy it warm. My kids always ask for seconds, especially when I sneak in a handful of walnuts or mini chocolate chips. It’s become our weekend treat, and honestly, I don’t mind making it repeatedly because it’s just so comforting. Plus, you can dress it up or down—add a smear of almond butter or a drizzle of caramel, and it’s a whole new experience. Trust me, this zucchini banana bread is the kind of recipe that makes home baking feel special, even on days when you’re short on time.
Top Tips for Perfecting Your Zucchini Banana Bread
Early on, I learned a few tricks that take this bread from good to absolutely fantastic. First, make sure to squeeze out as much moisture as possible from the shredded zucchini—this prevents sogginess and keeps the bread nice and fluffy. I usually wrap it in a clean dish towel and press gently. Next, don’t overmix when combining wet and dry ingredients. Overmixing can create a tight crumb, and nobody wants that chewy texture. Instead, stir just until combined—like a gentle fold, here. For the swirl pattern, I find that zig-zag swirling with a toothpick creates a beautiful marbled effect, but don’t overdo it; a few gentle passes are enough. If you want extra flavor, add a teaspoon of orange zest into the batter or a splash of maple syrup in the glaze—that subtle boost makes a big difference. I’ve experimented with different flours, and honestly, whole wheat works great if you want a healthier spin, but I do find the batter a little denser. Also, adjust baking time if your loaf is larger or smaller—always check with a toothpick. Oh, and for the glaze, if the consistency feels too thick, just add a tiny splash of milk or juice—trust me, smooth and glossy is the goal here. Little tweaks like these make your baking fail-proof and even more delicious!
Storing and Reheating Tips
This zucchini banana bread keeps beautifully, which makes it perfect for leftovers or planned snacks. At room temperature, wrapped tightly in foil or an airtight container, it stay fresh for about 2-3 days—think of that warm smell floating around all day. If you want it to last longer, pop it into the fridge—well-covered to prevent it from drying out—and it’ll stay good for up to a week. I recommend slicing it beforehand so you can grab just what you need without exposing the whole loaf repeatedly. Want to keep it even longer? Freeze slices individually wrapped in plastic wrap or foil; they’ll last about 3 months. To reheat, microwave a slice for about 10-15 seconds—so cozy—and if you like a little extra moisture, sprinkle a tiny splash of water on it before heating. For the glaze, just add it fresh after reheating to keep that glossy, tempting look. I’ve found that this bread reheats well without losing too much moisture, especially if stored properly. Honestly, it’s almost better on day two because all those flavors meld together even more—and the smell? It’s pure comfort.
Frequently Asked Questions
Final Thoughts
This zucchini banana bread is a true comfort dish—moist, fragrant, slightly spicy, and with that touch of sweet dark filling inside. It’s one of those recipes I keep close because it’s almost foolproof and always gets rave reviews. I love how versatile it is; you can customize the filling, choose your favorite toppings, or sneak in extra goodies like walnuts or blueberries. It’s perfect for mornings, snacks, or even a casual dinner finale. And the best part? It makes my kitchen smell like a bakery, which instantly lifts my mood. If you give this a try, I’d love to hear about your twists and tweaks! Don’t forget to snap a photo and share it in the comments. Happy baking—and I can’t wait to hear how yours turns out!

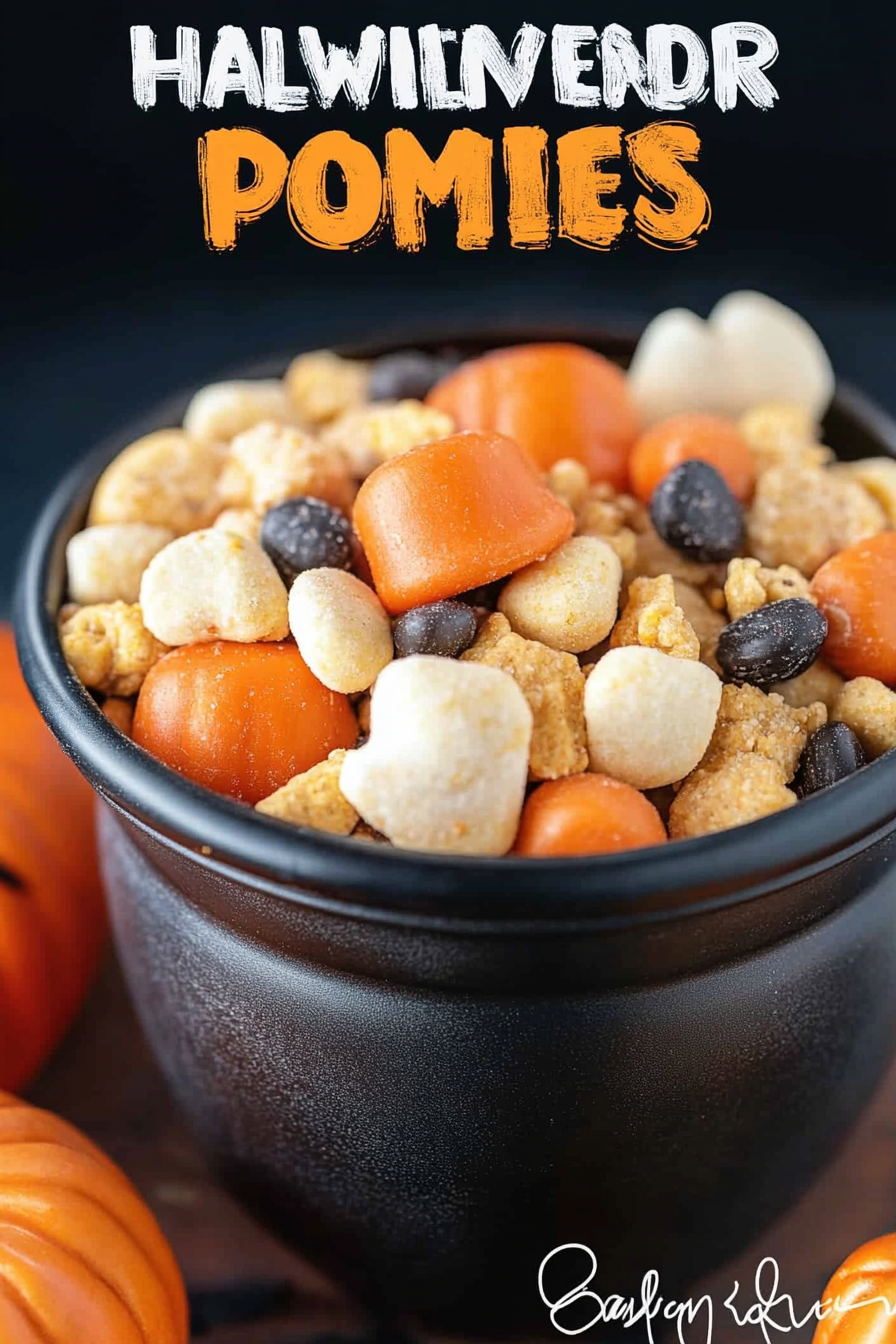
Halloween snack mix
Ingredients
Method
- Mix the candy corn and peanuts in a serving bowl.
- Slice each Rice Krispies Treat into 24 pieces. Mix into candy corn mixture. Serve.
- Store in an airtight container for up to 2 weeks.


Love this idea! Perfect for a fun Halloween party—kids will love helping mix it.