
Crispy Air Fryer Chicken Nuggets How Easy
There’s nothing quite like that feeling of slicing into a warm, gooey piece of cake, especially when it turns out so much better than I expected — and I say that after making it about a dozen times. I remember the first time I baked this chocolate zucchini cake, I was skeptical. Zucchini in cake? Sounds weird, right? But trust me, it’s one of those secretly genius tricks. The zucchini adds moisture and a little surprise of freshness, without overpowering the rich chocolate flavor. My kids ask for this all the time, and honestly, I don’t blame them — it’s incredibly delicious, and I always do this when I want something sweet but don’t want to spend forever in the kitchen. Plus, it’s a sneaky way to get veggies in — you know, for the picky eaters. I’ve tested this with almond milk, coconut oil, even a little apple sauce and it’s always a win. If you’re craving a dessert that’s cozy with a hint of healthy, this is your new go-to. Let’s get baking – your kitchen is about to smell like heaven!
What is Fudgy Chocolate Zucchini Cake?
This cake is kind of the best of both worlds — a rich, fudgy chocolate treat packed with sneaky zucchini, making it dense and moist, but not heavy. Think of it as the lovechild of a brownie and classic coffee cake, but completely homey and easy to whip up. Honestly, the name “zucchini cake” sounds like it might be healthy, but it’s pure indulgence. The zucchini does its job of creating a tender crumb while keeping the cake super moist, so every bite melts in your mouth. It’s essentially a chocolate lover’s dream with a veggie twist that’s perfect for sneaking into snack time or serving as a sweet finale after dinner. The best part? No fancy frosting required — just a dusting of powdered sugar or a quick drizzle of glaze, and you’re good to go. I love that this cake is as much a comfort food as it is a clever way to use up those garden zucchinis, and honestly, it’s become a family favorite I make whenever I need a little pick-me-up.
Why you’ll love this recipe?
What I love most about this is how incredibly moist and chocolatey it turns out, even hours after baking. That fudgy texture? It’s addictive. Plus, it’s surprisingly easy to make. You just toss everything in one bowl, stir, and bake — no complicated techniques or fancy equipment needed. This one’s a lifesaver on busy nights when I don’t want to fuss but still crave something decadent. And let’s talk about budget — the ingredients are simple pantry staples, so you probably already have everything you need. I’ve made this countless times and it never fails; it’s a guaranteed crowd-pleaser whether I bake it for friends, potlucks, or just a cozy weekend treat. I also love that it’s versatile: serve it warm with a scoop of vanilla ice cream, or let it cool and dust with powdered sugar for a more classic vibe. It’s honestly the kind of recipe I keep coming back to, because it’s like hugging a big chocolate cloud—who doesn’t need that? Plus, the zucchini keeps it from feeling overly sweet, so I can enjoy a slice without feeling too guilty.
How do I make fudgy chocolate Zucchini cake?
Quick Overview
This cake comes together in about 10 minutes of stirring, then bakes for roughly 40 minutes — easy peasy! The batter is thick, almost brownie-like, which is perfect because it means the zucchini is beautifully nestled inside without sinking to the bottom. I promise, this is foolproof once you get the hang of folding in the zucchini gently so it stays evenly distributed. The magic happens in the oven, where all those flavors deepen and the texture transforms into something truly irresistible. I like to test for doneness by inserting a toothpick — if it comes out with moist crumbs, you know it’s ready. Once cooled, I like to drizzle a quick chocolate glaze or just sprinkle powdered sugar on top for that beautiful, rustic look. It’s honestly one of those recipes that tastes even better the next day — if it lasts that long!
Ingredients
For the Main Batter:
– 1 ½ cups all-purpose flour (or gluten-free blend, see tips below)
– ½ cup unsweetened cocoa powder (use good quality for richer flavor)
– 1 teaspoon baking powder
– ½ teaspoon baking soda
– ¼ teaspoon salt
– 1 cup granulated sugar
– ½ cup light brown sugar (adds depth and moisture)
– ¾ cup vegetable oil (or melted coconut oil)
– 3 large eggs
– 1 teaspoon vanilla extract
– 1 cup grated zucchini (about one small-medium zucchini, shredded and drained slightly)
– ½ cup milk of your choice (dairy or plant-based, I prefer almond or oat milk)
For the Filling:
– Optional: mini chocolate chips, chopped nuts, or a swirl of peanut butter — all delicious!
– Just a handful for extra texture and flavor.
For the Glaze:
– ½ cup semi-sweet chocolate chips
– 2 tablespoons heavy cream or coconut milk
– A pinch of sea salt (optional but adds a lovely depth)
– Brighten it up with a teaspoon of espresso powder if you like a deeper chocolate punch.
Step-by-Step Instructions
Step 1: Preheat & Prep Pan
Set your oven to 350°F (175°C). Grease a 9-inch round cake pan, or line it with parchment paper for easy removal. I always do this so I don’t end up fighting the cake later. If you want a rustic look, a square pan works just as well — just adjust the baking time slightly.
Step 2: Mix Dry Ingredients
In a large bowl, whisk together the flour, cocoa powder, baking powder, baking soda, and salt. It’s worth sifting the cocoa if you can, to avoid clumps — trust me, the smooth batter makes a difference. This step ensures your cake rises evenly and has that perfect fudgy crumb.
Step 3: Mix Wet Ingredients
In a separate bowl, mix the sugars, oil, eggs, and vanilla until well combined. I use a whisk for this part — it emulsifies everything beautifully. Add in the milk last, just until combined. The batter will be thick, but that’s what we want — it helps the zucchini stay suspended and gives the cake that dense, fudgy texture.
Step 4: Combine
Gradually stir the dry ingredients into the wet mixture. Be gentle — overmixing can toughen the batter, and we want it nice and tender. Fold in the grated zucchini last, making sure it’s evenly distributed without deflating the batter. This is the secret to moisture without mess!
Step 5: Prepare Filling
If you’re adding chocolate chips or nuts, fold them into the batter now. Keep in mind, the zucchini just needs a gentle stir-in to keep everything even. If you want to add a swirl of peanut butter or Nutella, now’s the time — just dollop and swirl with a skewer or knife.
Step 6: Layer & Swirl
Pour the batter into your prepared pan. For a marbled look, dollop spoonfuls of filling (like peanut butter or extra chocolate) and swirl with a toothpick or skewer. I love making a little pattern—swirling it in a figure-eight shape — it looks pretty and keeps things interesting in every slice.
Step 7: Bake
Pop it into your preheated oven and bake for 40-45 minutes. Check the doneness by inserting a toothpick — it should come out with moist but not wet crumbs. If your oven runs hot, start checking around the 38-minute mark. My oven can be tricky sometimes, so I always keep a close eye near the end.
Step 8: Cool & Glaze
Let the cake cool in the pan for about 15 minutes, then transfer it to a wire rack to cool completely. I know it’s tempting to cut into it right away, but trust me — waiting until it’s fully cooled helps it set. While it cools, melt your chocolate chips with cream until smooth. Drizzle it all over the top, or just dust with powdered sugar if you prefer something simpler. The glaze sets quickly, so work fast but gentle.
Step 9: Slice & Serve
Use a sharp knife to cut neat slices — warming the knife slightly helps prevent crumbling. Serve it at room temperature, maybe with a glass of cold milk or a cup of coffee. The smell alone will make everyone come running — I swear, this disappears in minutes at my house. It’s perfect warm with a scoop of vanilla ice cream or just as is for an afternoon pick-me-up. It’s also amazing the next day — if it lasts that long! Just note, the glaze will firm up, giving you a slightly more fudgy experience.
What to Serve It With
This cake is so versatile, I honestly love serving it in different ways depending on the occasion. For breakfast, I like to pair it with a strong cup of coffee and a dollop of whipped cream if I’m feeling fancy. It’s also perfect for brunch laid out with fresh berries and a splash of cream — looks beautiful and feels indulgent without going overboard.
As a dessert, a simple dusting of powdered sugar or a drizzle of caramel elevates it beautifully. My family’s favorite way to serve it is slightly warm, with a scoop of vanilla ice cream and a sprinkle of crushed nuts — pure comfort. And when I want a quick snack, I slice a piece and toast it lightly, then spread with a bit of jam or peanut butter. This cake always makes an appearance on special occasions or just as a weekend treat. It’s become part of our little family tradition, and I hope it will become one of yours too!
Top Tips for Perfecting Your Fudgy Chocolate Zucchini Cake
Over the years, I’ve picked up a few tricks to make sure this cake turns out perfect every time. First, always squeeze out a little of the moisture from the grated zucchini — too much water can make the batter runny or cause uneven baking. I use a clean kitchen towel to gently press out excess liquid. Also, I’ve tested this with different flours, and honestly, a gluten-free blend works wonderfully, just add an extra pinch of xanthan gum if needed. When mixing, I avoid overdoing it — just fold the dry into the wet until barely combined. That keeps the crumb nice and tender.
Swirling in peanut butter or Nutella is one of my favorite tricks; it adds a little richness and looks pretty too. If you’re short on time, semi-sweet chocolate chips stirred in right before baking give that extra chocolaty bite — trust me on this. Banish any worries about the zucchini being too visible; once baked, it’s almost impossible to tell, but it sure makes the cake moister and healthier-feeling. Temperature-wise, I recommend positioning the rack in the middle of the oven for even baking, especially if your oven tends to hot-spot. Do a quick test with a toothpick near the end; it’s the best way to avoid dry edges or underbaked centers. And finally, don’t rush glazing — letting the glaze set for about 15 minutes really gives your cake that polished look.
This recipe is a treasure chest — adaptable, forgiving, and downright delicious. I’ve tweaked it over the years to suit my family’s taste, and every version is a hit. So don’t stress, just have fun with it! Baking is a bit like life — the more you try, the better you get, and the more you enjoy the process.
Storing and Reheating Tips
This cake remains lovely for a couple of days if stored properly. After cooling completely, I wrap it tightly in plastic wrap or slide it into an airtight container. It’s best to keep it at room temperature if you plan to eat it within two days — keep it away from direct sunlight or heat, of course. If you want to save some for later, the fridge is fine too; just bring it to room temp or give it a quick microwave zap (about 10-15 seconds) to warm it up — the texture stays moist and fudgy. When freezing, wrap slices individually in plastic wrap then foil to prevent freezer burn. It’s great for making ahead for parties or busy mornings. Just let it thaw fully before serving, and if you like, reheat a slice to bring back that fresh-from-the-oven warmth. Remember, the glaze might crack slightly after freezing, but the flavor stays perfect.
Frequently Asked Questions
Final Thoughts
If you’re looking for a chocolate cake that’s impressively moist, kind of indulgent, but still feels like a little secret treat, you’ve found it. The magic of this fudgy chocolate zucchini cake is in that perfect balance of richness and moisture, with just a hint of veggie freshness to keep it slightly healthy in spirit. I can’t tell you how many times I’ve surprised friends and family with this, and they always ask for seconds. It’s one of those recipes that gets better after sitting for a day or two — if it even lasts that long! Whether you’re baking for a cozy weekend afternoon, a casual family gathering, or just because you’re craving something truly chocolatey, this cake is a winner. So go ahead, give it a try, and don’t forget to tell me how yours turns out! Happy baking!
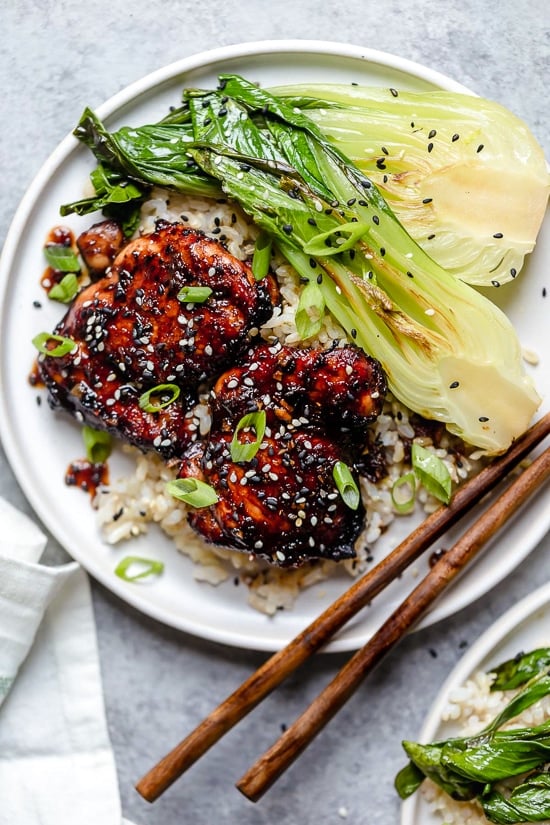
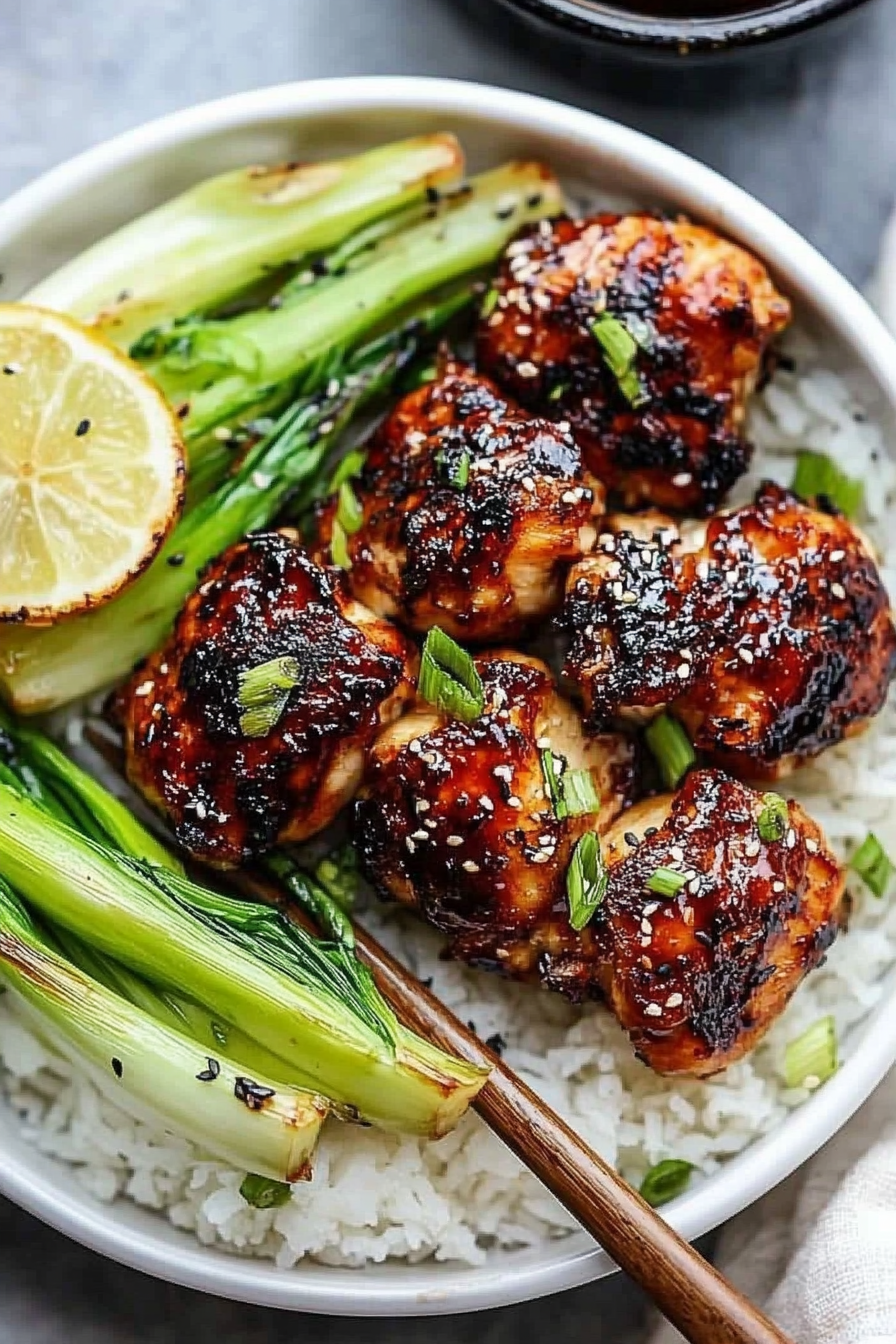
air fryer chicken
Ingredients
Method
- In a small bowl, combine balsamic vinegar, soy sauce, honey, crushed garlic, Sriracha, and grated ginger. Mix well.
- Pour half of the marinade into a large bowl with the chicken. Cover and marinate at least 2 hours or overnight.
- Reserve the remaining sauce for later.
- Preheat the air fryer to 400°F.
- Remove chicken from marinade and transfer to the air fryer basket.
- Cook in batches for 14 minutes, turning halfway through, until cooked through in the center.
- Meanwhile, simmer the remaining sauce in a small pot over medium-low heat until slightly reduced and thickened, about 1 to 2 minutes.
- Drizzle the sauce over the cooked chicken and garnish with sliced scallions to serve.


These nuggets look amazing! I’ve been wanting to try making them at home — do they really crisp up that well in the air fryer?
These nuggets look absolutely golden and crispy—can’t wait to try this! The recipe seems so simple and foolproof.
These air fryer nuggets look absolutely irresistible — crispy on the outside, juicy inside! Definitely trying this recipe soon.
I just tried these and they’re incredible—crispy on the outside, juicy inside! Way easier than I thought, and my whole family loved them.
I’ve made these before and they’re always a hit! The crunch is perfect, and they cook evenly in the air fryer—definitely doing this again.