

Easy Slow Cooker Italian Chicken Dinner
There’s something about the smell of baking in my kitchen that instantly makes me feel at home—especially when it’s a warm, cinnamon-scented coffee cake bursting with fresh zucchini. I swear, I’ve made this particular recipe so many times that my kids ask for it almost every weekend. It’s one of those dishes that’s as comforting as a hug from Grandma but way easier to pull together than you’d think. I always do this when I want that sweet, tender crumb with just a hint of moisture from the zucchini—and trust me, the secret to perfect moistness is squeezing out the water from that zucchini before adding it to the batter. This recipe’s a lifesaver on busy nights, since it comes together quickly, and it’s a fantastic way to sneak some veggies into the kids’ snacks. Plus, I’ve tested this with almond milk and it actually made it even creamier—so I promise, it’s flexible too. Whether you’re making it for breakfast, brunch, or just because you’re craving something sweet at 10 pm, I know you’re going to love this as much as my family does.
What is the best Zucchini coffee cake?
This zucchini coffee cake is like a golden-hued, tender crumb cake with a surprise ingredient—fresh zucchini! Think of it as a delightful blend of classic coffee cake and the healthy boost of zucchini that keeps it moist and tender. It’s essentially a cozy, bread-like cake with swirls of cinnamon streusel running through it, topped with a simple glaze that’s just enough to add a little extra sweetness. The name “coffee cake” might make you think of your usual breakfast baked good, but honestly, this one’s so versatile, you’ll be craving it all day long. It’s the kind of recipe that feels fancy enough to serve at brunch but simple enough for a quick weekday treat—kind of like that dependable jeans you always reach for. I always say, think of this as comfort food in cake form, but with a little extra nutrition sneaked in—because who doesn’t want that?
Why you’ll love this recipe?
What I love most about this zucchini coffee cake is its perfect balance of moistness and crumbly topping—plus, the aroma alone will have everyone asking what’s baking. The flavor is just right—not too sweet, with a gentle cinnamon-spiced kick that hits all the right notes, especially when paired with a hot cup of coffee or tea. It’s incredibly easy to make—no complicated techniques, just a few simple steps and a mix-and-pour attitude that’s perfect for busy mornings or lazy weekends. The cost? Totally budget-friendly, especially since zucchini is usually inexpensive and easy to find at this time of year. Plus, it’s a great way to use up any leftover zucchini from your garden or the farmers’ market—my go-to is always to keep a stash in the freezer for baking when spring and summer are over. The versatility is another win: serve it warm, at room temperature, or even cold. My kids ask for this all the time, and I’ve even taken to swapping in different fillings or toppings when I want to change things up a bit. Honestly, this recipe never fails to impress, whether I make it for guests or just for my own family’s dessert craving.
How do I make Zucchini Coffee Cake?
Quick Overview
This cake is pretty straightforward. You start by preheating your oven and lining your baking pan. Mix up your dry ingredients, then in a separate bowl, combine the wet ingredients—think eggs, oil, and a splash of vanilla. Fold everything together gently, and don’t overmix—that’s how you end up with a tender crumb. While the batter is coming together, squeeze out excess water from your grated zucchini, which makes all the difference—trust me on this one! Prepare the cinnamon streusel, layer half the batter in your pan, sprinkle on the filling, then swirl the remaining batter on top before baking. The smell alone will make everyone excited, and once cool, a simple glaze finishes this beauty perfectly. It’s fast, forgiving, and utterly delicious.
Ingredients
For the Main Batter:
– 2 cups all-purpose flour (or gluten-free blend, see tips below)
– 1 ½ teaspoons baking powder
– ½ teaspoon baking soda
– ½ teaspoon salt
– 1 teaspoon ground cinnamon
– ¾ cup granulated sugar
– ½ cup vegetable oil or melted unsalted butter
– 2 large eggs
– 1 teaspoon vanilla extract
– 1 ½ cups grated zucchini (about 1 medium zucchini)
For the Filling:
– ½ cup brown sugar
– 1 teaspoon ground cinnamon
– ¼ cup chopped nuts or chocolate chips (optional)
– ½ cup cream cheese or mascarpone (for a richer swirl — optional)
For the Glaze:
– ½ cup powdered sugar
– 1-2 tablespoons milk (dairy or almond milk works great)
– ½ teaspoon vanilla extract
– A pinch of cinnamon or lemon zest for extra flavor (optional)
Step-by-Step Instructions
Step 1: Preheat & Prep Pan
Set your oven to 350°F (175°C). Line a 9-inch square baking pan with parchment paper or lightly grease it with butter. This helps the cake come out easily and keeps cleanup simple. While the oven heats, grate your zucchini, then squeeze out excess water—this is so crucial! Too much moisture, and the cake can become soggy. I usually do this over a clean dish towel or paper towels, squeezing gently but firmly.
Step 2: Mix Dry Ingredients
In a large bowl, whisk together the flour, baking powder, baking soda, salt, and cinnamon. This ensures all those baking agents are evenly distributed. Overmixing at this step can lead to tough cake, so just stir until everything’s evenly combined.
Step 3: Mix Wet Ingredients
In a separate bowl, beat the eggs lightly, then add the sugar, oil, and vanilla. Whisk until it’s smooth and slightly frothy. This is when your kitchen smells fantastic—trust me, I love doing this step. If you’re using almond milk instead of regular milk, it actually makes the batter even more tender and adds a subtle nutty flavor.
Step 4: Combine
Gently fold the wet ingredients into the dry, just until combined. It’s tempting to overmix, but overworking the batter will make the cake dense instead of fluffy. When you see no dry flour streaks, stop mixing. Now, fold in the grated zucchini. Remember, squeezing out the water beforehand is key—this keeps the batter from turning into zucchini soup.
Step 5: Prepare Filling
In a small bowl, mix the brown sugar, cinnamon, and nuts or chocolate chips if you’re using them. If you’re feeling fancy, soften some cream cheese with a tiny bit of vanilla and swirl that in too—it makes the cake extra indulgent.
Step 6: Layer & Swirl
Pour half of the batter into your prepared pan. Spread it out gently. Sprinkle the filling mixture evenly over the layer, then top with remaining batter in dollops. Use a butter knife or toothpick to swirl the batter and filling together, creating beautiful marbled ribbons. The swirl pattern is part of what makes this so pretty and fun to serve.
Step 7: Bake
Pop the cake into the oven and bake for about 35-40 minutes. You’ll know it’s done when a toothpick inserted into the center comes out clean. Keep an eye on the edges—they’ll turn a gorgeous golden brown. Trust your nose—your kitchen will smell like cinnamon heaven. If it looks like it’s browning too quickly, just tent it with foil for the last 10 minutes.
Step 8: Cool & Glaze
Let the cake cool in the pan for at least 15 minutes before transferring to a wire rack. Once completely cooled, whisk together your glaze ingredients and drizzle it over the top. If the glaze is too thick, add a splash more milk; if too runny, dust it with a little extra powdered sugar. I love how the glaze adds just the right finishing touch—extra sweetness and a shiny look.
Step 9: Slice & Serve
Use a sharp serrated knife for clean slices. Serve it warm or at room temp with a cup of coffee or tea. I sometimes like to add a dollop of whipped cream or a sprinkle of toasted nuts on top. Honestly, a slice of this with a cold glass of milk is pure comfort. It’s so good that my kids ask for seconds—and I don’t mind sharing!
What to Serve It With
This cake works beautifully at a breakfast table alongside your favorite coffee or fresh juice. I love serving it at brunch surrounded by fruit and yogurt—something about the moist crumb and cinnamon aroma just screams weekend laziness in the best way. It’s also a crowd-pleaser as a dessert, especially with a dusting of powdered sugar or a side of vanilla ice cream. On cozy nights, I sometimes toast a slice and spread a little butter or jam. My family’s tradition is to have it with a big mug of hot cocoa on cold mornings, making it feel extra indulgent. It’s adaptable, so don’t hesitate to experiment with toppings or fillings—this cake truly shines when homemade with love.
Top Tips for Perfecting Your Zucchini Coffee Cake
After making this countless times, I’ve learned a few tricks that make all the difference. First, always squeeze out your zucchini—it’s surprising how much water it holds! If you skip that step, your batter might become too runny, and the cake won’t rise properly. When mixing, I avoid overworking the batter; just fold gently until combined—this keeps your crumb light and fluffy. Swirling the filling in a random pattern might seem simple, but I’ve found that doing gentle, wide strokes creates the most appealing marbling without mixing the layers too much. As for ingredient swaps, I’ve tested different nut butters mixed into the batter for added flavor, or swapped brown sugar for coconut sugar; results were tasty but slightly different in moisture. When baking, I always position my rack in the middle of the oven so heat circulates evenly. If your oven runs hot, reduce the temperature by 10-15°F and check a few minutes earlier. For the glaze, a little bit of lemon zest adds a bright note, but cinnamon or vanilla also work beautifully. Patience in cooling is key—wait until the cake is just warm for the best slice texture. Trust me on this—these little tips help make each batch better than the last.
Storing and Reheating Tips
This cake keeps surprisingly well. At room temperature, wrapped tightly with plastic wrap, it’s good for about 2 days before it starts to dry out. I usually cut slices and store leftovers in an airtight container in the fridge—up to 4 days. Reheat gently in the microwave for about 15-20 seconds to bring back the softness. If you want to freeze leftovers, wrap individual slices tightly in plastic wrap, then in foil or a zip-top bag. They’ll last for up to three months. When you’re ready to enjoy again, thaw at room temperature or microwave with a damp paper towel over the slice for about 30 seconds—perfectly moist and fresh-tasting. If you’ve added glaze, I recommend waiting to glaze until after thawing, so it stays shiny and inviting. I find that this cake tastes just as amazing days later, especially if you warm it slightly—you’ll swear it just came out of the oven!
Frequently Asked Questions
Final Thoughts
This zucchini coffee cake has become a staple in my kitchen—it’s one of those recipes I keep flipping back to because it’s forgiving, full of flavor, and always a crowd-pleaser. The fact that I can sneak in some vegetables makes me feel good about serving it for breakfast or dessert without guilt. Over the years, I’ve tweaked little things—adding more cinnamon, swapping ingredients, refining the swirl pattern—and each time, it feels like I’m perfecting a beloved family tradition. I honestly think you’ll find that too. Once you master the basic technique, you can personalize it endlessly—think blueberries in the batter, streusel topping with chopped nuts, or even a splash of bourbon in the glaze. I hope you give this a try and enjoy it just as much as my family does. Nothing beats the smell of a home baked cake, especially one that’s made with love and a little zucchini magic. Happy baking!
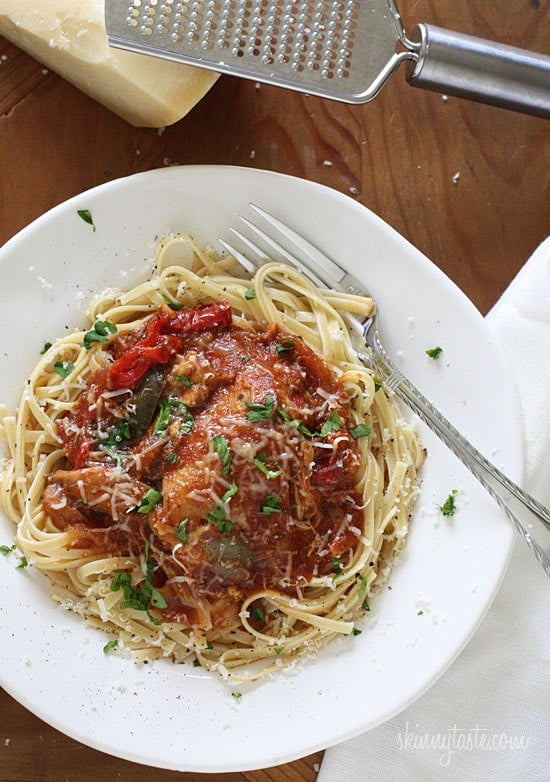
Slow Cooker Chicken
Ingredients
Method
- Season chicken with salt and pepper, then place in the slow cooker.
- Pour crushed tomatoes over the chicken, then add sliced onions and peppers. Sprinkle oregano, place bay leaf inside, and add salt and pepper. Give it a quick stir.
- Cover and set the slow cooker to LOW for 8 hours or HIGH for 4 hours.
- Once cooked, remove the bay leaf, garnish with fresh herbs, and serve.


That sounds absolutely comforting! Nothing beats the cozy aroma of something sweet and savory simmering together in the slow cooker.
Love this—slow cooker dinners are my go-to, and the cinnamon zucchini twist sounds amazing!
I totally agree—the smell of slow-cooker meals cooking all day just warms your soul. This sounds so cozy and delicious!
I totally get that feeling! Slow cooker dinners are the best—so easy and comforting. That coffee cake combo sounds amazing.
I love how comforting slow cooker meals are—this sounds perfect for a cozy night in!