
Easy Peanut Butter Cookie Dip Recipe
You know those mornings when you wake up late, the house is still wrapped in that sleepy dawn quiet, and all you want is something sweet but don’t feel like turning on the oven for a whole cake? That’s usually me, and this zucchini coffee cake is my saving grace. I think I first stumbled onto this recipe when I was trying to use up a mountain of zucchini from my garden—because honestly, what’s more summer than baking with fresh garden veggies? My kids ask for this all the time; it’s soft, moist, and just sweet enough to brighten even the gloomiest mornings. And the best part? It’s so easy that on busy nights, I always do this when I need reassurance that yes, I can still whip up something homemade and delicious without losing my mind. It’s become a family favorite, and I swear, the smell alone brings everyone rushing to the kitchen searching for a slice. Trust me on this: once you try this, it’ll be your new go-to, too!
What is Zucchini Coffee Cake?
Think of zucchini coffee cake as that cozy hug in dessert form. It’s essentially a humble cake made with grated zucchini—imagine it as a sneaky way to pack in some greens while still indulging your sweet tooth. The name “coffee cake” is just a charming way of saying it’s perfect for breakfast, brunch, or anytime you want a slice with your cup of joe. Folks often get confused because of the “coffee” part, but honestly, it’s just a soft, tender cake paired beautifully with coffee or tea, especially when you want to indulge but keep it light. This cake is a bit rustic, full of warm spices, and topped with a crunchy swirl of cinnamon-sugar that’s pure heaven. Think of it as that childhood breakfast muffin, but elevated and moist with hidden veggie goodness. I love that it’s so forgiving too—I’ve made tweaks along the way, and it always turns out just right.
Why you’ll love this recipe?
What I love most about this zucchini coffee cake is how it hits all the right notes—moist, spicy, slightly sweet, and so comforting. The flavor? Oh, it’s like a warm hug from Grandma, with a hint of cinnamon and vanilla that dance on your palate. Plus, it’s super straightforward—no fancy techniques here, just good old-fashioned mixing and baking. It’s also budget-friendly; I always keep a bag of shredded zucchini in my freezer, which makes this a quick, anytime treat. The versatility is another reason I keep coming back—serve it for breakfast with a smear of butter or cream cheese, enjoy it as a dessert with a drizzle of glaze, or even pack a slice for a cozy afternoon snack. I’ve tested this with almond milk and almost no sugar, and it still comes out tender and flavorful. Honestly, this one’s a lifesaver on busy nights when I need a sweet pick-me-up that’s still wholesome. My kids ask for this all the time; I swear, once you make it, it’ll be a staple in your kitchen too.
How do I make Zucchini Coffee Cake?
Quick Overview
This zucchini coffee cake is built on simple ingredients and straightforward steps. I start by mixing dry ingredients, then wet, and fold everything together — no overthinking or complicated tools needed. The grated zucchini adds moisture and tenderness, while the cinnamon-sugar swirl makes each bite irresistibly flaky and sweet. Once baked, it’s a matter of cooling slightly and drizzling with a quick glaze if you’re feeling fancy. It’s truly a one-bowl wonder that comes together in under an hour. The result? A moist, tender cake perfect for sharing with loved ones, or even just a quiet moment with your favorite mug.
Ingredients
For the Main Batter:
– 2 cups grated zucchini (about 2 medium zucchinis, shredded and drained)
– 1 ½ cups all-purpose flour (or your favorite gluten-free blend)
– ¾ cup granulated sugar
– 1 teaspoon baking powder
– ½ teaspoon baking soda
– ½ teaspoon salt
– ½ teaspoon ground cinnamon
– ½ teaspoon vanilla extract
– ½ cup vegetable oil or melted butter
– 2 large eggs (or flax eggs for vegan holdouts)
– ½ cup buttermilk or almond milk (tested with both – works great)
For the Filling:
– ¼ cup packed brown sugar
– 1 teaspoon ground cinnamon
– 2 tablespoons softened butter (or coconut oil for dairy-free)
– Optional: a handful of chopped nuts or chocolate chips for texture
For the Glaze:
– ½ cup powdered sugar
– 1-2 teaspoons milk (or lemon juice for zing)
– A splash of vanilla (optional)
Step-by-Step Instructions
Step 1: Preheat & Prep Pan
Set your oven to 350°F (175°C). Grease a 9×9-inch square pan or line with parchment paper. I always do this first so I don’t forget in the middle of the chaos—trust me, nothing worse than baked-on messes!
Step 2: Mix Dry Ingredients
In a large bowl, whisk together the flour, sugar, baking powder, baking soda, salt, and cinnamon. This step helps distribute everything evenly, and I’ve learned the hard way that neglecting this can lead to pockets of baking soda—so don’t skip!
Step 3: Mix Wet Ingredients
In a separate bowl, blend the eggs, oil, vanilla, and buttermilk. I like to beat the eggs lightly first; it makes everything come together smoother. If the eggs are cold, the batter might be a bit thicker on one side, so room temperature eggs are the way to go.
Step 4: Combine
Pour the wet mixture into the dry and fold gently—no overmixing! You want just combined batter that’s slightly lumpy but not gloopy. Overmixing can make the cake dense, and nobody wants a brick instead of cake.
Step 5: Prepare Filling
Mix the brown sugar and cinnamon in a small bowl. Soften the butter and stir it into the sugar mixture until crumbly but spreadable. If you’re feeling fancy, sprinkle some nuts or chocolate chips for extra texture.
Step 6: Layer & Swirl
Pour half of the batter into your pan, then spread half of the cinnamon-sugar mixture over it. Repeat with the remaining batter and filling, then use a butter knife or skewer to swirl gently through the batter—this creates those beautiful marbling patterns that are so pretty when sliced.
Step 7: Bake
Bake for 40-45 minutes, or until the top is golden and a toothpick inserted into the center comes out clean. Every oven is different, so start checking at 38 minutes. If it’s browning too fast, tent with foil—you don’t want burnt edges!
Step 8: Cool & Glaze
Let the cake cool for about 15 minutes in the pan, then transfer to a wire rack. Mix your glaze ingredients and drizzle while still warm for that glossy finish. If I forget to glaze immediately, I’ll wait until it’s fully cooled — it still tastes incredible either way.
Step 9: Slice & Serve
Cut into squares with a sharp knife, wiping between cuts for neat slices. These are best served slightly warm or at room temperature—paired with coffee, tea, or even a glass of milk. My kids love having this for breakfast, and honestly, I don’t mind sneaking a piece late at night once they’re asleep.
What to Serve It With
Ah, the fun part! For breakfast, I love to serve this with a dollop of Greek yogurt and a splash of honey—it’s like a flavor party. It’s perfect for brunch alongside fresh fruit and a pot of strong coffee; the cinnamon scent alone makes everyone feel warm inside. When I want to dress it up as a dessert, I drizzle it with a simple glaze or dust with powdered sugar, and maybe toss on some chopped nuts for crunch. I’ve also snuck a little cream cheese frosting on top once or twice, and wow, game changer! This cake is flexible enough to feel fancy but simple enough to enjoy as a cozy snack. It disappears in minutes at my house—seriously, I’ve made it for friends and they always ask for the recipe. It’s a comfort food, a showstopper, and a little bit of summer in every bite.
Top Tips for Perfecting Your Zucchini Coffee Cake
Every baked good has its tricks, and I’ve definitely learned a few along the way. First, don’t squeeze all the moisture out of your zucchini—just give it a gentle squeeze to get rid of excess water, but keep some moistness; that’s what keeps the cake tender. I tested this with fresh, crispy zucchinis from the market and grated them right before mixing—they add a lovely crunch but still stay soft in the batter. When mixing the wet into the dry ingredients, I find that folding gently is key; overmixing toughens the crumb and makes it heavy, which nobody wants. As for the swirl, try to use a light hand—too much and it becomes muddy rather than pretty. I like to sprinkle a few chopped walnuts or chocolate chips into the filling for texture, but honestly, it’s delicious plain too. Baking times can vary depending on your oven’s temperament—some run hot, so I always check a couple of minutes early. If the edges brown too quickly, tent with foil until the middle is baked through. The glaze is optional, but trust me, a simple powdered sugar drizzle makes it look so pretty and tastes divine. I tested this with almond milk and coconut oil, and they both worked beautifully—so don’t be afraid to swap out ingredients based on your diet or what you have on hand. This one’s a forgiving, cozy masterpiece I keep coming back to.
Storing and Reheating Tips
To keep this zucchini coffee cake fresh, I usually store leftovers in an airtight container—either at room temperature for up to two days or in the fridge if you want it to last longer. I find it still tastes amazing at room temp but will last a little longer, about five days, in the fridge. To reheat, I just give it a quick 10-15 second zap in the microwave or warm slices in the oven at a low temp. If you’ve glazed it, I suggest only adding the glaze just before serving—refrigeration can make the glaze lose its shine or get sticky. If you’re planning to freeze it, wrap slices tightly in plastic wrap and then foil—this prevents freezer burn. It’ll hold up well for up to a month. When thawing, let it sit at room temperature for about 30 minutes, so it feels fresh and fluffy again. Honestly, it’s a treat that’s almost better the next day, with all those flavors melding. Plus, you can bake a batch ahead and just warm a piece whenever you need a little comfort during busy mornings or cozy evenings. It’s like a hug that keeps on giving.
Frequently Asked Questions
Final Thoughts
Honestly, this zucchini coffee cake has become such a part of my baking arsenal—it’s simple, satisfying, and almost foolproof. Whether I’m rushing through a busy morning, sneaking in a snack when the kids aren’t looking, or just craving something warm and sweet, this cake is my go-to. I love that it hides a little veggie in each slice, so I don’t feel guilty indulging. Every time I make it, I get a little nostalgic for childhood mornings and lazy weekends, surrounded by the scent of cinnamon and fresh zucchini. If you’re looking for a recipe that feels like a comforting hug but still keeps things easy and fun, give this one a try. I promise, it’ll become your new favorite too! And hey, I’d love to hear how yours turns out—leave a comment or share your twist! Happy baking!
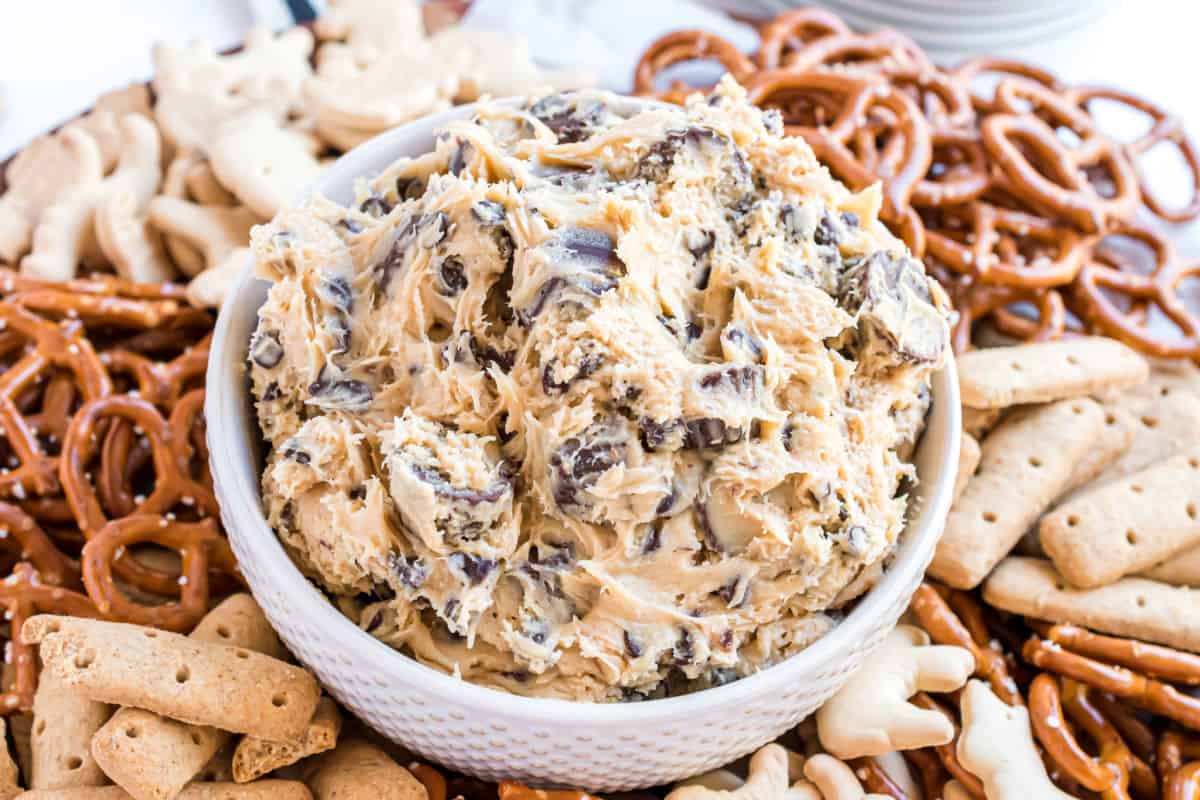
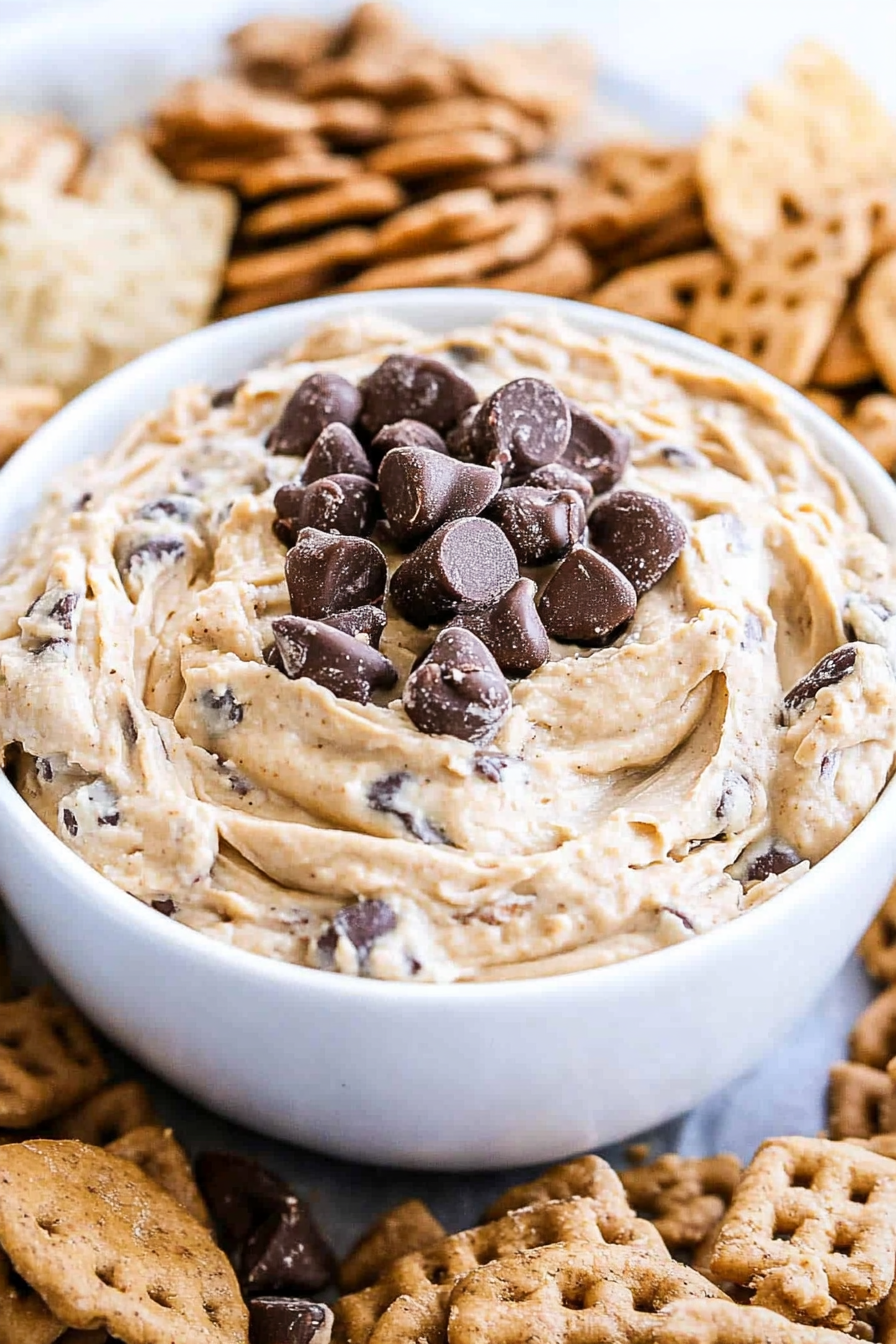
Peanut Butter Cookie Dip
Ingredients
Method
- In a small saucepan over medium heat, melt butter and whisk in the brown sugar and peanut butter. Heat until sugar dissolves (about one minute). Remove from heat immediately and allow to cool to room temperature.
- In a large mixing bowl, beat cream cheese with powdered sugar until creamy (about 3-4 minutes). On low, add in the cooled butter mixture. Mix until combined.
- Fold in mini chocolate chips and chopped Reese's cups. Serve immediately or refrigerate until ready to serve. Enjoy with pretzels, animal crackers, or graham sticks.


This sounds perfect for those lazy Sunday mornings—simple, sweet, and so easy to whip up! I’ll definitely try this recipe.
This dip sounds perfect for those lazy mornings—simple, sweet, and ready in a snap! I’ll definitely try it next weekend.
I totally get those mornings—this dip sounds perfect for a quick sweet fix!
This recipe sounds perfect for those lazy mornings—quick, sweet, and easy. Love that it doesn’t require baking!
I’ve been making this dip every weekend—so simple and delicious! Perfect when you need something sweet in a hurry.