
Easy Stuffed Bagel Bites Recipe
There’s something magical about pulling a warm, fragrant slice of cake out of the oven that instantly transports me back to lazy weekends at grandma’s house. The smell of freshly baked zucchini mingling with cinnamon, vanilla, and a hint of nutmeg—oh, it’s truly irresistible. I always do this when I want something homemade but don’t want to fuss over complicated recipes. This zucchini swirl cake has become a real family favorite, especially because it’s so versatile, budget-friendly, and honestly, pretty forgiving. The kids ask for this all the time, and I’ve tested it with a splash of almond milk and even coconut sugar, which made it even creamier and just a little healthier. Trust me on this one: if you love the idea of a moist, tender cake filled with a lush creamy center and topped with a sweet glaze, then you’re in for a real treat. It’s one of those recipes that’s perfect for everything—breakfast, brunch, or just a cozy afternoon snack with a cup of coffee. Let’s get started and make some magic!
What is Zucchini Swirl Cake?
Think of this as a cozy, homey cake that’s secretly a little sneaky with veggies—yes, zucchini! It’s essentially a moist, tender cake layered with a luscious, sweet filling that swirls beautifully into the batter, creating a magic pattern in every slice. The name might sound fancy, but I promise, it’s simple enough for a weeknight treat. The swirl comes from gently layering the cream cheese or custard-like filling into the batter before baking, which results in a beautiful marbled effect. It’s kind of like a cake version of a rich cinnamon roll, only way easier to make. The best part? The zucchini keeps everything super moist and adds a delicate flavor that complements all those warm spices. This cake is like comfort food with a little elegance—perfect for breakfast, brunch, or whenever you’re craving something sweet that’s not overly heavy.
Why you’ll love this recipe?
What I love most about this zucchini swirl cake is how it strikes that perfect balance between indulgence and wholesomeness. The flavor profile is just incredible—moist, slightly sweet, with that gentle hint of zucchini and spices. The cinnamon and vanilla add depth, while the creamy filling adds richness in every bite. And honestly, it’s so simple to put together that even if you’re juggling a busy life, you won’t be overwhelmed. The ingredients are budget-friendly, common pantry staples, and you probably already have everything you need in your kitchen—flour, eggs, zucchini, sugar, and some spices. Plus, the versatility of the filling means you can tweak it—swap in cream cheese, mascarpone, or even a fruit compote if you’re feeling creative. It’s truly a crowd-pleaser, whether you’re serving it at a brunch with friends or just treating yourself after a long day. This cake has become my “go-to” when I want a baked good that’s comforting, beautiful, and surprisingly healthy-ish. The swirl pattern? It’s almost too pretty to cut, but trust me, once you do, that first forkful will make you smile.
How do I make Zucchini Swirl Cake?
Quick Overview
This cake is all about simplicity and stunning visual impact. First, you grate the zucchini and squeeze out the excess moisture—no soggy surprises here. Then, you whip up a fluffy batter combining your dry ingredients with eggs, oil, and a splash of milk for extra creaminess. Meanwhile, you prepare a sweet, creamy filling—think cream cheese, sugar, vanilla, and a touch of butter. When it’s time, you pour half of the batter into your prepared pan, dollop the filling on top, and swirl it in with a butter knife for that gorgeous marbled effect. A sprinkle of cinnamon on top adds a lovely finishing touch. Pop it in the oven, bake until golden and puffy, then cool and drizzle with a simple glaze. It’s honestly foolproof once you get the hang of layering and swirling—this one’s a lifesaver on busy nights!
Ingredients
For the Main Batter:
– 2 cups all-purpose flour (or gluten-free blend if you prefer)
– 1 teaspoon baking powder
– ½ teaspoon baking soda
– 1 teaspoon ground cinnamon
– ½ teaspoon nutmeg (optional)
– ½ teaspoon salt
– 1 cup granulated sugar or coconut sugar
– ½ cup vegetable oil (or melted butter for richer flavor)
– 3 large eggs
– 1 teaspoon vanilla extract
– 1 cup grated zucchini (remember to squeeze out excess moisture!)
– ¼ cup milk (dairy or plant-based)
For the Filling:
– 8 oz cream cheese, softened
– ½ cup powdered sugar
– 1 teaspoon vanilla extract
– 2 tablespoons softened butter
– Optional: lemon zest or a splash of lemon juice for freshness
For the Glaze:
– ½ cup powdered sugar
– 1-2 teaspoons milk or lemon juice
– A pinch of vanilla or almond extract (optional)
Step-by-Step Instructions
Step 1: Preheat & Prep Pan
Set your oven to 350°F (175°C) and grease a 9-inch round cake pan or line it with parchment paper. I always give the pan a quick spray with non-stick spray, then dust lightly with flour or line with parchment—makes turning out the cake a breeze. While it heats up, get your zucchini grated and ready.
Step 2: Mix Dry Ingredients
In a large bowl, whisk together the flour, baking powder, baking soda, cinnamon, nutmeg, and salt. This step ensures everything is evenly distributed and prevents clumps—it’s the foundation for a fluffy, even crumb.
Step 3: Mix Wet Ingredients
In another bowl, beat the eggs with sugar, then stir in the oil, vanilla, and milk. I always do this until everything looks smooth and slightly frothy—that’s when I know it’s mixing nicely. Next, add the grated zucchini—it should look moist but not soaked! I learned early on to squeeze out as much moisture as I can, or the batter might be a little heavy.
Step 4: Combine
Gently fold the wet mixture into the dry ingredients, mixing just until combined. Overmixing can make the cake dense, so I go easy on this step. Just stir enough to incorporate everything—lumps are okay. It’s better to have a slightly lumpy batter than a tough cake.
Step 5: Prepare Filling
In a small bowl, beat the softened cream cheese, sugar, vanilla, and butter until smooth and creamy. I like to add a little lemon zest here—it brightens up the flavor. This filling lusciousness is what makes this cake a showstopper, so don’t skimp on the cream cheese—it’s what gives it that rich, gooey center.
Step 6: Layer & Swirl
Pour the first half of the batter into your prepared pan, smoothing it out with a spatula. Dollop spoonfuls of filling all over the batter, then gently spread or drop the rest of the batter on top. Use a skewer or butter knife to swirl the filling into the batter—think gentle figure-eights or zigzags. You want the beautiful marbling effect, but don’t overmix or you’ll lose the swirl pattern. If you’re feeling fancy, sprinkle a little extra cinnamon or sugar on top before baking.
Step 7: Bake
Place the cake in the oven and bake for about 40-45 minutes. Keep an eye on it—your kitchen will smell so good that you’ll want to sneak a peek early. The top should be golden, and a toothpick inserted in the center should come out clean. If it starts to brown too fast, cover loosely with foil and keep baking.
Step 8: Cool & Glaze
Remove the cake from the oven and allow it to cool in the pan for about 15 minutes, then transfer to a wire rack. Once cool, whisk together your glaze ingredients—just powdered sugar with a splash of milk or lemon juice—and drizzle generously over the top. The glaze should be smooth but not runny, and it’s so satisfying watching it slowly drip down the sides.
Step 9: Slice & Serve
Use a serrated knife to cut clean slices—this cake is moist, so be gentle. I love serving it slightly warm with a dollop of whipped cream or extra glaze on the side. It’s perfect with a cup of coffee or a glass of cold milk, and it makes such a pretty presentation for brunch or teatime. The swirl pattern in each slice? It looks like a work of art—just don’t forget to take a picture before everyone dives in!
What to Serve It With
This cake is so versatile, I often serve it in different ways depending on the occasion. For breakfast, pair it with a strong cup of coffee or a frothy cappuccino—nothing beats that cozy morning vibe. When I’ve got friends over for brunch, I’ll layer it with fresh berries and maybe a dusting of powdered sugar. It’s a hit as a dessert, too—warm slices with vanilla ice cream or a drizzle of caramel make it feel like a fancy treat. And if I’m just craving comfort, I’ll cut a thick piece, warm it up slightly, and slather some butter or jam on top. It’s a real crowd-pleaser and always disappears from the plate way too fast!
Top Tips for Perfecting Your Zucchini Swirl Cake
Over the years, I’ve learned a few tricks that make this cake turn out picture-perfect every time. First, don’t skip squeezing out the zucchini’s excess moisture—it keeps the batter from getting heavy and helps your cake stay light and moist. I’ve tested this with different zucchinis from my garden, and I swear the smaller, fresh ones give the best flavor and texture. When mixing, avoid overdoing it once you add the dry ingredients; a gentle fold is all you need—overmixing leads to a dense crumb, and nobody wants that.
For the swirl effect, I suggest taking your time to dollop and swirl—patience really pays off. You can even use a toothpick to create more intricate patterns if you’re feeling artsy. As for the filling, I’ve played around with lemon zest, a pinch of sea salt, or even chopped nuts—I recommend trying small tweaks to suit your taste. When baking, I always keep an eye on the color—not too dark, but golden and inviting. And test for doneness by inserting a toothpick—the center should be set but still moist. Don’t open the oven door too often, or the cake might sink—a mistake I’ve made more than once! The glaze? Keep it thick enough to hold its shape but pourable—variety is the spice of life, so experiment with flavors like vanilla, almond, or citrus zest.
Storing and Reheating Tips
This cake stays fresh surprisingly well—making it perfect for leftovers. I usually cover it tightly with plastic wrap or store it in an airtight container at room temperature for up to a day. After that, I pop it into the fridge, where it happily keeps for up to 4 days. If I want to keep it longer, freezing is my go-to—wrap it tightly in foil, then store in a freezer-safe bag or container for up to 2 months. When ready to eat, I let it thaw overnight in the fridge or microwave slices briefly until warm. Just hold off on adding the glaze until before serving if it’s been refrigerated—otherwise, it might absorb into the cake and lose that glossy finish. Reheating gently in the microwave or oven works wonders to revive its moist texture, especially if you prefer it warm with a cup of tea or coffee. If you’re taking it on the go, just make sure it’s well wrapped to stay fresh and flavorful.
Frequently Asked Questions
Final Thoughts
This zucchini swirl cake has become a cherished part of my baking lineup, and I think it’s destined to be yours too. It checks all the boxes—delicious, pretty, forgiving, and surprisingly healthy considering how indulgent it feels. I love how the zucchini keeps each slice so moist, and the swirl pattern makes it feel a little special, like I put extra effort into it, even when I didn’t. Whether you’re making it for friends, family, or just as a treat for yourself, I promise it won’t disappoint. And the best part? It’s endlessly customizable—add nuts, swap the filling, try different glazes, or simply enjoy it plain. I’ll bet you’ll find yourself returning to this recipe again and again, especially on those days when you need a hug in dessert form. Happy baking! I’d love to hear how yours turns out—leave a comment below or share your own twists! Happy baking!
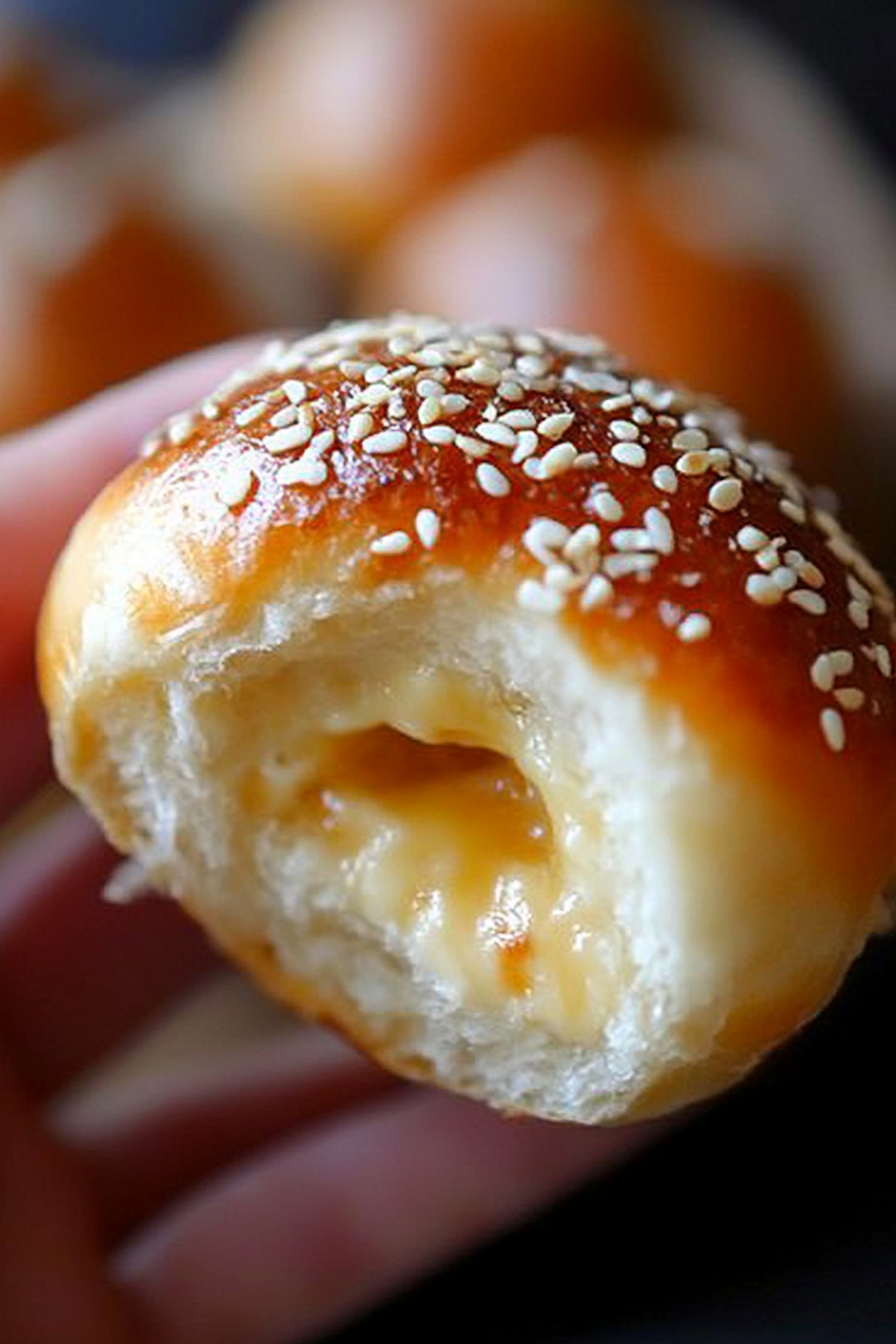
stuffed bagel balls
Ingredients
Method
- Preheat oven to 375F. Prepare a baking sheet with parchment paper or a silpat. Spray with oil if using parchment to prevent sticking.
- Combine flour, baking powder, and salt in a medium bowl and whisk well.
- Add Greek yogurt and mix with a fork or spatula until the mixture resembles small crumbles.
- Lightly dust your work surface with flour, turn out the dough, and knead a few times until tacky but not sticky, about 15 turns.
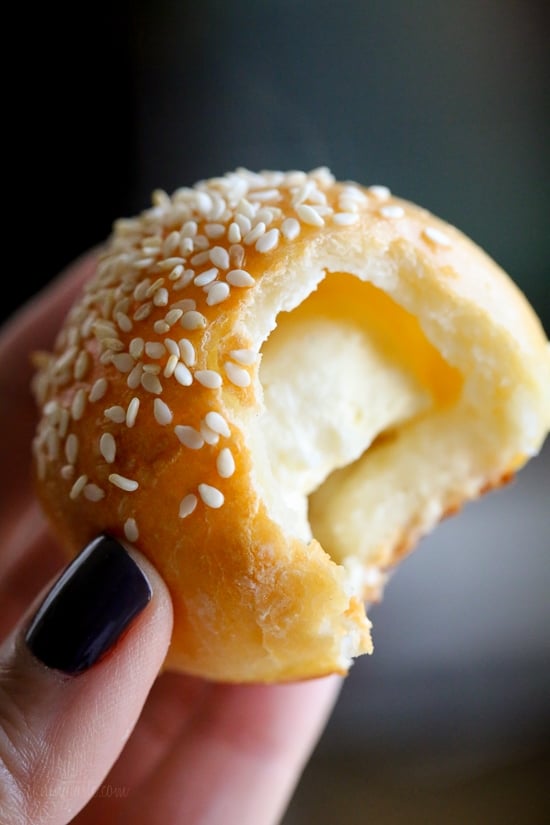
- Divide the dough into 8 equal parts. Flatten each into a circle, place 1/2 tablespoon of cream cheese in the center, then fold the dough around the filling and roll into a ball.
- Brush the balls with egg wash and sprinkle with topping if desired.
- Bake in the oven for 25 minutes. Allow to cool for at least 10 minutes before serving.
- Spray the air fryer basket to prevent sticking.
- Preheat the air fryer to 325F. Arrange the balls in a single layer and cook for 11-12 minutes until golden.
- Let cool for at least 10 minutes before eating.
These look absolutely delicious! I can totally picture the warm, gooey filling – perfect for a cozy snack.
I love this recipe! The smell of freshly baked bagels always reminds me of cozy mornings with my family. Can’t wait to try it!
I love this recipe—it’s such a fun twist on regular bagels and perfect for parties or quick snacks.
I love the cozy feeling this recipe evokes—those warm, cheesy bites remind me of comfort food at its best!
I love how this recipe brings back such warm memories! It’s amazing what a simple smell can do to spark nostalgia.