

How to Make Zesty Buffalo Cauliflower Bites
There’s just something about the smell of freshly baked bread that instantly makes my house feel warm and inviting. I remember sneaking bites of this zucchini banana bread as a kid, my little hands sticky with banana and hints of cinnamon. It’s the kind of recipe that brings back family Sundays, lazy mornings, or even a quick pick-me-up after a long day. My kids go wild for it; they ask for it special-occasion style, and honestly, I don’t mind doubling the batch because it disappears in minutes at my house. This one’s a lifesaver on busy nights—perfect when I really want something sweet but don’t want to turn on the oven for a full cake. The best part? It’s surprisingly easy to throw together, and you can sneak in a bit of zucchini without anyone batting an eye. Trust me on this: once you try it, it’ll become a staple at your place too.
What is Moist Zucchini Banana Bread?
Think of it as a cozy mash-up between classic banana bread and a veggie-enhanced snack that’s just too good to ignore. It’s essentially a moist, tender bread packed with mashed bananas and shredded zucchini, which keeps it super moist and fluffy. The name’s pretty straightforward—”moist” because let’s face it, no one likes dry bread, and “zucchini banana” because those two ingredients are the star players. I like to think of this bread as a delicious way to sneak in some extra veggies without sacrificing flavor. It’s perfect for breakfast, brunch, or a little afternoon treat with your coffee. What I love most about this is that it’s adaptable: you can add walnuts, chocolate chips, or even dried fruit. It’s kind of like a blank canvas that tastes better with each personal tweak!
Why you’ll love this recipe?
Honestly, this zucchini banana bread has stolen a special spot in my kitchen for a bunch of reasons. First off, the flavor — it’s sweet, with a gentle hint of cinnamon and vanilla, with just enough banana to bring that comforting richness. The zucchini, while subtle, adds moisture and keeps it from being dense—perfect for those days when you want bread that feels just right on the first bite. What I love most about this is how incredibly simple it is to make; I always do this when I need a quick snack or a dessert that feels homemade but doesn’t require a complicated process. Plus, it’s budget-friendly—most of the ingredients are staples I always have on hand, like bananas starting to turn brown and zucchinis from my garden or the farmers’ market. It’s versatile too; I’ve tested with almond milk instead of regular, which made it even creamier, and it’s fantastic. And oh, it’s a winner for the whole family—my kids ask for this all the time, and I love how I can sneak in those extra veggies without anyone noticing! It’s a straightforward recipe that’s become a go-to comfort food for us, and I bet it will be at your house too.
How do I make Moist Zucchini Banana Bread?
Quick Overview
This bread comes together quickly with a simple mix of mashed bananas, shredded zucchini, and basic pantry staples. The secret to its perfect moisture is the zucchini, which keeps each slice tender and delicious. I love that you don’t need any fancy equipment—just a bowl, a spoon, and your trusty muffin or bread pan. Once mixed, you layer in the filling, swirl, and bake. The entire process from start to finish takes about an hour, and the smell alone makes your kitchen smell like it’s Instagram-worthy. It’s foolproof, even for beginner bakers, because the batter isn’t finicky. Just don’t overmix; that’s where some of the magic can go sideways. After baking, a simple glaze jazzes it up and adds a touch of elegance that makes this bread feel extra special.
Ingredients
For the Main Batter:
– 3 ripe bananas, mashed — the riper, the better for sweetness and flavor
– 1 cup shredded zucchini — grated and drained well to avoid extra moisture
– 2 large eggs
– 1/3 cup vegetable or coconut oil
– 1 teaspoon vanilla extract
– 1 1/2 cups all-purpose flour
– 1 teaspoon baking soda
– 1 teaspoon baking powder
– 1 teaspoon ground cinnamon
– Pinch of salt
For the Filling:
– 1/2 cup cream cheese, softened (optional but so good!)
– 2 tablespoons honey or maple syrup
– 1 teaspoon vanilla
– Chopped walnuts or chocolate chips (my personal favorite for extra crunch)
For the Glaze:
– 1/2 cup powdered sugar
– 1-2 tablespoons milk or cream
– A dash of vanilla or lemon juice for flavor
Step-by-Step Instructions
Step 1: Preheat & Prep Pan
Set your oven to 350°F (175°C). Grease a loaf pan with butter or non-stick spray and line it with parchment paper for easy removal. To prevent sticking, I like to sprinkle a little flour over the greased pan. It’s a tiny step that makes all the difference when slicing later.
Step 2: Mix Dry Ingredients
In a small bowl, whisk together the flour, baking soda, baking powder, cinnamon, and salt. This ensures everything is evenly distributed. Mixing dry ingredients first is important—trust me, it helps avoid clumps and makes your bread rise evenly.
Step 3: Mix Wet Ingredients
In a larger bowl, mash the bananas until smooth. Add the eggs, oil, vanilla, and stir until combined. You want a nice, uniform mixture—this is your flavor base. I always test the temperature of the eggs if I’m unsure; I prefer room temperature eggs because they blend better and help the batter rise.
Step 4: Combine
Slowly add the dry ingredients into the wet, gently folding with a spatula. Don’t overmix—just fold until there’s no streak of flour. It’s okay if there are a few lumps; that’s what keeps the bread light and fluffy. Overmixing can make it dense or rubbery, which nobody wants!
Step 5: Prepare Filling
If using, mix the softened cream cheese with honey and vanilla until smooth. This will be your luscious layer inside the bread. If you prefer no filling, skip this step or save it for later as a spread.
Step 6: Layer & Swirl
Pour about half of the batter into the prepared pan. Spoon the filling in the middle and cover with the remaining batter. Use a skewer or butter knife to swirl gently through the batter, creating a marbled effect. I love how pretty it looks once baked, with little ribbons of cream cheese peeking through.
Step 7: Bake
Pop it in the oven for 50-60 minutes. I always check at around 55 minutes—insert a toothpick in the center; if it comes out clean, you’re good. Ovens vary, so if the top gets too golden early, tent with foil and keep baking. Patience is key because underbaked bread is sad, and overbaked makes it dry.
Step 8: Cool & Glaze
Once baked, let the bread cool in the pan for about 15 minutes, then transfer to a wire rack. After it’s cooled slightly—just enough to handle—drizzle on your prepared glaze. The glaze adds a sweet, shiny touch, and it still looks gorgeous if you make it a little thicker or thinner based on your preference.
Step 9: Slice & Serve
Use a serrated knife and cut carefully to avoid squashing the slices. This bread is best served warm or at room temperature. I love a big mug of coffee on the side, maybe some fresh fruit, and a little extra glaze on top. Honestly, it’s perfect for breakfast, snack times, or even dessert. My family always asks for seconds—trust me, this won’t stay on the countertop for long!
What to Serve It With
This zucchini banana bread is so versatile. For breakfast, I like tearing a slice and slathering a little butter or cream cheese—my kids adore it this way. It also pairs beautifully with a hot cup of coffee or tea, especially in the cozy mornings that feel like a warm hug.
At brunch, serve it sliced with fresh berries and a dollop of whipped cream or yogurt—it’s a little elevated and feels fancy but is still simple. For dessert, I sometimes warm a slice and drizzle extra glaze or a bit of caramel, adding chopped nuts or chocolate chips for fun. And honestly, this bread is my go-to for a quick snack after school—makes me feel good knowing I’ve snuck in some veggies too!
Top Tips for Perfecting Your Moist Zucchini Banana Bread
From my years of baking, I’ve picked up a few tricks that make all the difference. First, always drain the shredded zucchini well—excess moisture can make your bread soggy instead of moist. Squeeze out the water gently but thoroughly. I’ve tested with grated zucchini straight from the fridge, and honestly, a quick squeeze makes the batter much more stable.
When mixing, remember: less is more. Overmixing can turn your bread dense, so fold just until combined. If you want more flavor, toss in some chocolate chips or nuts early on—just sprinkle and fold in gently. For swirl patterns, I like to layer half the batter, add the filling, then cover with the rest and swirl with a toothpick or skewer for that pretty marbled look. Trust me—patience here pays off.
A quick swap I tried was using apple sauce instead of oil. It kept things super moist without feeling greasy, and my family loved the slightly lighter feel. Just use the same amount and enjoy the healthier twist.
Regarding baking, always check doneness with a toothpick; don’t rely solely on the timer. Ovens fluctuate, and I’ve learned the hard way that pulling it out just a minute early leaves you with raw centers. Also, let it cool before drizzling the glaze—warm bread absorbs the sweetness better, and the glaze sets nicely.
If you want a dairy-free version, coconut oil works beautifully, and for the glaze, coconut milk mixed with powdered sugar is a great dairy-free alternative. Play around with flavors—ginger, nutmeg, or a hint of citrus zest—those small touches elevate any loaf. I always just go with what I have on hand and love the surprises each little tweak brings.
Storing and Reheating Tips
This bread keeps beautifully for a few days if stored properly. If you’re planning to keep it overnight or for the next day, wrap it tightly in plastic wrap or store in an airtight container at room temperature. It stays moist and fresh for about 2-3 days this way. I recommend slicing only what you’ll eat to prevent drying out.
For longer storage, pop it in the refrigerator in a sealed container—still moist and delicious! Just be sure to bring it back to room temperature or warm it slightly in the microwave for that fresh-baked feel. Freeze slices individually after cooling; wrap tightly to prevent freezer burn, and they thaw perfectly in the microwave for a quick treat.
As for the glaze, if you’re storing the bread for a while, wait to add it until just before serving, so it stays shiny and fresh-looking. Or, if you like it extra sweet, brush a little honey on the slices after reheating for a soft, sticky finish.
Frequently Asked Questions
Final Thoughts
There’s a special magic in baking something that’s both wholesome and indulgent, and this zucchini banana bread hits all those notes. It’s a recipe I’ve perfected over the years—one that’s versatile, forgiving, and irresistibly delicious. The next time you have ripe bananas and zucchinis you’re about to overlook, give this a try. I promise, the smell alone will make your house feel cozier, and every bite will remind you why baking from scratch is such a simple joy. Don’t be shy to add your own twist—maybe toss in some chocolate chips or a handful of chopped pecans. I love hearing how everyone makes it their own. Happy baking, and I can’t wait to see how yours turns out! Drop a comment or snap a pic—a little baking community, right?
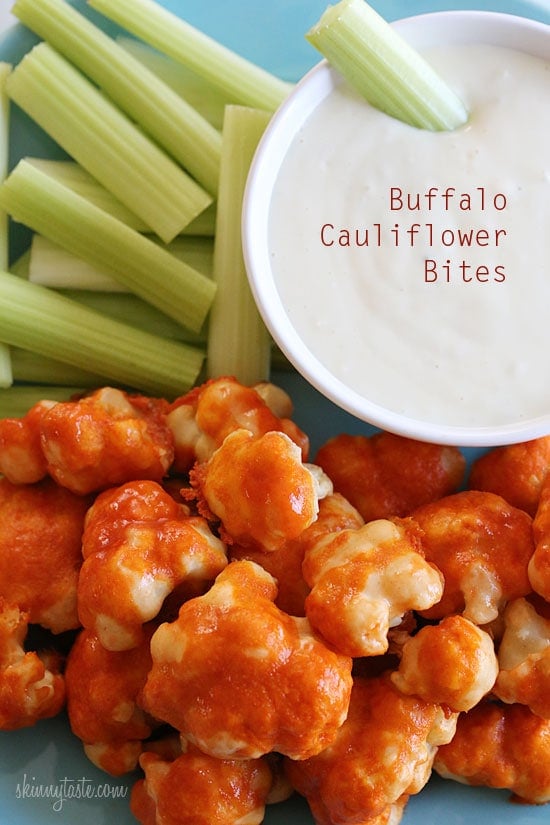
Buffalo Cauliflower
Ingredients
Method
- Preheat the oven to 450°F. Lightly spray a large non-stick baking sheet with oil.
- Combine the water, flour, and garlic powder in a bowl and stir until well combined.
- Coat the cauliflower pieces with the flour mixture and place on the baking sheet; bake for 20 minutes.
- While the cauliflower is baking, combine the hot sauce and melted butter in a small bowl.
- Pour the hot sauce mixture over the baked cauliflower and continue baking for an additional 5 minutes.
- Serve with celery sticks and optional blue cheese dressing.


This looks so tasty! I love how buffalo cauliflower bites are a healthier twist on a classic snack. Can’t wait to try it!
I’ve never tried these before, but they look absolutely delicious! Definitely adding this to my recipe list—perfect for game day snacks.
I just tried this recipe and the flavors are amazing! The zesty kick from the buffalo sauce is perfect.
I love the combo of cauliflower and buffalo sauce—perfectly crunchy and spicy. Great recipe!
I love the idea of these bites! The buffalo flavor sounds bold and delicious—definitely trying this recipe.