

Easy Dark Bean Soup Recipe
There’s something about that first whiff of cinnamon and fresh zucchini baking that instantly takes me back to lazy summer afternoons at my grandma’s house. I remember sitting at the kitchen table, watching her gracefully swirl ribbons of batter and filling together, patience shining in her eyes. That smell—warm, sweet, with just a hint of earthiness—could practically bring the whole house to life. Over the years, I’ve tried countless zucchini bread recipes, but this one, with its beautiful swirl and tender crumb, feels like a warm hug I want to share with everyone. And honestly, I love it because it’s so easy to make, even when I’m short on time or feeling a little nostalgic. Plus, it’s a sneaky way to get everyone, especially kids, to eat their veggies—trust me on this one, it disappears faster than you’d imagine! This isn’t just a quick snack or breakfast; it’s a piece of comfort that brightens my whole day, and I bet it’ll do the same for you.
What is Zucchini Swirl Bread?
Think of this zucchini swirl bread as the lovechild of a classic cinnamon loaf and a veggie-packed treat. It’s technically a quick bread, meaning you don’t need yeast or waiting around for rise times—just whisk, swirl, bake, and enjoy. The ‘swirl’ part comes from layering a cinnamon-sugar mixture inside a moist, grated zucchini batter, then swirling it beautifully through the loaf before baking. It’s essentially bread with a surprise cinnamon ribbon running through it, all tender and just slightly sweet. It’s called ‘zucchini’ because, well, that’s the secret ingredient that keeps it incredibly moist and nutritious, but you won’t even notice it once it’s baked. My version is a cozy, homey recipe I’ve tweaked over the years, adding a touch of vanilla and a simple glaze that makes it irresistible. Think of it as a bakery treat you can make at home—perfect for breakfast, teatime, or just when you need a little bit of comfort in a slice.
Why you’ll love this recipe?
Honestly, what I love most about this zucchini swirl bread is how unfussy it is—yet it looks like it came straight from a bakery window. It’s a total crowd-pleaser without any fancy ingredients or complicated steps. The flavor? Richly cinnamon-spiced, with a tender crumb that practically melts in your mouth. And the best part? It’s super budget-friendly. You probably already have all the ingredients in your pantry and fridge: flour, sugar, eggs, zucchini, cinnamon, vanilla. It’s a=vegan-adaptable, too, if you swap out the eggs for applesauce or flax eggs—it’s that forgiving. I’ve tested this with different nuts and even added a handful of blueberries once—delicious! This bread also keeps well, so I always bake a double batch on weekends, then slice and freeze extras. It’s one of those recipes I make when I want something sweet but wholesome. And my kids? They ask for this all the time, especially if I promise them a little slather of cream cheese or a drizzle of honey on top.
How do you make Zucchini Swirl Bread?
Quick Overview
This zucchini swirl bread comes together in about an hour, start to finish. First, you grate the zucchini and squeeze out excess moisture—trust me, this makes a huge difference. Then, you’ll mix the dry ingredients, whisk together the wet, combine everything carefully so the batter is just combined, and pour half into your loaf pan. Next, sprinkle a cinnamon-sugar layer on top, swirl your batter to create a beautiful marbled effect, and bake. The amazing part? It’s so forgiving—you don’t need to be perfect at swirling, and it still looks stunning. Once it’s golden and a tester comes out clean, you let it cool just enough before glazing. Honestly, it smells so good during the bake that I sometimes sneak a piece while it’s still warm—that’s when the crumb is at its most tender. This is one of those recipes that makes your kitchen smell like home, no matter what kind of day you’re having.
Ingredients
For the Main Batter:
- 1 ½ cups all-purpose flour (I like unbleached for richer flavor)
- 1 teaspoon baking powder
- ½ teaspoon baking soda
- ½ teaspoon salt
- 1 teaspoon ground cinnamon
- ¾ cup granulated sugar
- ⅓ cup vegetable oil (or melted coconut oil for added flavor)
- 2 large eggs
- 1 teaspoon vanilla extract
- 1 cup grated zucchini (about 1 small zucchini)
- ¼ cup buttermilk or milk (almond milk works beautifully here)
For the Filling:
- ¼ cup brown sugar
- 1 tablespoon cinnamon
- 2 tablespoons melted butter or coconut oil
For the Glaze:
- ½ cup powdered sugar
- 1-2 teaspoons milk (or more for drizzling consistency)
- Optional: a splash of vanilla or lemon juice for extra flavor
Step-by-Step Instructions
Step 1: Preheat & Prep Pan
Crank your oven to 350°F (175°C). Grease your standard loaf pan (9×5 inches) generously with butter or non-stick spray, then dust lightly with flour. Pro tip: lining the bottom with parchment paper makes removal a breeze. Just a little prep goes a long way to keep your slices perfect. While that’s warming up, grate your zucchini—the finer, the better—and don’t forget to squeeze out excess moisture with a clean kitchen towel or paper towels. Moisture is the enemy here; too much and the bread can turn out heavy or gummy.
Step 2: Mix Dry Ingredients
In a large bowl, whisk together the flour, baking powder, baking soda, salt, and cinnamon. This step ensures your leavening agents are evenly dispersed and helps prevent clumps, which can lead to uneven baking. I learned this trick the hard way—lumps in the dry ingredients make for an uneven rise and some overly floury bites. Set this aside while you work on the wet.
Step 3: Mix Wet Ingredients
In another bowl, beat the eggs, sugar, oil, and vanilla until well combined. Then, stir in the grated zucchini and buttermilk. The mixture might look a little lumpy at this point, which is totally fine—just don’t overbeat. I like to use a whisk for this step; it keeps things light and helps incorporate air, making the bread extra tender. If you’re using almond milk or any plant-based milk, I find it actually makes the loaf a bit creamier and adds a subtle nutty undertone.
Step 4: Combine
Gently fold the wet ingredients into the dry, just until everything is combined. Do not overmix—that’s how dense bread happens! I usually switch to a spatula at this point and stir gently, making sure no pockets of flour remain. The batter will be thick but pourable—perfect for layering and swirling.
Step 5: Prepare Filling
Mix together the brown sugar, cinnamon, and melted butter. This fragrant combo adds that irresistible swirl flavor. Feel free to add chopped nuts or chocolate chips if you’re feeling a little fancy—that’s how I’ve made it more decadent on lazy weekends.
Step 6: Layer & Swirl
Pour half your batter into the prepared loaf pan. Spread the cinnamon-sugar filling over the top, then spoon the remaining batter on top. Using a butter knife or skewer, swirl through the batter to create marbled ribbons. Don’t worry if the swirl isn’t perfect—once baked, it looks beautifully rustic and homemade. I find that a gentle swirl across the surface works best; just enough to see the cinnamon peeking through.
Step 7: Bake
Pop it into your preheated oven and bake for about 50–60 minutes. The top should be golden brown, and a toothpick inserted in the center should come out clean. If it starts browning too quickly, tent it loosely with foil for the last 10 minutes. Every oven is different, so start checking around the 50-minute mark. This bread is ready when it passes the toothpick test—my favorite sign that’s it’s perfectly baked and moist inside.
Step 8: Cool & Glaze
Let your loaf cool in the pan for about 10 minutes, then transfer it to a wire rack. Once cooled just enough to handle (but still warm), drizzle with your simple glaze—powdered sugar with a splash of milk—and watch how the glaze soaks into the tender crumb. This step is optional but truly adds that bakery vibe I love. If you prefer a less sweet touch, dust with powdered sugar instead or drizzle honey for a natural shimmer.
Step 9: Slice & Serve
The best way to slice this bread? Wait until it’s totally cooled—warm bread tends to be too soft and can fall apart. Use a serrated bread knife and cut with a gentle sawing motion. Serve slices slightly warm or at room temperature with a dollop of butter, a smear of cream cheese, or just as is. It’s lovely with a cup of coffee or tea, and leftovers make a delightful breakfast option for busy mornings.
What to Serve It With
This zucchini swirl bread works beautifully across all meals. For breakfast, I love to serve it toasted with butter and a drizzle of honey, paired with a strong cup of coffee or a creamy latte. When I make brunch, I like to cut it into thicker slices, pile on fresh berries, and add a dollop of whipped cream or Greek yogurt—such a pretty, nourishing plate. And as a dessert? Warm slices with a scoop of vanilla ice cream or a side of buttery caramel sauce are divine. For casual snacking, I often wrap individual slices in foil and take them on the go, especially when my kids ask for “those yummy bread slices” after school. It’s a family favorite, and everyone loves how the cinnamon swirls peek through each bite—like edible art. This dish has become one of those comfort staples I can turn to anytime I want something sweet and wholesome without fussing for hours in the kitchen.
Top Tips for Perfecting Your Zucchini Swirl Bread
Even after baking this for years, I keep discovering little tricks to make it even better. First, squeezing out the zucchini thoroughly is a game changer—it prevents that unwanted sogginess and helps the bread rise perfectly. I’ve tested using various zucchinis from my garden, and I find that the smaller, firmer ones give the best texture. When mixing, resist the temptation to overdo it; the batter should be just combined—overmixing makes it dense, and nobody wants a gummy loaf. For the swirl, I’ve played with patterns—you can do a single swirl, or layer generously for a more dramatic effect. If you want a more colorful look, sprinkle some chopped nuts or mini chocolate chips into the filling. Substituting oil for melted butter works well, too—giving a slightly different richness. I’ve also experimented with different spices—nutmeg and cardamom add a lovely twist. Every tweak teaches me something new, and honestly, I love the process as much as the finished loaf. Baking this bread has become a cozy ritual—my kitchen filled with warm spices, the smell of baking zucchini, and the sound of the timer dinging. Just trust your senses, and don’t be afraid to improvise a little—you’ll get a loaf that’s uniquely yours.
Storing and Reheating Tips
This bread keeps quite well, especially if you wrap it tightly in plastic or place it in an airtight container. At room temperature, it’s good for up to 2 days—perfect for slicing and keeping on the countertop, so there’s always a piece ready to enjoy with coffee. If you want to keep it longer, store slices in the refrigerator for up to a week, wrapped well to prevent drying out. Reheat slices in the microwave for about 15–20 seconds, or toast lightly for a crispier edge—either way, it tastes almost as fresh as day one. For freezing, wrap the loaf tightly in foil and store for up to 3 months. I recommend slicing first, so you can grab a piece without defrosting the whole loaf. To thaw, just leave the slices at room temperature for 20–30 minutes or warm them briefly in the microwave. Keep in mind, if you add the glaze before freezing, it might become a little less shiny once reheated, so I prefer to glaze just before serving. Proper storage keeps that moist, tender crumb intact and makes sure your zucchini swirl bread stays delicious from first slice to last.
Frequently Asked Questions
Final Thoughts
If you’ve made it this far, I hope you’re feeling inspired to bake your own cozy zucchini swirl bread. It’s one of those recipes that truly feels like a warm hug—moist, fragrant, and just sweet enough to satisfy that craving without feeling heavy. I’ve tested and loved every variation I could think of, and honestly, every loaf has been met with happy faces—whether it’s a lazy Sunday morning, a side at brunch, or a quick treat after school. I love that this bread is forgiving and adaptable; you can swap ingredients based on what you have on hand or tweak the sweetness and spice to suit your mood. It’s also a great way to sneak some greens into your family’s diet without fuss or fussiness. My advice? Give it a try, don’t overthink the swirl, and embrace the rustic beauty of a homemade loaf. Once you smell that cinnamon and zucchini baking, your kitchen transforms into a cozy bakery, and I promise, your home will smell just as inviting as mine. Can’t wait to hear how yours turns out—happy baking!
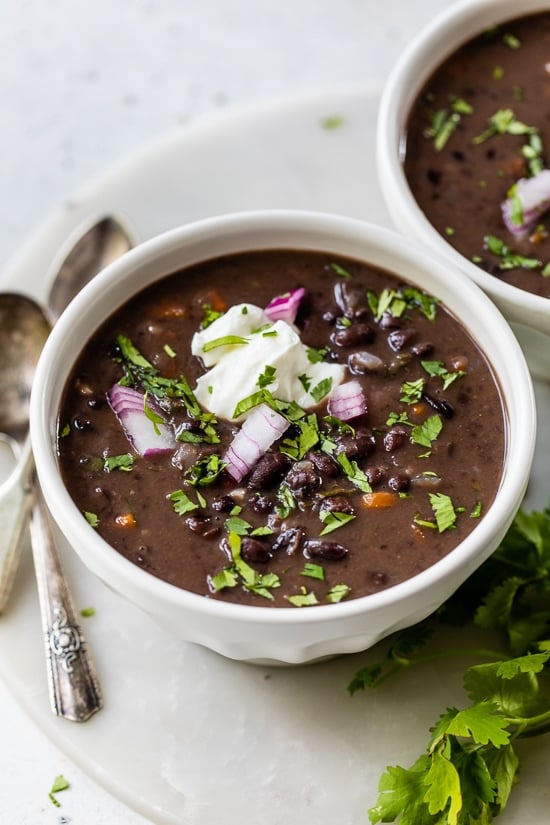
black bean soup
Ingredients
Method
- Rinse the dry black beans and soak overnight in large pot with 8 cups of water.
- Drain and rinse soaked beans. Fill the pot with 9 cups of fresh water and add beans, bay leaves, onion, bell pepper, and garlic. Bring to a boil, then simmer for 1.5 hours until tender.
- While beans cook, heat olive oil in a large skillet over medium-low. Add diced onion, parsley, carrots, bell pepper, garlic, salt, and pepper. Sauté about 6 minutes until vegetables soften.
- Add sautéed vegetables to the soup after an hour of simmering, along with wine, vinegar, cumin, oregano, and bouillon cube. Stir well.
- Cover and simmer another 30 minutes, stirring occasionally.
- Use an immersion blender to partially blend the soup for about 10 seconds to thicken, or transfer about 3 cups to a blender and return to the pot.
- Adjust seasoning with salt, pepper, and cumin as desired. Ladle about 1 1/4 cups into each bowl and top with avocado, sour cream, chopped onions, scallions, chives, or cilantro.


This brings back so many memories! Your grandma’s kitchen sounds like the coziest place on earth.
This recipe brought back such warm memories—just like grandma used to make! Perfect for cozy nights.
This brings back such sweet memories! I love how food can instantly transport you to a special place. Thanks for sharing this cozy recipe.
This soup sounds so comforting! I love how it brings back those cozy summer memories—definitely adding this to my recipe list.
This brings back so many sweet memories—grandma’s kitchen always smelled like comfort and home. Thanks for sharing this recipe!