
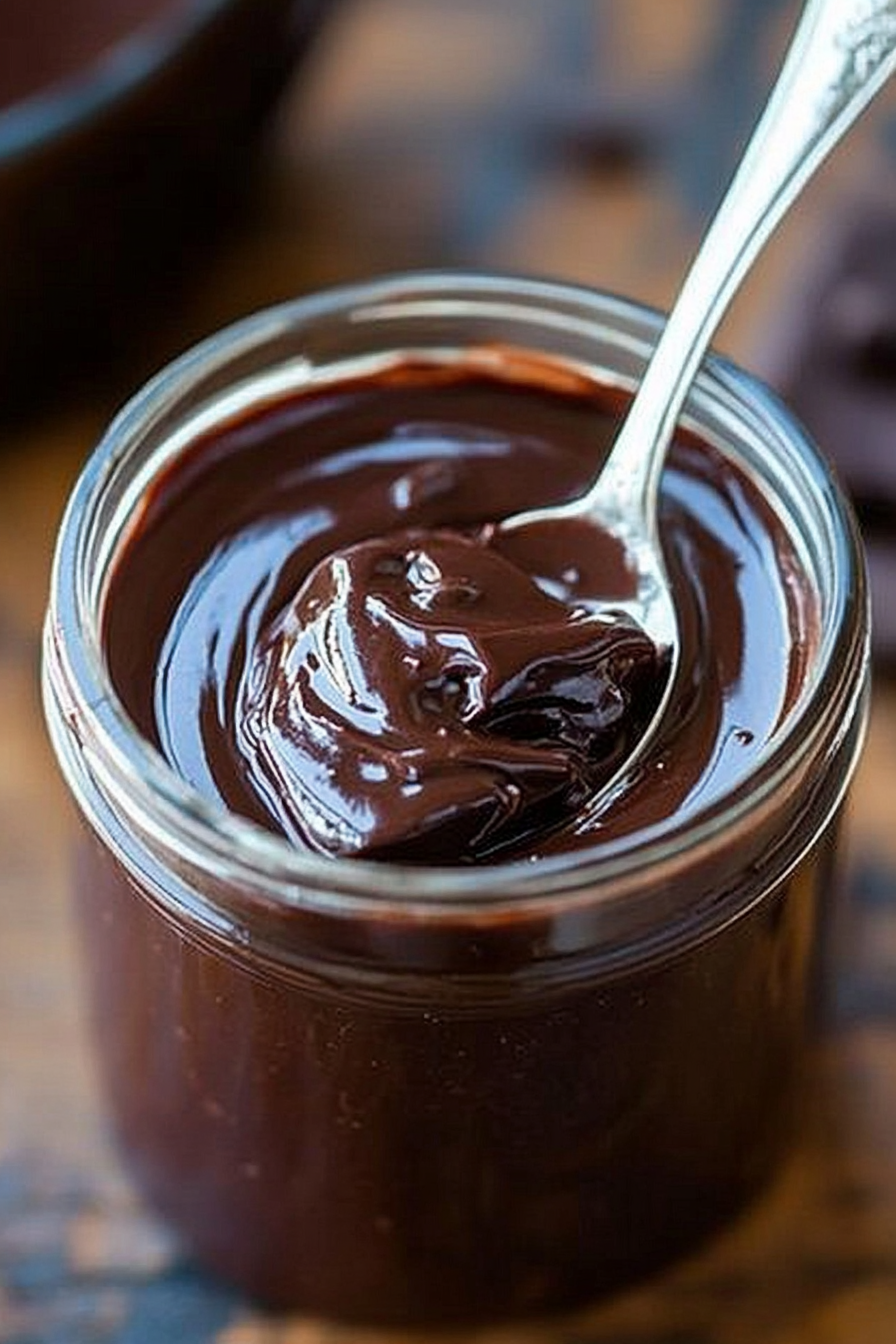
Easy Homemade Hot Fudge Sauce Recipe
If there’s one thing I’ve learned over the years, it’s that the best recipes are the ones that feel like a warm hug—simple, comforting, and endlessly adaptable. This zucchini breakfast layer cake is exactly that. I first whipped it up during one of those busy mornings when I needed something both hearty and satisfying, but didn’t want to spend hours in the kitchen. The smell alone—think freshly grated zucchini mingling with cinnamon and vanilla—fills the whole house with such cozy allure. My kids actually ask for this all the time now, especially when zucchinis are at their peak during summer. It’s like a cross between a breakfast loaf and a sweet cake—think a quick bread, but with a little more flair. When I tested this with almond milk, it made it even creamier, which I loved. Trust me, this one’s a lifesaver on busy nights or when friends pop over unexpectedly. It’s incredibly forgiving, and you can even make it ahead. That’s why I keep returning to it—it’s like comfort food in cake form, and I promise, it’ll become a staple in your mornings too.
What is Zucchini Breakfast Layer Cake?
This zucchini breakfast layer cake is kind of like a fancy loaf, but with a playful twist. Think of it as a combination of a soft, moist cake and a hearty vegetable bun—kind of like a coffee cake but with a healthy boost. The real star here is the zucchini, which keeps the cake super moist without making it heavy. It’s essentially a breakfast bake that’s great to enjoy with a cup of coffee or tea, but it’s so sweet and tasty that it can double as an afternoon snack or a light dessert. The name might sound fancy, but honestly, it’s just a simple, rustic cake that’s loaded with grated zucchini, cinnamon, and a dreamy swirl of cream cheese that’s the perfect counterpoint to the slightly sweet batter. It’s one of those recipes that makes you feel good inside—nourishing, light, and incredibly satisfying. Think of it as a slice of sunshine on your plate, perfect for starting your day or winding down.
Why you’ll love this recipe?
What I love most about this zucchini breakfast layer cake is how versatile and forgiving it is—perfect for bakers of all skill levels. The flavor profile is just right—subtle sweetness balanced with a warm cinnamon-spice that makes it feel like a cozy morning. The zucchini keeps it incredibly moist, so you don’t have to worry about it drying out, even if it sits for a few hours. Plus, it’s budget-friendly! You probably already have most of these ingredients in your pantry and fridge, which is a huge plus during hectic weeks. The best part? It’s a one-bowl wonder for the batter, making cleanup a breeze. This cake also doubles beautifully—you can serve it plain for a quick breakfast, or dress it up with fresh berries or extra glaze when you want to impress guests. I’ve tested this with different flours, and I swear, it always turns out perfect. It’s that kind of recipe you keep in your back pocket—reliable, comforting, and wholesome. And honestly, the cream cheese swirl? It’s a game-changer. My kids ask for this all the time. It’s become a family favorite that I can’t imagine my mornings without now.
How do I make Zucchini Breakfast Layer Cake?
Quick Overview
This cake is straightforward—mix the dry ingredients in one bowl, the wet in another, then combine gently. The batter is wonderfully thick and spoons into your prepared pan easily. Mix up that luscious cream cheese for the swirl, layer it into the batter, and swirl with a toothpick for a pretty marbled effect. Bake until a toothpick comes out clean, then cool before glazing. It’s a simple process that yields such a stunning dish. No complicated techniques, just good old-fashioned baking that’s foolproof enough for a weeknight treat or weekend brunch. The magic is in how moist and flavorful it turns out every time, thanks to the zucchini and that hint of cinnamon. Plus, it’s pretty quick to pull together, so don’t be surprised if the whole house starts craving it!
Ingredients
For the Main Batter:
- 2 cups grated zucchini (about 2 small zucchinis)
- 1 ½ cups all-purpose flour (or a mix of whole wheat and AP for a healthier touch)
- 1 teaspoon baking powder
- ½ teaspoon baking soda
- ½ teaspoon salt
- 1 teaspoon cinnamon
- ½ teaspoon nutmeg (optional but adds warmth)
- ¾ cup granulated sugar (adjust to taste)
- ¼ cup light brown sugar for depth
- ½ cup vegetable oil or melted coconut oil
- 2 large eggs
- 1 teaspoon vanilla extract
- ½ cup milk (dairy or plant-based)
For the Filling:
- 4 oz cream cheese, softened
- 2 tablespoons powdered sugar (or more, to taste)
- ½ teaspoon vanilla extract
- Optional: a pinch of lemon zest for brightness
For the Glaze:
- ½ cup powdered sugar
- 1-2 teaspoons milk or lemon juice
- Optional: zest of lemon or orange for extra zing
Step-by-Step Instructions
Step 1: Preheat & Prep Pan
I always start by heating my oven to 350°F (175°C). Grease a 9-inch square or round cake pan and line it with parchment paper—trust me, this makes the removal so much easier. If you don’t have parchment, a quick spray of non-stick spray with a little flour works fine, too. While that’s happening, I grate the zucchini and squeeze out excess moisture using a clean kitchen towel or paper towels. Moisture is sneaky and can make the batter a bit too loose, so get as much water out as you can!
Step 2: Mix Dry Ingredients
In a large bowl, whisk together the flour, baking powder, baking soda, salt, cinnamon, and nutmeg. This step is crucial because it distributes the leavening evenly, ensuring a nice rise and tender crumb. I always do this first—it’s like giving the dry ingredients a little spa day before they get mixed with everything else.
Step 3: Mix Wet Ingredients
In a separate bowl, combine the sugars, oil, eggs, vanilla, and milk. Whisk until smooth and slightly frothy. The batter should be thick but pourable. I’ve learned that using room temperature eggs helps everything mix more evenly and keeps the batter smooth. The smell of vanilla and cinnamon during this step is pure comfort—makes the whole house smell like a bakery!
Step 4: Combine
Pour the wet mixture into the dry ingredients and gently fold together. No overmixing! The batter will be thick, and that’s exactly what you want. Overmixing can lead to a tough crumb, and nobody loves that in a breakfast cake. Fold until just combined—lumps are okay, just stop when it looks like a cohesive batter.
Step 5: Prepare Filling
In a small bowl, blend the softened cream cheese, powdered sugar, vanilla, and lemon zest if using. Mix until smooth. I like to chill this just a little before swirling—it helps keep the swirl defined and pretty.
Step 6: Layer & Swirl
Pour half of the batter into your prepared pan. Drop dollops of the cream cheese mixture on top, then spoon the remaining batter over. Using a toothpick or skewer, swirl gently through the layers to create a marbled effect. Don’t overdo it—just enough to see pretty patterns. This trick gives you that homemade bakery look without the fuss.
Step 7: Bake
Pop it into the oven and bake for about 40-45 minutes. Start checking at 40—you want a toothpick inserted into the center to come out clean or with moist crumbs. Sometimes my oven runs hot or a little cooler, so I adjust baking time accordingly. The top should be golden brown, and the house will smell like cinnamon heaven.
Step 8: Cool & Glaze
Let the cake cool in the pan for about 15 minutes before transferring to a wire rack. Once cooled, whisk together your glaze ingredients and drizzle it artfully over the top. If the glaze is too thick, add a tiny splash of milk; if too runny, add more powdered sugar. I love adding a little zest here—it boosts the citrus flavor and makes it feel fresh and vibrant.
Step 9: Slice & Serve
Slice with a sharp serrated knife—you don’t want to crush the cake. Serve warm or at room temperature, maybe with a dollop of yogurt or a sprinkle of extra cinnamon. This cake is fantastic on its own, but a spoonful of fresh berries on the side takes it over the top. It’s so soft and fragrant—that first bite is always met with happy murmurs. Be sure to store leftovers in an airtight container—this cake stays moist and delicious for days.
What to Serve It With
This zucchini breakfast layer cake is such a versatile treat. For breakfast, serve it with a steaming mug of coffee or a glass of fresh orange juice—something just to brighten up your morning. I like to warm a slice and spread a little butter or cream cheese on top; it feels indulgent yet wholesome. When you’re entertaining friends for brunch, pair it with a light fruit salad, some herbal tea, or even a mimosa for that added celebratory feel. Honestly, I’ve also snacked on it in the afternoon with a cup of herbal tea—it makes for a lovely, slightly sweet pick-me-up. And as a dessert? Warm with a drizzle of honey or extra glaze and maybe a scoop of vanilla ice cream. My family loves it with a dusting of powdered sugar, and I often sprinkle chopped nuts or toasted coconut for added crunch. It’s one of those dishes that you can keep in the fridge and enjoy over a few days—everything stays fruity and moist, and the flavor only gets better after a night or two.
Top Tips for Perfecting Your Zucchini Breakfast Layer Cake
Over the years, I’ve picked up some tricks to make this cake shine every time. Firstly, when grating zucchini, I always use a box grater or the fine side of a microplane—you get really smooth, tender pieces that blend beautifully. Removing excess moisture is a game-changer—I press the grated zucchini against a paper towel or clean kitchen towel to squeeze out all that extra water. This prevents the batter from becoming too loose or watery, which can mess with the rise. Speaking of batter consistency, I’ve learned not to overmix once I combine wet and dry ingredients—stir just until the ingredients are incorporated. The swirl technique is another little trick I swear by: using a toothpick or skewer, I create a gentle figure-eight or swirl pattern—this ensures a pretty, marbled look inside. For ingredient swaps, I’ve tested coconut sugar instead of brown sugar, which gives a slightly richer flavor, and almond flour works beautifully if you want an gluten-free version, just reduce the liquid slightly. Baking is always a little unpredictable, so I recommend checking your cake at the 40-minute mark. If your oven runs hot, try lowering the temperature slightly or tenting the cake with foil if it browns too quickly. When it comes to the glaze, I’ve experimented with citrus zest, vanilla, or even honey—depending on the mood. Trust me, a good glaze can turn an already delicious cake into something wow-worthy. The lessons I’ve learned? Patience and gentle touch go a long way. This cake is forgiving, but every tweak you make improves the final result.
Storing and Reheating Tips
This cake keeps well, which is part of its charm. For best freshness, store it in an airtight container at room temperature for up to two days—just be sure it’s not in direct sunlight. If you want to keep it longer, pop it into the fridge for up to five days. I recommend wrapping it tightly in plastic wrap or storing it in a sealed container—this keeps it moist and prevents it from absorbing fridge odors. If you’re planning to serve it later, I suggest slicing what you need and leaving the rest whole; it stays fresher that way. To reheat, place a slice in the microwave for about 15-20 seconds or warm it gently in the oven at 300°F for about 10 minutes—just enough to revive the aroma and soft texture. If you’ve added glaze, wait until just before serving to drizzle more, ensuring it stays shiny and luscious. For freezing, wrap the cake tightly in plastic wrap, then foil, and store for up to three months. To thaw, leave it on the countertop for a few hours or in the fridge overnight. I find that a little patience pays off; a properly stored cake still tastes fresh and delightful—even after a few weeks.
Frequently Asked Questions
Final Thoughts
This zucchini breakfast layer cake is a true testament to how simple ingredients—plus a little love—can turn into something special. It’s a recipe I’ve made dozens of times, and every single time, it brings a smile to my family’s face. Whether it’s a rushed morning, a lazy weekend brunch, or a cozy afternoon snack, it’s always a hit. I love how adaptable it is, and I’ve discovered that adding a splash of citrus zest or mixing in some chopped nuts can make it even more personal. Plus, with a few tweaks here and there, it can be gluten-free or lower in sugar without sacrificing flavor. The best part? It feels like you’re indulging without the guilt—moist, flavorful, and packed with veggies! I’d love for you to try it and tell me what variations you come up with. Do make sure to leave a comment or tag me in your photos—I can’t wait to see your versions. Happy baking, friends—and enjoy every delicious slice!
hot fudge
Ingredients
Method
- Bring cream, corn syrup, brown sugar, cocoa powder, and salt to a boil in a saucepan over medium heat, stirring until the sugar and chocolate are melted; simmer for 5 minutes, stirring frequently.
- Remove from heat, add butter, vanilla, and remaining chopped chocolate; stir until smooth and glossy. Let cool slightly before serving.


I just made this fudge sauce and it’s amazing! So rich and easy—perfect for ice cream. Definitely adding it to my go-to recipes.
I love that zucchini breakfast twist—simple and comforting just like your hot fudge sauce!
I love this idea! Zucchini in breakfast is such a clever way to add moisture and nutrients. Can’t wait to try it.
I love how simple and comforting this recipe is—perfect for cozy mornings! Can’t wait to try it.
I love how comforting and simple this recipe sounds—perfect for a cozy breakfast treat!