

Creamy Green Egg Salad Recipe
I’ll never forget the first time I bit into this zucchini cream cheese swirl loaf. It was at one of those frantic weekend mornings — you know, the kind where you’re juggling pancakes, school bags, and trying to find five minutes to breathe? I had zucchinis from last week’s garden that needed using up, and I was craving something sweet but with a little bit of that garden freshness. I threw together this loaf in a rush, not expecting much, but oh my gosh — the aroma alone made everyone in my house come rushing to the kitchen. The moist, tender crumb combined with that sweet cream cheese swirl, it’s honestly become a neighborhood favorite. It’s like the little brother of those big bakery muffins but way more cozy and personal. Trust me, this one’s a lifesaver on busy nights or when those veggie bits in your fridge are begging for attention. Plus, it’s surprisingly easy to make — and I always do this when I want something comforting that’s also healthy-ish. You’ll see what I mean once you try it! Now, let’s get right into how to make this beloved zucchini cream cheese swirl loaf. I promise, you’ll be hooked after your first bite.
What is Zucchini Cream Cheese Swirl Loaf?
This recipe is basically a delightful loaf cake that’s packed with grated zucchini and swirled with luscious cream cheese. Think of it as a happy marriage between a quick bread and a coffee cake, with a little surprise inside. It’s called a “swirl” because that smooth, creamy layer of cream cheese gets beautifully marbled through the batter — each slice revealing a fancy pattern that looks just as good as it tastes. The name might sound fancy, but honestly, it’s like eating a soft, flavorful hug. It’s essentially a way to enjoy those summer zucchinis in a way that feels indulgent without turning on the oven for hours. The trick here is to grate the zucchini finely and squeeze out excess moisture — that’s what keeps the loaf nice and tender without getting soggy. And the cream cheese filling? It’s just sweet enough to balance the zucchini’s mellow flavor, creating a perfect harmony in every bite. This is definitely a recipe I love to whip up when I want something homemade, but I don’t want to spend the whole day baking. It’s simple, satisfying, and endlessly customizable!
Why you’ll love this recipe?
There are so many reasons why this zucchini cream cheese swirl loaf has become a staple in my kitchen — and I bet it’ll be yours too. First, the flavor profile is just magical. That tender crumb filled with subtle zucchini sweetness and a rich, velvety cream cheese swirl? Yes, please. It’s a sweet treat with a healthy twist that doesn’t feel heavy or overly indulgent. What I love most about this is how ridiculously easy it is to put together. Honestly, I’ve made this countless times, often with ingredients I already have on hand, and it never fails. Plus, the cost? Super budget-friendly — just basic pantry staples like flour, sugar, and eggs, with a few fresh zucchinis. And versatility? Oh, it’s fantastic. You can serve it toasted for breakfast, as a snack with tea, or sliced up for brunch. Sometimes, I add a handful of blueberries or chopped nuts for variation. This loaf is perfect when you want a cozy, homemade feeling without hours of effort. It’s a crowd-pleaser for family brunch, a sweet gift for friends, or even a sneaky way to get kids to eat more vegetables without fuss. Honestly, what’s not to love?
How do you make Zucchini Cream Cheese Swirl Loaf?
Quick Overview
This zucchini cream cheese swirl loaf is all about simplicity. You start by finely grating the zucchini and squeezing out the excess water (don’t skip this step — soggy bread is the worst!). Next, mix your dry ingredients, then beat together wet ingredients, and fold everything gently. The key is not overmixing — you want a tender crumb. Prepare your cream cheese filling while the oven heats up, then carefully layer it into your batter. Swirl it with a toothpick or a knife — no perfect patterns needed — just confident, sweeping motions. Bake until golden and a skewer comes out clean. Let it cool, then spread a quick glaze if you like, or just dive right in. Honestly, it’s foolproof once you get the hang of layering and swirling, which is half the fun anyway. And because it’s so forgiving, it’s a great project for beginner bakers who want something impressive yet straightforward.
Ingredients
For the Main Batter:
– 2 cups all-purpose flour (I swear by unbleached for a slightly richer flavor),
– 1 cup sugar (white or coconut sugar works perfectly),
– 1 teaspoon baking powder,
– ½ teaspoon baking soda,
– ½ teaspoon salt,
– 1 teaspoon cinnamon (because who doesn’t love a hint of warmth?),
– 2 large eggs (preferably at room temp for everything to blend smoothly),
– ¾ cup vegetable oil or melted coconut oil (I’ve tested both — both work, but I prefer coconut for flavor),
– 1 teaspoon vanilla extract,
– 1 cup grated zucchini (finely grated and well-drained).
For the Filling:
– 8 oz cream cheese (softened, of course),
– ¼ cup sugar (up the sweetness if you like it richer),
– 1 teaspoon vanilla extract,
– Optional: a handful of chocolate chips or chopped nuts for extra texture.
For the Glaze:
– ½ cup powdered sugar,
– 1-2 teaspoons milk or lemon juice (adjust for desired drizzling consistency),
– Optional: a splash of vanilla or lemon zest for flavor.
Step-by-Step Instructions
Step 1: Preheat & Prep Pan
Set your oven to 350°F (175°C). Line a standard loaf pan with parchment paper or spray it well with non-stick spray. This makes removal so much easier! If you want a super pretty loaf, you can even lightly dust it with flour after greasing. Keep your ingredients close — you’ll want everything within reach because this comes together quickly once you start.
Step 2: Mix Dry Ingredients
In a big bowl, whisk together the flour, sugar, baking powder, baking soda, salt, and cinnamon. The dry ingredients are the foundation that keeps your bread tender and flavorful. Mixing them first ensures even distribution, so every bite is perfect.
Step 3: Mix Wet Ingredients
In a separate bowl, beat the eggs until frothy — I usually do this with a fork or whisk. Add the oil, vanilla, and grated zucchini, then mix until smooth. I love how the zucchini adds moisture without overpowering; it’s like a secret ingredient that makes the loaf so tender.
Step 4: Combine
Gently fold the wet ingredients into the dry, just until combined. Be careful not to overmix — it’s tempting, but overworking the batter can make the bread dense. The batter will be slightly lumpy—perfectly okay! You want that rustic texture.
Step 5: Prepare Filling
In a small bowl, blend the softened cream cheese with sugar and vanilla until smooth and creamy. You want it soft enough to dollop easily but not so runny that it’s drippy. If you’re feeling adventurous, add some chocolate chips or chopped nuts here. My kids ask for this all the time, and I love sneaking in extra goodies.
Step 6: Layer & Swirl
Pour half of the batter into your prepared loaf pan. Spread about half of your cream cheese mixture over it, then add the remaining batter and top with the rest of the cream cheese. Use a toothpick or a skewer to swirl through the layers — swirling in figure-eights creates beautiful marbled patterns. No perfect swirls needed — just go for a casual, confident streaking. The messier, the better; it actually looks more rustic and cozy.
Step 7: Bake
Pop it into the oven and bake for 50-60 minutes. Check for doneness by inserting a toothpick or cake tester in the center — it should come out clean. Your house will smell like a cinnamon dream, and I guarantee you’ll be tempted to sneak a slice warm from the oven. Let it cool in the pan for about 15 minutes, then transfer to a wire rack. This step prevents the edges from getting soggy.
Step 8: Cool & Glaze
Once cooled, whisk your powdered sugar with milk or lemon juice until smooth. Drizzle this over the loaf for a shiny, sweet finish. I find that adding just a little zest (lemon or orange) to the glaze elevates the flavors beautifully. Trust me on this—you want that tangy contrast with the sweet bread.
Step 9: Slice & Serve
Use a serrated knife to cut neat slices — my trick is to let it sit a few minutes after cooling; it slices more cleanly. Serve slightly warm or at room temperature. A dollop of whipped cream or a sprinkle of powdered sugar turns it into a showstopper. This loaf actually tastes even better the next day—if it lasts that long!
What to Serve It With
This loaf is flexible enough to shine in many settings. For breakfast, I love slicing it thick and toasting it with a smear of butter or cream cheese. It pairs beautifully with a strong cup of coffee or a mug of herbal tea. When I serve it at brunch, I like to dress it up with fresh berries or a drizzle of honey. My family asks for this all the time after dinners, especially topped with a dash of extra glaze or a sprinkle of nuts for crunch. It makes a lovely centerpiece on any dessert table too — warm slices with a scoop of vanilla ice cream are heavenly. Or just keep it simple: a slice with a cup of afternoon tea or milk, and you’re set. I’ve even packed slices in my kids’ lunchboxes — they’re a hit! Honestly, this loaf feels like a hug from the kitchen, and I bet it’ll become a part of your home, too.
Top Tips for Perfecting Your Zucchini Cream Cheese Swirl Loaf
The key to mastering this recipe is all in the prep and layering. First, always squeeze out excess moisture from the zucchini — this is the trick to keeping the texture light, not soggy. I tested this with different grating techniques and found that finely grated zucchini that’s well-drained really makes a difference. Overmixing the batter is a common mistake — I’ve learned to fold gently and stop when just combined. For the swirl, don’t overthink it — just pour, dollop, and swirl confidently; it’s part of the rustic charm. If you want a more decadent bread, add chocolate chips or chopped nuts into the cream cheese filling or the batter. I’ve also experimented with using honey or maple syrup instead of sugar, which is a game-changer if you want a more natural sweetness. When baking, always check at the 50-minute mark — oven temps vary, and you don’t want an over-baked loaf. A toothpick inserted in the center should come out clean, but a few moist crumbs are okay because this bread stays tender for days. For the glaze, I like it thick enough to drizzle without running, but feel free to loosen it with a splash more milk if desired. Trust me, once you get the hang of swirling and layering, this recipe is pure joy — I’ve made this so many times, I could do it in my sleep.
Storing and Reheating Tips
This loaf keeps surprisingly well. If you’re serving it the same day, just let it cool completely before slicing. To store at room temperature, wrap it loosely in foil or keep it in an airtight container — it’s best enjoyed within 2 days before the moisture starts to fade. For longer storage, refrigerate in an airtight container for up to 5 days. Just keep in mind that refrigeration can dry it out a bit, so I like to warm individual slices in the microwave for about 10-15 seconds before eating. If you want to keep it longer, this bread freezes beautifully. Wrap it tightly in plastic wrap, then foil, and freeze for up to 3 months. When ready to eat, thaw at room temp and warm slices gently. If you’re adding the glaze, do so after reheating for the freshest look and taste. Freshness is all about timing, so try to slice only what you’ll eat within a couple of days for the best experience. And honestly, this loaf tastes just as amazing cold out of the fridge if you prefer it that way. It truly holds up beautifully.
Frequently Asked Questions
Final Thoughts
This zucchini cream cheese swirl loaf isn’t just a recipe — it’s a feeling. It reminds me of lazy Sunday mornings and spontaneous baking with my kids, who love helping swirl the cream cheese and watching the batter rise. It’s at once humble and elegant, and every time I make it, I get a little bit of that joy back. The versatility is what makes it so magic — breakfast, snack, dessert, you name it. Plus, it’s satisfying to know you can sneak some veggies into a treat that everyone asks for again and again. I hope you try it soon — don’t be surprised if it quickly becomes a family favorite in your home, too. Happy baking, everyone! And I’d love to hear how yours turns out, so drop a comment or share your own twists. Can’t wait for you to enjoy a slice of this cozy, delicious loaf!
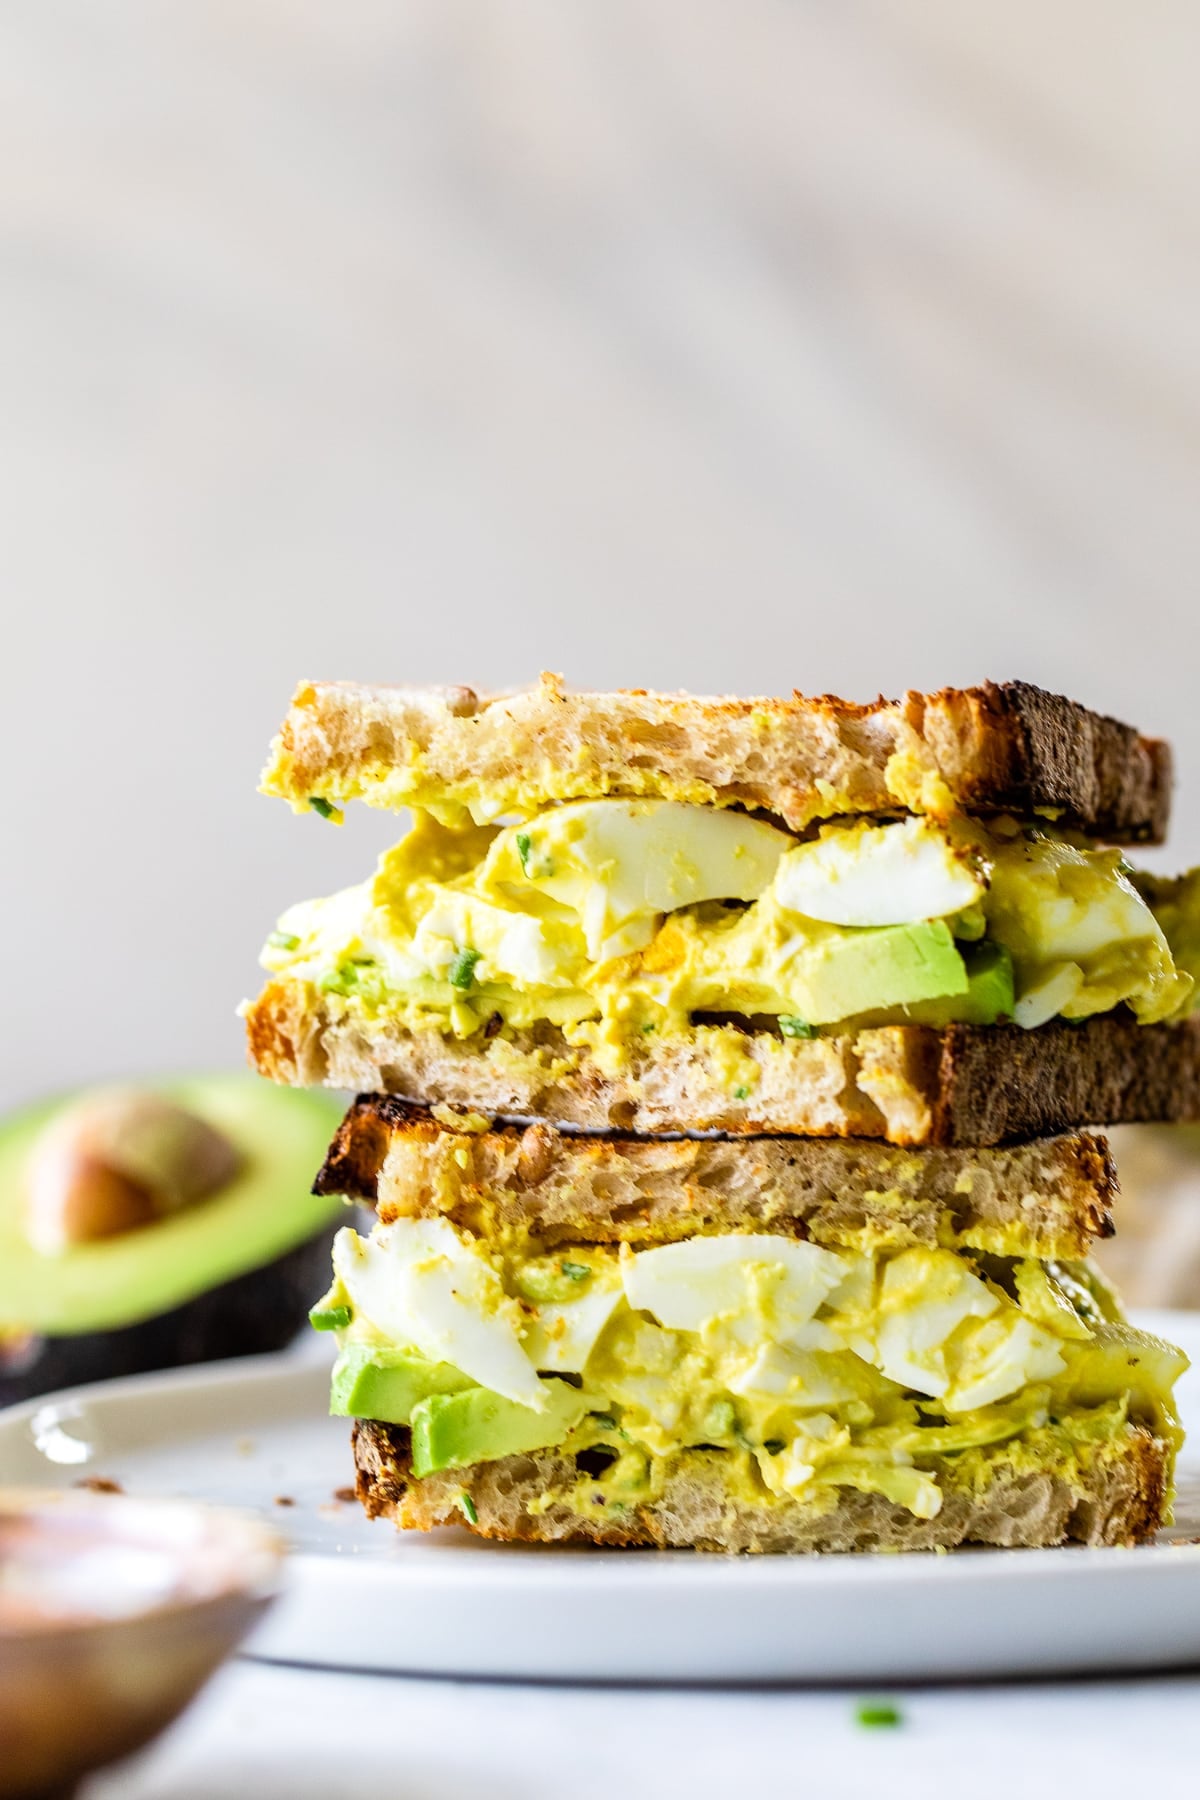
avocado egg salad
Ingredients
Method
- Combine the egg yolks with the avocado, light mayo, yogurt, chives, vinegar, salt and pepper in a medium bowl.
- Mash with a fork until smooth.
- Chop the hard-boiled eggs and add to the mixture, then gently combine and season to taste.


This egg salad recipe sounds amazing! I love how creamy and flavorful it is — perfect for busy mornings.
That egg salad sounds amazing! I love creamy textures with fresh greens—definitely adding this to my lunch rotation this week.
I just tried this egg salad recipe—it’s seriously creamy and delicious! The green color looks so fresh too, perfect for a light lunch.
I love the idea of a creamy green egg salad! It sounds so fresh and satisfying — perfect for a quick lunch or brunch side.
Wow, this egg salad sounds amazing! I’ve been looking for a fresh twist on classic egg salad—definitely saving this recipe. Thanks for sharing!