
Easy Samoa Cheesecake Without Baking
Honestly, there’s something about plant-based baking that feels like a cozy hug—probably because I grew up sneaking zucchini muffins from my mom’s bakery, and let me tell you, nothing beats the smell of fresh carrot cake or zucchini bread filling up the kitchen on a lazy Sunday. But what I really love about this gooey cinnamon swirl zucchini cake is how it’s a secret weapon for those times I want something comforting and sweet but don’t want to fuss in the kitchen forever. It’s kind of like that old-school coffee cake your grandma used to make, but with a sneaky healthy twist that fools everyone into thinking you’ve gone full gourmet. This one’s a lifesaver on busy nights when dessert feels like a distant dream, and yet, here I am, baking something that tastes like a slice of heaven. I’ve tested this with almond milk, and believe me, it made it even creamier—so don’t hesitate to try that if you’re dairy-free. I promise, once you make this, it’s going to disappear faster than you can say “more, please”! And the best part? It’s so forgiving, you’ll want to keep it in your rotation all year round.
What is a gooey cinnamon swirl zucchini cake?
This isn’t just your average zucchini bread—think of it as a moist, tender cake with a surprise cinnamon swirl and a sticky, sweet glaze on top that makes every bite feel like a little celebration. The name says it all: gooey because of the rich, melt-in-your-mouth texture, cinnamon swirl because it adds that warm, spicy punch, and zucchini, well, it’s the sneaky veggie that keeps everything moist and flavorful. The idea behind this recipe started out as a way to use up those sad, overgrown zucchinis in my fridge—because honestly, I’ve learned that hiding a vegetable in something sweet tricks everyone into eating more greens! Plus, it’s essentially a cross between my childhood favorite coffee cake and grandma’s zucchini loaf, with a modern twist. It’s friendly for bakers of all skill levels too—seriously, anyone can master this with just a few mixing bowls and a spatula. Think of it as a cozy, crowd-pleasing dessert that’s perfect for breakfast, brunch, or just whenever the craving hits.
Why you’ll love this recipe?
What I love most about this gooey cinnamon swirl zucchini cake is how it combines all the good stuff into one simple loaf—that’s moist, packed with flavor, and just the right amount of sweetness. The smell alone will make your whole house smell like a bakery—think cinnamon, vanilla, and that faint nutty undertone of zucchini—trust me, it’s addictive. This recipe is so easy you’ll want to make it on a whim; no fancy equipment or complicated techniques involved. Honestly, I’ve made this countless times, tweaking ingredients here and there, and it’s always a hit. Plus, it’s budget-friendly because the ingredients are staples—flour, sugar, zucchini, cinnamon—and the filling is just a mixture of cinnamon, brown sugar, and butter, which you probably already have lurking in your pantry. The versatility of it is what keeps me coming back: serve it warm with a dollop of whipped cream or chill it for a morning treat. It’s perfect when you want something sweet without going overboard—my kids ask for this all the time, especially when they need a quick breakfast or a snack that’s a little special. The gooey cinnamon swirl gives it that decadent torn sensation in every bite, and I swear, once you master the swirl technique, it’ll look like you bought it from a bakery. And hey, if you’re into gluten-free baking, I’ll give you a few swaps later on—this cake adapts beautifully.
How do I make a gooey Zucchini cake?
Quick Overview
This cake comes together pretty fast, especially once you get the hang of swirling the cinnamon filling into the batter. The basic idea: mix dry ingredients, combine with wet, layer with the cinnamon mixture, swirl for that gorgeous marbled effect, bake until golden, and finish with a sticky glaze. The magic is in the swirl—the cinnamon and brown sugar naturally sink into the batter, creating beautiful streaks. The cake stays moist thanks to the zucchini, and the glaze adds that final touch of sweetness and shine. It’s a simple one-bowl process for the most part, making it perfect for weekday baking or lazy weekends where comfort food is calling your name. What makes this stand out, apart from how insanely good it tastes, is how forgiving it is—no overmixing, no fancy techniques, just a few spoonfuls of love mixed with your favorite ingredients. It’s truly a keep-in-the-fridge kind of dessert—better the next day, I swear—and it’s just as good cold or slightly warm, depending on your mood.
Ingredients
For the Main Batter:
– 2 cups all-purpose flour (or gluten-free blend if needed)
– 1 cup granulated sugar
– 1/2 teaspoon baking powder
– 1/2 teaspoon baking soda
– 1/4 teaspoon salt
– 1 teaspoon vanilla extract
– 3/4 cup vegetable oil or melted coconut oil
– 2 large eggs or flax eggs for vegan version
– 1 cup shredded zucchini (squeeze out excess moisture)
– 1/4 cup almond milk or dairy milk, optional for creaminess
For the Filling:
– 1/2 cup brown sugar
– 2 teaspoons ground cinnamon
– 2 tablespoons softened butter or coconut oil
– Optional: 1/4 teaspoon nutmeg or cardamom for extra spice flair
For the Glaze:
– 1 cup powdered sugar
– 2-3 teaspoons milk (or more for thinner consistency)
– 1/2 teaspoon vanilla extract
– Optional: a splash of lemon juice or a sprinkle of cinnamon on top
Step-by-Step Instructions
Step 1: Preheat & Prep Pan
Set your oven to 350°F (175°C). Grease a loaf pan with butter or non-stick spray and line it with parchment paper if you like. This step is crucial to make sure nothing sticks, especially with that gooey cinnamon swirl. While it’s heating up, grate your zucchini and squeeze out as much moisture as possible—this keeps the cake from getting soggy. I always do this in the morning, then set it aside. It’s such a small step but makes all the difference in the texture of the final cake.
Step 2: Mix Dry Ingredients
In a large mixing bowl, whisk together the flour, sugar, baking powder, baking soda, and salt. I like doing this first because it ensures everything is evenly distributed. You want your baking soda and powder to be incorporated thoroughly so your cake rises nicely. The smell of those dry ingredients mixed together is always a good sign that I’m on my way to a delicious bake.
Step 3: Mix Wet Ingredients
In a separate bowl, beat the eggs (or flax eggs), then add vanilla, oil, and almond milk. Mix until smooth. If you’re using almond milk, I tested it with almond milk because I’m dairy-free, and it actually made the cake even creamier and lighter. Pour this wet mixture into the dry ingredients and fold gently—don’t overmix! You’ll see the batter come together quickly—smooth but a little thick, just right for holding the cinnamon swirl later.
Step 4: Combine
Gently add the grated zucchini into the batter, folding softly to keep everything airy. Overmixing now can make the cake dense, so I usually do a few gentle strokes until everything looks combined but not gloopy. Trust me, the batter should be thick but spreadable—not runny. This is the moment to taste a tiny bit of batter if you want—don’t forget, it’s raw, but it’s the best way to check sweetness before baking!
Step 5: Prepare Filling
In a small bowl, stir together the brown sugar, cinnamon, and softened butter. I love adding a pinch of nutmeg sometimes—it really gives an extra cozy flavor. Spread this evenly over the batter once you pour it into the pan, or sprinkle it on top and swirl it in. The cinnamon makes the whole kitchen smell like a cinnamon roll, which is always a good sign.
Step 6: Layer & Swirl
Pour the batter into your prepared pan, then dollop the cinnamon mixture randomly over the surface. Use a butterknife or skewer to swirl the cinnamon and batter together—don’t overdo it; just a few gentle turns to create beautiful streaks. This swirl pattern is the secret to that irresistible gooey look and flavor. I always spend a little extra time making sure the cinnamon is evenly spread because this is what makes the cake look like that bakery special.
Step 7: Bake
Pop it into the oven and bake for about 45-50 minutes. The top should be golden and slightly cracked, and a toothpick inserted into the center should come out clean or with moist crumbs. Every oven is different—mine tends to run a little hot, so I start checking around 45 minutes. If the top gets too dark early, tent it with foil, but trust your toothpick—nothing worse than overbaked, dry cake. The smell when it’s baking? Unreal. I always open the oven door a crack at the end and sneak a peek—can’t resist!
Step 8: Cool & Glaze
Let it cool in the pan for about 15 minutes before transferring to a wire rack. Once it’s just warm, drizzle the glaze over the top. If you want a shiny finish and a burst of sweetness, mix powdered sugar with a splash of milk and vanilla until smooth. For a more zingy twist, add lemon juice instead of milk. I usually wait until the cake is completely cooled so the glaze sets nicely—it makes slicing easier and keeps the cake moist inside.
Step 9: Slice & Serve
Use a sharp serrated knife to cut neat slices, and serve it warm or chilled—either way, it’s divine. I love dishing it up with a dollop of whipped cream or a sprinkle of extra cinnamon on top. Trust me, this cake disappears in minutes at my house. Plating it with a few fresh berries or a dusting of powdered sugar amps up the presentation too. And don’t forget—leftovers keep beautifully in an airtight container, so you can enjoy a little slice of comfort whenever you need it.
What to Serve It With
This cake is quite the versatile baker’s dream. For breakfast, I like pairing it with a bold cup of coffee or a warm chai latte—that cinnamon flavor is perfect for a cozy morning. It’s also fantastic for brunch served with a side of yogurt and sliced fruit, especially strawberries or sliced peaches. When it’s dinner time or after, I often serve it as a dessert with a dollop of whipped cream or a drizzle of caramel sauce. My kids actually ask for seconds, especially when I warm up a slice and add a little vanilla ice cream—it’s like a grown-up caramel apple with a cinnamon twist! And if I want something casual, I’ll just cut a big square, wrap it in foil, and munch on it with tea in the afternoon when I need a quick pick-me-up. Honestly, it’s become one of those recipes I keep handy all year, no matter the season—because it’s comforting, satisfying, and really, just a little bit special without all the fuss.
Top Tips for Perfecting Your Gooey Cinnamon Swirl Zucchini Cake
I’ve made this cake so many times that I’ve gathered a few tricks to make sure it always turns out perfect. First, when grating zucchini, I always do it on the fine side of my grater—big chunks will throw off the moisture balance. After grating, I squeeze out as much excess water as I can—nothing ruins a moist cake faster than soggy zucchini! I’ve tested different flours, and honestly, gluten-free blends work just as well if you use a bit more baking powder, but I always recommend weighing your ingredients for best results. Overmixing is my biggest mistake—trust me, a gentle hand keeps the cake tender. To make the cinnamon swirl pop even more, I sometimes add a few chopped pecans or walnuts to the filling for crunch. When swirling, I focus on creating a marbled effect rather than fully mixing—this keeps the visually stunning streaks alive and the flavor well distributed. As for baking, I recommend positioning your rack in the middle of the oven and checking early if your oven runs hot. The toothpick test is your best friend here—better a slightly underdone slice than a dry one. Lastly, don’t skip the glaze—it’s the finishing touch that elevates this from good to unforgettable. I’ve experimented with adding a dash of espresso powder or orange zest to the glaze, and both work beautifully—so feel free to get creative! What I’ve learned over the years is that patience and a gentle touch are the keys—soon enough, you’ll be pulling out a cake that looks just as good as it tastes, and honestly, that makes me the happiest.
Storing and Reheating Tips
This cake keeps beautifully, which makes it perfect for making ahead or leftovers. Once cooled completely, store slices in an airtight container at room temperature for up to 2 days—cover lightly with plastic wrap to keep it fresh. If you want it to last longer, pop it in the fridge, wrapped tightly, for up to 4 days. I find that chilling it slightly enhances the cinnamon swirl’s flavor and keeps it from getting too moist. For longer storage, freezing slices works great—wrap them individually in plastic wrap, then place in a zip-top bag or airtight container. When ready to enjoy, let the slices thaw at room temperature for about 15 minutes or warm them gently in the microwave—just a quick 15-20 seconds on medium. I recommend adding the glaze after thawing to keep that glossy finish—I tried freezing it with the glaze once, and it lost some of its shine, so I prefer applying it fresh. Reheating the slices in the oven at 350°F for about 10 minutes keeps them moist and warm, perfect for a cozy night treat or breakfast. The cake tastes just as good the next day, especially when slightly warmed—trust me, that gooey cinnamon swirl comes to life once heated up. This flexibility makes it a real winner in my kitchen, especially for busy mornings or impromptu gatherings. Just keep in mind: the longer it sits, the more the flavors meld, and honestly, I think it’s even better the day after baking.
Frequently Asked Questions
Final Thoughts
This gooey cinnamon swirl zucchini cake has become my go-to treat whenever I want something warm, comforting, and just a little indulgent. It’s a humble dish that feels like a little slice of nostalgia, but with a grown-up twist that keeps everyone coming back for more. Whether it’s served up for brunch, dessert, or an afternoon snack, the combination of moist zucchini, spicy cinnamon, and gooey glaze really hits the spot. And honestly, once you’ve made it a few times, it’s so effortless that it almost feels like cheating. I love that it’s adaptable—gluten-free? No problem. Want more nuts or fruits? Go for it! My family always asks for seconds, and I secretly love how versatile and forgiving it is. So go ahead, gather your ingredients, and give this one a try—I promise you’ll be sneaking slices even when nobody’s looking. Happy baking!
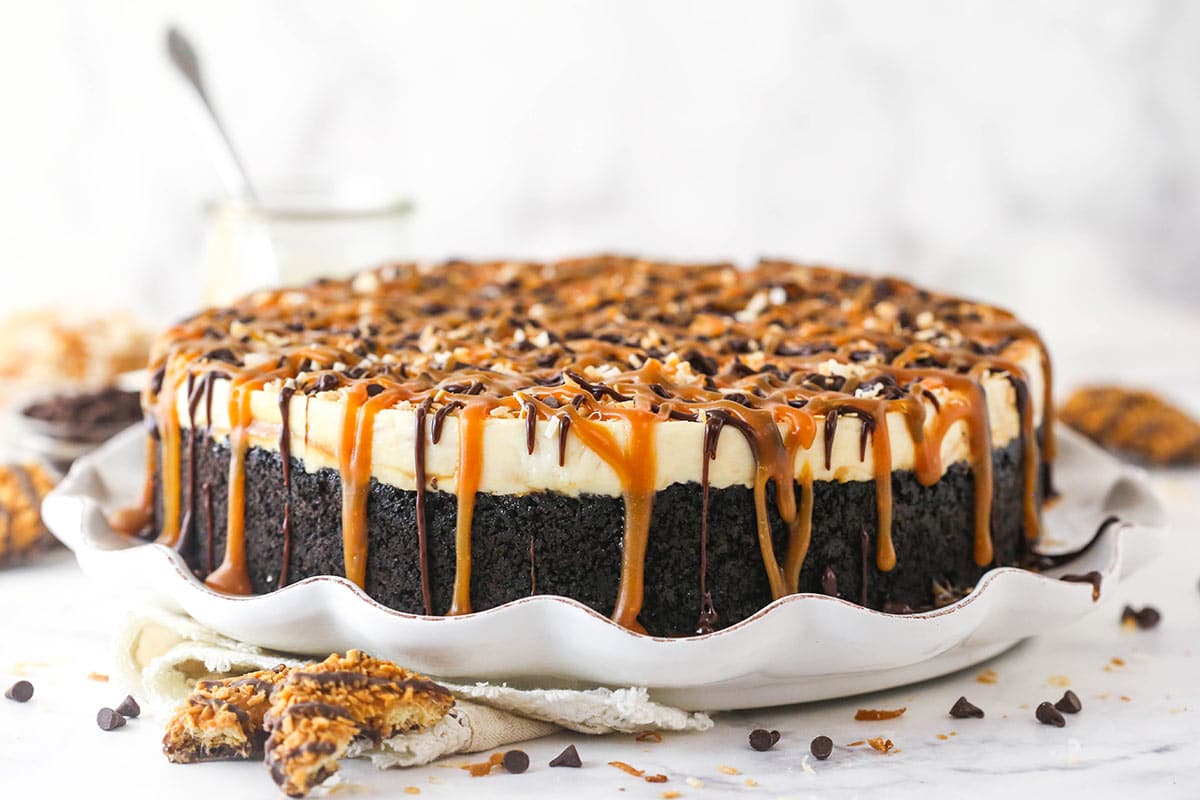
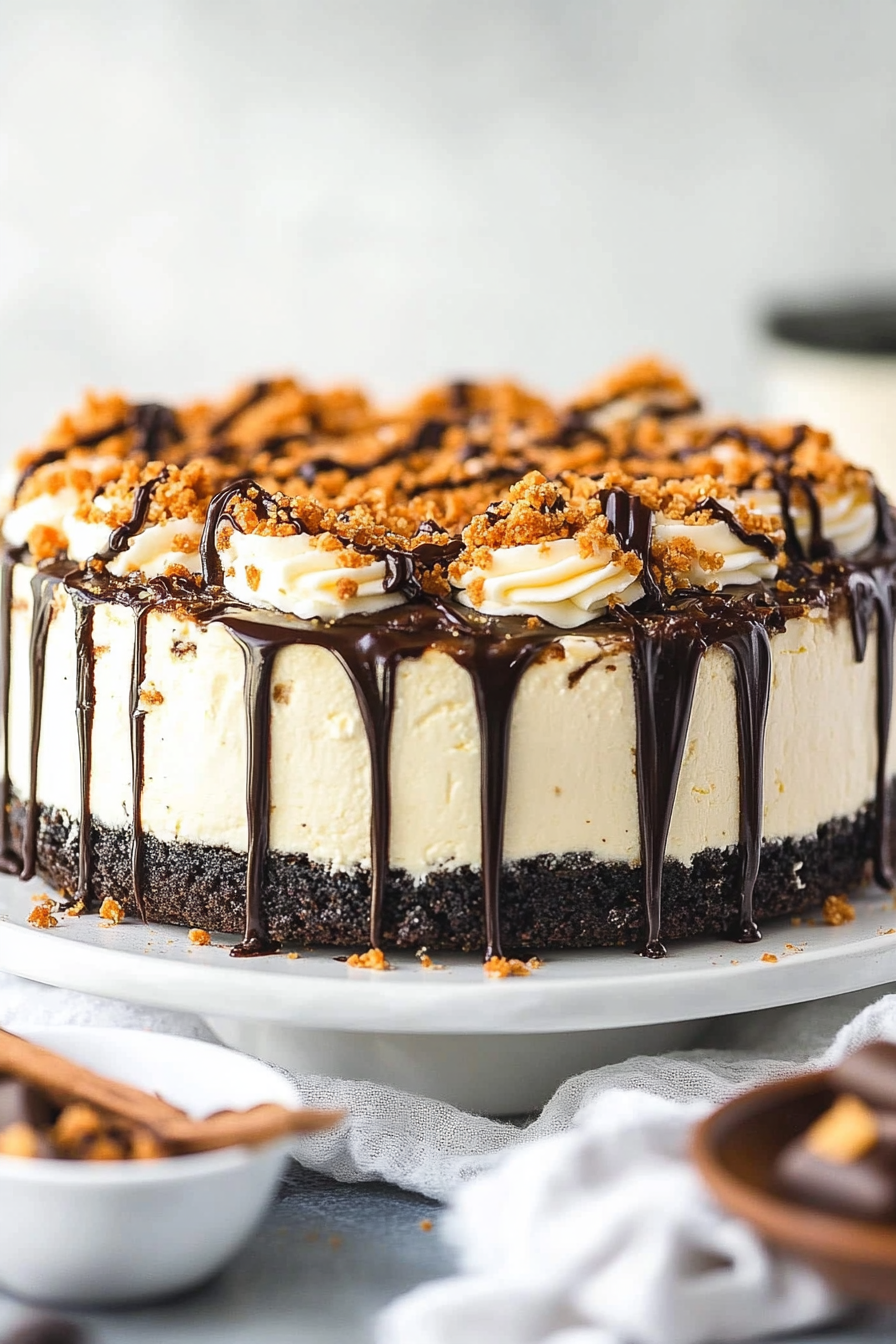
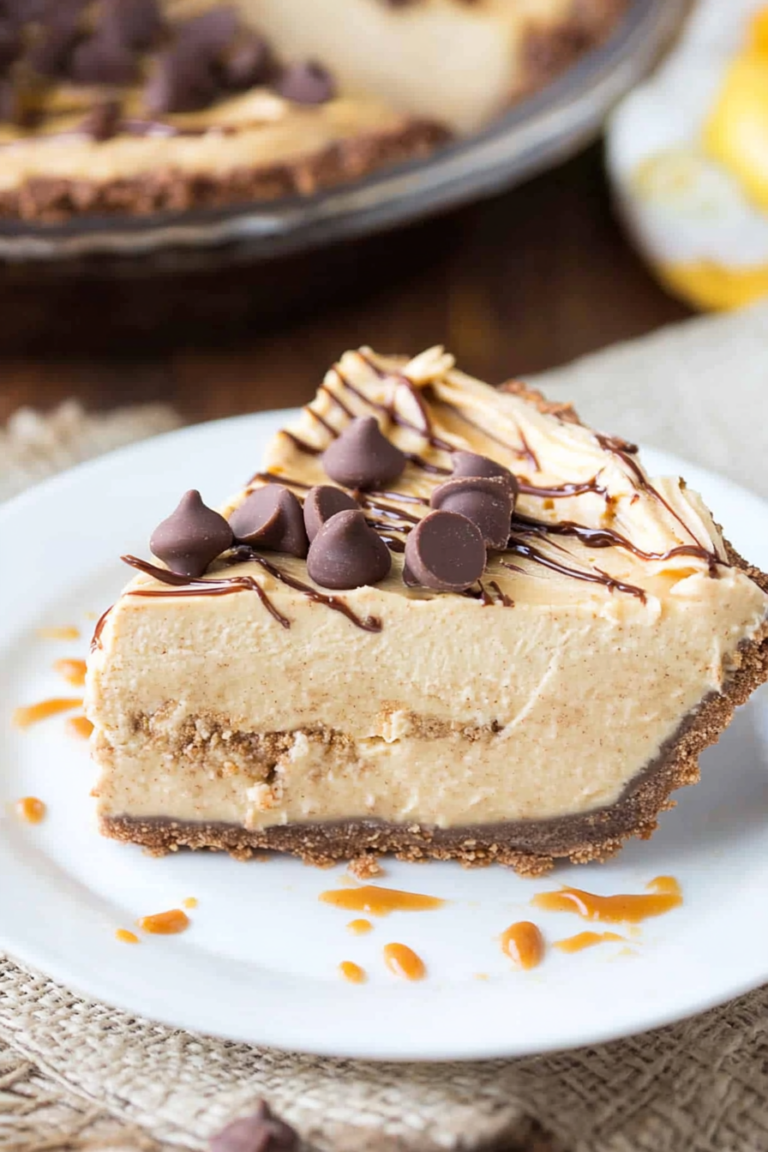
Samoa Cheesecake
Ingredients
Method
- Prepare the crust: Crush Oreo cookies and mix with melted butter. Press into the bottom of a springform pan and chill.
- In a large bowl, beat the cream cheese and powdered sugar until smooth. Add vanilla extract and mix well.
- In a separate bowl, whip the heavy cream until stiff peaks form. Gently fold into the cream cheese mixture.
- Spread a layer of caramel sauce over the crust, then pour the cream mixture on top. Smooth the surface.
- Sprinkle toasted coconut and mini chocolate chips on top. Drizzle remaining caramel sauce over as desired.
- Refrigerate for at least 4 hours or overnight until set. Serve chilled.

I love this idea! My kids actually asked me to make it last weekend—they couldn’t believe it was no-bake. Such a fun twist on a classic!
I totally get that cozy vibe—my mom’s chocolate zucchini loaf was my favorite childhood treat. This cheesecake idea sounds next-level!
I love this idea! Plant-based baking always feels so comforting. Have you tried making it with different nut butters?
I totally get that cozy vibe! Plant-based baking has such a comforting, nostalgic feel—like a warm hug in a bowl.
I love this idea—so creative and delicious! Plant-based baking definitely has that special, comforting vibe.