
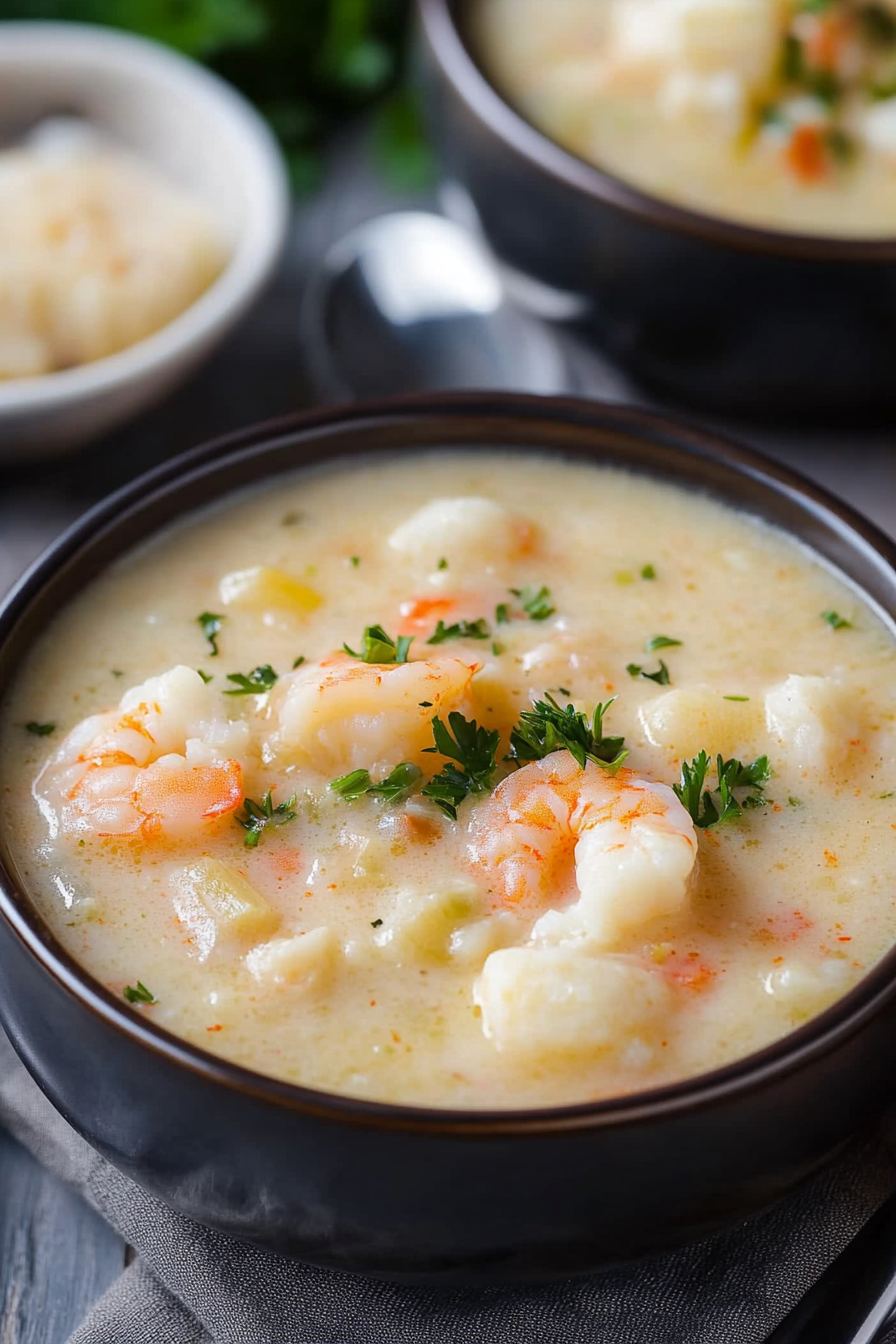
Creamy Seafood Chowder Recipe
If you had told me a few years ago that zucchini in muffins would become one of my most-loved go-tos, I’d probably have raised an eyebrow. But here’s the thing—these zucchini swirl muffins are a total game-changer. They’re moist, flavorful, and secretly sneaky in the best way—they hide that vegetable without sacrificing an ounce of flavor. Plus, the swirl of cream cheese or fruit in the middle makes them look like little works of art. I always do this when I want something sweet but don’t want to mess around with complicated baking; it’s honestly my quick fix for that afternoon craving. If you’ve got kids, these disappear in minutes at my house, and I swear my kids ask for these all the time. They’re perfect on busy mornings or even as a cozy afternoon treat with coffee. Trust me on this—they’re so good, you’ll want to keep a batch in the freezer for whenever the mood hits.
What is Zucchini Swirl Muffins?
Think of zucchini swirl muffins as the lovechild of your favorite moist muffin and a little bit of wellness. It’s essentially a classic muffin batter jazzed up with grated zucchini — that humble veggie that usually gets a bad rap for being bland or watery. The magic is in the swirl: a cream cheese or fruit filling layered in, giving these muffins a stunning marbled look and an extra punch of flavor. The name “zucchini swirl” says it all: smooth, tender muffins with a delightful spiral of richness or fruit in the center. I love how adaptable it is; you can tweak the filling to suit your mood or what’s in the fridge. The best part? They taste like a treat, but they’re kinda good for you too, which makes them perfect for breakfast or snack time. I’ve been making these for years — they’ve become a little tradition in my kitchen, and my family always asks for seconds.
Why you’ll love this recipe?
What I love most about these zucchini swirl muffins is how simple they are to make. There’s no complicated batter, and no fancy ingredients that make you run to specialty stores—you probably have everything you need right now. And let’s be honest, the smell alone when they’re baking is enough to bring everyone to the kitchen, eyebrows raised in anticipation. The flavor? Out of this world—moist, gently sweet, with a hint of that freshness from the zucchini. Plus, the swirl filling just takes the whole thing up a notch. It’s like a mini dessert disguised as a breakfast treat!
Also, these are super budget-friendly. Zucchini is basically free when it’s in season, and the rest of the ingredients are pantry staples. I love how versatile they are too—you can swap the cream cheese for fruit preserves or nut butter, or even toss in chocolate chips if you’re feeling indulgent. When my kids ask for snacks, I always have a batch ready—that’s what makes this recipe a lifesaver on busy nights or lazy weekends. I’ve tested this with almond milk, whole milk, even plant-based options, and honestly, the batter turns out just as moist and flavorful every time. It’s one of those recipes that’s become a real staple in my kitchen—it’s cozy, flexible, and always a hit.
How do you make Zucchini Swirl Muffins?
Quick Overview
This recipe is so straightforward—mix the dry ingredients in one bowl, wet in another, then bring them together gently. The secret is in preparing your zucchini properly—moisture is the enemy, so I always squeeze out excess water (trust me on this!) before adding it to the batter. Once everything’s combined, you pour half of the batter into your muffin tins, spoon in the filling, swirl gently, then layer with the remaining batter. Bake until golden, cool briefly, then glaze or dust with powdered sugar if you like. The whole process takes less than 45 minutes, and the result is a muffin that’s moist, tender, and beautifully marbled—perfect for breakfast, snacks, or dessert.
Ingredients
For the Main Batter:
– 1 ½ cups all-purpose flour (I like unbleached for added flavor)
– 1 teaspoon baking powder
– ½ teaspoon baking soda
– ½ teaspoon salt
– ½ cup sugar (or a little less if you prefer less sweetness)
– ½ cup vegetable oil or melted butter
– 2 large eggs
– ½ cup milk (dairy or plant-based—you can also swap with almond or oat milk for extra creaminess)
– 1 teaspoon vanilla extract
– 1 cup grated zucchini (remember to squeeze out excess water!)
For the Filling:
– ½ cup cream cheese, softened (or try fruit jam, nut butter, or even a fruit compote)
– 2 tablespoons sugar (or honey for a natural touch)
– ¼ teaspoon cinnamon (optional but adds warmth)
For the Glaze:
– ½ cup powdered sugar
– 1-2 teaspoons milk or lemon juice
– A pinch of extra cinnamon or vanilla for flavor (optional)
Step-by-Step Instructions
Step 1: Preheat & Prep Pan
Set your oven to 350°F (175°C). Line a muffin tin with paper liners or lightly grease it—I like using silicone liners because they’re super easy to clean and look pretty. Prepare your zucchini by grating it coarse—don’t worry about peeling unless you prefer a smoother look. Then, using a clean dish towel or paper towel, squeeze out as much excess water as you can. Moisture is the enemy here; too much water will make your muffins dense and gummy, and nobody wants that.
Step 2: Mix Dry Ingredients
In a big bowl, whisk together the flour, baking powder, baking soda, salt, and sugar. I always do this first—it ensures everything is evenly distributed, and prevents clumps. This step is boring but super important for light, airy muffins.
Step 3: Mix Wet Ingredients
In a separate bowl, beat the eggs, then add the oil, milk, and vanilla. Mix well until combined. Then, fold in the grated zucchini—here’s a tip: once the zucchini is squeezed dry, it’s easier to incorporate without making your batter watery. If you want, you can toss in a few extra add-ins—like chopped nuts or chocolate chips—at this stage. It’s your muffin, after all.
Step 4: Combine
Gently pour the wet mixture into the dry ingredients. Stir just until combined—don’t overmix, or your muffins might turn out rubbery. A few lumps are fine; it keeps the muffins tender.
Step 5: Prepare Filling
In a small bowl, blend the softened cream cheese with sugar and cinnamon. If you’re using jam or nut butter, just have it ready in a spoon. This filling adds a lot of personality—the swirl makes each bite exciting.
Step 6: Layer & Swirl
Drop about a tablespoon of batter into each muffin cup. Then, dollop a small spoonful of your filling in the middle, followed by more batter on top. Use a toothpick or skewer to gently swirl the filling into the batter—don’t overdo it, just a few gentle swirls for a marbled effect. It looks pretty and keeps the filling evenly distributed.
Step 7: Bake
Bake for about 20-25 minutes, or until a toothpick inserted in the center comes out clean. Ovens vary—my tip is to start checking at 20 minutes. If the muffins are golden on top and spring back when you lightly press them, they’re ready.
Step 8: Cool & Glaze
Let the muffins cool in the pan for 5 minutes, then transfer to a wire rack. While still warm, drizzle the glaze—just whisk powdered sugar with a bit of milk or lemon juice until it’s smooth and pourable. If you want a less sweet finish, dust with powdered sugar instead. The glaze adds a lovely shine and a touch of sophistication.
Step 9: Slice & Serve
Usually, I like to wait a few minutes until they’re just warm so the filling sets a bit. These muffins are best enjoyed fresh but will keep well for a day or two. I like to serve these on a cheerful plate, maybe with some fresh berries or a mug of hot coffee—perfection in a bite.
What to Serve It With
Honestly, these muffins are so versatile, you can serve them just about anywhere. For breakfast, a dollop of Greek yogurt or a splash of vanilla coffee pairs beautifully. I also love bringing them to brunch alongside a big fruit salad and some herbal tea or mimosas—super elegant but still cozy. When I want a quick, satisfying dessert, I’ll warm one up and add a scoop of vanilla ice cream or a sprinkle of chopped nuts on top. If you’re just craving something sweet for a snack, they’re perfect on their own, with a mug of tea or a glass of cold milk. My family has a tradition of having muffins for weekend brunch, and these zucchini swirl ones are always the star. Plus, they make the house smell amazing—a little spicy, a little sweet, and totally comforting. They’re a hit with kids and grown-ups alike, and I love how they turn simple ingredients into a little piece of happiness.
Top Tips for Perfecting Your Zucchini Swirl Muffins
I’ve made these so many times, and honestly, it’s the small tweaks that make the difference. First, always squeeze out as much water from the zucchini as possible. You want moistness, but not wetness—that’s how you get dense muffins. I learned this the hard way during my first attempt—my muffins came out a little gummy, not ideal. If you want extra flavor, try adding a pinch of nutmeg or lemon zest to the batter; it brightens everything up.
In terms of mixing, be gentle—I’ve overmixed and ended up with tough muffins, which is upsetting because the batter is so easy to handle. When swirling the filling, I’ve found that a toothpick or skewer creates the cutest marbling pattern—that’s what makes these look homemade and charming. For ingredient swaps, coconut flour works okay if you reduce the amount of flour and add a bit more liquid, but the texture is different. Chocolate chips are a no-brainer if you’re feeling indulgent, or add chopped walnuts for crunch.
Oven placement matters—baking on the middle rack ensures even heat, which is crucial for nice tops and thorough baking. If your oven runs hot, lower the temp slightly and bake a bit longer. And a tip I swear by: always do a toothpick test. If it comes out clean, you’re good. Finally, don’t skip the glaze if you want that little extra pop—just mix powdered sugar with a splash of milk and a dash of vanilla, then drizzle generously. Trust me, a little goes a long way, and it makes the muffins look professional.
These muffins are quite forgiving, so don’t stress—once you get the hang of layering and swirling, they come out perfect every time. Plus, you can experiment with different fillings, like fruit preserves, peanut butter, or even a chocolate spread for a totally different twist. The key is to have fun and make it your own. I learned this after many batches—patience and a light touch yield the best results. Oh, and don’t forget to store them properly; they’re just as delicious the next day if kept in an airtight container. If you want to intensify the flavor, add a sprinkle of sea salt on top before baking—sounds odd, but it balances the sweetness beautifully.
Storing and Reheating Tips
These muffins are happily adaptable when stored. If you’re serving them within a day or two, just keep them in an airtight container at room temperature—covering with a clean towel works too if you want to prevent them from drying out. They’re best enjoyed within 24 hours for that soft, fresh muffin texture. For longer storage, pop them into an airtight zip-top bag or container and stash in the fridge for up to 5 days—just give them a quick warm-up in the microwave or oven to revive that moistness and aroma. Freezing is also a good option—wrap each muffin individually in plastic wrap or foil, then stash in a freezer bag. They’ll stay good for up to 3 months. To reheat, just warm in the microwave for about 20 seconds or in a low oven until heated through. If you add the glaze afterward, it’s best to wait until they’re fully cooled or just warm—they’ll set better that way and look pretty on your plate.
Frequently Asked Questions
Final Thoughts
Honestly, these zucchini swirl muffins have become my little culinary secret. They’re easy, forgiving, and so hard to resist. Every time I bake a batch, I’m reminded of how simple ingredients can come together to create something pretty special—moist, fluffy, and bursting with flavor. Plus, they’re a sneaky way to get my kids to eat more veggies without any protest! One of my favorite things about this recipe is how flexible it is—you can mix and match fillings, tweak the sweetness, or even swap ingredients to suit your diet. I’ve tested every variation I could think of, and they all turn out delicious. If you try these, I’d love to know what you think—doesn’t matter if you add chocolate chips, blueberries, or go entirely dairy-free, it’s all about making it your own. Happy baking, and I can’t wait to hear how yours turn out!

shrimp chowder
Ingredients
Method
- Add butter to a large pot on medium heat. Once melted, add onions and cook until soft, but do not brown them.
- Add in celery, potatoes, salt, pepper, garlic powder, celery salt, and boiling water. Cook for about 15 minutes or until potatoes are softened.
- Reduce heat to medium low and add in milk and shrimp. Heat for about 5 to 7 minutes.
- Stir in parsley, Swiss cheese, and cheddar cheese. Serve hot.
I never thought zucchini in muffins would become a favorite either, but they’re so moist and tasty—definitely a game changer!
I never thought zucchini in muffins would be my favorite, but they’re absolutely delicious—thanks for sharing this!
I love how zucchini muffins turned out—moist, flavorful, and totally addictive! Thanks for sharing this amazing recipe.