
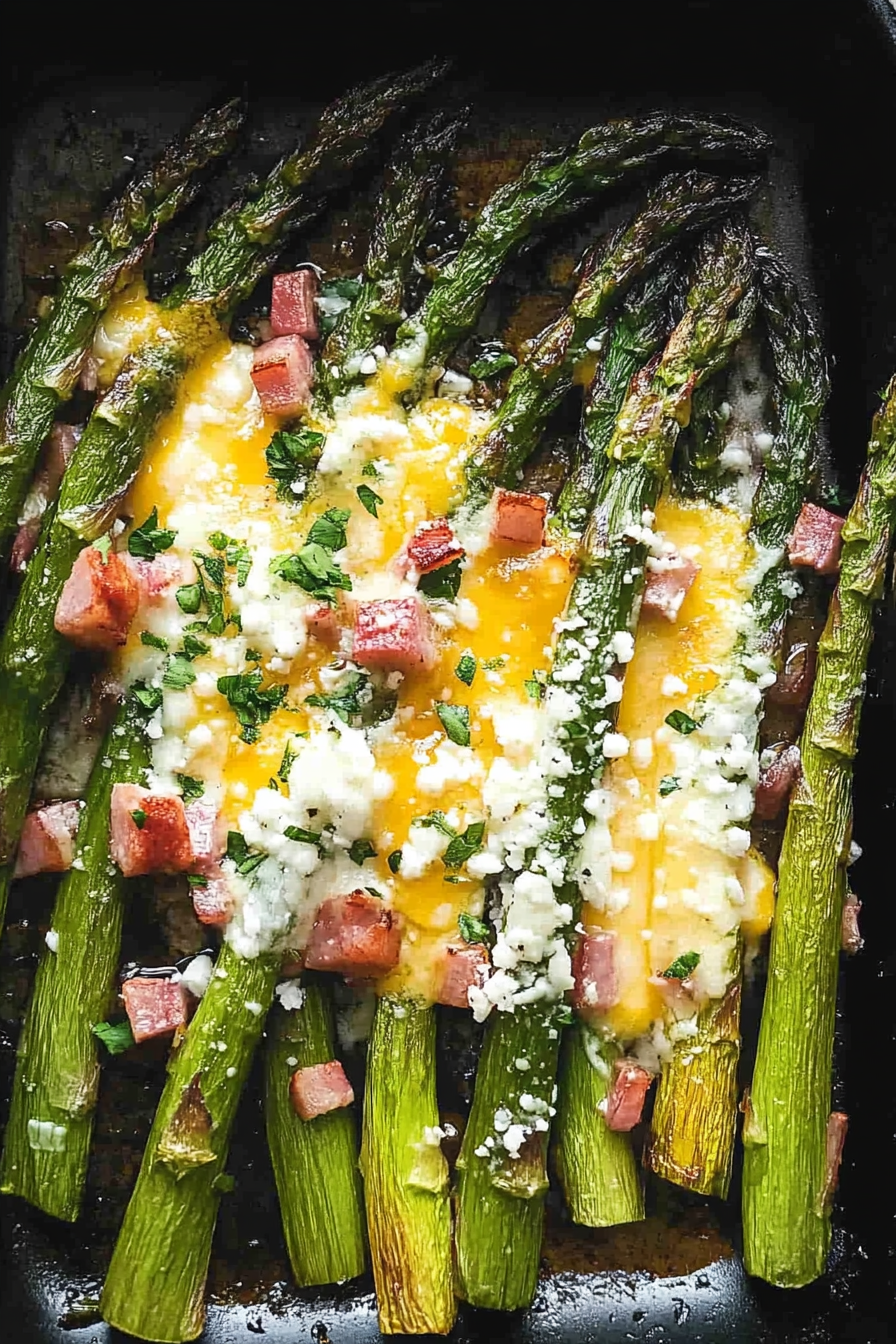
Easy Bacon Asparagus with Feta
I remember the first time I bit into a slice of this zucchini swirl bread—warm, sweet, with that little surprise of moist zucchini running through it. It took me straight back to childhood afternoons spent baking with my grandma, her kitchen filled with the smell of vanilla and cinnamon. These days, I make it whenever I need a little boost of nostalgia or just a quick, no-fuss treat that feels like a warm hug. Honestly, it’s one of those recipes I’ve made so many times I could almost do it in my sleep—and yet, each time, it comes out perfect. This one’s a lifesaver on busy nights or those mornings when I want something sweet but don’t want to mess around with complicated ingredients. Plus, it’s such a crowd-pleaser! My kids ask for this all the time, and honestly, I don’t mind baking it again and again because I know it’ll disappear in minutes.
What is Zucchini Swirl Bread?
Think of zucchini swirl bread as a beautiful fusion of bread and cake—like a cinnamon roll and banana bread had a cozy little baby. The word “swirl” is key here because it’s all about that gorgeous marbling of cinnamon-spiced batter with tender zucchini bits weaving through each slice. It’s essentially a sweet, tender bread that gets a nutrition boost from the zucchini, which keeps everything moist and adds a delicate, garden-fresh flavor. This recipe originated from my grandmother’s classic zucchini bread, but I jazzed it up with a luscious cinnamon swirl that makes each bite extra special. The best part? It’s just as delicious for breakfast as it is for a snack or dessert—truly a versatile treasure that I keep returning to, no matter what season it is.
Why you’ll love this recipe?
What I love most about this is how effortless it is—seriously, you only need a handful of ingredients, and the process is so straightforward. I’ve tested this with different types of sweeteners, and honestly, honey or maple syrup makes it even more tender and flavorful—trust me on that one. The smell alone when it’s baking is enough to bring everyone running to the kitchen, slippers and pajamas still on. Plus, it’s budget-friendly—those zucchinis are cheap and plentiful in summer, but I also keep a stash of frozen grated zucchini for year-round baking. This bread is also surprisingly versatile. I’ve swapped whole wheat flour for white, added a handful of chocolate chips, or even almond extract for a nutty twist. The result is always the same: moist, flavorful, and just a little indulgent without feeling over the top. It’s family-friendly, so my kids love sneaking extra slices, and I love knowing we’re sneaking in some veggies too. That balance of tasty and nutritious? It’s a win-win in my book.
How do you make Zucchini Swirl Bread?
Quick Overview
This recipe is truly a breeze—mix the wet ingredients, combine the dry, swirl together with cinnamon batter, bake until golden, and finish with a dusting of powdered sugar or glaze if you’re feeling fancy. The secret to that perfect swirl? Just layer the cinnamon filling into the batter in the pan and gently swirl with a skewer or butter knife. It’s like a hug in bread form. No fancy equipment needed—just a loaf pan, a mixing bowl, and a spatula—and patience while it bakes. While it’s baking, your kitchen will fill with the warm smell of cinnamon, making everyone want to poke their heads in for a sneak taste. Trust me, once you try this, it’ll become a weekly staple—no need for complicated frosting or fancy toppings. It’s simple, it’s beautiful, and it’s so good.
Ingredients
For the Main Batter:
– 2 cups all-purpose flour (or whole wheat for more fiber)
– 1 cup sugar (or coconut sugar for a healthier vibe)
– 1 teaspoon baking powder
– ½ teaspoon baking soda
– ½ teaspoon salt
– 1 teaspoon ground cinnamon
– 1 teaspoon vanilla extract
– ½ cup vegetable oil (or melted butter)
– 3 large eggs
– 1 cup grated zucchini (squeeze out excess moisture—trust me, it’s worth it!)
For the Filling:
– ¼ cup packed brown sugar
– 1 tablespoon ground cinnamon
– 2 tablespoons softened butter or coconut oil
For the Glaze:
– ½ cup powdered sugar
– 1-2 teaspoons milk or cream
– Splash of vanilla (optional)
Step-by-Step Instructions
Step 1: Preheat & Prep Pan
Set your oven to 350°F (175°C). Grease a standard loaf pan—the kind with the paper liner or butter and flour it lightly so nothing sticks. I usually line mine with parchment for easy removal—and less cleaning. This step makes all the difference when it’s time to slice later, trust me.
Step 2: Mix Dry Ingredients
In a big bowl, whisk together the flour, sugar, baking powder, baking soda, salt, and cinnamon. This ensures everything is evenly distributed and gives your bread that lovely rise. A good mix here prevents too much clumping of baking soda or uneven cinnamon pockets.
Step 3: Mix Wet Ingredients
In another bowl, beat the eggs, add the oil, vanilla, and grated zucchini. I like to grate the zucchini right before I start mixing so it stays fresh and moist. Squeezing out the excess water is key—if you skip this, your batter might be too runny, and that’s no fun. Sometimes I use almond milk instead of regular milk, and it actually makes the bread even creamier!
Step 4: Combine
Pour the wet mixture into the dry ingredients and gently fold until just combined. No overmixing—that’s the fast track to dense bread. It should look a little lumpy but well combined. Overworking the batter makes it tough, so just fold slowly and stop as soon as you can see everything’s incorporated.
Step 5: Prepare Filling
Mix the brown sugar, cinnamon, and softened butter—this will be our cinnamon swirl. If you want to jazz it up, try adding a pinch of nutmeg or a splash of orange zest for extra flavor. Set this aside; you’ll layer it in just a moment.
Step 6: Layer & Swirl
Pour about half of the batter into your loaf pan. Sprinkle half of the cinnamon mixture over it, then pour the rest of the batter on top. Dollop the remaining cinnamon and swirl gently with a skewer or a butter knife, creating pretty ribbons. Don’t overmix—just aim for a beautiful marbled effect. This swirl is what makes this bread special—it looks fancy but is so easy!
Step 7: Bake
Bake for 50-60 minutes, or until a toothpick inserted in the center comes out clean. Oven times can vary, so start checking around 50 minutes. If your loaf starts to brown too quickly, tent it with foil—no burnt tops here.
Step 8: Cool & Glaze
Let the bread cool in the pan for about 15 minutes, then transfer it to a wire rack. Once fully cooled, whisk together the powdered sugar, milk, and vanilla for the glaze. Drizzle generously over the top for that bakery-style finish, or just dust with powdered sugar if you prefer a more subdued look.
Step 9: Slice & Serve
Use a serrated knife to cut clean slices—working slowly helps keep the swirl pattern intact. I think this tastes even better warm, but it’s delicious at room temperature too. Pair with a hot cup of coffee or tea, and you’ve got a cozy moment waiting to happen.
What to Serve It With
This bread is so versatile, it practically adapts to whatever mood you’re in. For breakfast, I love it toasted with a smear of butter or some cream cheese—my kids ask for seconds every time. It’s also lovely on a brunch table, paired with fresh fruit and yogurt. If I’m serving it as dessert, I’ll add a dollop of whipped cream or a drizzle of honey—oh, and coffee or a glass of cold milk makes everything better.
In my family, we’ve done everything from morning bites to Sunday afternoon snacks at the park picnic with slices packed in a box. It’s a crowd-pleaser and keeps well in an airtight container for several days. Sometimes, I slice it thin and serve with cheese for an unexpected savory combo. It’s comforting, versatile, and, honestly, one of those recipes I feel good about sharing with friends—it’s got that special “homemade” touch that can’t quite be replicated by store-bought options.
Top Tips for Perfecting Your Zucchini Swirl Bread
Practice makes perfect, right? Over the years, I’ve learned a few tricks that make this bread turn out just right every time. First, when I grate the zucchini, I always squeeze out as much moisture as I can—this keeps the batter from being runny and helps the bread stay moist but not soggy. I’ve tested a trick where I freeze grated zucchini beforehand—super handy for winter baking, and it actually retains more flavor.
Mixing is another place where patience pays off. I used to rush through it and end up with dense spots or uneven swirls. Now, I fold the wet into the dry gently, just until combined—no overmixing! For the swirl pattern, I’ve found that dolloping the cinnamon mixture on top of the batter and swirling with a toothpick creates those pretty ribbons we all love. If you want a more dramatic swirl, pile the cinnamon higher and do a few extra swoops.
Ingredient swaps? Oh, I’ve tried plenty! Almond flour works beautifully if you want gluten-free, just add a touch more baking powder to help with rise. For sweetness, honey adds a lovely floral note, but I’ve also experimented with maple syrup for a richer flavor. As for toppings—sometimes I sprinkle chopped nuts or even mini chocolate chips on top before baking, giving it an extra crunch or melt-in-your-mouth bites.
My biggest lesson? Keep an eye on the oven. Every one’s a little different, so start checking at the 50-minute mark. Don’t forget to do the toothpick test to make sure it’s baked through. The glaze is flexible—play with flavors, add lemon zest or a splash of bourbon for grown-up versions. The key is to enjoy the process and trust your senses. Your kitchen will smell amazing, and I promise, your family will thank you.
Storing and Reheating Tips
This bread keeps surprisingly well. I usually store slices in an airtight container at room temperature for up to two days. Cover it lightly with a clean towel—keeps the crust crisp! If I want to keep it longer, the fridge is perfect. Wrap individual slices tightly in plastic wrap, then pop them into a container—up to five days that way. To reheat, I just toss a slice in the microwave for 20 seconds or warm it in the oven at 350°F until just heated through. The flavor and moisture stay perfect this way. If you’re freezing, wrap the whole loaf tightly with plastic, then foil, and keep up to three months. When ready to eat, let it thaw at room temperature, then reheat as described. Just remember to add the glaze after reheating if you want that glossy finish. A little love goes a long way, and trust me, even day-old slices taste almost as good as fresh.
Frequently Asked Questions
Final Thoughts
This zucchini swirl bread is one of those recipes that feels like a warm secret—something I keep in my back pocket for whenever I want a slice of comfort. It’s simple enough for weeknights but special enough to serve for a casual brunch or family gathering. The cinnamon swirl gives each piece a little burst of spicy sweetness, balanced perfectly with the tender zucchini—moist, flavorful, and honestly, a little addictive. I love that it’s forgiving, flexible, and always makes my house smell incredible. Plus, it’s such a great way to sneak veggies into your baked goods, which my kids totally appreciate. I hope you try it, tweak it, and fall in love with it just like I did. Happy baking! And I’d love to hear how yours turns out—so leave a comment or share your variations. Nothing makes me happier than sharing baked love with friends like you.
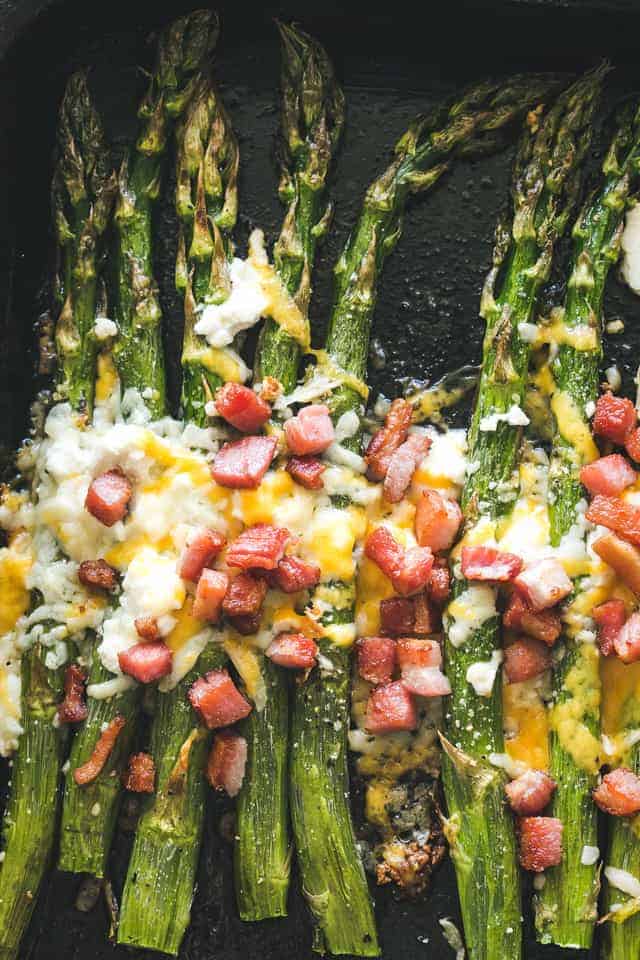
roasted asparagus
Ingredients
Method
- Preheat the oven to 450°F. Place the asparagus on a baking sheet lined with aluminum foil. Drizzle with olive oil and add minced garlic, salt, and pepper; toss to combine.
- Roast the asparagus for about 10 to 12 minutes or until crisp-tender.
- While the asparagus is roasting, cook the bacon in a skillet until crispy. Transfer to a paper towel-lined plate to drain and crumble.
- Remove the asparagus from the oven and sprinkle with shredded cheeses. Return to the oven for 2 to 3 minutes until cheese melts.
- Remove from oven, top with crumbled bacon, and serve hot.


That sounds delicious! The combination of bacon, asparagus, and feta is always a winner.
That sounds delicious! I’ve been craving something savory like that lately—definitely adding this to my meal plan.
Love this recipe! I tried something similar last week and it turned out amazing—perfect balance of flavors.
I love the idea of combining bacon, asparagus, and feta—it sounds delicious and perfect for a quick dinner!
Love this! Bacon and feta are a match made in heaven—so easy and always a crowd pleaser.