
Easy Cookie Cup Treats Delight
You know that feeling when you walk into your kitchen on a lazy Sunday afternoon, and the smell of something baking instantly makes you feel safe and warm? That’s exactly how I felt the first time I made this zucchini swirl cake. It’s one of those recipes that feels like a hug in dessert form — sweet, moist, a little nutty—and surprisingly easy to whip up even when you’re tired. My kids ask for this all the time, especially when I tell them it’s good for breakfast too (don’t judge—they do love it with a splash of coffee)! I’ve made this countless times, tweaking the batter, trying different fillings, and experimenting with glazes. Trust me on this one: it’s a total lifesaver on busy nights or when you have vegetable-like zucchinis that need a good home. Plus, the aroma alone will bring everyone running to the kitchen. Let’s get to baking something that’s heartfelt, delicious, and just *so* human.
What is Zucchini Swirl Cake?
Think of zucchini swirl cake as a cozy, cake-version of a classic coffee cake but with a twist—swirling in a sweet, cinnamon-spiced filling that makes each slice a special treat. It’s essentially a moist, lightly fluffy cake that’s been lovingly layered with that decadent filling, then baked until golden. The name comes from how the filling and the batter intertwine — like a beautiful marbled pattern, but in cake form. It’s the kind of dessert that’s versatile enough to serve for breakfast, brunch, or a lovely afternoon snack, and it’s a brilliant way to sneak some veggies into the mix (because, let’s be honest, zucchini sneaks in quietly but makes everything taste better). Whether you’re making it for family, friends, or simply for yourself, this cake has a way of making everyone feel right at home.
Why you’ll love this recipe?
Where do I even start? The flavor profile alone is enough to make this zucchini swirl cake a household staple. The cake itself is tender and subtly sweet, with a gentle hint of cinnamon and vanilla — nothing overpowering, just comfort. The filling? Oh, it’s a gooey, spicy-sweet swirl that you’ll be tempted to eat straight from the bowl. What I love most about this is how simple it is to make. You don’t need fancy ingredients or complicated techniques; just good old-fashioned mixing and layering, and you’re good to go. Plus, it’s budget-friendly. You probably have most of the ingredients in your pantry already! This cake is also super versatile: you can switch out the filling for apples, walnuts, or even a dash of chocolate chips if you want to go wild. It’s genuinely one of those recipes that makes your house smell divine and tastes even better than it smells. I’ve tested this with almond milk, and honestly, it made it even creamier—trust me on that. It’s perfect when you’re craving something sweet at 10 pm but don’t want to bake a whole cake from scratch. Plus, my kids ask for seconds every single time, and I secretly love the extra cuddle time baking gives us.
How do I make Zucchini Swirl Cake?
Quick Overview
Making this zucchini swirl cake is surprisingly straightforward. You mix up a simple batter, prepare a cinnamon-spiced filling, layer everything in your favorite baking pan, swirl the filling into the batter for that pretty marbled look, then bake until golden and fragrant. The beauty here is in the layers—the swirl pattern makes every piece unique, and the moistness from the zucchini keeps it soft and tender. It’s a one-bowl situation for the batter, and once you’ve got that ready, assembly takes just a few minutes. The whole process feels cozy and rewarding—like baking with an old friend—and it’s perfect for both beginner bakers and seasoned pros alike.
Ingredients
For the Main Batter:
- 2 cups grated zucchini (squeeze out excess moisture—trust me, it helps keep the cake moist but not soggy)
- 1 3/4 cups all-purpose flour (or gluten-free blend if you prefer)
- 1 teaspoon baking powder
- 1/2 teaspoon baking soda
- 1 teaspoon ground cinnamon
- 1/2 teaspoon salt
- 1/2 cup granulated sugar
- 1/2 cup brown sugar
- 1/2 cup vegetable oil or melted butter
- 2 large eggs (or flax eggs for a vegan version)
- 1 teaspoon vanilla extract
For the Filling:
- 1/2 cup brown sugar
- 1 teaspoon ground cinnamon
- 1/4 cup chopped nuts (walnuts, pecans—totally optional)
- Optional: a splash of maple syrup or honey for extra richness
For the Glaze:
- 1/2 cup powdered sugar
- 1-2 teaspoons milk or almond milk
- Vanilla or lemon zest (optional)
Step-by-Step Instructions
Step 1: Preheat & Prep Pan
Set your oven to 350°F (175°C). Grease your favorite loaf or bundt pan, or line a 9×9 inch square baking dish with parchment paper—whatever you have on hand. I like to give the pan a quick spray of non-stick spray, just in case. The oven needs to be nice and hot so the cake bakes evenly and gets that lovely golden crust.
Step 2: Mix Dry Ingredients
In a large bowl, whisk together the flour, baking powder, baking soda, cinnamon, and salt. Doing this first ensures your leavening agents are evenly distributed and prevents overmixing later. I’ve learned the hard way that lumps in baking powder aren’t fun to deal with later—trust me, sift or whisk thoroughly!
Step 3: Mix Wet Ingredients
In another bowl, combine the sugars, oil, eggs, and vanilla. Whisk until smooth (the mixture should look slightly frothy). Add the grated zucchini and stir well. It might seem a little chunky at first, but that’s totally fine—the zucchini helps keep everything moist and adds a nice texture.
Step 4: Combine
Make a well in your dry ingredients and pour in the wet mixture. Gently fold everything together with a spatula—don’t overmix! You want a smooth batter with just a few lumps. Overmixing here can make the cake dense, and nobody wants that.
Step 5: Prepare Filling
In a small bowl, mix the brown sugar and cinnamon. If you’re feeling fancy, stir in those chopped nuts or a splash of honey to enhance the flavor. Set aside; you’ll layer this soon.
Step 6: Layer & Swirl
Pour half of the batter into your prepared pan, spreading evenly. Sprinkle the cinnamon-sugar filling over the batter, then add another layer of batter on top. Use a knife or skewer to swirl the filling into the batter, creating beautiful marbled patterns. Don’t worry if it looks messy—this is *homey* and charming.
Step 7: Bake
Pop your cake into the oven and bake for 40-50 minutes. Check for doneness by inserting a toothpick in the center; it should come out clean. If the top gets too dark before the middle is baked, tent it with foil. Every oven is different, so keep an eye on it as it nears the end.
Step 8: Cool & Glaze
Allow the cake to cool in the pan for about 15 minutes before transferring to a wire rack. Once cooled, whisk together your glaze ingredients and drizzle it over the top. The glaze adds a glossy finish and a little extra sweetness—perfect with a cup of coffee or tea.
Step 9: Slice & Serve
Slice it when it’s just slightly warm or completely cooled—whatever you prefer! I like mine with a dusting of powdered sugar or a dash more cinnamon. Serve with a dollop of whipped cream or a scoop of vanilla ice cream, and enjoy those cozy, homey flavors.
What to Serve It With
This cake is incredibly versatile. For breakfast, it’s fantastic with a hot cup of coffee—think of a lazy morning where everyone’s still in pajamas but the smell of cinnamon wakes the house. I love serving it for brunch, paired with fresh fruit and maybe a side of yogurt. It’s also a fabulous after-dinner dessert—warm slices with a drizzle of honey or caramel sauce are divine.
For casual snacking, I keep a loaf of this on the counter, and it disappears before you know it. Sometimes, I like to spread a little cream cheese or mascarpone between slices for an extra indulgent treat. A sprinkle of powdered sugar, a few fresh berries, or even a dollop of whipped cream make this cake feel special no matter how you serve it.
My family especially loves it when I cut it into mini squares for picnics, or as part of a brunch platter. It’s so forgiving—trust me, it’s one of those recipes that tends to get better with age if stored properly. Everyone asks for it on special occasions, but honestly, it’s so quick and simple that I make it just for ourselves on a weekday. And, of course, I always add a little extra cinnamon in the filling—because, let’s face it, cinnamon makes everything better.
Top Tips for Perfecting Your Zucchini Swirl Cake
Over the years, I’ve picked up a few tricks that make all the difference with this cake. First, squeezing out excess moisture from the zucchini is key. I always do this after grating; I wrap it in a clean dish towel and give it a good squeeze, which helps prevent the batter from becoming too wet and dense. Moisture is good, but too much makes the cake fall flat.
When mixing the batter, be gentle. I used to overmix and ended up with a dense, rubbery texture—lesson learned! Just fold until everything is combined; a few lumps are totally fine. For the swirl, I like to layer the filling and use a skewer or knife to create a marbled effect; it’s not about perfect lines but about that beautiful natural pattern.
If you prefer a more intense cinnamon flavor, sprinkle extra on top of the filling before baking. Same goes for nuts — I like walnuts, but pecans or sliced almonds work beautifully, too. For an extra touch, I sometimes add a teaspoon of orange zest or a dash of nutmeg to the batter, which adds a lovely depth.
Baking time can vary, so start checking around the 40-minute mark. If your cake is browning edges too quickly, a quick tent with foil will protect it while the inside finishes. And don’t forget the toothpick test! Nothing beats that moment when it comes out clean, telling you that your cake is just right.
When it’s cooled, I strongly recommend the glaze—it adds just the right amount of sweetness and a beautiful shine. I’ve also experimented with cream cheese frosting or a simple dusting of powdered sugar for different looks, so don’t be afraid to get creative. This recipe is quite forgiving, and the more you play with it, the better it gets.
Storing and Reheating Tips
This cake stays fresh for a couple of days at room temperature if covered tightly with foil or stored in an airtight container—trust me, it gets even better after a day or two because the flavors meld together beautifully. If you need to keep it longer, pop slices into an airtight container and refrigerate; it’ll be good for 3-4 days. Just warm individual slices in the microwave for about 10-15 seconds if you love it warm and cozy. For longer storage, wrap the whole cake tightly in plastic wrap and foil, and freeze for up to 3 months. Thaw at room temperature or in the fridge before slicing. Just avoid glazing until right before serving—glaze loves a freshly baked look. If I’ve stored it in the fridge, I take it out an hour before serving for best flavor and texture—nothing beats that fresh, just-baked appeal.
Frequently Asked Questions
Final Thoughts
There’s just something about this zucchini swirl cake that feels like home — it’s cozy, approachable, and adaptable. I’ve made it for everything from casual family mornings to special brunches, and it never disappoints. Every time I bake this, I remember why I fell in love with cooking—simple ingredients coming together to create something that warms hearts and fills bellies. Honestly, I think you’re going to love how easy and forgiving this is to make. Plus, the fact that it’s packed with zucchini means you’re sneaking in some veggies without anyone noticing—except maybe how delicious it is! I encourage you to play around with the filling, maybe toss in some chocolate chips or swap the nuts for dried fruit. The beauty of this recipe is that it’s your creation, tailored perfectly to your taste. I can’t wait to hear how yours turns out! Happy baking, my friend!
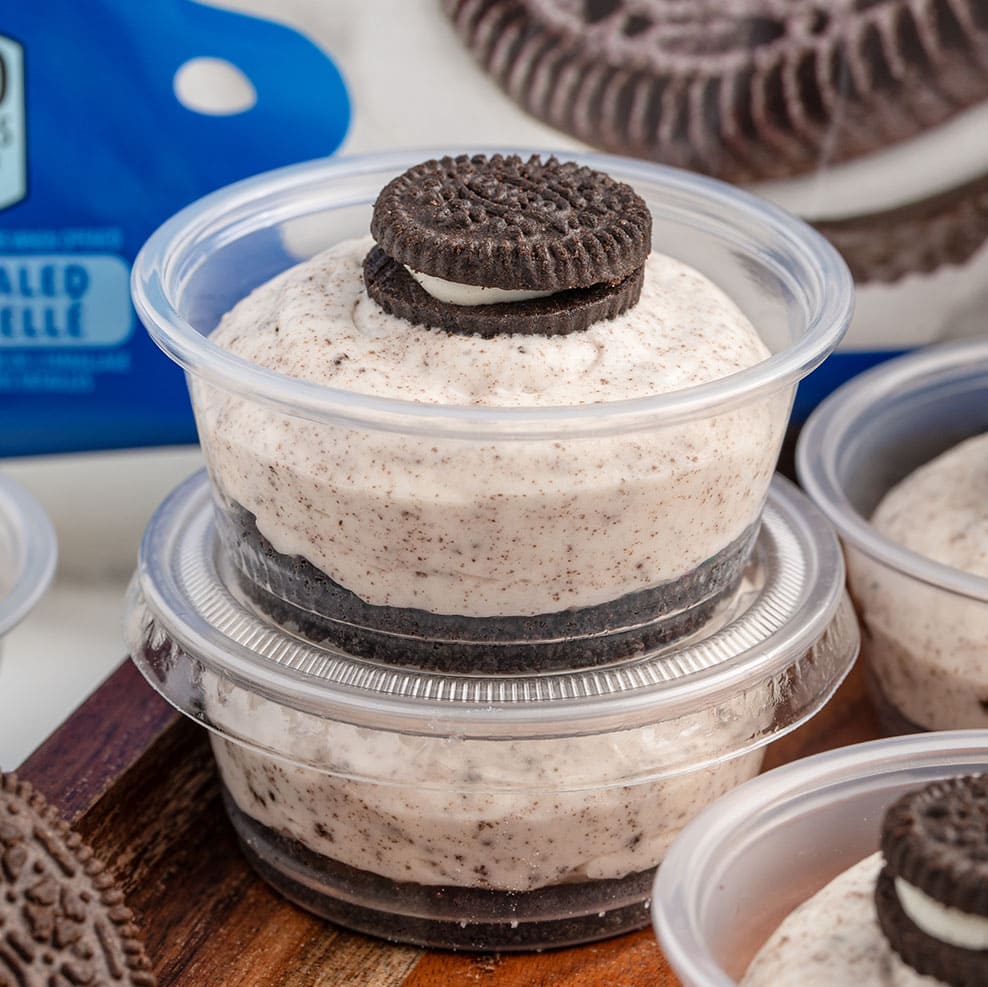
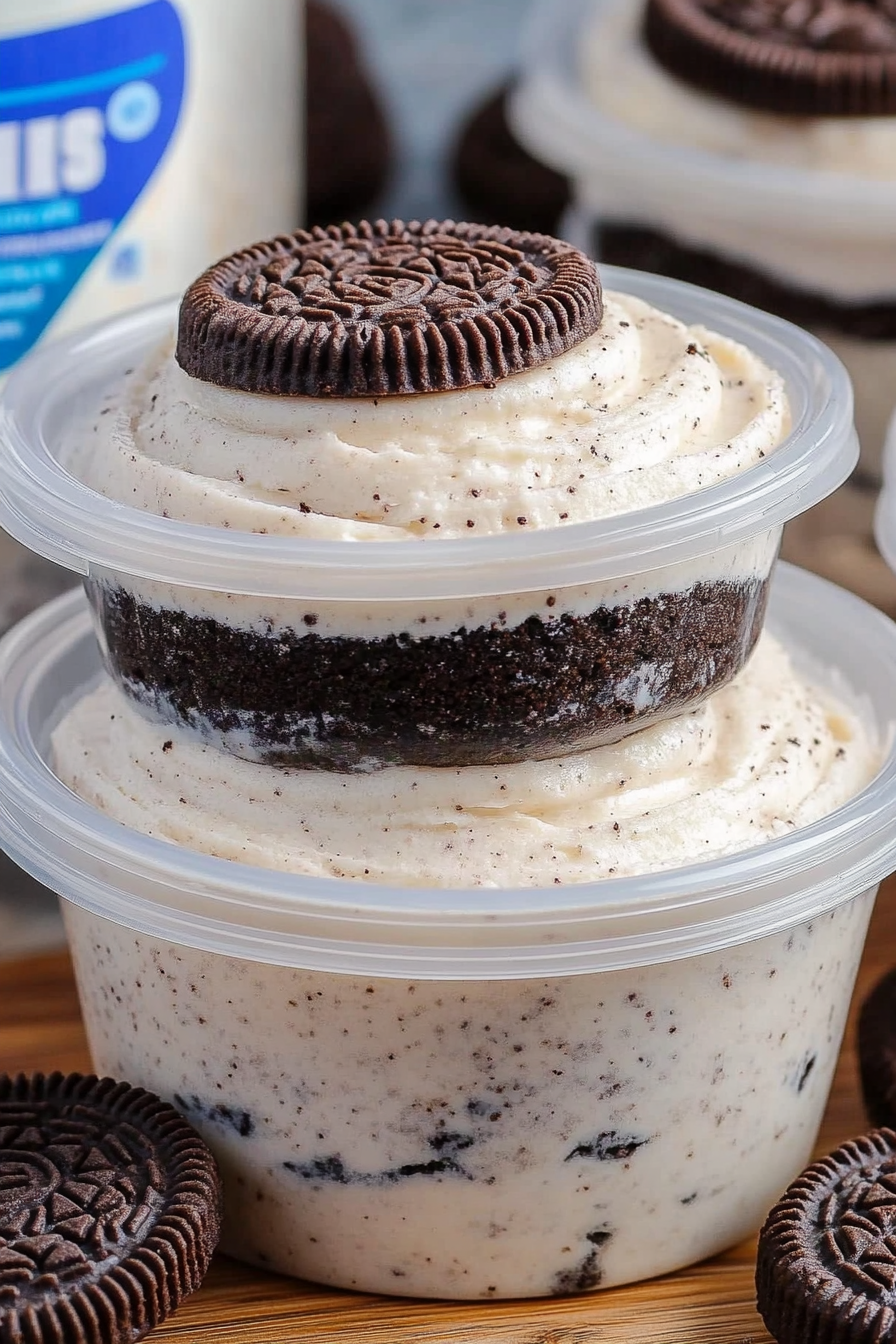
Oreo dessert cups
Ingredients
Method
- Add 2.5 cups of crushed Oreo cookie crumbs and 0.25 cups of melted butter to a bowl. Stir to coat the crumbs completely.
- Spoon 2 teaspoons of the cookie mixture into each cup and tamp down to form a base.
- In a mixing bowl, beat the softened cream cheese until smooth.
- Add powdered sugar in 0.5 cups increments, mixing well after each addition.
- Add cold heavy cream and vanilla; beat until thickened and peaks form.
- Fold in remaining crushed cookies into the filling.
- Transfer filling to a piping bag and pipe onto each cookie crust in cups, filling about 3/4 full.
- Top each cup with a mini Oreo and refrigerate until ready to serve.

So cozy! I just baked these and my whole apartment smells amazing—can’t wait to try them!
I love how cozy these cup treats look—definitely making me want to bake them on my next lazy Sunday!
I totally get that feeling—there’s nothing like the cozy warmth of baking on a lazy Sunday. These cup treats look perfect for it!
I love this—baking always feels like a warm hug! This recipe sounds perfect for those cozy Sunday vibes.