
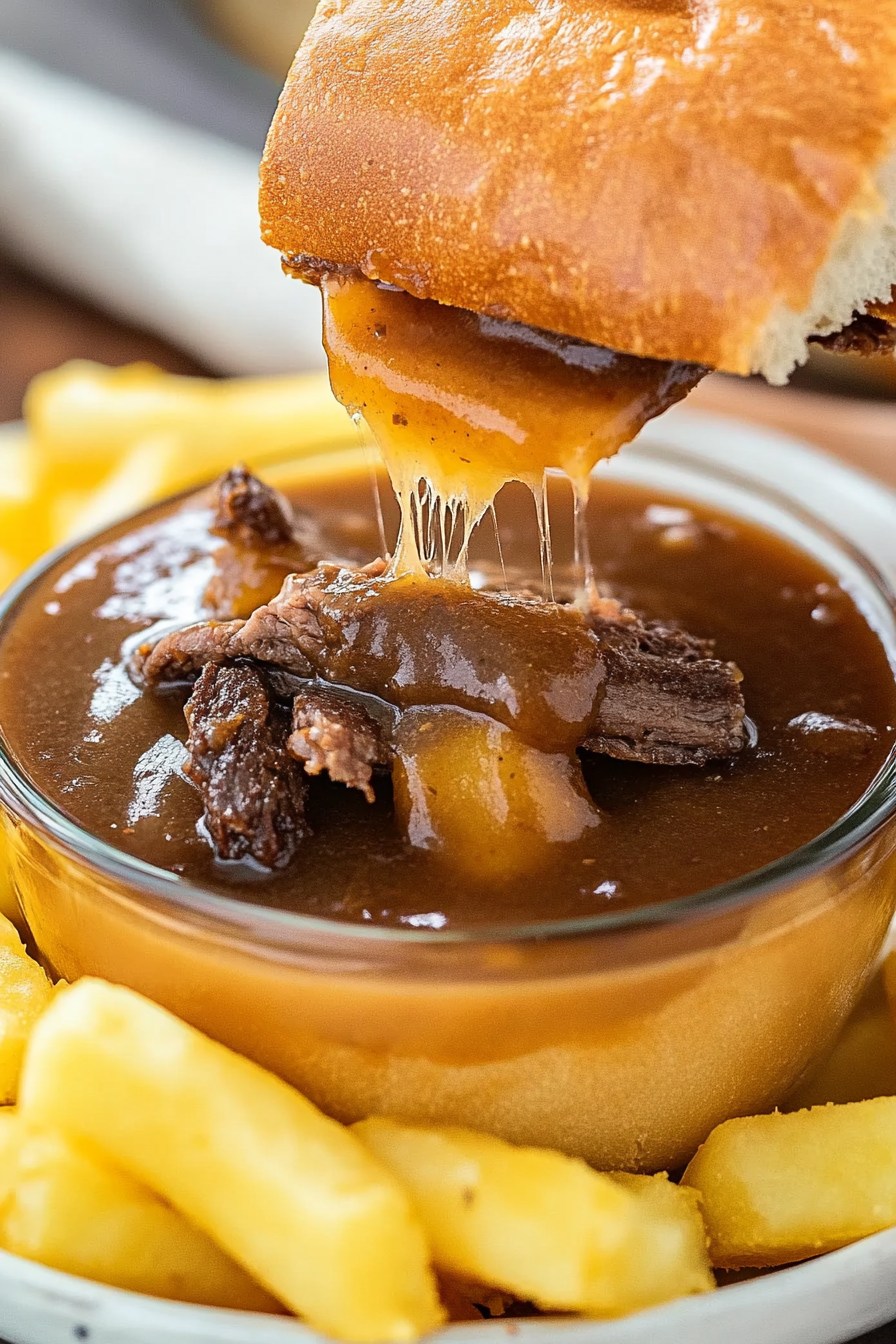
Easy Slow Cooker French Dips
There’s just something about the smell of freshly baked coffee cake wafting through the house that instantly makes everything feel cozy — like a warm hug wrapped in buttery, cinnamon-scented goodness. I’ll admit, I used to think that if I was craving something sweet at 10 pm, I’d have to settle for a cookie or a slice of toast, but this zucchini swirl coffee cake changed the game for me. It’s incredible how a little zucchini can change everything — keeping the cake moist and tender, all while sneaking in a veggie that my kids actually ask for seconds of! Plus, it’s surprisingly easy to whip up, even on the busiest nights. Trust me, once you get the hang of swirling in that cinnamon-spiced batter, you’ll be hooked. This one’s a lifesaver when you want something comforting with a little extra veggie boost. And if you’re like me, you’ll probably make it way more often than you admit — just because it’s that good and that simple. So, grab your zucchini and let’s get baking — your kitchen is about to smell amazing!
What is Zucchini Swirl Coffee Cake?
Think of this zucchini swirl coffee cake as a marriage between a classic cinnamon swirl cake and a sneaky veggie sidekick. It’s essentially a tender, buttery cake layered with a cinnamon sugar swirls, with grated zucchini folded gently into the batter. The name might sound fancy, but it’s really just a straightforward treat that feels special enough for weekend brunch but is easy enough to make on a whim. The “swirl” part comes from mixing cinnamon sugar into half of the batter, then swirling it through the plain batter before baking — creating gorgeous, marbled ribbons of flavor with every slice. I love that you get the perfect balance of sweetness and spice, plus a little boost of moistness from the zucchini—no one will ever guess it’s hiding in there! It’s a homey recipe that’s been a favorite of mine for years, especially because it tastes even better as it sits and the flavors meld. Honestly, it’s one of those recipes that makes the kitchen smell like a bakery, even if you’re just making it for yourself.
Why you’ll love this recipe?
What I love most about this zucchini swirl coffee cake is how versatile and forgiving it is. The flavor is a showstopper — warm cinnamon, a hint of vanilla, and just the right amount of sweetness. And the best part? It’s so simple that even a beginner baker can master it with a little patience. I always do this when I have a pile of zucchini from my garden — grate it, toss it in the freezer, and then pull it out for moments like this. It’s super budget-friendly, too, because zucchini is so affordable, especially when it’s in season. Plus, you can easily customize this cake: swap out the cinnamon for cardamom, add chopped nuts, or even sprinkle some streusel on top for an extra crunch. What I love most about this is that it’s a crowd-pleaser — my kids ask for this all the time, and my friends always want the recipe. It’s perfect for lazy Sunday mornings, brunch gatherings, or even an unexpected sweet treat when a friend drops by. Honestly, I’ve made this more times than I can count, and it never fails to bring smiles all around.
How do I make Zucchini Swirl Coffee Cake?
Quick Overview
This cake starts with mixing together a simple, buttery batter, then dividing it into two halves. One half gets stirred with grated zucchini, while the other remains plain. You’ll then layer the plain batter in your pan, spread a cinnamon sugar swirl over it, then dollop or swirl the zucchini batter on top. A gentle swirl with a skewer or knife creates those beautiful ribbons of cinnamon and zucchini. Bake until golden, cool slightly, and then drizzle with a sweet glaze — easy as that! The magic lies in the swirl and the tender crumb, which is perfectly moist thanks to the zucchini. Trust me, it’s so straightforward that you’ll be making this on repeat. The best part? It’s just as good the next day — if it lasts that long!
Ingredients
For the Main Batter:
– 2 cups all-purpose flour (I like to use unbleached for a bit more flavor)
– 1 cup granulated sugar
– 1/2 cup unsalted butter, melted
– 1 cup grated zucchini (squeeze out excess moisture, I test with a paper towel)
– 2 large eggs
– 1 teaspoon vanilla extract
– 1 teaspoon baking powder
– 1/2 teaspoon baking soda
– 1/4 teaspoon salt
For the Filling:
– 1/4 cup brown sugar
– 1 tablespoon ground cinnamon
– A pinch of nutmeg (optional but delicious)
– 2 tablespoons melted butter
For the Glaze:
– 1 cup powdered sugar
– 2-3 teaspoons milk or cream
– A dash of vanilla extract (or lemon juice if you prefer a zing)
Step-by-Step Instructions
Step 1: Preheat & Prep Pan
Set your oven to 350°F (175°C). Grease a 9-inch square baking pan or line it with parchment paper — trust me, this saves a headache when you’re ready to serve. I always do this first, so I’m not scrambling later. If your zucchini is extra watery, I recommend squeezing out as much moisture as you can with a paper towel or clean kitchen towel. It makes for a tender crumb and prevents the cake from being soggy.
Step 2: Mix Dry Ingredients
In a medium bowl, whisk together the flour, baking powder, baking soda, salt, and nutmeg if you’re using it. Mixing these first helps distribute everything evenly — I learned this trick after a few too many lumpy cakes. Set that aside;
Step 3: Mix Wet Ingredients
In a large bowl, beat the eggs with the sugar until light and slightly fluffy. Then stir in the melted butter and vanilla until just combined. Now, fold in the grated zucchini. The batter should be thick but pourable; if it feels too thick, a splash of milk won’t hurt. I tested this with almond milk once, and it actually made the cake even creamier — don’t be afraid to experiment!
Step 4: Combine
Gradually add the dry ingredients into the wet, mixing gently until just combined. Overmixing can make the cake dense, so stir until everything looks just combined — you want that tender crumb. A few lumps are okay; they’ll bake out.
Step 5: Prepare Filling
Mix the brown sugar with cinnamon and a pinch of nutmeg. Pour the melted butter over and stir well. This makes a gooey cinnamon-sugar mixture that will swirl beautifully through the batter. You can also add chopped nuts or chocolate chips if you’re feeling fancy, but honestly, this is perfect as-is.
Step 6: Layer & Swirl
Pour half of the plain batter into your pan, spreading it evenly. Then dollop or spread the cinnamon-sugar mixture over that layer. Add the remaining batter on top in spoonfuls, then swirl gently with a knife or skewer to create those beautiful marbled ribbons. I’ve learned that a gentle swirl keeps the pattern pretty — no need to overdo it.
Step 7: Bake
Pop it into your preheated oven and bake for about 35-40 minutes. Start checking around 35; the top should be golden, and a toothpick inserted into the center should come out clean. Every oven is different, so keep an eye on it — I’ve had mine come out a little sooner or later depending on the day.
Step 8: Cool & Glaze
Allow the cake to cool for 15 minutes in the pan, then transfer to a wire rack if you used parchment. A little warm glaze drizzled on top makes it special; mix powdered sugar with milk and vanilla until you have a pourable consistency. I wait until the cake is just a little cooled so the glaze doesn’t melt right off—the wait is worth it!
Step 9: Slice & Serve
Use a sharp serrated knife to get clean slices. Serve warm or at room temperature — both ways are delicious, but I’m partial to a slice with a morning cup of coffee. A dollop of whipped cream or a dusting of powdered sugar is the perfect finishing touch. Trust me, once you taste this, it disappears in minutes at my house!
What to Serve It With
This cake is so flexible — I usually just serve it as is, especially with a hot cup of coffee or tea. For breakfast, I love pairing it with freshly brewed dark roast or a latte. When I serve it for brunch, I like adding a few fresh berries on the side or a dollop of Greek yogurt for added creaminess. It’s also fantastic as a late-night treat — warm in the microwave with a little extra glaze, maybe topped with a sprinkle of crushed almonds or even a scoop of vanilla ice cream. My kids actually ask for this all the time, and I’ve learned that it’s equally impressive with a drizzle of honey or even a splash of lemon zest in the glaze. No matter how you serve it, I promise this zucchini swirl coffee cake will become a little spot of happiness in your kitchen — my family’s new favorite.
Top Tips for Perfecting Your Zucchini Swirl Coffee Cake
Ensuring your cake turns out perfect every time is all about small details. Here are some tips I’ve picked up after making this dozens of times:
- Zucchini Prep: Always squeeze out excess moisture. If the zucchini is waterlogged, the cake can turn out soggy, which is no fun. Grate, then press it with the back of a spoon or a paper towel. Freshness counts — use zucchini that’s firm and shiny.
- Mixing Advice: Be gentle when combining your wet and dry ingredients. Overmixing is the enemy of a tender crumb. Mix just until everything’s combined and you’ll get that beautiful light texture every time.
- Swirl Customization: Pattern is everything. Use a skewer or butter knife to create gentle zigzags, and try to keep the layers even. That marbled look makes the cake so pretty when sliced!
- Ingredient Swaps: Want to make it gluten-free? Swap in almond or rice flour mixed with a little xanthan gum. For a dairy-free version, coconut oil and plant-based milk work wonders. I’ve tested lots of variations and they all turn out tasty, just different in texture.
- Baking Tips: Every oven bakes a bit differently. If your oven runs hot, check your cake a few minutes early. And don’t forget to use a toothpick or cake tester — it’s the most reliable way to tell if it’s done.
- Glaze Variations: You can add a splash of lemon juice or vanilla to the glaze for a flavor twist. Or sprinkle some chopped nuts or shredded coconut on top before glazing for an extra crunch. It’s all about personal touches!
This recipe is forgiving, so don’t worry if it’s your first try. Each time, you’ll learn little tricks — like how to swirl better or bake it just a few minutes longer. My biggest lesson was learning not to overmix and to let the cake cool fully before glazing. That way, the glaze sets perfectly, and the cake stays moist and tender. Trust me, practice makes perfect, and you’ll be surprised how confident you feel after a few tries. Plus, it’s such a hit with everyone who tastes it — I’ve even brought leftovers to work and had coworkers asking for the secret recipe!
Storing and Reheating Tips
This cake keeps beautifully, so don’t worry if you bake a little extra. Store it tightly wrapped in plastic wrap or in an airtight container. At room temperature, it’s good for about two days — just make sure it’s in a cool, dry place. If you want to keep it longer, pop it in the fridge for up to a week. I recommend bringing slices to room temperature before serving, as the flavors really shine then. For leftovers, you can also freeze slices — wrap tightly in plastic wrap, then toss them into a zip-top bag. They’ll last a month or so. Thaw in the fridge or microwave gently. Just remember, if you glazed the cake, it’s best to add the glaze after reheating to keep that glossy finish perfect. The microwave should do the trick for warming — just 15-20 seconds, enough to bring back that comforting warmth without cooking the cake further.
Frequently Asked Questions
Final Thoughts
This zucchini swirl coffee cake has become a go-to in my house because it’s like capturing a little piece of heaven — moist, flavorful, and surprisingly easy to make. The cinnamon swirl creates beautiful marbled patterns when sliced, and the fact that it’s packed with zucchini makes it feel a little healthier, even though it tastes indulgent. I love making this for weekend brunch, easy afternoons, or when I want a treat that’s just a touch more special than the usual fare. Honestly, every time I bake this, I’m reminded that simple ingredients, good technique, and a sprinkle of love can turn ordinary into extraordinary. So, gather your zucchini, invite a friend over, and enjoy the magic happening in your oven. And hey, I’d love to hear how yours turns out — don’t forget to leave a comment or share your own twist on this recipe! Happy baking! — and filling your home with that irresistible smell.
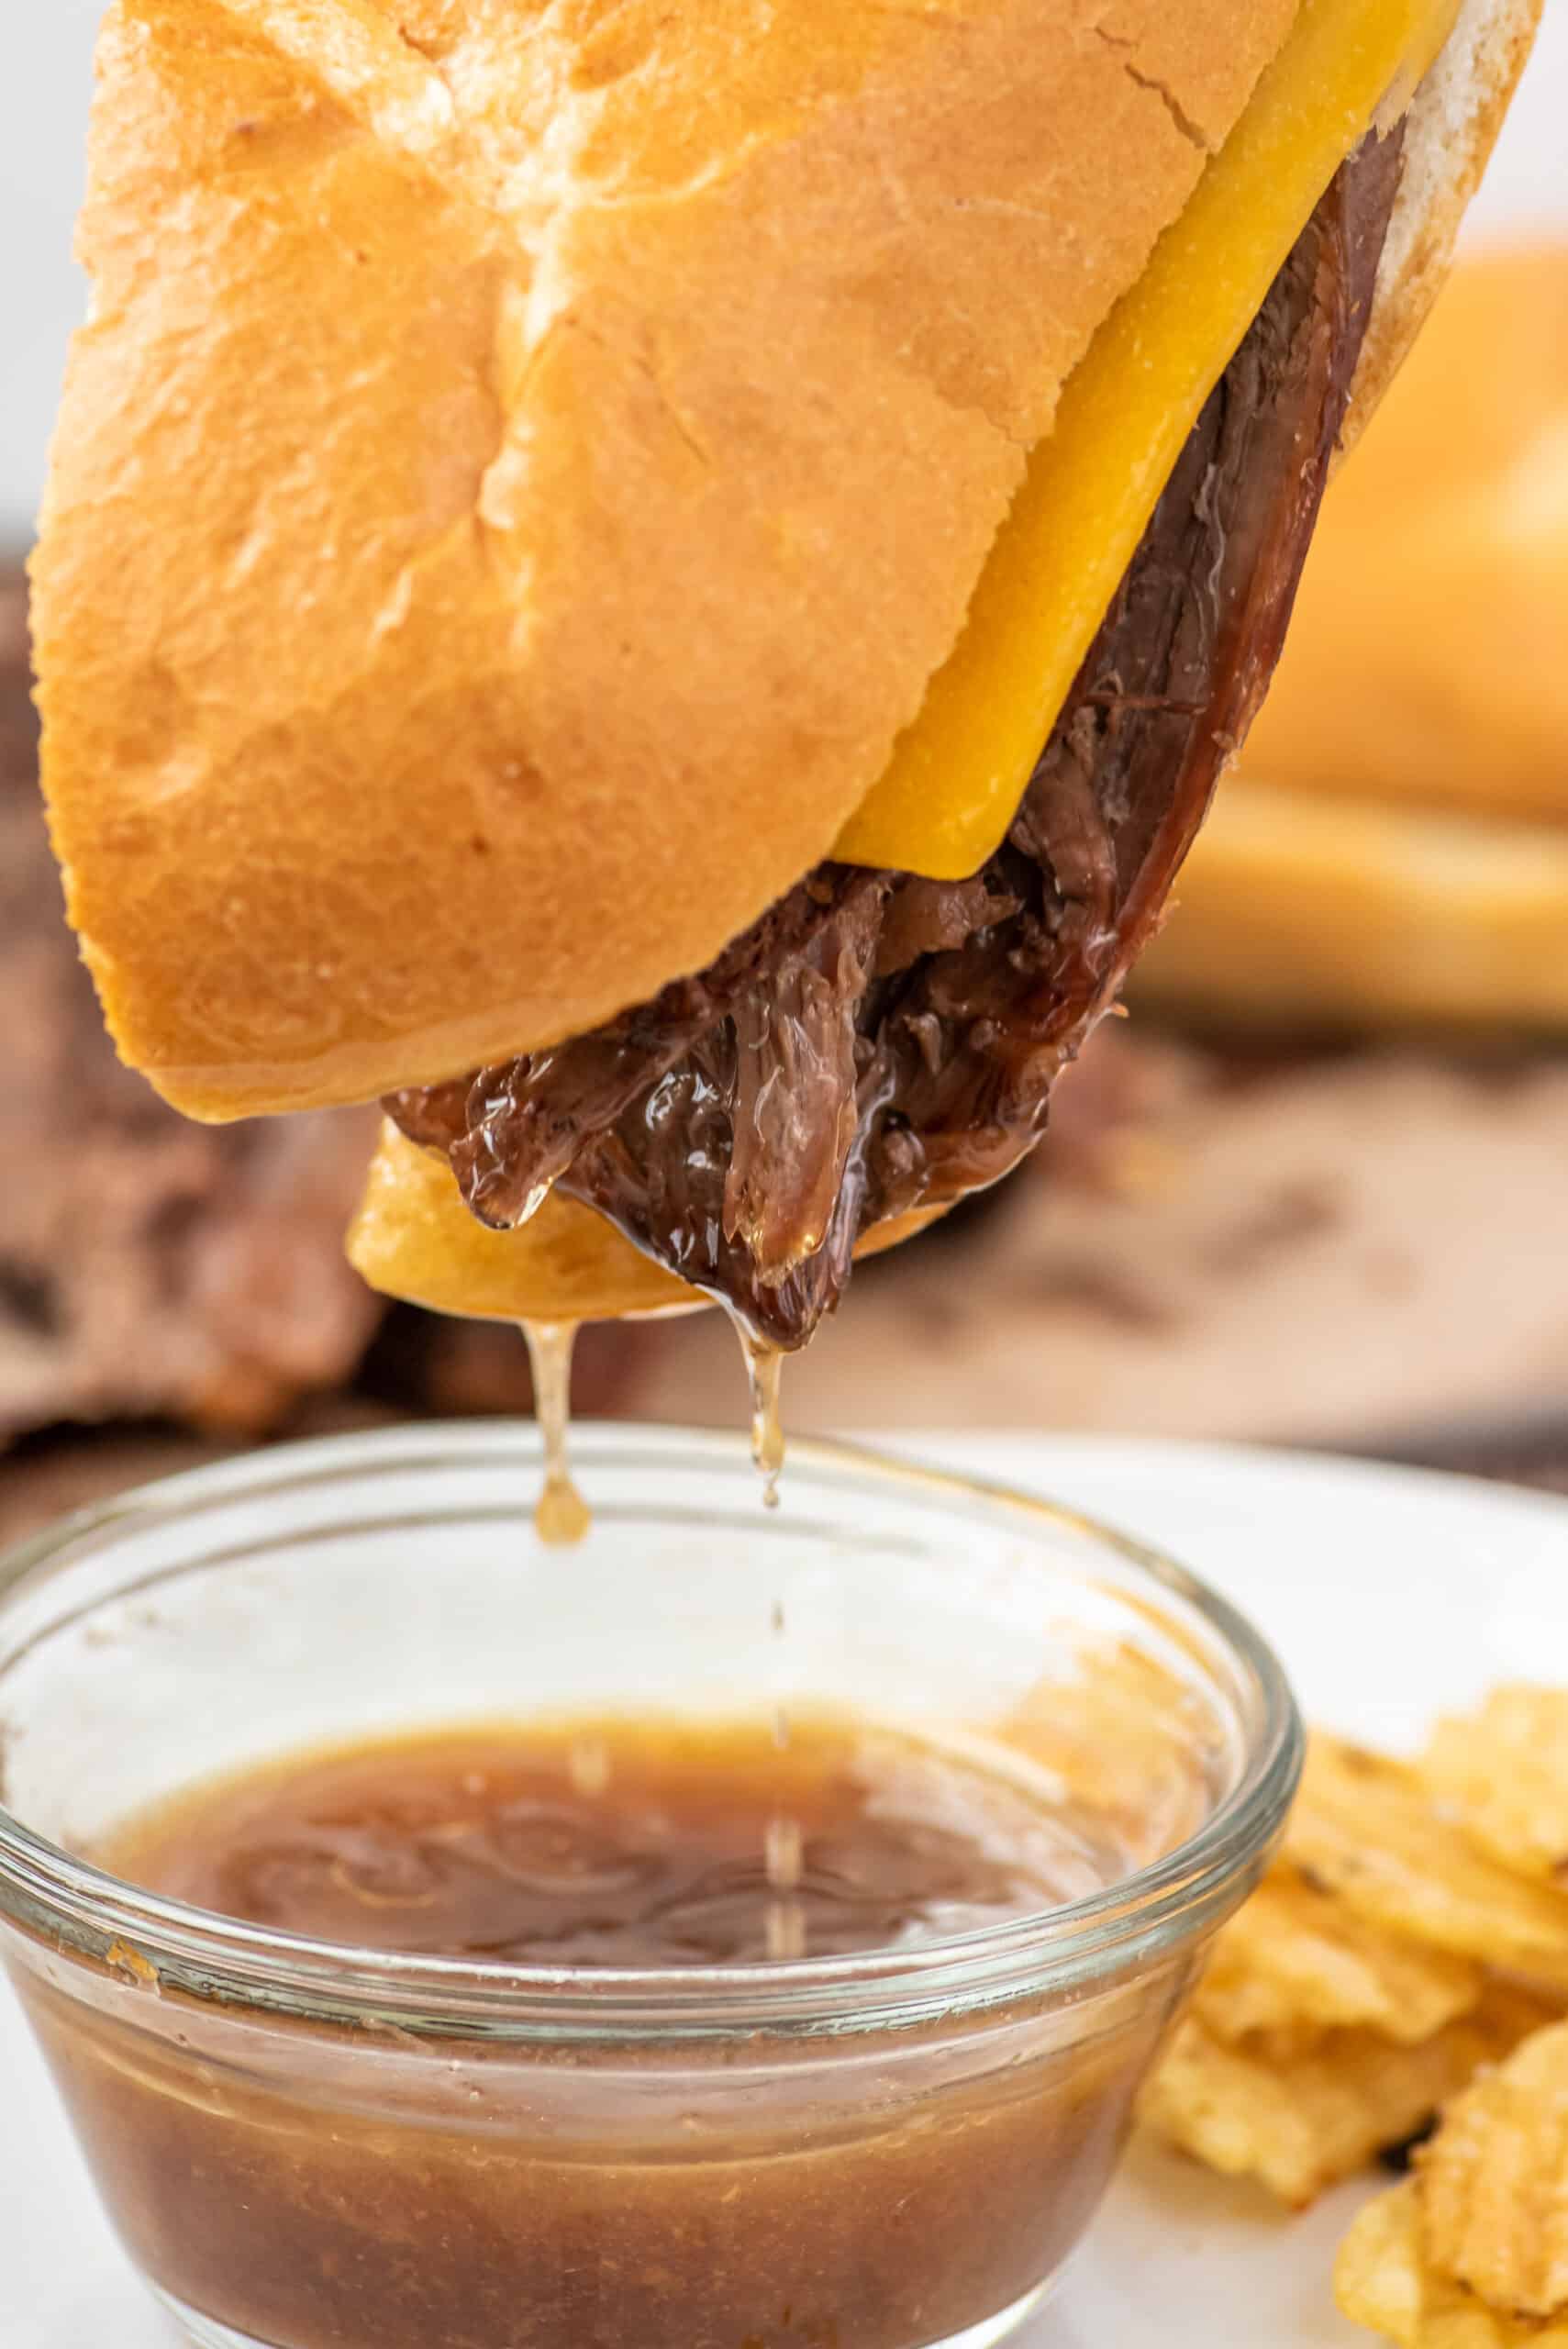
Slow Cooker French Dip Sandwiches
Ingredients
Method
- Place the beef rump roast in a large crockpot. Season with salt, grill seasoning, onion powder, garlic powder, ground black pepper, beef bouillon granules, and minced onion. Add beef stock and beer to the crockpot, cover, and cook on low for 8 hours.
- Remove the cooked meat from the crockpot, then shred or slice it. Strain the au jus to remove any clumps of meat or fat. Serve the beef on French bread with a side of au jus for dipping. Enjoy!


Love the cozy vibes in this recipe! That cinnamon coffee cake smell really does make everything feel warmer. ☕🍰
That smells absolutely irresistible! I can totally imagine how comforting it would be to come home to that aroma — such a cozy vibe.
I love this cozy vibe—nothing beats the smell of coffee cake in the morning, and a slow cooker French dip sounds like the perfect comfort meal to go with it.