
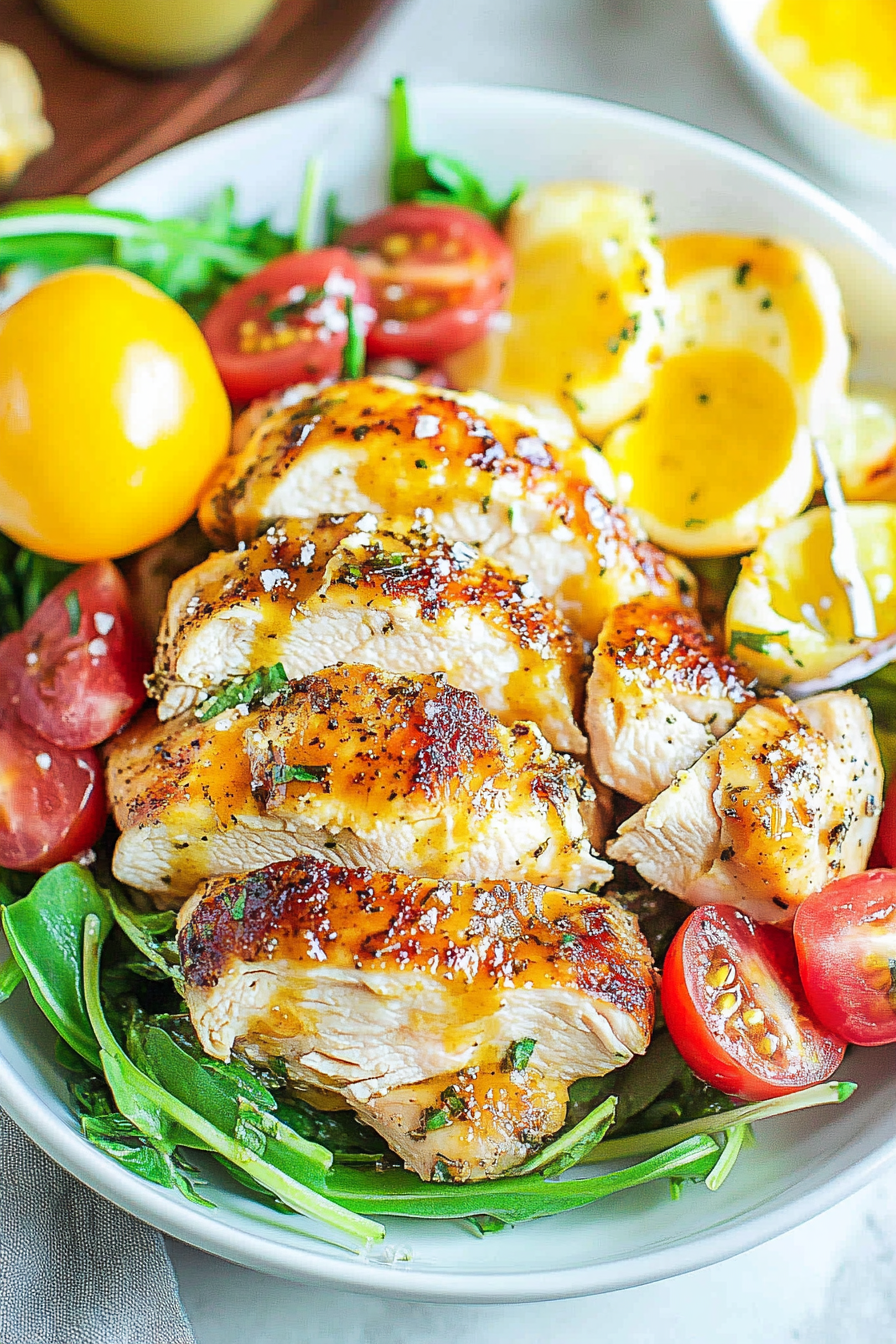
Flavorful Herb Chicken Cobb Salad
There’s something magical about pulling a warm, fragrant slice of cake from the oven that makes you feel like a kid again. I remember my grandma’s kitchen filled with the smell of cinnamon and freshly baked goods, and that’s exactly what this zucchini chocolate swirl cake reminds me of. It’s a little bit unexpected—moist, tender, and packed with hidden veggies, yet rich enough to satisfy any sweet tooth. Honestly, I’ve tested this with everything from hazelnut cocoa to vanilla bean—trust me, the flavor is always incredible! And the best part? It’s dead simple, even on busy weeknights. I love how satisfying it is without feeling heavy; perfect for when the kids ask for seconds or when I want something sweet, but I don’t want to feel like I overindulged. And the swirl? Well, it’s just the visual fun and flavor burst that makes each bite feel like a little surprise. Once you’ve made this a couple of times, you’ll see—it’s the kind of recipe that becomes a family staple, no matter the season. Grab your apron, and let’s get baking!
What is Zucchini Chocolate Swirl Cake?
This zucchini chocolate swirl cake, think of it as a cozy, inviting dessert that combines the best of both worlds: the luscious, fudgy embrace of chocolate and the sneaky healthy goodness of zucchini. It’s essentially a loaf cake that packs a punch of flavor and moisture, thanks to the zucchini hiding inside. The name’s pretty straightforward—”swirl” because of the beautiful ribbon of cocoa running through the batter, creating a pretty marbled effect when you slice into it. Think of it as a cross between a quick bread and a layered cake—no fancy frosting needed, just a dusting of powdered sugar or a drizzle of glaze for that perfect finishing touch. I first discovered this recipe when I was scrambling to get dinner on the table but still wanted something sweet and comforting. It’s the kind of dessert that feels special but is so simple, you’ll want to make it every week. Plus, it’s a sneaky way to get kids (or even yourself) to eat more veggies—because zucchini, when baked right, is practically magic.
Why you’ll love this recipe?
What I love most about this zucchini chocolate swirl cake is how it hits all my sweet spots without the guilt trip. The flavor? Oh, it’s deeply chocolatey, but with this unexpected moistness that only zucchini can give—think of it as a secret ingredient that makes each slice melt-in-your-mouth tender. The swirl of cocoa runs through the batter, making each bite visually appealing and exciting—my kids actually ask for “the chocolate stuff” first! And the best thing? It’s super easy to whip together. No fancy gadgets, just bowls and a whisk. I’ve made this countless times for friends’ gatherings, and it always disappears in minutes. Plus, it’s budget-friendly, using simple pantry staples like flour, sugar, cocoa, and zucchini. Versatility is a big win here—serve it for breakfast with a dollop of whipped cream, a cozy afternoon snack with tea, or a decadent dessert after dinner. What I love most is how it feels like a warm hug—comforting, satisfying, and just the right amount of sweetness. Honestly, it’s become one of my go-to recipes when I want to treat my family and still feel good about what we’re eating.
How do I make Zucchini Chocolate Swirl Cake?
Quick Overview
This cake is a breeze! It all starts with grating fresh zucchini—no need to peel—and mixing it into a simple batter of flour, sugar, and cocoa. While the batter comes together quickly, the secret to that gorgeous swirl is swirling cocoa into part of the batter before layering everything into your baking pan. It’s a visual and flavor treat! The batter bakes in about 40-45 minutes, and the smell alone will have everyone craving a slice. Once cooled, a light dusting of powdered sugar or a quick chocolate glaze takes it to the next level. It’s perfect when you want something homemade but don’t want to spend hours in the kitchen.
Ingredients
For the Main Batter:
– 2 cups grated zucchini (about 2 medium zucchinis, shredded and excess moisture squeezed out)
– 1 1/2 cups all-purpose flour
– 1 cup granulated sugar
– 1/2 cup unsweetened cocoa powder (good quality, because flavor matters!)
– 1 teaspoon baking powder
– 1/2 teaspoon baking soda
– 1/4 teaspoon salt
– 1/2 cup vegetable oil or melted coconut oil
– 2 large eggs
– 1 teaspoon vanilla extract
For the Filling:
– 3 tablespoons unsweetened cocoa powder
– 2 tablespoons hot water (to loosen cocoa paste)
For the Glaze:
– 1/2 cup powdered sugar mixed with 1-2 teaspoons milk (adjust for consistency)
– Optional: a splash of vanilla or a pinch of cinnamon for extra flavor
Step-by-Step Instructions
Step 1: Preheat & Prep Pan
Set your oven to 350°F (175°C). Grease a loaf pan or line it with parchment paper—I love using the metal loaf pan I have, but a silicone one works too. This cake is sticky but so worth it, so don’t skip greasing or lining. If you’re short on time, I always do this first so I can get right to mixing while the oven warms up.
Step 2: Mix Dry Ingredients
In a big mixing bowl, whisk together the flour, sugar, cocoa powder, baking powder, baking soda, and salt. I’ve made this with just a spoon or a whisk—no fancy tools needed. Mixing thoroughly is key because it ensures everything’s evenly distributed, preventing clumps and uneven baking.
Step 3: Mix Wet Ingredients
In another bowl, beat the eggs, then add the oil and vanilla, whisking until combined. I always test the temperature before adding to the dry—make sure your eggs are at room temp for the best mixture. Then, stir in the grated zucchini. I always squeeze out excess moisture with my hands after grating; otherwise, the batter can be a bit too watery and might sink in the middle. This is one of those little tricks I learned after a few tries.
Step 4: Combine
Pour the wet mixture into the dry ingredients and fold gently with a spatula until just combined—that’s important. Overmixing can make the cake dense, and nobody wants that! See if you gently lift the batter; it should be thick but not stiff. I keep an eye out for a smooth, uniform batter with a few zucchini streaks here and there.
Step 5: Prepare Filling
Mix the cocoa powder with hot water until you get a smooth, thick paste. Pour about a third of the plain batter into your pan; then spread half of the cocoa mixture over the top. Repeat with the remaining batter and cocoa, creating layers. Using a skewer or a butter knife, swirl through the batter to make pretty ribbons of chocolate and zucchini batter—don’t overmix, just a gentle swirl is perfect.
Step 6: Layer & Swirl
This is my favorite part—seeing the marbled pattern come to life! Gently run your skewer or toothpick through the batter in a swirling motion, zig-zagging across the pan. It creates those beautiful ripples you see in bakery cakes. Trust me, it’s worth taking your time here to get the pattern just right.
Step 7: Bake
Pop it in the oven on the middle rack for about 40-45 minutes. Start checking at 40 minutes—insert a toothpick in the center; if it comes out clean or with just moist crumbs, it’s done. Remember, ovens vary, so if your cake looks golden but the toothpick isn’t quite dry, give it a few more minutes. I’ve learned this the hard way—overbaking makes it dry, and it’s so unfair for such a moist cake!
Step 8: Cool & Glaze
Let the cake cool in the pan for about 15 minutes, then transfer to a wire rack. It can be tempting to cut into it right away, but patience is key—we want the crumb to set. Once cooled, drizzle with your prepared glaze or dust with powdered sugar if you prefer a lighter touch. I love how that little touch of chocolate glaze makes it just a bit more decadent.
Step 9: Slice & Serve
Use a sharp serrated knife for clean slices, and try not to rush this part. If you’re feeling fancy, serve with a dollop of whipped cream or a sprinkle of crushed nuts. It’s also great just as is—moist, flavorful, and beautifully marbled. Trust me, the first slice is worth waiting for!
What to Serve It With
This cake is so versatile that the serving ideas practically write themselves. For breakfast, I love a warm slice with a cup of black coffee or a side of fresh berries. It’s a cozy start to the day, and the sneaky zucchini keeps it feeling a little healthier. When I entertain for brunch, I slice it up and pair it with some glass of sparkling juice or a shot of espresso—it elevates the simple and makes it feel special. As a dessert, I’ll dust it with powdered sugar or serve with fresh strawberries and a dollop of whipped cream. It’s also a fantastic snack that’s just as good at 3 pm with tea or a glass of milk. Honestly, my kids ask for this all the time—seriously, it’s disappeared before I knew it! And I love how it’s comfort food with a little healthy twist—a win-win in my book.
Top Tips for Perfecting Your Zucchini Chocolate Swirl Cake
Every baker has lessons learned, and I’ve definitely had my fair share. Here are some tips to make sure your cake turns out just perfect:
- Zucchini Prep: Always squeeze out excess moisture after grating. I learned this trick after a few too many soggy middles—trust me, it makes all the difference in keeping the cake moist without sinking!
- Mixing Advice: When combining wet and dry ingredients, fold gently. Overmixing leads to dense, tough cake. Keep it light and airy—this is what gives it that tender crumb.
- Swirl Customization: Be playful here! Different patterns add visual interest, and I sometimes add a sprinkle of chopped nuts or chocolate chips into the batter before swirling for extra texture.
- Ingredient Swaps: Want to make it gluten-free? Swap in almond flour or gluten-free baking mix—just note that the texture might change slightly. I tested this and found it still delicious, just a little denser.
- Baking Tips: Keep an eye on the oven; every oven heats differently. If your cake is browning too quickly, tent with foil. And don’t forget the toothpick test—nothing beats that for perfect doneness.
- Glaze Variations: For a richer glaze, melt a bit of dark chocolate with a splash of cream and drizzle over the cooled cake. It’s divine! Or, for a vegan option, try coconut milk-based glaze with a dash of vanilla.
I’ve tested this with various tweaks over the years, and I’ve found that the simplest methods often yield the best results. Enjoy customizing it to suit your taste buds — that’s part of the fun!
Storing and Reheating Tips
Once you’ve got your slice of this zucchini chocolate swirl cake, you’ll want to keep it fresh as long as possible.
- Room Temperature: If you’re planning to eat it within a day, keep it covered with a clean cloth or aluminum foil. It stays moist and delicious for about 1-2 days this way.
- Refrigerator Storage: For longer freshness, store slices in an airtight container in the fridge for up to 4 days. I recommend cutting the cake into slices first—this way the whole loaf isn’t exposed to air every time.
- Freezer Instructions: Wrap the cake tightly in plastic wrap followed by foil, then pop it in a freezer-safe bag. It’ll last up to 3 months. When ready to enjoy, microwave slices for 20-30 seconds or let thaw naturally in the fridge. The moisture might be slightly less, but the flavor stays fabulous—trust me!
- Glaze Timing: If you like a glossy finish, add the glaze just before serving; it’s the best way to keep that shiny look and fresh flavor. If freezing, wait to glaze until after thawing for the best appearance.
My biggest tip: avoid storing the cake in plastic wrap for too long—as I learned, it can sometimes make the surface stick and lose its lovely texture. A good airtight container is your best friend here.
Frequently Asked Questions
Final Thoughts
This zucchini chocolate swirl cake has become one of my favorite little secrets in the kitchen. It’s not overly sweet, incredibly moist, and visually stunning, with that gorgeous cocoa swirl. Every time I bake it, I’m reminded of the simpler pleasures—sharing slices with family or friends and hearing how surprised they are that there’s zucchini in there! It’s a cake that feels like a warm hug, perfect for lazy Sunday mornings, afternoon tea, or even a spontaneous dinner party. Don’t be discouraged if you’ve never baked like this before—once you get the hang of swirling and folding, you’ll see how straightforward and forgiving it is. And honestly, the smell alone will make everyone come running. I hope you love this recipe as much as I do—I’d love to hear about your tweaks and how yours turns out! Happy baking!
Herb Chicken
Ingredients
Method
- Preheat oven to 375°F. Rub the chicken breasts with olive oil, herbs, garlic, salt, and pepper.
- Place the seasoned chicken in a baking dish and bake for 25-30 minutes or until cooked through.
- Remove from oven and let rest for 5 minutes before slicing.
- Serve with your favorite sides and enjoy.


This sounds delicious! I love how food brings back such warm memories—your grandma must’ve made the best meals.
This sounds amazing! I love how comforting and nostalgic baking feels—like it really does bring back those sweet childhood memories.
This salad sounds amazing—herb chicken and fresh greens are such a perfect, satisfying combo. Love that it brings back cozy kitchen memories too!