
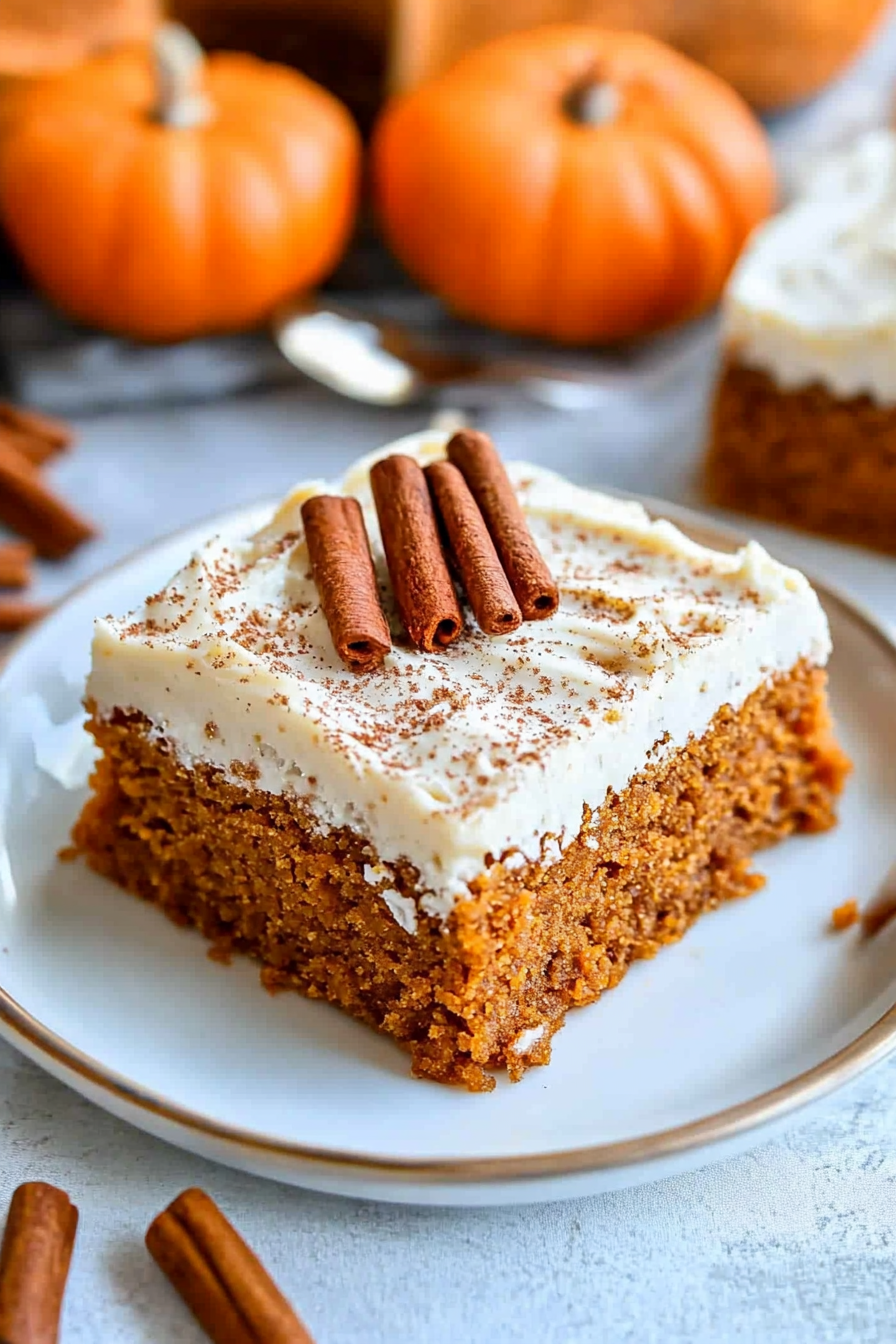
How to Bake Pecan Pumpkin Bars
Oh, I gotta tell you about this one. It’s like a secret weapon in my kitchen—a cake that’s as sneaky as it is delicious. I first made it during one of those Friday nights when I needed a little comfort, and I had a bunch of zucchini sitting on the counter, leftovers from summer gardens. You know how zucchinis just sit there, quietly waiting to be turned into something special? Well, this cake is exactly that—special. It’s soft, moist, bursting with chocolatey goodness, but what makes it extra fun is that little swirl of zucchini hiding right in the middle—like a sweet little secret. My kids ask for this all the time, and I love being able to give them something that feels indulgent but actually sneaks in some veggie nutrition. Trust me, once you try this, you’ll be making it on repeat. It’s incredible how a simple veggie can shine in a dessert—plus, it’s pretty much foolproof, which is perfect when you’re juggling a million things. Plus, the smell alone? It’s heaven. Warm chocolate, baked zucchini—your whole house will smell like a cozy bakery. And the best part? It’s so easy, you’ll want to make it even on your busiest days. Let me walk you through this magic!
What is Zucchini Chocolate Swirl Cake?
This cake is kind of a happy accident in the baking world—a moist, tender cake where shredded zucchini gets to be the star, hiding in plain sight among rich cocoa and a swirl of chocolate. Think of it as a more wholesome take on your typical chocolate cake, but with that sneaky veggie twist that somehow makes the whole thing even better. It’s essentially a layered surprise: fluffy sponge interlaced with that decadent chocolate swirl, yet still light enough to slice and enjoy with a cup of coffee or milk. The name says it all—zucchini, that humble vegetable, elevates a traditional chocolate cake to something a little more nourishing and a lot more fun. The idea of zucchini in cake might sound weird at first, I get it—trust me, I was skeptical too!—but once you taste that first bite, it’s a revelation. Plus, it’s a fantastic way to use up extra zucchinis from your garden or from those Mercados where they’re suddenly cheap and everywhere. Think of it as a little bit of summer, anytime you want, wrapped in a soft, cocoa-kissed cake. Everyone who’s tried it always asks for seconds, and I promise, once you get the hang of it, it’ll become your go-to for whenever you need a quick, cozy dessert.
Why you’ll love this recipe?
What I love most about this zucchini chocolate swirl cake is how surprisingly simple it is. No fancy fancy ingredients, no complicated steps—just everyday stuff you probably already have in your pantry. It’s a lifesaver on busy nights when you want something homemade but don’t have hours to fuss. And speaking of fuss, I’ve made this with almond milk, regular milk, even coconut yogurt, and honestly, it’s always a hit—each variation brings its own little magic. Plus, it’s budget-friendly: zucchinis are cheap, and the rest are pantry staples. My family loves how the cake turns out—moist, tender, with that delightful swirl pattern that makes it look so pretty and inviting. The flavor? Out of this world. The chocolate is rich but balanced by the zucchini’s subtle earthiness, giving the cake a depth you don’t get with just plain chocolate. I also love how versatile it is—you can serve it plain with a dusting of powdered sugar, top it with whipped cream, or add a drizzle of caramel for an extra treat. This one’s a crowd-pleaser, and honestly, I make it whenever I want some kind of comforting, wholesome dessert that doesn’t feel like a guilty splurge. The best part? It’s so forgiving—you’ll love experimenting with add-ins like chopped nuts or even a handful of berries. Trust me, once you try it, it’s never just a leftover zucchini again!
How do I make Zucchini Chocolate Swirl Cake?
Quick Overview
This cake is about blending simple ingredients with a little love, then swirling in that gorgeous chocolate layer before baking. It’s a one-bowl wonder—minimal mess, maximum flavor. First, you shred your zucchini and squeeze out excess moisture (that’s key to keeping it tender but not soggy). Then, mix your dry ingredients, followed by your wet ones, and gently fold everything together. Pour half the batter into your prepared pan, add a thick layer of chocolate filling, swirl it gently, and pour the remaining batter on top. Bake until a toothpick comes out clean, cool it a bit, glaze if you like, and you’re ready to dive in. What I love most is how forgiving this recipe is—once you get the hang of mixing and swirling, it practically makes itself. Plus, the smell as it bakes? Pure cozy heaven. The entire process is straightforward enough for a weeknight treat but special enough to serve to guests. Once baked, it stays moist for days, making it perfect for slicing and sharing with friends or just enjoying over a lazy weekend morning. My secret? Don’t overmix the batter—keep it light and airy for that perfect crumb. That’s the magic trick that guarantees a fluffy, tender cake every single time.
Ingredients
For the Main Batter:
– 1 ½ cups all-purpose flour (or a gluten-free blend if needed)
– ¾ cup granulated sugar
– ½ cup unsweetened cocoa powder (good quality for rich flavor)
– 1 teaspoon baking powder
– ½ teaspoon baking soda
– ¼ teaspoon salt
– ⅓ cup vegetable or neutral oil
– 2 large eggs
– 1 teaspoon vanilla extract
– 1 cup finely shredded zucchini (about 1 medium zucchini, excess moisture squeezed out)
For the Filling:
– ½ cup semi-sweet chocolate chips or chopped dark chocolate
– 2 tablespoons heavy cream or coconut milk
– Optional: a teaspoon of instant espresso powder for a mocha kick
For the Glaze:
– ½ cup powdered sugar
– 1-2 teaspoons milk or lemon juice
– Cocoa powder or melted chocolate for extra richness (optional)
Step-by-Step Instructions
Step 1: Preheat & Prep Pan
Set your oven to 350°F (180°C). Grease a 9-inch round or square baking pan and line it with parchment paper—trust me, this makes life so much easier when you’re ready to serve. Don’t skip this step or you’ll end up wrestling with a stuck cake. I always do this first so I can focus on mixing and swirling without stress.
Step 2: Mix Dry Ingredients
In a large bowl, whisk together the flour, cocoa powder, baking powder, baking soda, salt, and sugar. Mixing dry ingredients well ensures your cake will be evenly textured and that the leaveners activate correctly. Pay attention to lumps in the cocoa—sift if needed, because clumps can be a pain later on. This step is quick, and it sets the foundation for a fluffy, moist cake.
Step 3: Mix Wet Ingredients
In a separate bowl, whisk together the eggs, oil, vanilla, and your shredded zucchini. I find that grating the zucchini finely helps it incorporate smoothly, and squeezing out excess moisture is a game-changer—this prevents a soggy crumb. I’ve tested this with almond milk, coconut yogurt, you name it, and it all works great, just watch the moisture content.
Step 4: Combine
Pour the wet mixture into the dry ingredients and fold gently with a spatula until just combined. Avoid overmixing—that’s how you get dense, rubbery cakes. The batter should be thick but pliable. If it’s too stiff, a splash of milk can loosen it up a bit. Do not stir vigorously; gentle is key.
Step 5: Prepare Filling
In a small bowl, melt the chocolate chips and cream together—microwave in short bursts, stirring in between, until smooth. You want a thick, spreadable consistency. If I want a mocha flavor, I toss in a pinch of espresso powder. This filling is the heart of the swirl—rich, velvety, and decadent, just enough to make your cake look fancy.
Step 6: Layer & Swirl
Pour half the batter into your pan, then spread the melted chocolate evenly over the surface. Using a skewer or toothpick, swirl gently in a figure-eight motion to create that beautiful marbled effect. Pour the remaining batter on top and do a light swirl again. It’s like painting with chocolate and batter—fun, messy, and so satisfying. Just try not to overdo it—less is more here to keep the swirl distinct.
Step 7: Bake
Pop it into your preheated oven and bake for 30-35 minutes. Check with a toothpick—when it comes out with a few moist crumbs, you’re good. Baking times can vary depending on your oven, so keep an eye starting at 30 minutes. The smell alone will make you want to dance around the kitchen.
Step 8: Cool & Glaze
Let the cake cool in the pan for about 15 minutes, then transfer it to a wire rack. It’s tempting to dig right in, but cooling helps it set up nicely. For the glaze, stir powdered sugar with a splash of milk or lemon juice until smooth, then drizzle over the cooled cake. If you want a richer look, melt some extra chocolate and spread a thin layer on top—trust me on this one, the visual is worth it.
Step 9: Slice & Serve
Cut with a sharp serrated knife, and serve slices on a plate. I love a little dusting of cocoa or a dollop of whipped cream to finish. This cake is best enjoyed slightly warmed or at room temp—either way, the moist crumb, the rich swirl, and that sweet, chocolaty aroma will have everyone begging for a second piece.
What to Serve It With
Honestly, this cake is so versatile that it can shine pretty much anywhere. For breakfast or brunch, pair it with a strong brewed coffee or a frothy cappuccino. A drizzle of caramel or fresh berries on top make it feel a little more special. When you want something decadent after dinner, serve it with a scoop of vanilla ice cream or a side of whipped cream—my kids actually ask for this as dessert all the time. Or, simply enjoy a slice with a hot cup of tea on a lazy Sunday afternoon. I’ve even sliced leftovers and toasted them lightly the next day—they become a cozy snack that tastes even better with a little butter or jam spread on top. It’s one of those recipes that feels like a warm hug, whether you’re sharing with loved ones or just treating yourself.
Top Tips for Perfecting Your Zucchini Chocolate Swirl Cake
Over the years, I’ve picked up a few tricks that elevate this cake from good to downright irresistible. First, always squeeze out excess moisture from the zucchini—you want just enough to keep the cake moist, not soup. I’ve tried grating it finer or coarser, but fineness really helps it blend seamlessly into the batter without making it dense. If you’re feeling ambitious, try adding a teaspoon of cinnamon or a pinch of chili powder—little tweaks that give it a twist! When mixing, fold gently—you don’t want to deflate the batter, just combine until everything’s just incorporated. Swirling is an art—I use a skewer or the end of a chopstick to create that marble effect. Take your time; a gentle swirl looks prettier and keeps the alternating layers distinct. Want to make it vegan? Substitute eggs with flaxseed meal or applesauce, and use dairy-free chocolate chips. I’ve done both, and honestly, it still turns out so good. For the glaze, I sometimes add a splash of orange zest or a pinch of salt to balance the sweetness. My biggest lesson? Don’t overbake. Keep that toothpick in and check around the 30-minute mark—they finish baking quickly once the top looks matte and a little crackly. Every oven’s different, so trust your nose and eye—nothing beats that warm chocolate smell wafting through your kitchen!
Storing and Reheating Tips
This cake stays pretty fresh and moist for a couple of days on the counter, wrapped loosely with foil or stored in an airtight container. Keep it away from direct sunlight or heat—nothing dries out a good cake faster. If you want to keep it longer, pop it into the fridge for up to 3 days; just remember to bring it back to room temperature or warm it slightly before slicing, so it’s soft and tender. I love wrapping slices in plastic wrap and freezing them—perfect grab-and-go treats. Thaw in the fridge overnight or warm in a low oven for a few minutes. When reheating, avoid nuking it at high power or you’ll end up with a soggy mess. A gentle reheat at 250°F for about 10 minutes keeps it moist and flavor-packed. And if you’re saving leftovers with the glaze, it’s best to add the drizzle just before serving to keep that shiny look and fresh flavor. Honestly, this cake is so forgiving—little reheats or leftovers just get better with age, the flavors melding together.
Frequently Asked Questions
Final Thoughts
This zucchini chocolate swirl cake has become one of my favorite secrets—so moist, so flavorful, and surprisingly easy to pull together. It’s wonderful how this humble vegetable transforms into a rich, decadent treat that’s also nourishing. Every time I make it, I feel like I’ve unlocked a little bit of magic, especially when I see my kids’ eyes light up at the first bite. The versatility is a huge plus—serve it for breakfast, snack, or dessert; it’s effortless, charming, and just the right amount of indulgence. I hope you give it a try and fall in love with how easy and delicious veggies in cake can be! Keep experimenting—try adding chopped nuts, swapping the chocolate for fruit preserves, or even topping it with a crunchy granola layer. I’d love to hear how yours turns out, so don’t forget to leave a comment or share your twists. Happy baking, my friend! Remember: the secret ingredient is always a little love. Enjoy every bite!
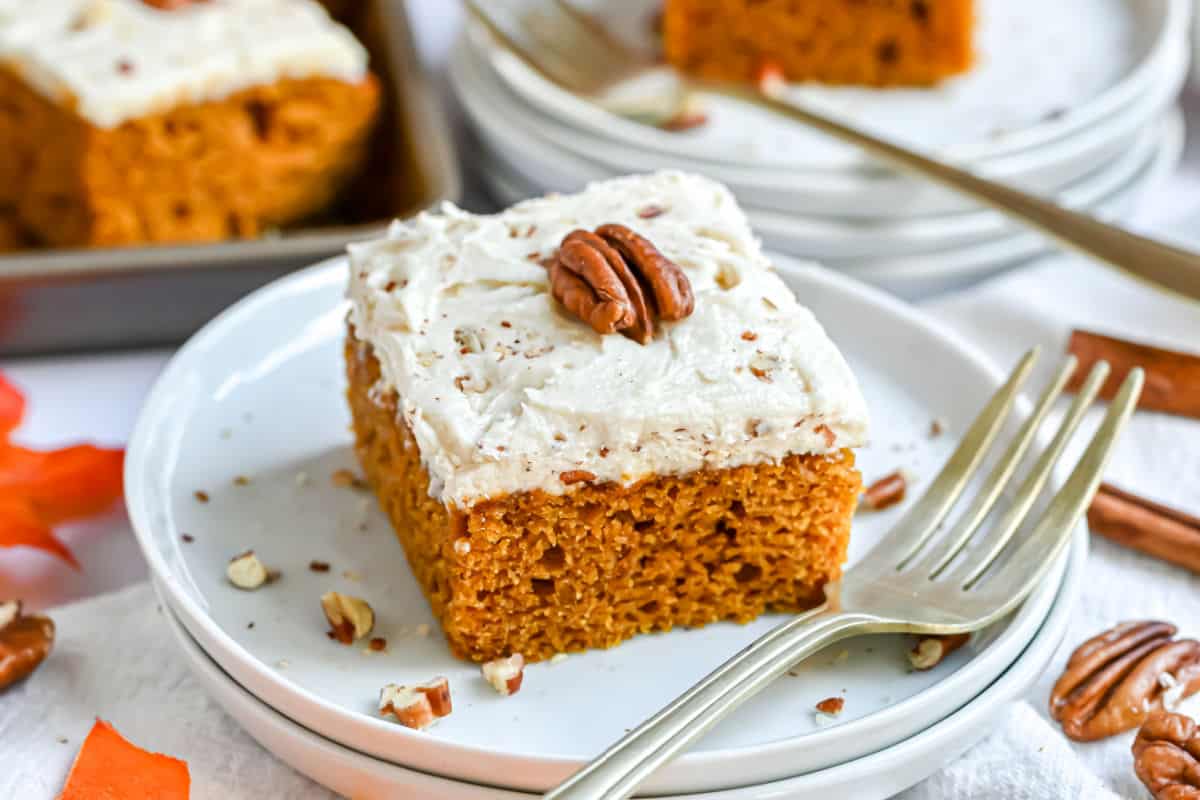
pumpkin bars
Ingredients
Method
- In a large mixing bowl, beat eggs, sugar, pumpkin, and melted butter until smooth. Add remaining ingredients and beat for 2-3 minutes until fully combined.
- Pour batter into a lightly greased 15x10x1 inch baking sheet. Bake at 350°F for 25-30 minutes.
- Remove from oven and cool completely before frosting.
- For the frosting, combine brown sugar, 2 Tbsp butter, and milk in a small saucepan over low heat. Whisk until sugar dissolves. Remove from heat and cool completely.
- In a large mixing bowl, beat 1/2 cup softened butter with powdered sugar. Pour in cooled brown sugar mixture. Beat for 3-4 minutes until light and fluffy. Fold in chopped pecans.
- Spread frosting over cooled pumpkin bars. Gently press pecan halves into the top of the bars. Cut and store in an airtight container in the refrigerator or freeze until ready to serve.

This sounds amazing! I love how comforting these bars can be—perfect for fall. I’m definitely adding this to my baking list.
This sounds amazing! I love how you describe it as a “secret weapon”—must be a crowd-pleaser. Can’t wait to try it!
Oh my gosh, this sounds absolutely amazing! I’m definitely saving this recipe for fall—perfect for pumpkin season.
I love this idea—so much flavor and texture! Do you have a favorite variation to share?